- Подводные камни HTTPS в Android
- Зацепки
- Рытье
- SSL Server Test (Powered by Qualys SSL Labs)
- A comprehensive free SSL test for your public web servers.
- Решение
- Как включить DNS-over-HTTPS в Google Chrome для Android
- Как использовать DNS-over-HTTPS в Chrome для Android
- How to enable DNS over HTTPS in Firefox, Chrome, Edge, Opera, to block ISP tracking
- What is DNS over HTTPS
- Block ISP tracking
- 1] How to enable DNS over HTTPS in Firefox
- 2] Enable DNS over HTTPS for Chrome
- 3] Enable DNS over HTTPS for Microsoft Edge
- 4] Setup DNS over HTTPS on Android or iPhone
- 5] Enable DNS over HTTPS in Opera
- Playing with proxy on Android🛡
- How to inspect all HTTP & HTTPS requests from any app?
- 1. Proxy Installation
- 2. Device Configuration
- 3. HTTPS Reading
Подводные камни HTTPS в Android


Проснувшись прекрасным праздничным посленовогодним утром (в два часа дня) я привычным движением подобрал планшет и тыкнул пальцем в мою разработку чтоб посмотреть на картинку Солнца.
Не сказать что я был удивлен, когда вместо диска обнаружилась пустота, все таки данные берутся с https://sdo.gsfc.nasa.gov/ и уже бывало что он был не доступен целиком или в части фотографий. Однако увы в браузере все грузилось и было на месте, более того даже на своем месте, т.е. это не смена url.
Таким образом меня ждал очень интересный день, ибо что может быть лучше чем ловить внезапный баг в уже более месяца опубликованном приложении 🙂
Зацепки
Первое что бросилось в глаза — сайт перешел с http на https.
Второй сюрприз, в версиях android 4.4.2 и выше все работало как надо. Т.е. мне еще повезло что планшет у меня работает на 4.2.
Ну и третье, единственная ошибка в логах: ”Server closed connection”
Рытье
После этого конечно возникло ощущение что какая то беда в протоколах, был нарыт сайт:
SSL Server Test (Powered by Qualys SSL Labs)
A comprehensive free SSL test for your public web servers.
который собственно помог, его основная функция тестирование ssl сайтов, применительно к нашему подопечному https://www.ssllabs.com/ssltest/analyze.html?d=sdo.gsfc.nasa.gov выяснилось что он поддерживает только два протокола: TLS 1.1 и TLS 1.2, что в общем то правильно так как SSL2–3 признаны устаревшими.
И что самое приятное в результатах теста есть часть: “Hadshake Simulation” где сразу видно что сайт нормально работает только с Android 4.4.2 и выше, а так же видна причина, древние версии андроида не работают с протоколами TLS1.1 и 1.2. Затем выяснилось что начиная с android API16 (4.1) данные протоколы встроены, но отключены по умолчанию. И тут мне повезло так как минимальная поддерживаемая версия android моего приложения как раз 4.1.
Решение
Включаем TLS1.1 и TLS1.2
Моя программа стильна модна молодежна 😀 Т.е. написана на kotlin и использует всякие Dagger2, rxJava, Realm, Retrofit2 и т.п. (при этом кстати весит меньше 8Мб)
В данном контексте важно что для поиска и загрузки изображений используется Retrofit2, который в свою очередь использует okHttpClient в котором есть методы для установки своей sslSocketFactory.
Путем гугления https://github.com/square/okhttp/issues/2372 было найдено готовое решение которое на kotlin выглядит следующим образом:
При использовании ProGuard данный класс пришлось добавить в исключения, иначе хоть сборка и проходила без ошибок в процессе исполнения один класс не находил другой
Так как в котлине возможны экстеншены к классам то можно создать такую симпатичную функцию к OkHttpClient.Bilder’у:
Соответственно в коде включение tls выглядит как будто эта функция имеется в самом классе, примерно так:
В этом один из плюсов kotlin, но это уже другая тема.
После этого все заработало как надо.
PS: Небольшая правда уже не сильно полезная ссылка, подробно показывающая какие протоколы в каких версиях андроида используются
Источник
Как включить DNS-over-HTTPS в Google Chrome для Android
Ранее в настольной версии Chrome 83 была добавлена поддержка безопасных DNS-серверов. На этой неделе компания Google объявила, что данная функция теперь появится в мобильной версии Chrome для Android.
Как и в случае с десктопной версией, функция безопасных DNS (Secure DNS) будет постепенно развертываться для пользователей.
Безопасные DNS или DNS-over-HTTPS — это новая функция безопасности и приватности, которая стала очень популярной в последнее время. Она интегрируется как в браузеры, такие как Chrome, Firefox, Edge, Opera, так и операционные системы, такие как Windows 10.
Данная функция позволяет зашифровать DNS-трафик, чтобы защититься от модификации и регистрации трафика. Реализация данного функционала отличается в различных продуктах, но в Chrome и браузерах на Chromium используется следующая концепция:
- Chrome не переключает стандартный DNS-провайдер, но использует безопасные DNS, если они поддерживаются провайдером.
- Опции для ручного отключения и настройки функции доступны как в настройках браузера, так и через корпоративные политики.
Как использовать DNS-over-HTTPS в Chrome для Android
Перейдите в меню > Настройки > Конфиденциальность и безопасность. На данной странице вы найдете новую опцию Использовать безопасный DNS-сервер. Обратите внимание, что данная функция будет поэтапно поставляться на устройства, поэтому у вас пока она может быть недоступна. В интерфейсе отображается статус функции, вам нужно нажать на опцию, чтобы настроить мобильный браузер.
Google Chrome отображает две опции на странице Использовать безопасный DNS-сервер.
- Включайте и отключайте функцию с помощью переключателя Использовать безопасный DNS-сервер в верхней части страницы. Если вы не хотите использовать функцию, просто отключите ее. Chrome продолжит использовать сервера стандартного провайдера без DNS-over-HTTPS
- Chrome предлагает опции для использования стандартного провайдера и выбора альтернативного провайдера.
Первый вариант установлен по умолчанию. Это значит, что если DNS-over-HTTPS не поддерживается провайдером, то безопасные DNS не будут использоваться. Вы можете переключиться на опцию Выбрать другого поставщика, чтобы использовать альтернативные серверы.
Chrome предлагает четыре различных провайдера безопасных DNS на выбор: Cloudflare DNS (1.1.1.1), Quad9 (9.9.9.9), Google (Google Public) и CleanBrowsing (Family Filter). Вы также можете вручную указать URL-адрес другого безопасного DNS. Например, для Comss.one DNS необходимо указать адрес:
Поддержка DNS-over-HTTPS появляется в большом количестве браузеров, но наглядный индикатор текущего статуса функции вы в них не найдете. Проверить работу DNS можно с помощью сервиса DNS Leak Test (нажмите кнопку Extended test). Убедитесь, что все найденные DNS-серверы относятся к указанному провайдеру.
А вы планируете переходить на безопасные DNS, DNS-over-HTTPS?
Источник
How to enable DNS over HTTPS in Firefox, Chrome, Edge, Opera, to block ISP tracking
No matter how much effort we put in to avoid getting tracked on the internet, there is one thing that seems tough to avoid — ISP tracking. Since no law stops ISP from monitoring, it comes as no surprise that they are doing it. However, there is a solution if you want to stop them. In this post, we will show how you can enable DNS over HTTPS in Firefox, Chrome, Edge, Opera, Android & iPhone to stop ISP tracking.
What is DNS over HTTPS
When you type a website address on your browser, it locates the IP address using a DNS service. This DNS, unless configured otherwise, is offered by your ISP. It means they know where you are going and what you are doing, making it a lot easier to track and create a profile.
The privacy solution that can stop is called DNS over HTTPS. It uses the same standard of encryption and performs DNS resolution via HTTPS. It makes sure to keep man-in-the-middle attacks at bay using encryption. Another benefit is improved performance. Google and the Mozilla Foundation started testing versions of DNS over HTTPS since the last year.
Block ISP tracking
While the whole thing is under testing, you can still have it by using the Firefox browser. The browser offers both the encryption technology and an encrypted DNS service provider. It has signed up an agreement with Cloudflare to purge any data it collects and not provide it to any other parties. Mozilla is close to signing on additional DNS providers under the same terms.
1] How to enable DNS over HTTPS in Firefox
- Open Firefox and click on the hamburger menu or the three horizontal lines icon in the upper right corner of the browser.
- Click Options to open the settings window.
- Scroll to the bottom to find Network Settings > click on the settings button.
- It will open the Connection settings popup window.
- At the bottom, check the box next to “Enable DNS over HTTPS.”
As of now, the only provider available Cloudflare. It is the default provider, but as more options show up, you should be able to change it.
2] Enable DNS over HTTPS for Chrome
If you want to enable DoH on any browser using Cloudflare or any of the listed DNS over HTTPS public servers, you will need to use parameters with the browsers. When the browser is launched with those parameters, all queries are encrypted first. Here is how you can do it on Chrome.
Find or create a Chrome Shortcut. You should use this shortcut every time you want to use DoH.
Now, right-click on the Chrome shortcut and select Properties.
In the Shortcut Tab > Target, add the following URL at the end-
Click on Save, and launch Chrome again using the same shortcut. It will prompt for admin permission before making any changes.
Head over to Cloudflare checker to know if you are using DNS over HTTPS
If you want to use some other DoH server, there is more here. So, for example, if you want to use Google DoH, then the query URL should be https://dns.google/dns-query. The text which you need to add in Chrome shortcut should be-
You will see it in Chrome 83 and later under Settings > Privacy and security.
3] Enable DNS over HTTPS for Microsoft Edge
That said, the same settings don’t work on Edge even though it’s using Chromium. So Edge users will have to wait until Microsoft integrates it into their browser. However, if you are ready to experiment, you can enable an experimental flag—Secure DNS lookups.
- Launch Edge, and type edge://flags
- Search for Secure DNS lookups
- Enable the flag and restart the browser.
Here is the description for Secure DNS lookups: Enables DNS over HTTPS. When this feature is enabled, your browser may try to use a secure HTTPS connection to look up the addresses of websites and other web resources. – Mac, Windows.
While it should enable, I am not sure which how exactly it is working. I would suggest that you be aware of the fact that its coming to Edge, but more details will be available only when it comes to the final or the beta version.
4] Setup DNS over HTTPS on Android or iPhone
Most of the Mobile OS offers you to edit DNS settings. Since you need to use Cloudflare, the easy way is to install the Cloudflare app on your smartphone. A simple switch will make sure your phone starts using DNS.
Download the app from 1.1.1.1, and toggle the switch on to start using encrypted DNS. Done that, anything which accesses the internet will use DNS over HTTPS service. All your traffic will be encrypted, making you secure from snoopers and hackers.
5] Enable DNS over HTTPS in Opera
Open Opera, type opera://flags/#opera-doh in the address bar and hit Enter to open this setting-
From the drop-down, select Enabled.
Источник
Playing with proxy on Android🛡
How to inspect all HTTP & HTTPS requests from any app?


When you’re developing an Android app, it’s sometimes necessary to exactly debugging what’s going on behind the scenes, especially for network requests (HTTP & HTTPS).
Some powerful debugging tools already exist and they do amazing work, like Stetho, Retrofit’s Interceptors, or Android Studio Network Profiler. Also, they can be added/configured to your project pretty easily 👌.
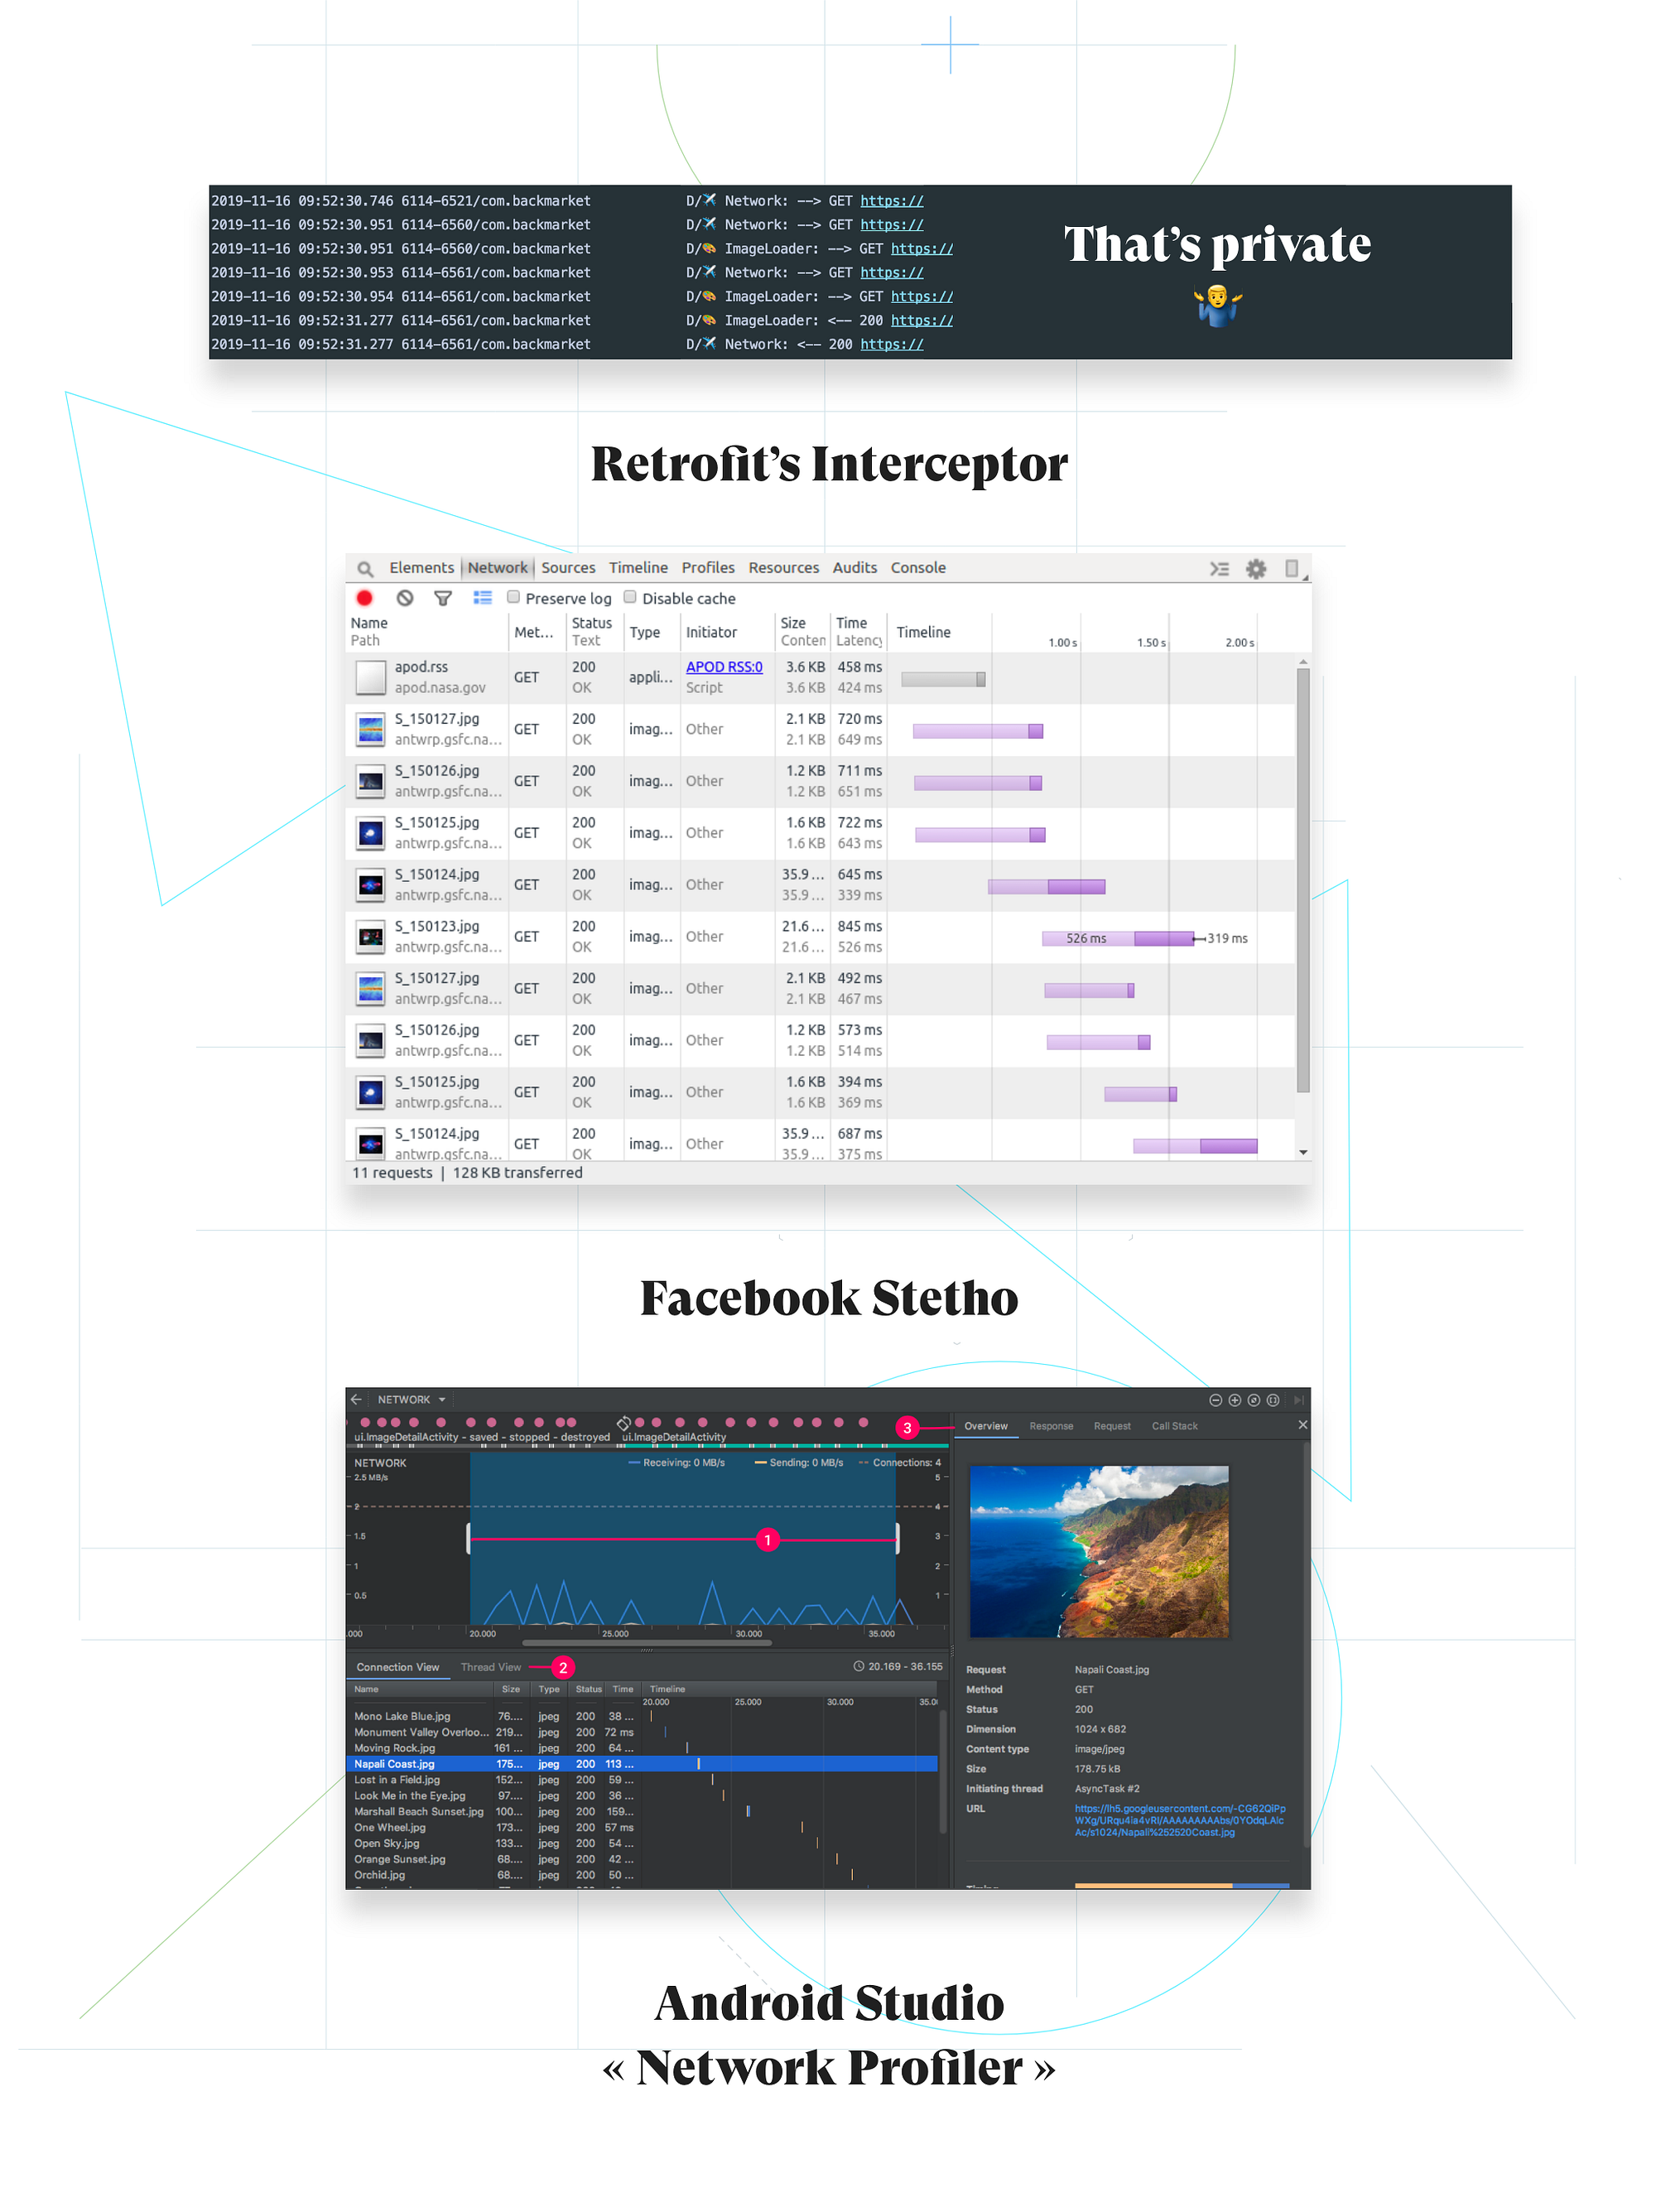
What if you want to inspect or debug other network requests, requests sent not directly by your app, but from an SDK you have been installed (Google Analytics, Facebook Ads, etc…)? 🧐
1. Proxy Installation
For our need, I choose to use mitmproxy (but others exists, like Charles for example). Installation steps can be found here.
If you have a Mac, you’ll just have to install it with brew…
$ brew install mitmproxy
…and launch the proxy with:

2. Device Configuration
Then, find out what is the local IP address of your computer (because the proxy is running on it). I used ifconfig to get it on my Mac:

Finally, tell your device which proxy to use. With an AVD emulator, this is actually pretty simple:

Now, mitmproxy should be able to intercept and read any HTTP request from your device 👍.

🤓 Sounds cool, but why HTTPS requests are not intercepted?
Actually, they are! But mitmproxy can not read them, because those requests are encrypted (actually that’s all the point of HTTPS!).
3. HTTPS Reading
In order to be able to read those HTTPS requests, we will have to perform a kind of man in the middle attack.
⚠️ Perform this attack only with an application you own. Seriously. ⚠️
Basically, you will have to tell Android that mitmproxy is a trusted certification authority that is able to provide dummy certificates for each of the SSL sites that your device visits. In this way, mitmproxy will be able to decrypt encrypted traffic on the fly 👌.
In order to install the mitmproxy CA certificate, we will need to do some configuration. I choose to show you the way that will work in most cases, without a rooted device.
Now, you should be able to decrypt and analyze all the HTTPS requests of your Android applications 🎉 ( except if your application implements Certificate Pinning security).
Here is what it looks like with one of my demo Github project:
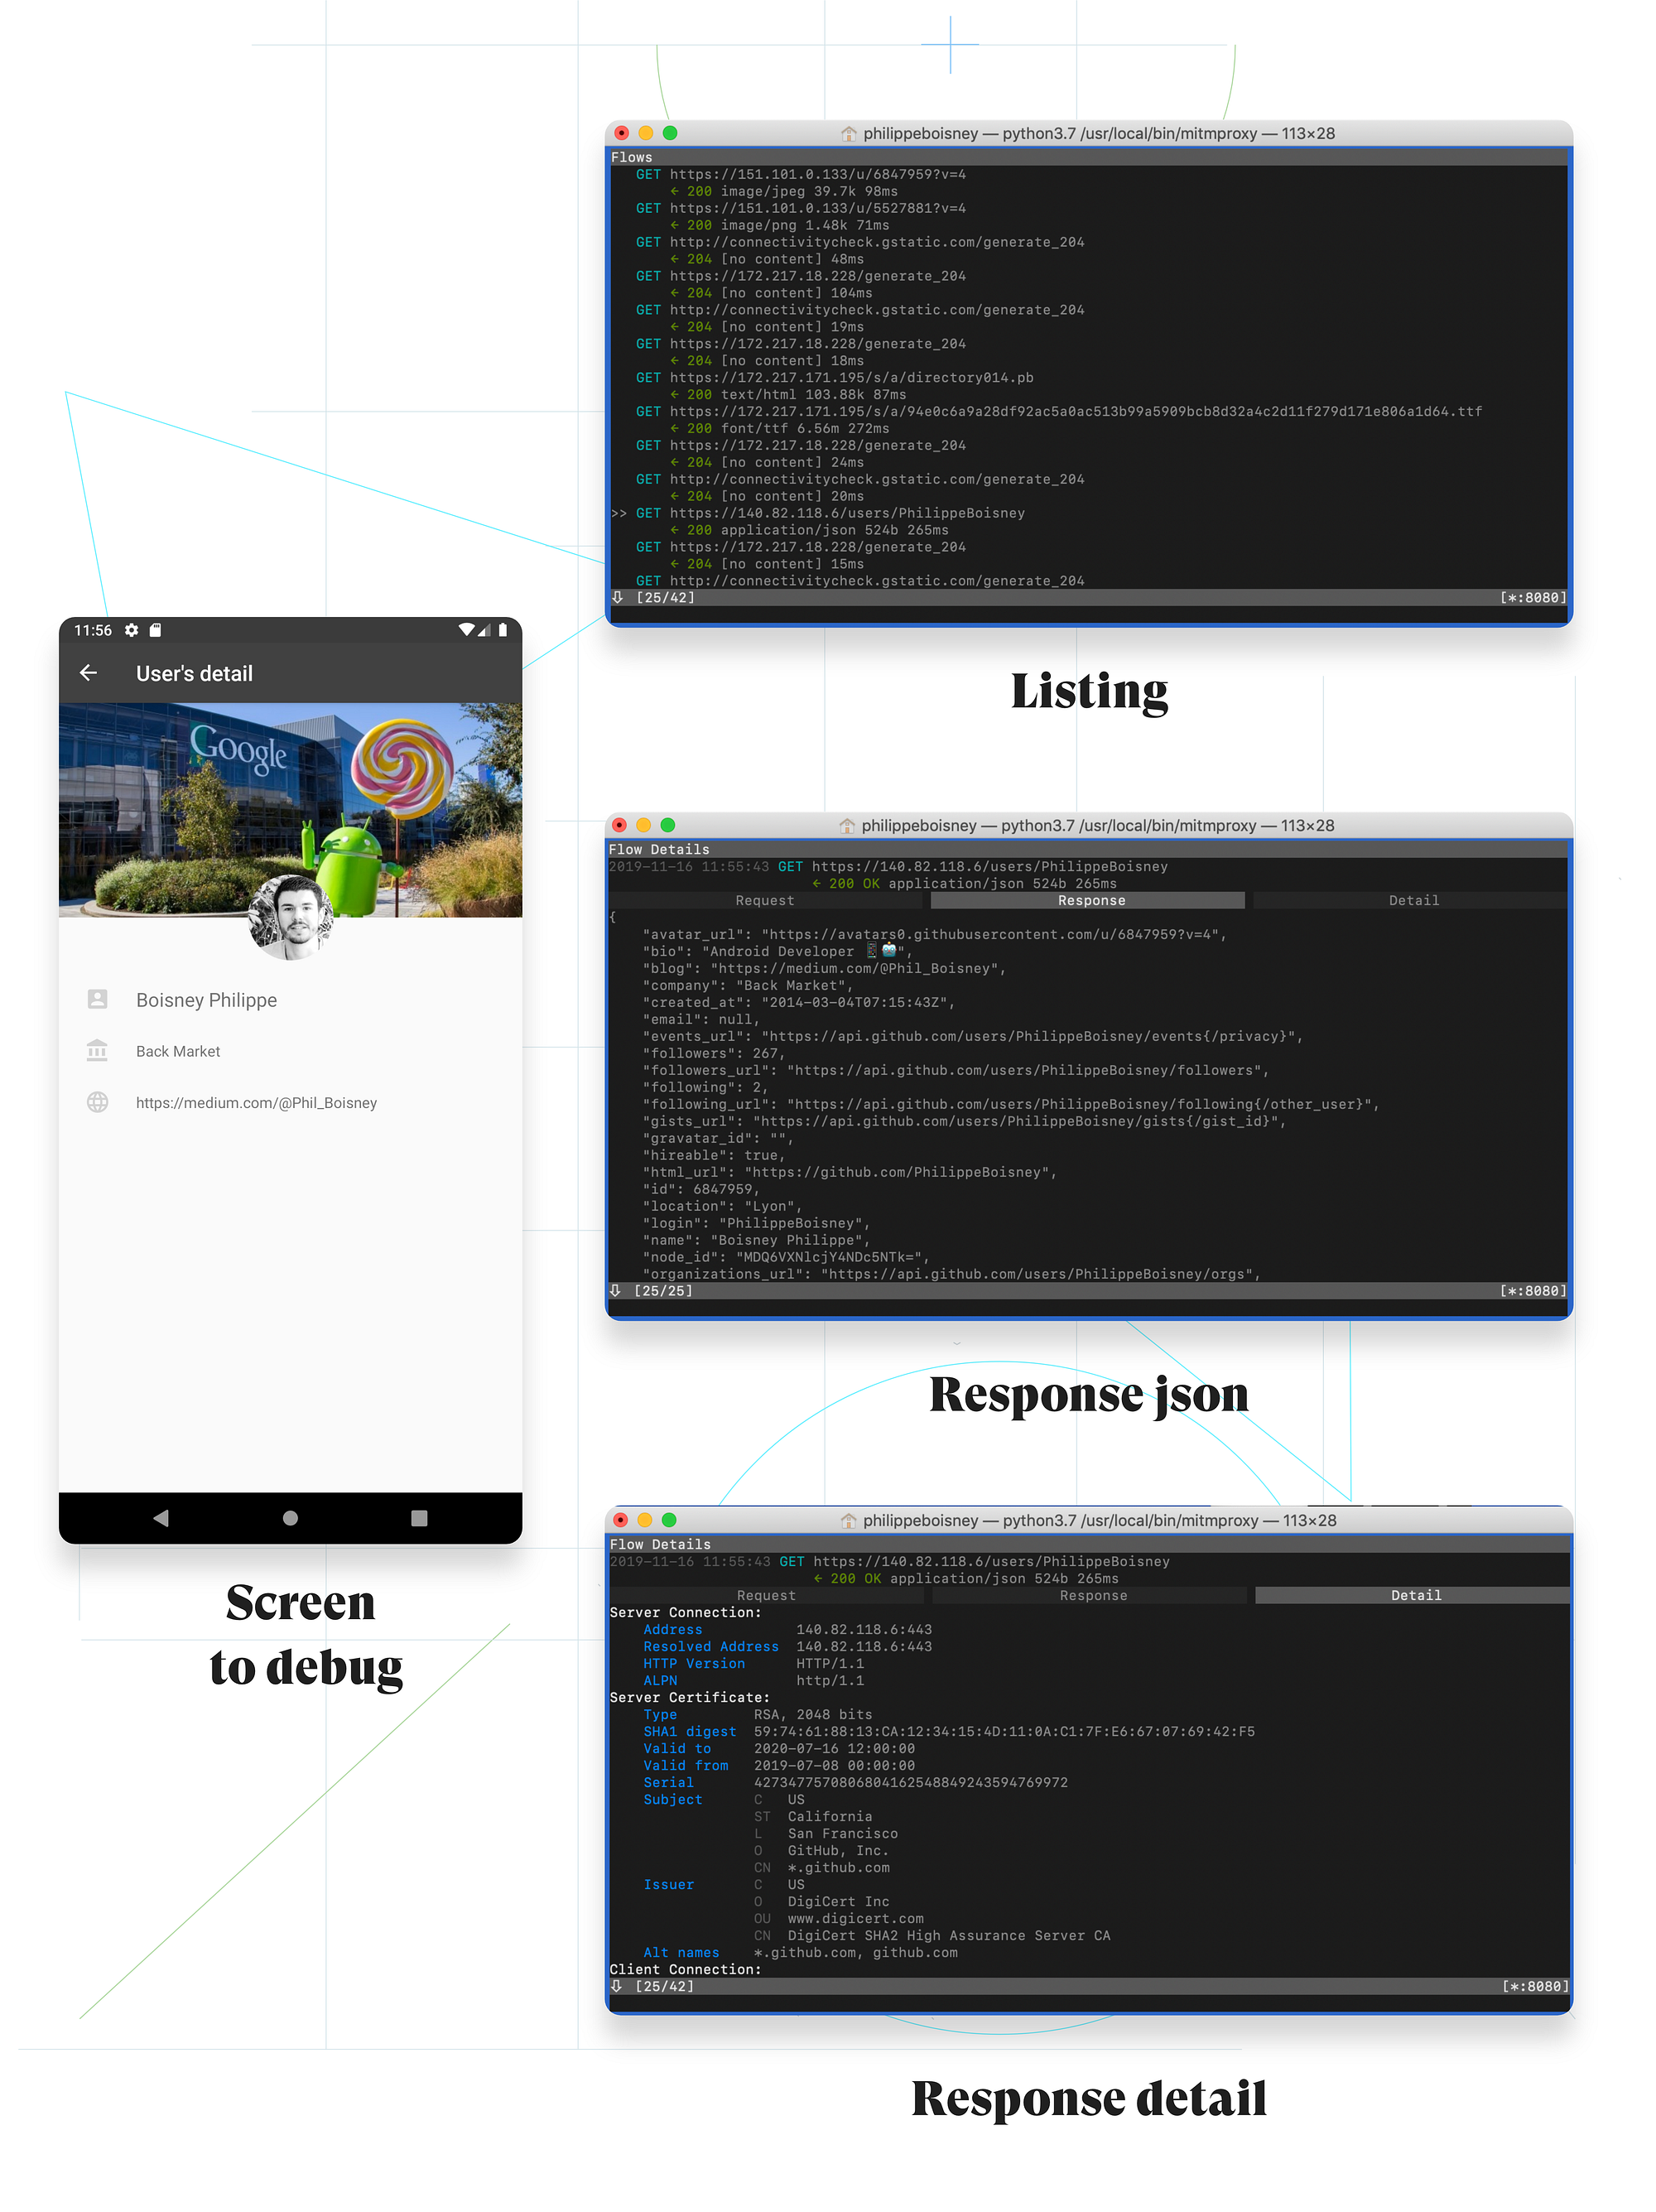
As you can see, mitmproxy is a very powerful tool. In this post, I only show you the way to debug HTTP & HTTPS requests but mitmproxy has more useful features that could help you to debug complex scenarios or just secure a bit more your application.
Always use it with caution and on applications you own ⚠️.
If you want to join our Bureau of Technology or any other Back Market department, take a look here, we’re hiring ! 🦄
Источник


