- How to Build an Android App with JavaScript
- Build an Android App with JavaScript for Generating QR Codes
- Can we use JavaScript for Android?
- Using the Ionic framework for Building Android Apps with Javascript
- Building the UI Layer for Ionic Hybrid App
- Making API Calls from Ionic Hybrid App
- How to Build an Android App with JavaScript (for QR Code Generation)
- Choosing a QR Code Generation API
- How to Get Access to the API
- 1. Sign up for RapidAPI Account
- 2. Access the QRickit QR Code QReator API
- 3. Subscribe to the QRickit API
- 4. Test the QRickit API
- Let’s create the app with Ionic Framework
- Prerequisites
- Step 1: Create a new Ionic project
- Step 2: Add a new HTTP service to the project
- Step 3: Add the UI and interaction code
- Reader Interactions
- Leave a Reply
- Primary Sidebar
- Build amazing apps, faster.
- 📱Создаем мобильное приложение для Android на JavaScript с помощью Apache Cordova
- furry.cat
- Шаг #0. Настройка среды разработки
- Android Studio
- Создание эмулятора
- Cordova
- Шаг #1. Превращение веб-страницы в Android-приложение
- Создание пустого проекта
- Добавление платформы
- Сборка проекта
- Запуск на эмуляторе или устройстве
- #Шаг 2. TODO-приложение
- Отладка
- Шаг #3. Использование функциональности платформы
- Диалоговые окна
- Напоминания о делах
- Публикация проекта в Google Play
How to Build an Android App with JavaScript
Last Updated on April 23, 2021 by Shyam Purkayastha Leave a Comment
Table of Contents
Build an Android App with JavaScript for Generating QR Codes
We are back with yet another Android app demo. This time, we take a different approach to building an Android app with JavaScript.
Being the de-facto programming language for the web, JavaScript has enjoyed tremendous growth over the years, especially in frontend browser-based applications. Thanks to the advances in runtime environments and the tooling, it is now possible to take JavaScript off the browser and use it in other ways. In this blog post, we show you how to build an Android app using JavaScript and related web technologies, without using any native Java or Kotlin based environments. We also show you how to integrate an API with such Android applications by leveraging the power of the RapidAPI‘s API marketplace.
Can we use JavaScript for Android?
The Android ecosystem supports the concept of hybrid apps, which is a wrapper over the native platform. It mimics the UI, UX, and all kinds of hardware and network interactions, just like how you would use a native Android app.
Many frameworks offer a hybrid wrapper for Android. The Ionic framework is the most popular among the developer community. It leverages the Cordova WebView plugin, which is a browser like skin over the native Android UI.
Using the Ionic framework for Building Android Apps with Javascript
The ionic framework works with Angular, React as well as vanilla JavaScript or Vue, to bind the application. Ionic 5 is the latest version of the framework. The support for React, JavaScript, and Vue was added in version 4. However, JavaScript and Vue support is still not stable enough to build production-grade apps. Therefore, as of this writing, it is recommended to use Angular with Ionic 5.
Using the TypeScript language, a superset of JavaScript, you can build an Ionic application on top of Angular, which runs as a hybrid Android app using the WebView plugin.
The Ionic framework acts as the glue between the Android platform, Angular, and Cordova. The resulting hybrid app feels just as good as a native app. A regular user would never be able to make out the difference.
The only downside is these apps is that they are not performant like native apps. Moreover, these apps cannot command fine-grained control over the underlying hardware in case of a need for hardware boosted performance.
Building the UI Layer for Ionic Hybrid App
The Ionic framework offers a set of UI components that you can use to build the app UI.
Like you use HTML tags to build the browser UI, Ionic offers high-level custom tags to build the app’s UI elements.
Here is how you can piece together an app screen to display a piece of small information on a card.

Using the tag, you can build this screen as follows.
In this way, Ionic provides a complete library of UI specific custom elements to build UI screens for apps.
Making API Calls from Ionic Hybrid App
If you are using Angular as the base framework, then making an API call is easy.
Angular provides an HTTP client library for TypeScript that leverages the HTTPClient class.
This class provides all the HTTP methods, including the most common ones, post() and get() to invoke API requests from an URL. Here is how you can define a module to make a quick API call using HTTPClient and a few helper classes.
By importing this module in an Angular app, you can call the function get( ) . It will return the HTML body of the example.com domain as a text blob.
How to Build an Android App with JavaScript (for QR Code Generation)
QR codes get a lot of love from people from around the world. Everybody loves to scan a QR code. Companies and brands want to use them to lead customers to their website URLs.
So how about building an Android app that lets you instantly generate a QR code from an URL. Before you even wonder about the nitty-gritty details of generating the QR code, let us remind you that the RapidAPI’s API marketplace has many APIs to help you with that.
Choosing a QR Code Generation API
Head over to the RapidAPI homepage to search for QR code APIs.
You can find a lot of QR code APIs listed on the marketplace.
There are wide varieties of API choices to generate customized QR codes, with images, logos, and color combinations along with various options to access the generated code.
Let’s pick a no-frills QR code generator for the Android app that we want to build.
We have done a random pick to choose the QRickit QR Code QReator API. It is a simple, easy to use API without any customization options.
Follow the steps below to get started with this API.
How to Get Access to the API
1. Sign up for RapidAPI Account
To access any API, you’ll first have to sign up for a free RapidAPI developer account. With this account, you get a universal API Key to access all APIs hosted in RapidAPI.
RapidAPI is the world’s largest API marketplace, with over 10,000 APIs and a community of over 1,000,000 developers. Our goal is to help developers find and connect to APIs to help them build amazing apps.
2. Access the QRickit QR Code QReator API
Once signed in, log in to your RapidAPI account and visit the API console here .
3. Subscribe to the QRickit API
Once inside the API console, click on the “Pricing” tab to access the pricing plan.
The QRickit QR Code QReator API offers a freemium plan that lets you make 100 API calls in a month.
Subscribe to this plan, and you are all set to try it out.
4. Test the QRickit API
If you go back to the “Endpoints” tab, you can access the API endpoints and the parameters.
Key in the domain name “example.com” in the text box next to the parameter ‘ d ’. Trigger the API. If you see a status code of 200, then the API call has succeeded.
The actual QR code image is sent as a blob response by the API, which may not be visible on the browser. However, when you build the Android app, you will capture it and display it as an image.
Let’s create the app with Ionic Framework
We will now write the code for the Android app. To build this app using the Ionic framework, you need to set up some tooling.
First up, here are a few prerequisites for platforms and SDKs that must be satisfied before proceeding further.
Prerequisites
-
- Install Android Studio : This is the Android development environment. You must have the Android Studio version 3.0 or above, installed on your development computer.
- Install Java SDK : All Android applications leverage the Java platform. You need to install the JDK from the official Oracle website .
- Install Android SDK : This is the Android platform SDK. You must have the latest Android SDK (preferably Android 10.0) installed through the Android Studio.
- Install Node.js and NPM: NPM is the package management tool for all Angular and Ionic packages as well as the TypeScript libraries. It is available as part of the Node.js package. You can install Node.js from the official page .
- Install Angular: Follow this official guide to set up your local Angular environment.
- Install Ionic : Install the ionic CLI from this official Ionic docs . Only follow the section until the installation of the Ionic CLI.
Note: The code presented in this post has been tested with the following versions of the platforms/SDKs on Windows 10.
Android Studio: 3.5.3
Android SDK: Android 10.0
Angular CLI: 9.1.11
You also need to make sure that the system paths for Android SDK, Java, Node, NPM, Angular CLI, and Ionic CLI are correctly set to invoke them directly.
Let’s start the development now. Follow along with the steps below to set up a new Ionic project and build the Android app’s code.
Before starting, make sure that you have a command-line terminal running and a code editor open.
Step 1: Create a new Ionic project
On the terminal, create a new project folder and then, while inside the folder, create a new Ionic project using the Ionic CLI.
| ionic start qrcode blank |
This will create a new blank project called “qrcode.” It automatically creates the project main folder named “qrcode” and the subfolders within.
Step 2: Add a new HTTP service to the project
For triggering the API calls from the app to the QRickit API, we define a new service. Invoke the following command using the Ionic CLI.
| ionic generate service HTTP |
A service is an add-on module, used as a library across the code. It performs a well-defined responsibility. In this case, it is the invocation API calls. You will define the logic inside this module in a little while.
Step 3: Add the UI and interaction code
This app only has one screen. It displays a text box to accept the domain name and a submit button to trigger QRickit API call. Below the button is a display area that shows the generated QR code.
Open the file home.page.html under qrcode/src/app/home/ to define the UI as follows. You can overwrite the default content generated as part of the project creation.
and defines the top level wrappers for housing the UI elements.
The UI is structured in a typical HTML fashion using
Reader Interactions
Leave a Reply
Primary Sidebar
Build amazing apps, faster.
Discover, evaluate, and integrate with any API. RapidAPI is the world’s largest API Hub with over 2,000,000 developers and 20,000 APIs.
Источник
📱Создаем мобильное приложение для Android на JavaScript с помощью Apache Cordova

furry.cat
Распространение мобильных устройств в наше время достигло невероятных значений. Мобильный телефон есть у 2 из каждых 3 человек на планете. С помощью мобильных люди общаются, делают покупки, получают образование, играют. Это огромный рынок, который нельзя оставлять без внимания.
Однако чтобы разрабатывать приложения для мобильных платформ, нужно владеть определенным языком программирования. Swift – для iOS, Java или Kotlin – для Android. Или JavaScript – для iOS, Android и ряда других ОС!
Да-да, JavaScript везде, и на мобильных в том числе. На данный момент есть несколько известных и проверенных фреймворков для создания кроссплатформенных мобильных приложений на этом языке, например, React Native и Apache Cordova, а также основанные на ней проекты.
Для разработки на React Native требуется знание библиотеки React и основных паттернов работы с ней. Cordova же может взять обычное веб-приложение и обернуть его нужным кодом так, чтобы оно работало на мобильных ОС. Такие «гибридные» приложения не могут похвастаться высокой нативной производительностью, однако очень просты в разработке.
Cordova отлично подходит для создания простых проектов без сложной графики. Сейчас мы как раз разработаем один из них – классическое Todo App для Android на JavaScript.
Шаг #0. Настройка среды разработки
Так как мы пишем приложение для Android, нам понадобится JDK (Java Development Kit) и Android SDK – среда разработки для приложений Android. А также собственно Cordova.
Установочник для нужной платформы можно найти на сайте Oracle. Выбирайте версию не выше JDK 8, с более новыми Cordova не будет работать.
Запомните, куда установился пакет, и сохраните этот путь в переменной окружения JAVA_HOME .

А также добавьте его в переменную PATH .

Android Studio
Для разработки под Android также потребуется установить Android Studio.
После установки зайдите в программу и откройте меню SDK Manager (при открытом проекте Tools -> SDK Manager).
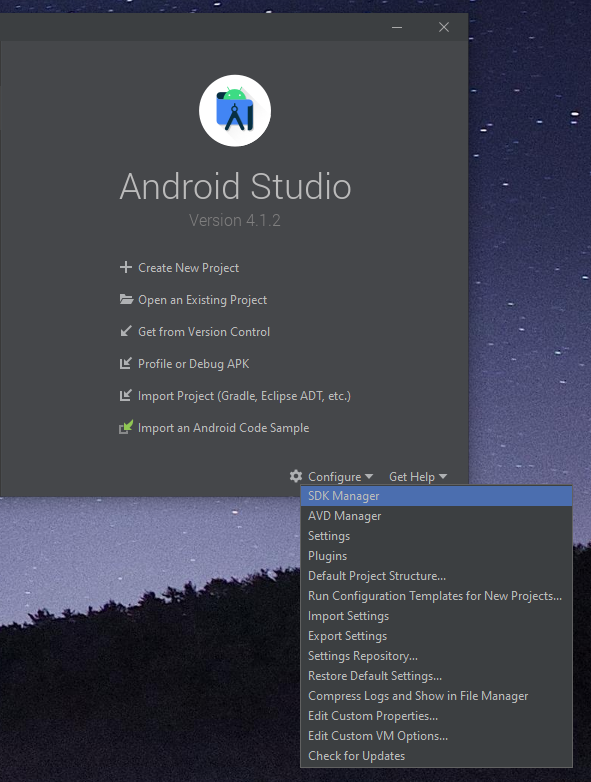
Здесь вы найдете путь к Android SDK (Android SDK Location), сохраните его в переменную окружения ANDROID_SDK_ROOT .
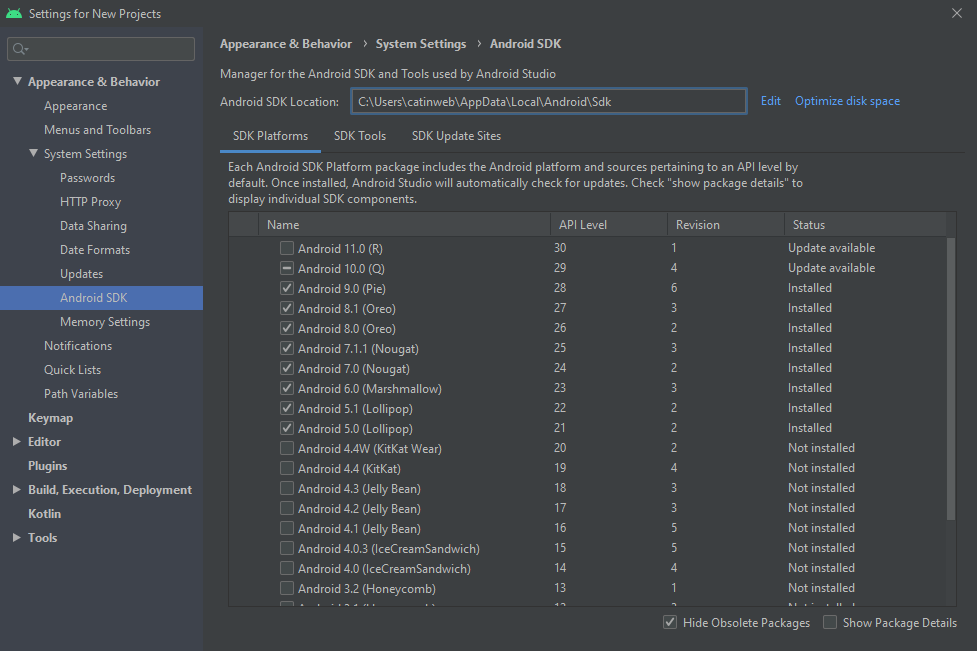
Добавьте в переменную PATH каталоги tools и platform-tools :

Затем убедитесь, что установлен пакет Android SDK Build-Tools (во вкладке SDK Tools).
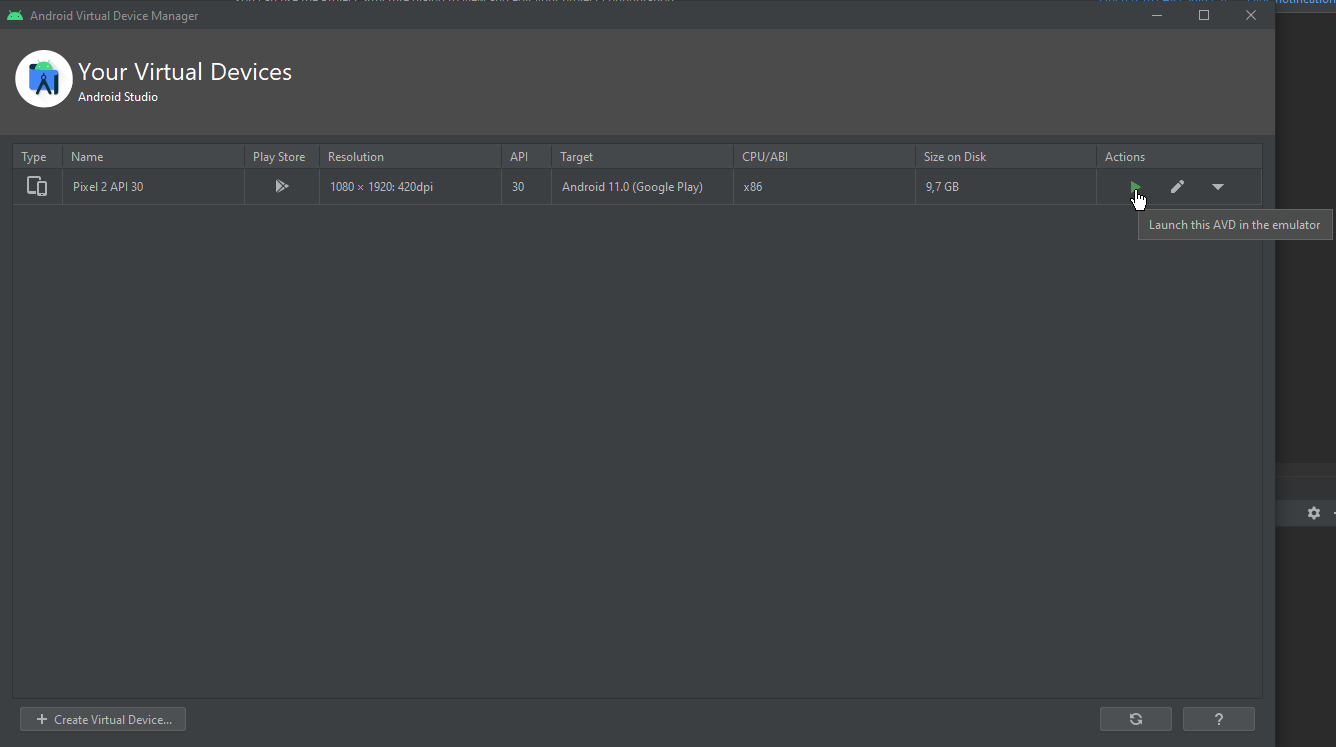
Создание эмулятора
Наконец, создадим эмулятор, на котором можно будет запускать приложение в процессе разработки.
Для этого зайдите в меню AVD Manager:
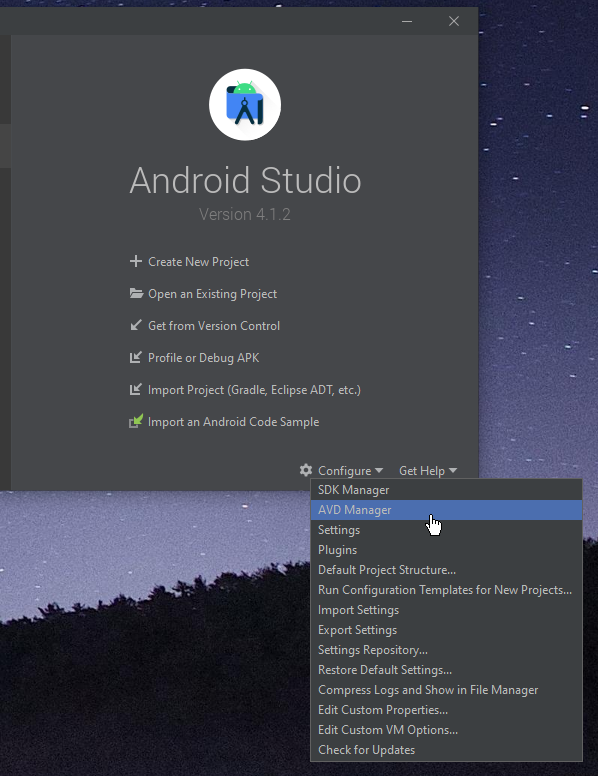
И создайте эмулятор с нужными параметрами.
Cordova
Осталось глобально установить npm-пакет Cordova:
Шаг #1. Превращение веб-страницы в Android-приложение
Подготовительные работы закончены, пора приступать к самому интересному.
Вероятно, самый интересный вопрос – как запустить обычную веб-страницу на устройстве Android. Чтобы ответить на него, создадим пустой проект Cordova и разберемся на практике.
Создание пустого проекта
Команда для создания нового проекта Cordova:
- Первый аргумент – todo-app – это название новой папки, которую Cordova создаст в текущем каталоге.
- Второй аргумент – com.furrycat.todo – это идентификатор проекта.
- Третий аргумент – TodoApp – имя приложения.
Появилась новая папка todo-app . Перейдите в нее и запускайте все дальнейшие команды уже внутри этой директории.
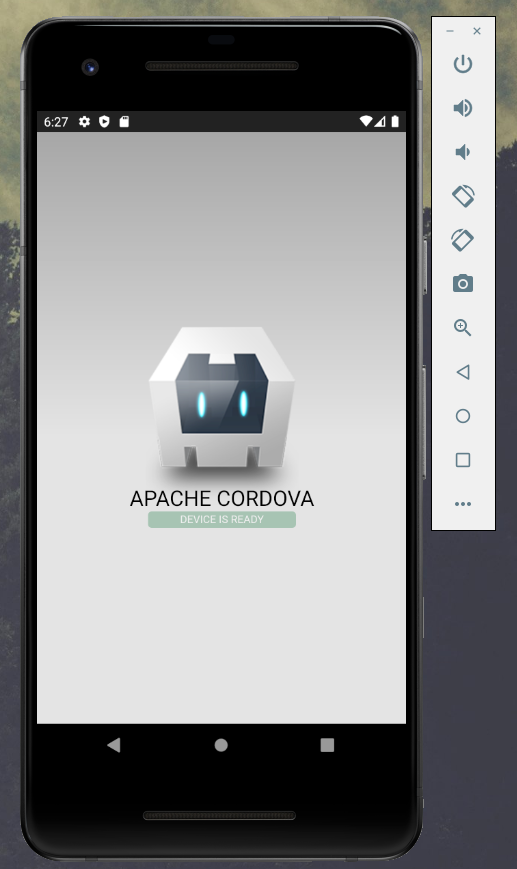
Внутри находится файл config.xml , которые содержит все мета-данные, а также папка www – именно в ней и расположен код веб-приложения. Сейчас это простейшая страница – index.html – с логотипом Cordova и парой надписей, к ней подключен файл стилей и скрипт. Вы можете открыть эту страницу в браузере:
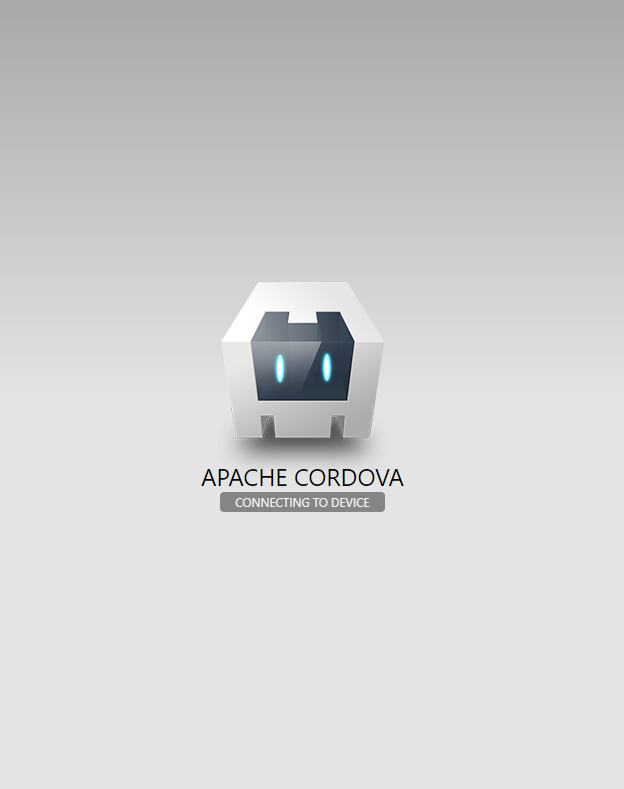
Заглянем в файл js/index.js . Здесь очень простой код: установлен слушатель события deviceready , его обработчик просто добавляет класс .ready к одному из html-элементов.
deviceready – это событие, которое вызывает сама Cordova. Нетрудно догадаться, что оно возникает после того, как устройство, на котором запущено приложение будет готово его воспроизводить. Так как мы запустили проект в обход Cordova, это событие не возникает, поэтому надпись Connecting to device не исчезает.
Добавление платформы
Укажем целевые платформы для проекта – у нас это только Android:
Появилась новая директория platforms , а внутри нее – android . Весь код нашего веб-приложения вы можете найти в папке platforms/android/app/src/main/assets/www. Он просто копируется из внешней папки www при сборке. Все остальные файлы в папке android – это оболочка Cordova, необходимая для запуска на устройстве.
Сборка проекта
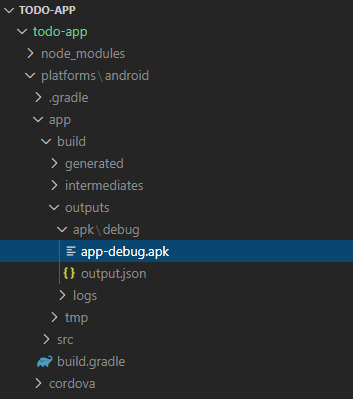
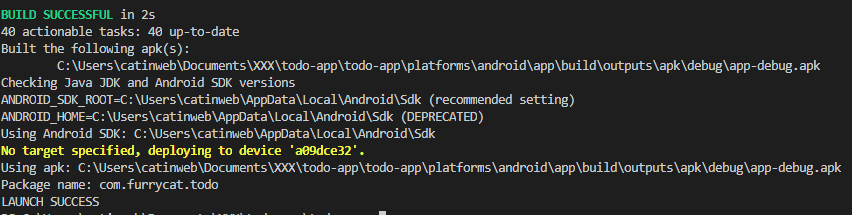
Команда для сборки проекта для Android-платформы:
В папке platforms/android/app появилась новая директория build . Внутри нее есть файл outputs/apk/app-debug.apk . По сути это уже рабочий apk, который можно запустить на Android-устройстве.
Загрузите его на смартфон, запустите – и вы увидите ту самую дефолтную веб-страницу. Все работает!
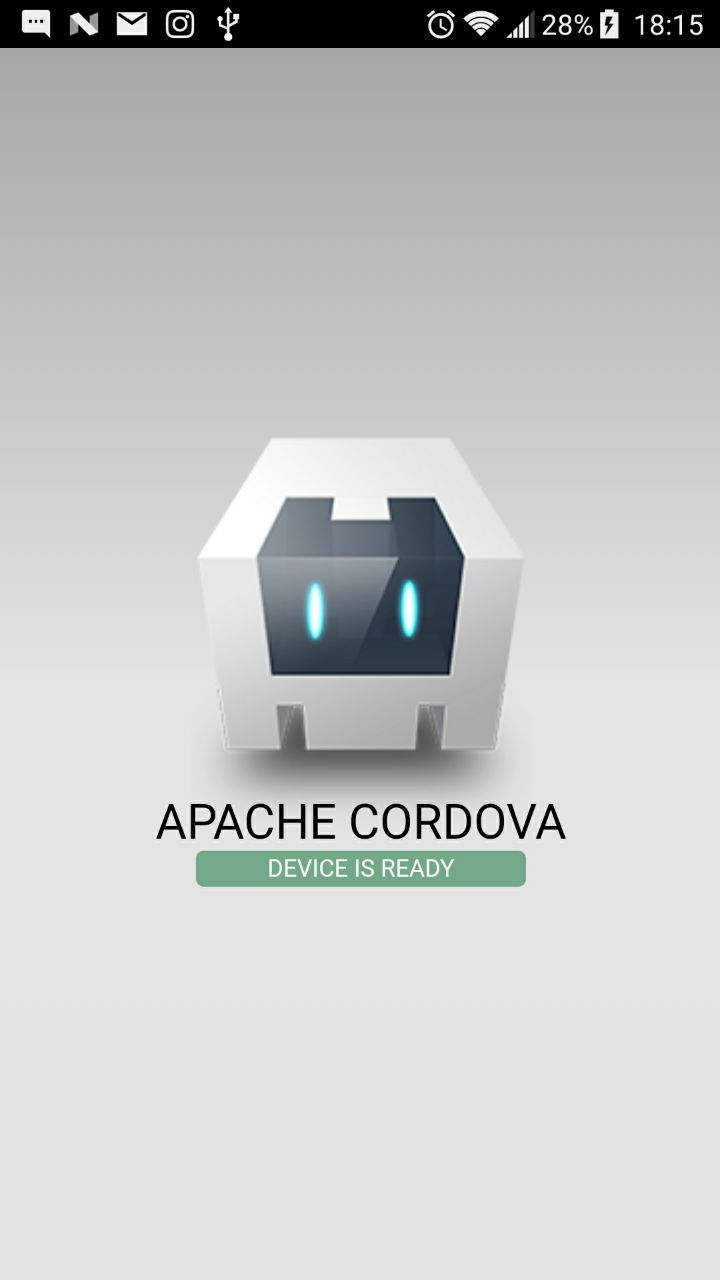
Как видно, надпись connecting to device сменилась на device is ready. Это значит, что кордова вызвала событие deviceready , а приложение отреагировало на нее.
Запуск на эмуляторе или устройстве
Нет необходимости вручную копировать apk на устройство при каждом изменение приложения.
Чтобы запустить проект на смартфоне, подключите его к компьютеру, разрешите отладку и запустите команду:
Кордова сама соберет проект, обнаружит устройство и запустит приложение
Можно обойтись и без реального устройства.
Запустите созданный ранее эмулятор в Android Studio:
и снова выполните команду:
На этот раз кордова найдет эмулятор и запустит проект на нем:
Теперь мы умеем запускать обычную веб-страницу как приложение на Android-устройстве.
#Шаг 2. TODO-приложение
Теперь заменим дефолтную страницу Cordova на собственное крутое Todo-приложение.
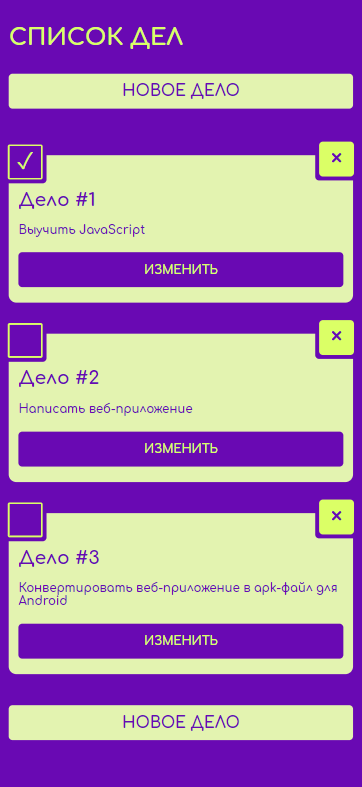
Это очень простое веб-приложение, написанное с использованием фреймворка Vue. Его исходный код находится в корне проекта в новой папке src . Сборка осуществляется с помощью webpack, собранные файлы помещаются непосредственно в папку www .
Есть возможность добавлять, редактировать, удалять дела, а также отмечать их сделанными. Чтобы при перезагрузке список дел не пропадал, все сохраняется в localStorage .
Откройте приложение в эмуляторе или на подключенном устройстве и убедитесь, что все работает:
Отладка
Запущенное на эмуляторе или реально устройстве приложение Cordova можно отлаживать через браузер Chrome.
Для этого перейдите по адресу: chrome://inspect/#devices, найдите устройство в списке и нажмите Inspect.
Шаг #3. Использование функциональности платформы
До сих пор наше приложение использовало только функциональность веб-платформы. Однако Cordova предоставляет доступ и к возможностям мобильного устройства – через многочисленные плагины.
Для примера реализуем нативные диалоговые окна и оповещения.
Диалоговые окна
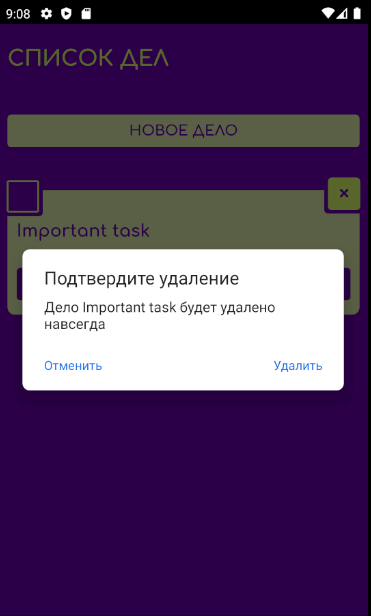
Добавим подтверждение действия при удалении задачи – модальное окно с кнопками Отменить и Удалить. В вебе мы можем использовать для этого стандартное модальное окно confirm , но его нельзя кастомизировать. Поэтому мы должны получить доступ к нативным диалоговым окнам Android.
Теперь в коде приложения нам доступ объект navigator.notification с четырьмя методами:
- navigator.notification.alert
- navigator.notification.confirm
- navigator.notification.prompt
- navigator.notification.beep
Нам нужен метод confirm :
Напоминания о делах
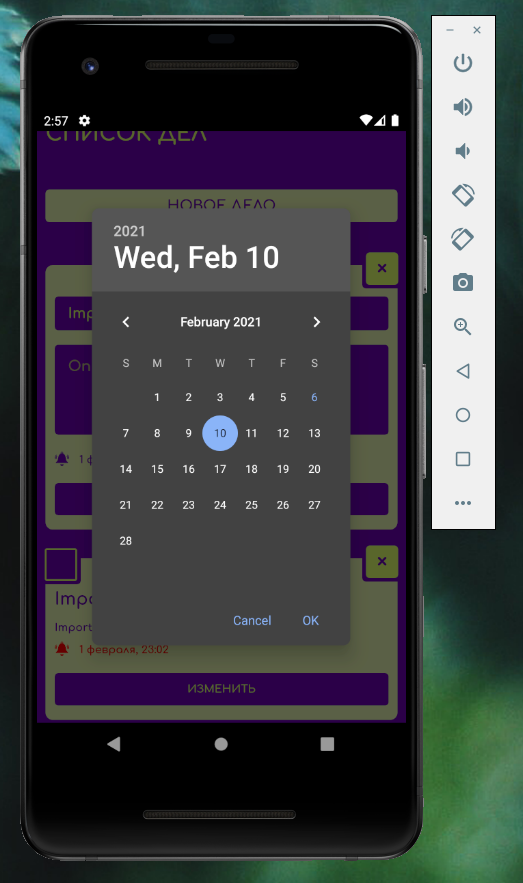
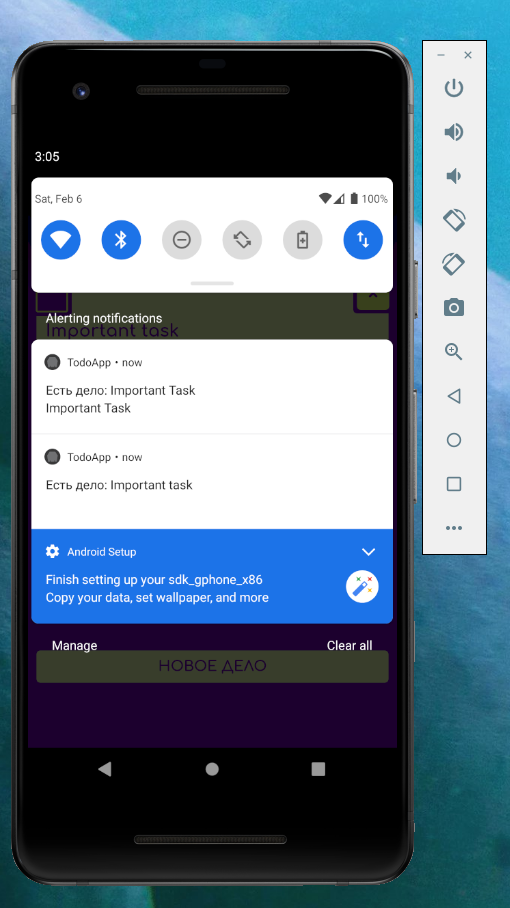
Еще одна очень полезная функциональность – напоминание о делах в установленное время.
Для начала добавим возможность выбрать дату и время – нам понадобится плагин skwas-cordova-plugin-datetimepicker.
Использование в коде:
А для планирования оповещений понадобится плагин cordova-plugin-local-notification.
Использование в коде проекта:
Чтобы запланировать оповещение на определенное время, используется параметр trigger.at .
Публикация проекта в Google Play
Приложение готово, осталось только собрать его для продакшена.
В директории platforms/android/app/build/outputs/apk должна появиться новая папка release, внутри которой вы найдете неподписанный apk-файл.
Чтобы выложить проект в Google Play, его нужно подписать.
Для этого нужно сгенерировать ключ:
Имя ключа – todoapp.keystore , алиас – todoapp . При создании вам нужно будет ввести пароль и ответить на ряд вопросов (или пропустить их). В результате в текущей директории появится новый файл todoapp.keystore – не потеряйте его.
Теперь скомпилируем проект с ключом:
Важно указать правильное имя ключа и алиас.
Осталось запаковать проект в новый apk. Для этого понадобится утилита zipalign (она находится в папке build-tools в Android SDK):
Этот apk-файл можно добавлять в Google Play через ваш аккаунт разработчика.
Источник


