- Как включить отладку по USB на Android
- Включение отладки по USB на Android телефоне или планшете
- Видео инструкция
- Как включить отладку по USB на Android
- USB отладка: как включить Android для перехода в режим отладки
- Как включить режим для разработчиков на Android
- Как включить режим USB отладки на Андроид
- Как отключить отладку по USB на телефоне
- Выводы статьи
- How to Enable USB Debugging on Android Phone
- Part 1. Enable USB Debugging on Android 5.0 to 7.0
- Part 2. Enable USB Debugging on Android 4.2 or Newer
- Part 3. Enable USB Debugging on Android 3.0 to 4.1
- Part 4. Enable USB Debugging on Android 2.3 or Earlier
- Related Articles
- How to Enable Android USB Debugging Mode
- 1. What is USB Debugging Mode
- 2. How to Enable USB Debugging
- How to Enable USB Debugging on Different Android Devices
- How to Enable USB Debugging Mode on Different Android OS Versions
- 3. Advantages and Disadvantages of USB Debugging Mode
- Advantages of USB Debugging Mode
- Disadvantages of USB Debugging Mode
Как включить отладку по USB на Android
Включенная отладка по USB на Android устройстве может потребоваться для самых разных целей: прежде всего, для выполнения команд в adb shell (прошивка, кастомный рекавери, запись экрана), но не только: например, включенная функция может пригодиться и для восстановления данных на Android.
В этой пошаговой инструкции подробно о том, как включить отладку по USB на Android 5-7 (в общем-то, то же самое будет и на версиях 4.0-4.4), в видео показано включение отладки на Android 9 Pie и на смартфонах Samsung Galaxy.
Скриншоты и пункты меню в руководстве соответствуют почти чистой ОС Android 6 на телефоне Moto (то же самое будет на Nexus и Pixel), но принципиальной разницы в действиях на других устройствах, таких как Samsung, LG, Lenovo, Meizu, Xiaomi или Huawei не будет, все действия практически те же самые, также в статье присутствуют текстовые пути для настроек на других версиях Android и марках телефонов.
Включение отладки по USB на Android телефоне или планшете
Для того, чтобы появилась возможность включить отладку по USB, сначала необходимо включить режим разработчика Android, сделать это можно следующим образом.
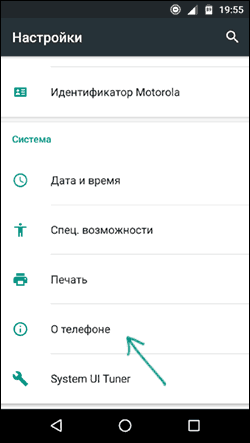
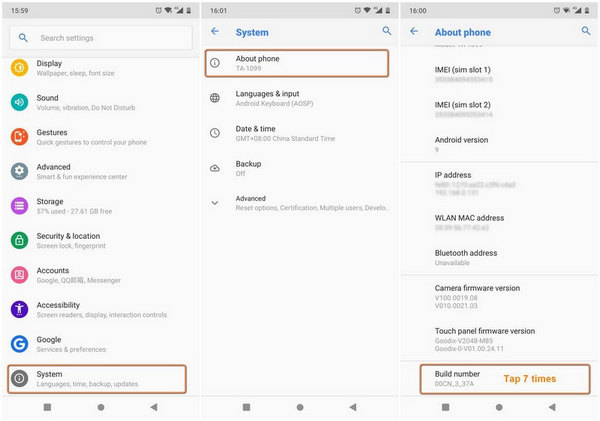
- Зайдите в Настройки и нажмите пункт «О телефоне» или «О планшете», на Samsung — «Сведения о телефоне» — «Сведения о ПО». На чистом Android 9.0 зайдите в пункт «Система» — «О телефоне».

- Найдите пункт «Номер сборки» (на телефонах Xiaomi и некоторых других — пункт «Версия MIUI») и несколько раз нажимайте по нему, пока не увидите сообщение о том, что вы стали разработчиком.

Теперь в меню «Настройки» вашего телефона появится новый пункт «Для разработчиков» и можно переходить к следующему этапу (может быть полезно: Как включить и отключить режим разработчика на Android).
Процесс включения отладки по USB также состоит из нескольких очень простых шагов:
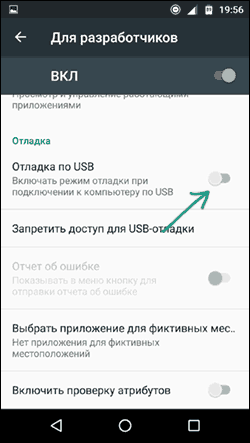
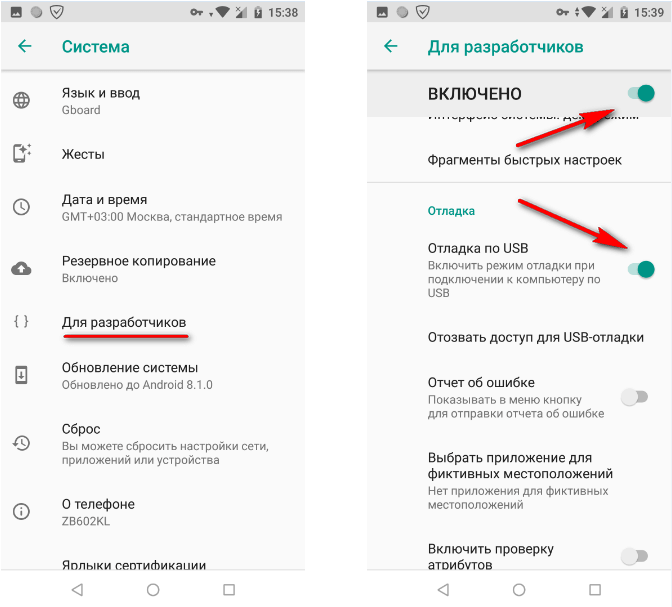
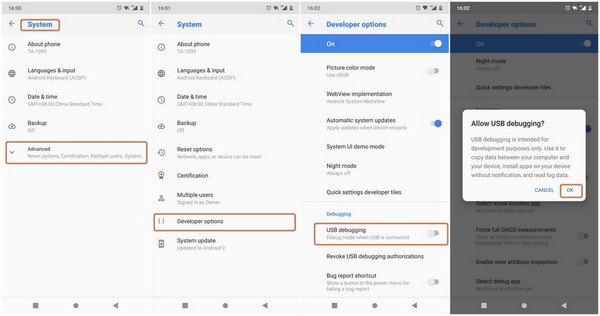
- Зайдите в «Настройки» — «Для разработчиков». На Android 9, например, на Nokia — в Настройки — Система — Дополнительно — Для разработчиков. На некоторых китайских телефонах, например, на Xiaomi — в Настройки — Дополнительно — Для разработчиков или Настройки — Расширенные настройки — Для разработчиков. Если вверху страницы есть переключатель, который установлен в положение «Выкл», переключите его в «Вкл».
- В разделе «Отладка» включите пункт «Отладка по USB», чтобы включить режим отладки по USB.
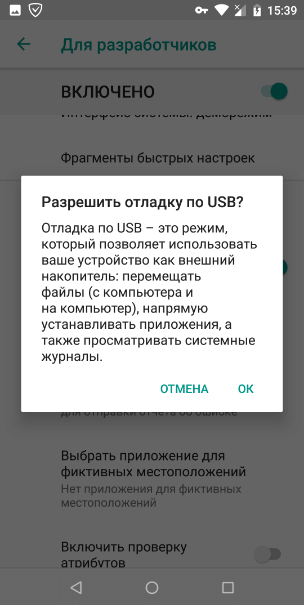
- Подтвердите включение отладки в окне «Разрешить отладку по USB», внимательно прочитав предупреждение.


На этом всё готово — отладка по USB на вашем Android телефоне включена и ее можно использовать с нужными вам целями.
Видео инструкция
В дальнейшем, вы можете отключить отладку в том же разделе меню, а при необходимости — отключить и убрать из меню Настроек пункт «Для разработчиков» (ссылка на инструкцию с необходимыми действиями была приведена выше).
А вдруг и это будет интересно:
17.07.2021 в 22:27
Здравствуйте! С помощью «Для разработчиков» и «Отладки USB» я удалял проблему связи, через кабель компьютер видел и изображения, и видео, и я оперировал ими. И это прекрасно!
Но есть пару но.
1. На всё время данной связи связи с интернетом не было (пока я работал с файлами через кабель, файлы, направляемые ко мне как и всегда через вай-фай, отсутствовали. И как только восстановил через Google связь, файлы гурьбой прилетели).
2. Второе но — после восстановления интернета связь через кабель с компьютером опять отсутствует. Как и ранее.
Есть ли вариант разовой настройки на связи одновременно и с интернетом, и компьютером по USB навсегда, кто знает?
28.09.2021 в 17:24
13.10.2021 в 18:30
Спасибо, никак не мог разобраться с просмотром файлов с телефона Redmi 4 на ПК, очень помогли.
Источник
Как включить отладку по USB на Android
На мобильных телефонах, под управлением операционной системы Android, имеется специальный режим «отладка по USB», отключенный в обычном состоянии, поэтому некоторые пользователи ищут ответ на вопрос, как включить отладку на смартфоне или планшете.
Режим отладки по USB позволяет использовать мобильное устройство как внешний накопитель: перемещать файлы с компьютера на телефон, с телефона на компьютер, устанавливать приложения, просматривать журналы.
Режим отладки через USB востребован разработчиками программного обеспечения в операционной системе Андроид, для тестирования функций и приложений. Обычным пользователям режим отладки понадобится для работы некоторых программ, например, записи экрана смартфона, восстановления данных, удаленных с телефона, создания бэкапа, прошивки устройства и т. д.
USB отладка: как включить Android для перехода в режим отладки
Во время работы в режиме отладки, компьютер и мобильное устройство подсоединяются друг к другу с помощью USB кабеля напрямую. Функции включения отладки находятся в специальном системном режиме «Для разработчиков», не доступном пользователю смартфона или планшета при обычном использовании операционной системы.
В операционной системе Android режим разработчика отключен по умолчанию для обеспечения безопасности устройства. Поэтому у пользователей возникает вопрос: как на телефоне включить отладку по USB?
Для начала, пользователю потребуется включить режим для разработчиков, а затем включить режим отладки по USB на мобильном телефоне. После этого, можно подсоединить телефон к компьютеру кабелем, для выполнения нужных работ.
Включение USB отладки происходит одинаково в разных версиях Android 4, 5, 6, 7, 8, 9. На телефонах могут отличаться названия некоторых пунктов интерфейса, в зависимости от версии операционной системы, или особенностей модифицированной оболочки, установленной производителя устройства.
В этом руководстве я покажу, как включить отладку через USB на примере Android 8.1.0, на моем устройстве установлена практически «чистая» операционная система.
Как включить режим для разработчиков на Android
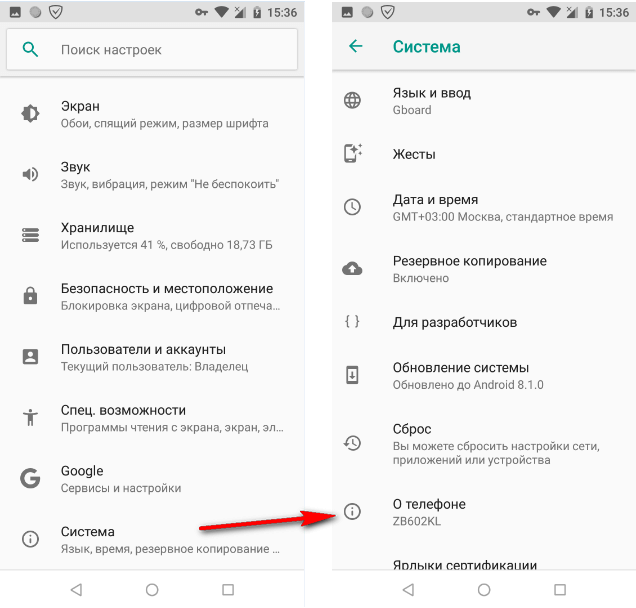
Войдите в настройки смартфона или планшета. В настройках мобильного устройства нажмите на пункт «Система».
В открывшемся окне нажмите на опцию «О телефоне».
В следующем окне потребуется несколько раз подряд нажать на пункт «Номер сборки». Система подскажет сколько раз еще нужно нажать для включения нужного параметра настроек.
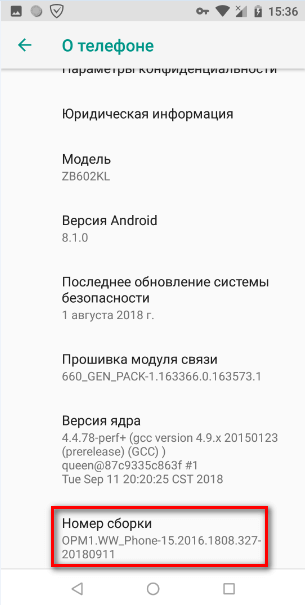
После этого, на экране появится сообщение «Вы стали разработчиком!».
Как включить режим USB отладки на Андроид
После активации режима разработчика, в настройках телефона, в разделе «Система» появился новый пункт «Для разработчиков».
- Нажмите на опцию «Для разработчиков».
- В разделе «Для разработчиков» активируйте настройку «Включено».
- В параметре «Отладка» включите режим «Отладка по USB».
- В окне с предупреждением «Разрешить отладку по USB?» нажмите на «ОК».
Все, отладка по USB на Андроид включена, мобильное устройство можно подсоединить к компьютеру напрямую, при помощи USB кабеля.
Как отключить отладку по USB на телефоне
В режиме отладки имеется доступ к операционной системе, а это небезопасно. Поэтому, после выполнение необходимых действий, рекомендуется отключить режим отладки и деактивировать режим разработчика в настройках девайса.
- Войдите в раздел «Система», нажмите на опцию «Для разработчиков».
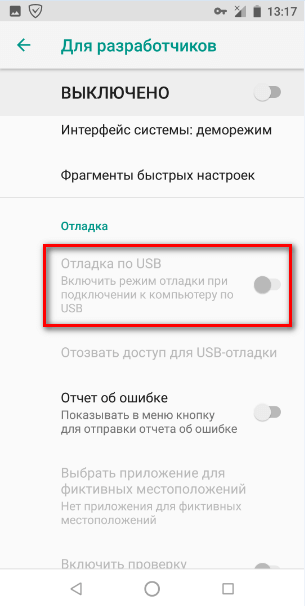
- В окне «Для разработчиков», напротив пункта настроек «Отладка по USB», передвиньте переключатель в положение «Выключено».
- Передвиньте переключатель в положение «Выключено».
Режим для разработчиков и режим «Отладка по USB» будут отключены этом гаджете.
Опция режима для разработчиков останется в настройках телефона. Чтобы убрать данный режим из настроек смартфона, потребуется сбросить настройки телефона до заводских, с удалением данных и программ. Другой вариант: режим разработчика пропадет, после установки на телефон обновления системы от производителя устройства.
Если будете сбрасывать устройство, заранее позаботьтесь о сохранности данных, например, выполнив синхронизацию с Google.
Выводы статьи
Если пользователя интересует вопрос, как включить режим отладки USB на Андроид, ему потребуется активировать режим для разработчиков в настройках телефона. В настройках режима для разработчиков сначала необходимо включить режим отладки по USB, а затем соединить компьютер и мобильный телефон с помощью USB кабеля. После этого, можно проводить необходимые работы на смартфоне или планшете.
Источник
How to Enable USB Debugging on Android Phone
With USB debugging, you can transfer data from Android to computer or install application with much convenience. However, when you buy a new Android phone, for example, HTC, Motorola, Samsung, Sony Xperia, Lenovo, LG, Google Nexus and so on, USB debugging is not on. After enabling USB debugging, you can connect Android smartphone to PC so as to back up data from devices to computers or drag and drop files to the phone as well.
Now the passage will be divided into 4 parts so as to show you the way to enable USB debugging for three different versions of Android operating system.
Part 1. Enable USB Debugging on Android 5.0 to 7.0
Enabling USB Debugging on Android such as Samsung Galaxy S8/S7/S7 Edge, LG G6, etc with the system of Android Lollipop/Marshmallow/Nougat is almost the same as that of Android 4.2.x:
Now, I will take a Samsung device as an example to show you the way to enable USB debugging with newer Android version.
Device Model Information:
Device Name: Samsung Galaxy S7 edge
Model Number: SM-G9350
Android Version: 7.0
Step 1 Open «Apps» on the home screen and select «Settings» app.
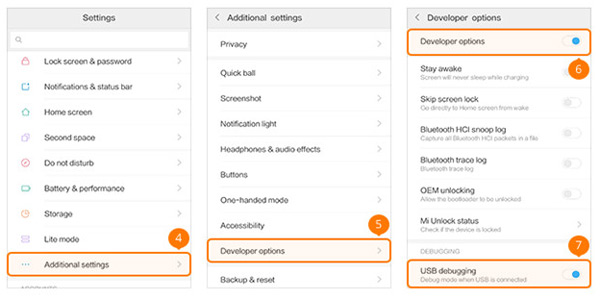
Step 2 Scroll down to the bottom and then tap on «Develop options».
Step 3 On the interface, you need to firstly swift on the button on the top. Then continue to scroll down the screen until you can see the «USB debugging» option. Turn it on and confirm your action on the pop-up window.

Part 2. Enable USB Debugging on Android 4.2 or Newer
For the newer Android operating system like Android 4.2 or later, for example, Samsung Galaxy S6/S5, you can enable USB debugging by the following steps:
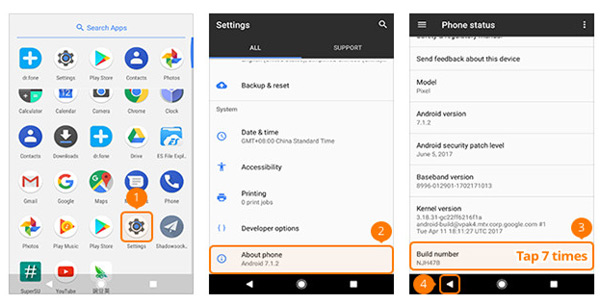
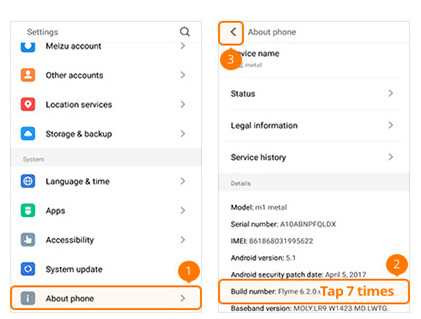
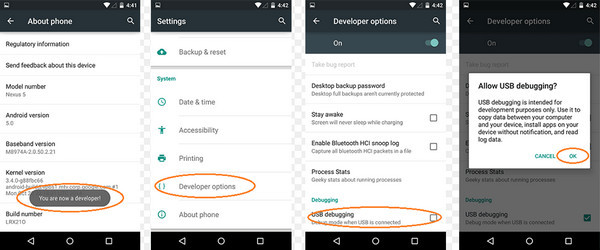
Step 1. Enter «Settings», then, click «About Phone».
Step 2. Tap «Build number» for 7 times until you get a note «You are under developer mode».
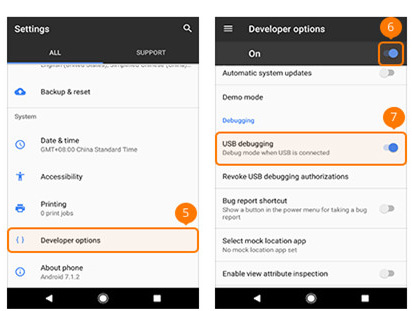
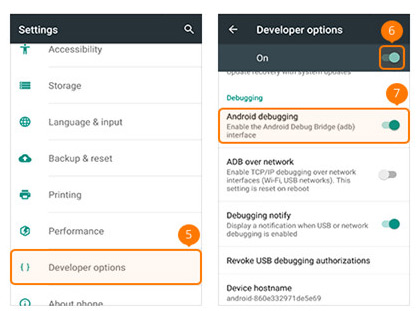
Step 3. Then back to «Setting», then, click «Developer options».
Step 4. The last step, tick «USB debugging»

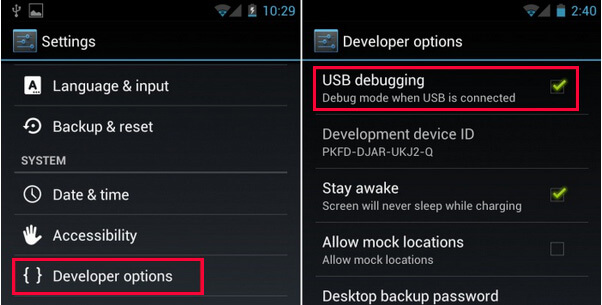
Part 3. Enable USB Debugging on Android 3.0 to 4.1
If your Android phone is Android 3.0 to 4.1, you can enable USB debugging by clicking «Settings > Developer options > USB debugging«

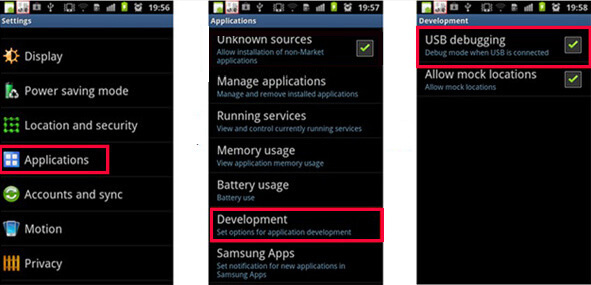
Part 4. Enable USB Debugging on Android 2.3 or Earlier
If you use Android 2.3 or the earlier version of Android, you can enable USB debugging as follow: «Settings» > «Applications» > «Development» > «USB debugging«

That’s it. The steps are quite simple, isn’t it? You can try it by yourself. You’ll find it useful if you have tried.
Related Articles
 Ivy Bruce
Ivy Bruce is the Founder and Editorial Director at Recovery-Android Studio. You can also find her on Google+ and Twitter.

How to Transfer Videos from Computer to iPhone
![]()
User Guide of Phone to Phone Transfer Software

How to Recover Deleted File from Motorola Atrix

How to Transfer Music from Computer to Nexus
Источник
How to Enable Android USB Debugging Mode
I want to let the software read the contact on my Android phone, but I don’t know how? Anyone can help?
There are different tools on Android that require enabling USB debugging mode to access internal data on Android. Then you can read your internal files or root Android phone with simple clicks.
1. What is USB Debugging Mode
In order to let the program or app read, copy or modify Android internal logs, your devices are required to enable the USB debugging mode to turn it on.

2. How to Enable USB Debugging
Depending on the Android devices, OS versions and installed utilities, you should check below detailed instructions.
How to Enable USB Debugging on Different Android Devices
1. How to Enable USB Debugging on Samsung
Samsung has released different models, you will be required different operations on Android devices properly.
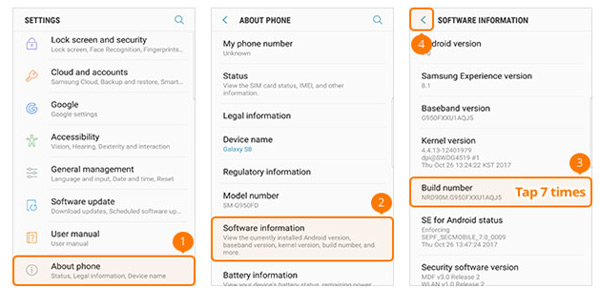
Step 1. Tap Settings > About phone > Software information, then tap Build number for 7 times.
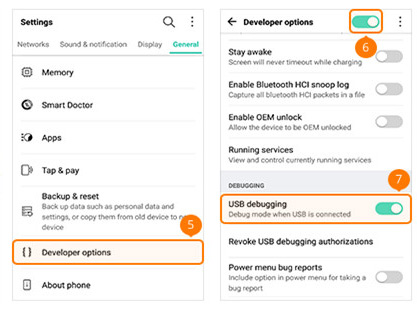
Step 2 . Back to Settings page, tap Developer options, then turn on the button on the top and enable USB debugging.
2 . How to Enable USB Debugging on Google Phone
Step 1. Open Settings app on Google phone, go to About phone, then tap Build number for 7 times.
Step 2 . Tap back button and locate Developer options, turn USB debugging on.
3 . How to Enable USB Debugging on HTC
Step 1. Launch Settings on HTC, tap About > Software information > More.
Step 2. Tap Build number for 7 times.
Step 3 . Tap back button and find Developer options, toggle on the button on the top and enable the button next to USB debugging.
4. How to Enable USB Debugging on Huawei
Step 1. Open Huawei phone, tap Settings app > About phone.
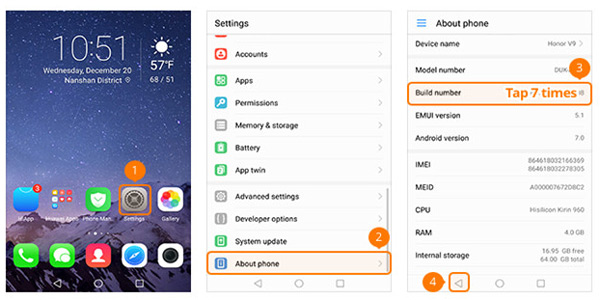
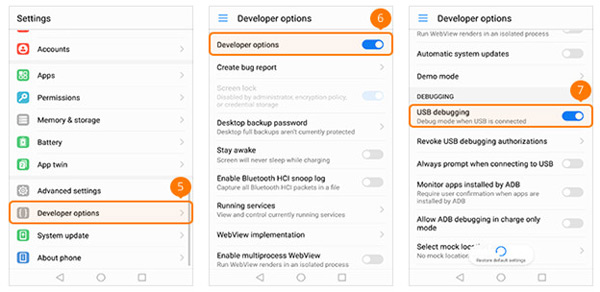
Step 2 . Find Build number and tap for 7 times, go back to locate Developer options, turn on the button next to Developer options.
Step 3. Toggle on USB debugging.
5 . How to Enable USB Debugging on LG
Step 1. Find Settings and tap to open it. Tap About phone > Software info.
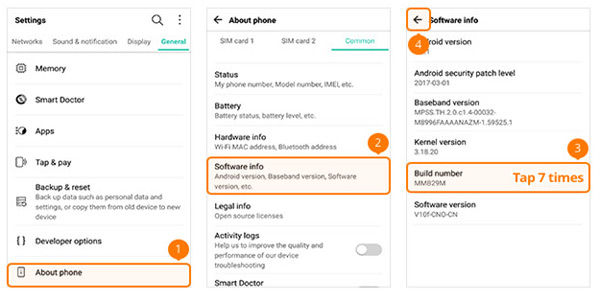
Step 2 . You can see the Build number, tap it for 7 times.
Step 3. Go back to find Developer options, turn the button on the top and USB debugging button on.
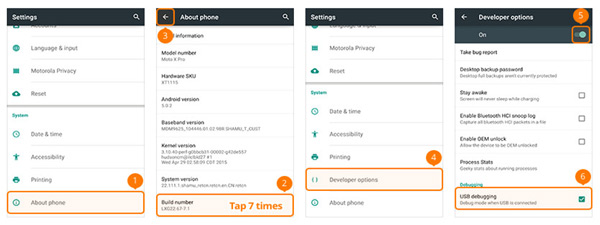
6 . How to Enable USB Debugging on Motorola
Step 1. Launch Settings on Motorola phone, then tap About phone, and tap Build number for 7 times.
Step 2 . Tap the back icon on upper-left corner, tap Developer options, check the box next to USB debugging.
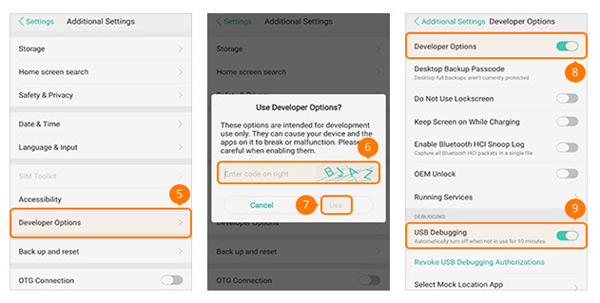
7. How to Enable USB Debugging on OPPO
Step 1. Open Settings on OPPO, tap About phone, then tap Versions for 7 times.
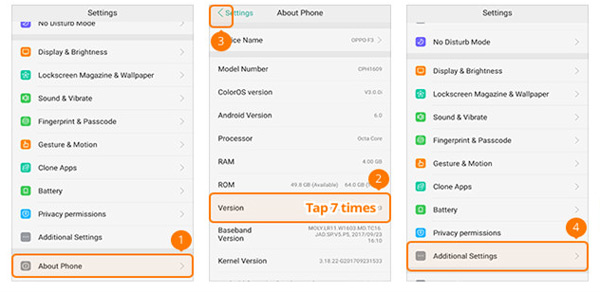
Step 2. Go back and find Additional Settings > Developer options. You will be required to enter the verification code and tap Use.
Step 3 . Enable Developer options and USB debugging.
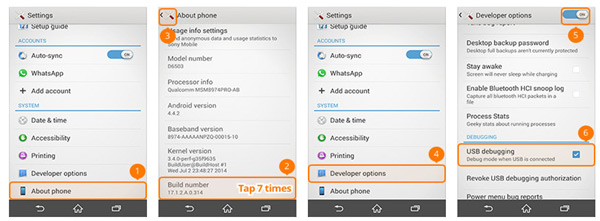
8 . How to Enable USB Debugging on SONY
Step 1. Go to Settings on SONY, hit About phone, then tap Build number for 7 times. Tap back icon.
Step 2 . Find Developer options, then turn on Developer options and USB debugging.
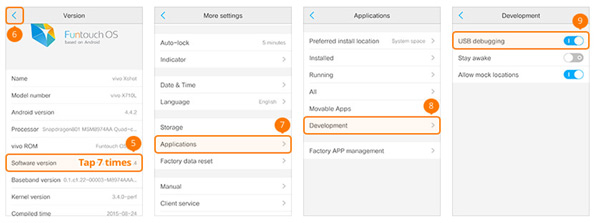
9 . How to Enable USB Debugging on Vivo
Step 1. Open VIVO Settings app, choose More settings > About > Version. Then hit Software version for 7 times.
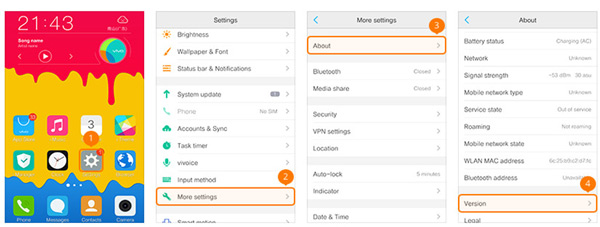
Step 2 . Go back to More settings interface, tap Applications > Development, toggle on the USB debugging and Allow mock locations.
10 . How to Enable USB Debugging on Xiaomi/Redmi
Step 1. Tap Settings > About phone, then locate MIUI version and tap it for 7 times.
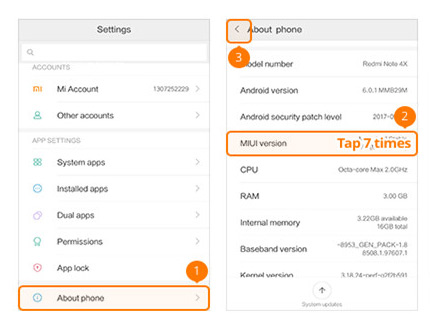
Step 2. Go back to Settings main page, hit Additional settings > Developer options, turn on Developer options, USB debugging and install via USB.
11 . How to Enable USB Debugging on OnePlus
Step 1. Go to Settings on OnePlus phone, choose About phone and tap Build number for 7 times.

Step 2 . Find Developer options and tap it, enable the button on the top and toggle on Android debugging.
12 . How to Enable USB Debugging on MEIZU
Step 1. Find MEIZU Settings app and open it. Tap About phone, and Build number for 7 times. Hit the back icon to Settings interface.
Step 2. Select Accessibility > Developer options, turn on Enable developer options and USB debugging.
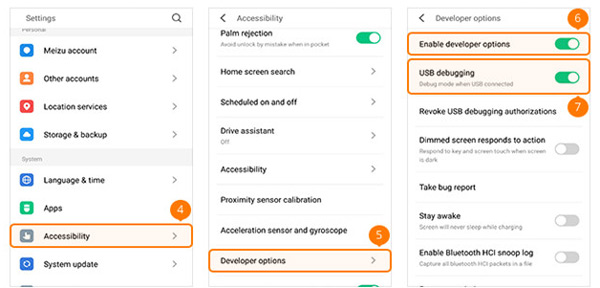
13 . How to Enable USB Debugging on Lenovo
Step 1. Go to Lenovo Settings app, select About phone > Device information, then tap Build number for 7 times. Go back to Settings interface.
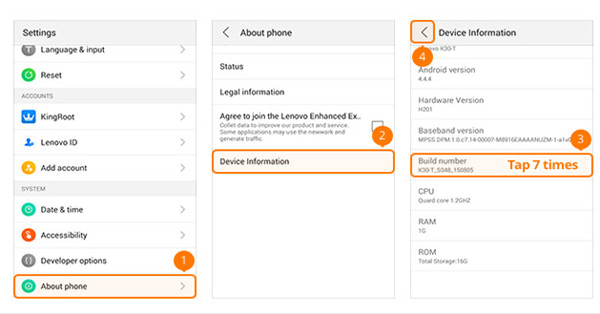
Step 2. Find Developer options and tap it, toggle Developer options and USB debugging on.
14. How to Enable USB Debugging on ASUS
Step 1. On your ASUS phone, tap Settings app, then tap Software information, find Build number and tap it for 7 times.
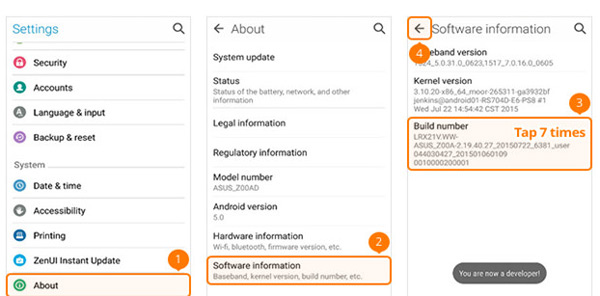
Step 2 . Go back to find Developer options and toggle it on, then turn on USB debugging.
15 . How to Enable USB Debugging on Nokia
Step 1. Open Nokia Settings app, tap System > About phone, tap Build number for 7 times.
Step 2 . Go back and find Advanced > Developer options > Enable USB debugging.В
16 . How to Enable USB Debugging on ZTE
Step 1. Go to ZTE Settings > Developer options, then tap Build number for 7 times.
Step 2 . Turn on Developer options and USB debugging on, tap OK when the window pops up.
It has become apparent to us that operations to enable USB debugging on different devices are almost the same with small differences. What’s more should you concerned about it? Keep moving.
How to Enable USB Debugging Mode on Different Android OS Versions
When asked about how to enable USB debugging mode, overwhelming majority of people think that they should have an idea about how to enable USB debugging on different devices. But another important point is how to enable USB debugging on different Android OS versions.
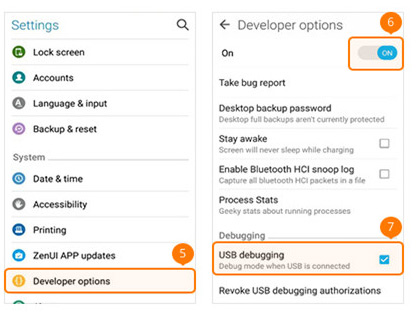
1 . How to Enable USB Debugging on Android 4.2 or later
Step 1. Go to Android phone Settings app, tap About phone > Build number, then tap it for 7 times.
Step 2 . Back to Developer options, check USB debugging and then tap OK button when it pops up.
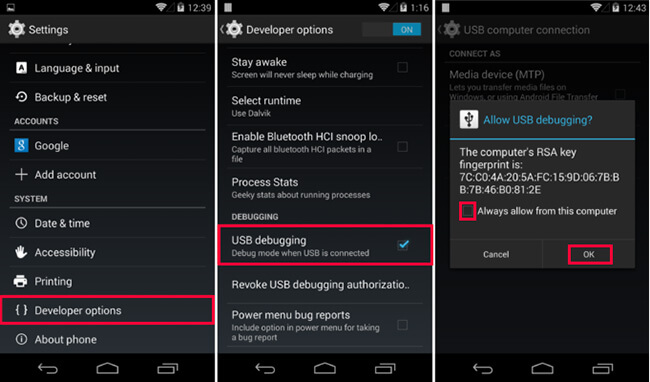
2. How to Enable USB Debugging on Android devices with the system 3.0 — 4.1
Step 1. Tap Settings > Develop options.
Step 2 . Find USB debugging and switch it on.
3 . How to Enable USB Debugging on Android 2.3 or earlier
Step 1. Tap Settings > Applications > Development.
Step 2 . Locate USB debugging and turn it on.
3. Advantages and Disadvantages of USB Debugging Mode
But you may ask, is it safe to enable USB debugging on my Android?
A study of advantages and disadvantages of USB debugging mode perhaps will make this point clear.
Advantages of USB Debugging Mode
- More easier to access contacts, messages, call logs, photos and more files on Android.
- You can unlock Android phone with ease.
- You are allowed to fix some issues which can not be fixed as usual.
- After enabling USB debugging, you can root your device.
Disadvantages of USB Debugging Mode
- Your personal information may be stolen easier.
- More junk files and apps will be stored on your phone.
That’s all about USB debugging mode. If you have more questions about it, please leave comments below.
Copyright В© 2021 FoneLab Studio. All rights reserved.
Источник


