- How to Enable USB Debugging Mode on Android
- First, you need to enable «Developer Options Menu».
- Now, you can enable USB Debugging mode.
- How to Enable USB Debugging Mode on Android
- How to Enable USB Debugging
- Disclaimer
- Android Pie (9.0)
- Android Oreo (8.0 and 8.1.0)
- Android Nougat (7.0, 7.1.1 and 7.1.2)
- Android Marshmallow (6.0 and 6.0.1)
- Android Lollipop (5.0 and 5.1.1)
- Android KitKat (4.4 and 4.4.4)
- Android Jelly Bean (4.1, 4.2.2 and 4.3.1)
- Android ICS (4.0 and 4.0.4)
- Android Gingerbread (2.3 and 2.3.6)
- Conclusion
- How To Enable USB Debugging On Your Android Phone
- Debugging Mode for Android
- Enable USB Debugging Mode On Your Android Mobile Phone Device
- Newer versions of Android (4.0+)
- Step 1
- Step 2
- Older versions of Android
- 79 Comments
How to Enable USB Debugging Mode on Android
The ways to enable USB Debugging mode, which is accounted for the key step in Android rooting process, vary from one Android version to another. USB Debugging is required by adb, which is used for rooting, backing up, installing a custom ROM, tacking screenshots from computer and more.
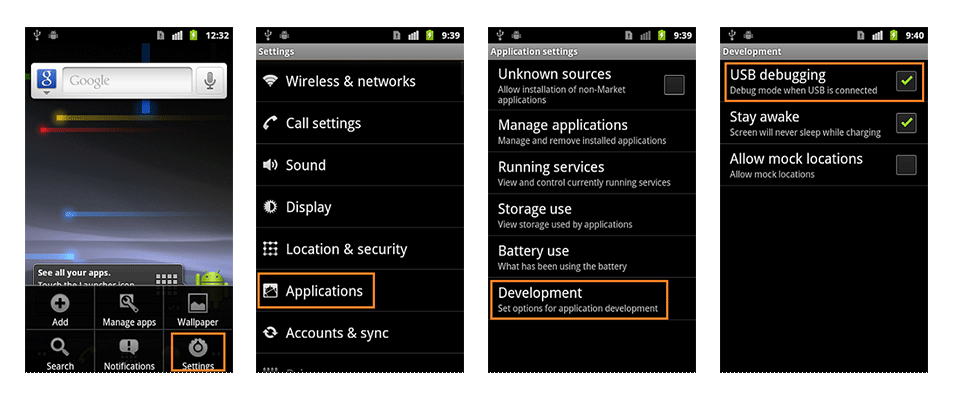
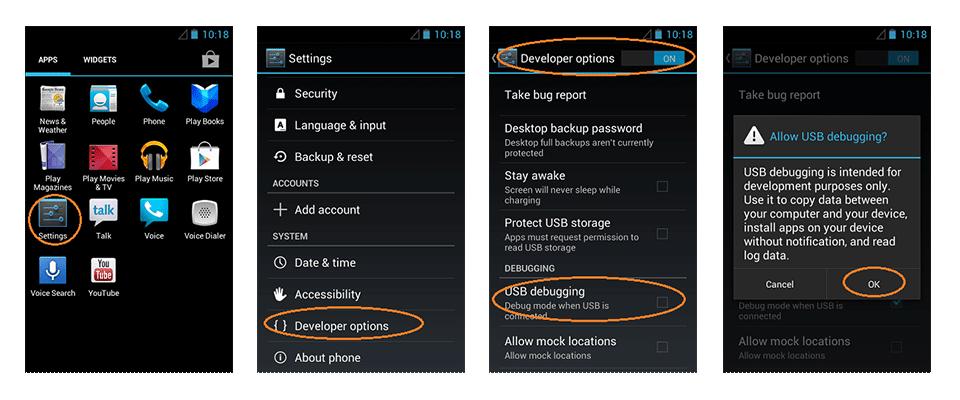
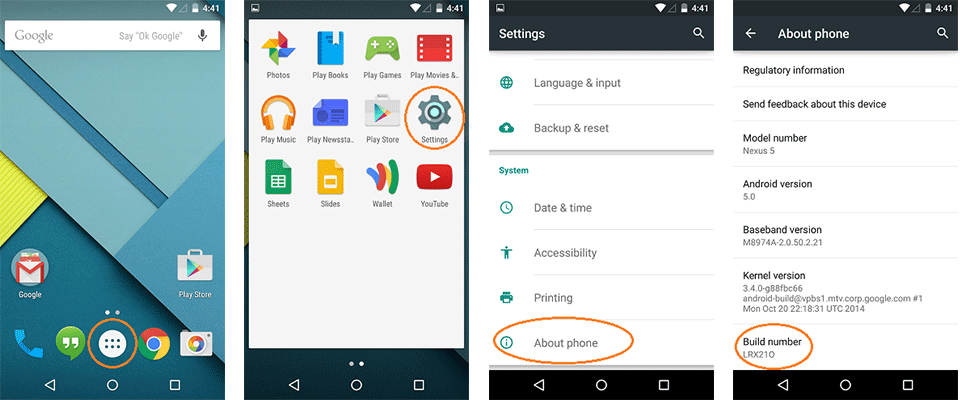
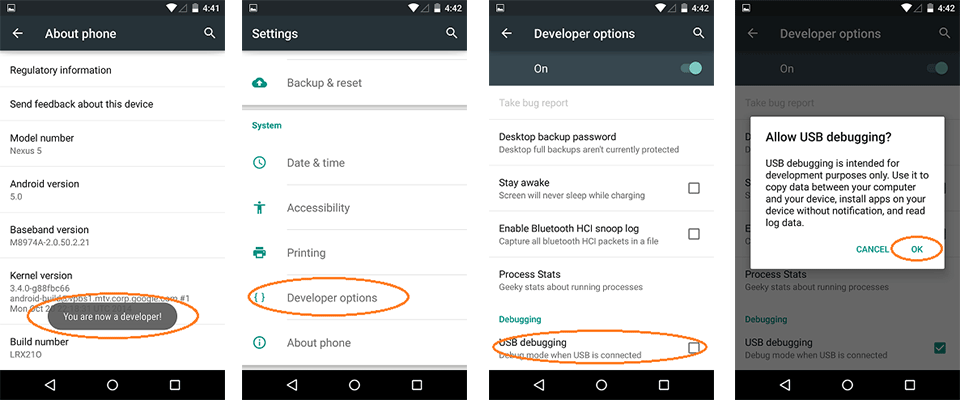
First, you need to enable «Developer Options Menu».
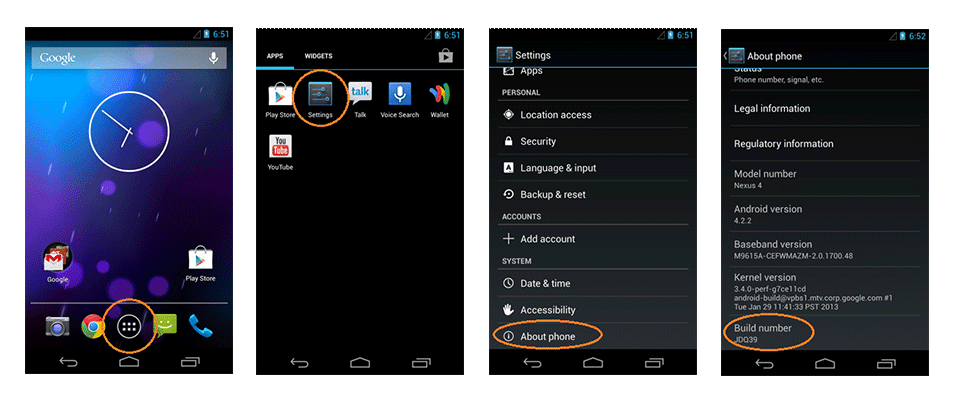
Now, you can enable USB Debugging mode.
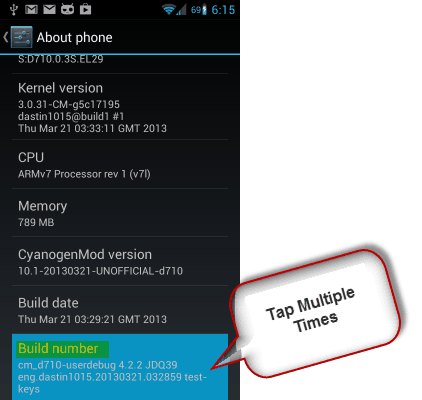
- Settings > About Phone > Build number > Tap it 7 times to become developer;

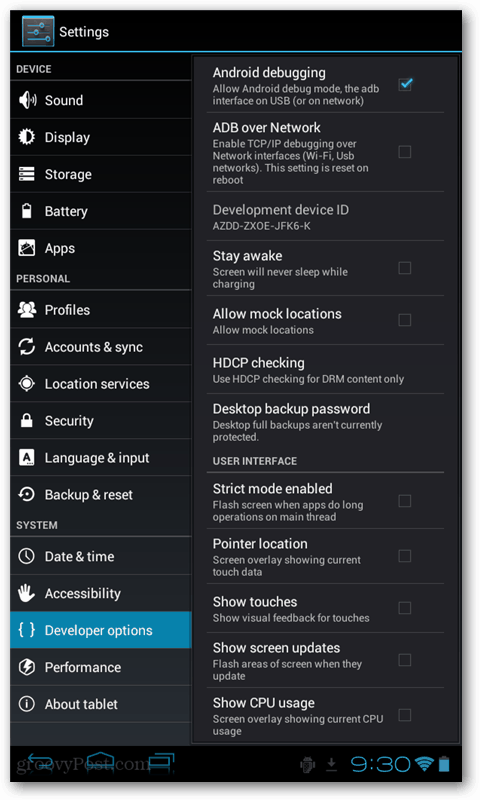
- Settings > Developer Options > USB Debugging.
Warning USB Debugging should only be enabled when you need it. Leaving it enabled all the time is kind of a security risk for that this mode grants you high-level access to your device. Say if you connect your Android phone to a USB charging port in a public location, the port could use the USB access to your phone to access data on your phone or install malware. This could happen when and only when USB debugging mode is enabled.
To disable USB Debugging and other developer options when you don’t need them, slide the switch at the top of the screen to OFF.
Источник
How to Enable USB Debugging Mode on Android
Enable USB Debugging mode on Android Pie, Oreo, Nougat, Marshmallow, or any version using our easy steps guide. Enable developer options and USB debugging from PC using this simple tutorial. USB Debugging (also called as Developer mode or Android debug mode) is used for the connection between Android device and your computer using Android SDK.
You can easily turn on the Developer options or the USB debugging on any Android smartphone including Samsung Galaxy phones, Google Pixel, Sony, Motorola, Xiaomi Redmi, Huawei, One Plus, Oppo, Vivo, HTC, Honor, Kindle fire, Asus, LG, Lenovo, Micromax and many more.
Using ADB command prompt window or few tricks, you can turn on the USB debugging mode on broken screen phone, hard bricked phone, dead phone, FRP locked phone, password locked, black screen phone, boot-loop phone, etc. In this guide, we’ll discuss the step-by-step procedure on how to enable USB debugging mode on any Android smartphone and tablets.
How to Enable USB Debugging
In this article, we’ll go through every Android OS version, and check how to enable USB debugging mode using easy steps.
Note: Android 11 and Android 10 has similar steps as Android 9.0 mentioned below.
Disclaimer
USB Debugging is intended for development purposes only. Enabling it grants high-level access to your device which is a kind of security risk. So it is recommended to enable it only when needed.
Android Pie (9.0)
USB debugging mode is available under the Developer options. But in Android Pie, the developer options are hidden. So firstly you need to unlock it to access the debugging mode.
- Open the apps panel on your phone and launch the Settings app.
- On the next screen, scroll down to the bottom and open the System.
- In System, open the About Phone section.
- Under the About Phone section, look for the Build number.
- Just tap on Build number 7 times. It’ll show you a countdown message saying, “You’re 4,3,2,1 steps away from being a Developer”.
- Tap on the Build number until it shows a message saying, ” You are now a developer”.
- As soon as you receive this message, the Developer options will get unlocked in your About Phone section.
- So go back in the About phone section, and click on the Advanced option.
- The advanced options will not be available on some phones, so those phones directly go to the next step.
- Look for the Developer options and open it.
- Under Developer options, you can find and enable USB debugging mode.
Note: To disable USB Debugging and other developer options, slide the switch at the top of the screen to OFF.
Android Oreo (8.0 and 8.1.0)
- Open the Settings of your phone.
- On the next screen, scroll down and open the System.
- Next, open the About phone section.
- Tap on the Build number 7 times until a message saying, “You are now a developer” appears.
- Go back and you’ll find the Developer option under the About phone section.
- Under Developer options, you’ll find the USB debugging.
Android Nougat (7.0, 7.1.1 and 7.1.2)
- In the Settings of your phone, open the About phone section.
- On the next screen, tap on the Build number 7 times until it says, “You are now a developer”.
- Go back in the Settings and open the Developer options.
- Look for the USB debugging mode to enable it.
Android Marshmallow (6.0 and 6.0.1)
- Open the About phone in your device settings.
- Just rapidly tap on Build number until you become a developer.
- Go back in settings and open the Developer options.
- Enable USB debugging mode.
Android Lollipop (5.0 and 5.1.1)
- Open Settings » About Phone/Device on your device.
- Tap 7 times on build number.
- Go back and open Developer options from Settings.
- Look for USB debugging mode and enable it.
Android KitKat (4.4 and 4.4.4)
- Navigate to Settings » About Phone » tap Build number seven times.
- Tap until you get a short pop-up in the lower area of your display saying that you’re now a developer.
- Go back and open the Developer options menu, check ‘USB debugging’ and click OK on the prompt.
Android Jelly Bean (4.1, 4.2.2 and 4.3.1)
- From the App drawer, open the Settings app.
- In the Settings, scroll down to the bottom and open About phone/device.
- On the next screen, locate the Build Number and tap on it seven times. This will activate the hidden developer option.
- Go back to Settings and click on developer options.
- Check the USB Debugging field to enable it.
Android ICS (4.0 and 4.0.4)
In Android ICS and below, the Developer option is not hidden and is available under the Settings.
- Open the Settings of your device.
- In settings, open the Developer option and tick the USB debugging option on the next screen.
Android Gingerbread (2.3 and 2.3.6)
In Android Gingerbread, the step to turn on the USB debugging mode is slightly different.
- From the app drawer, open the Settings.
- Click on Applications.
- On the next screen, click on Development.
- Under development, you’ll see the first option as USB debugging. Check it to enable and click OK on the prompt.
- This is how you can enable USB debugging on Android 2.3 Gingerbread OS.
Conclusion
Finally! This is how you can enable USB Debugging on your Android smartphone or tablet. If you face any issue while going through this tutorial, then do comment below.
Источник
How To Enable USB Debugging On Your Android Phone


Learning how to enable USB debugging mode is critical if you want to do anything useful with your Android Mobile Phone. This tutorial explains how to do it.
Are you interested in creating Android Apps, or maybe just running home diagnostics on your device? If so, one of the first things you’ll want to do is connect your phone to your computer. But to do this, it requires that you set up your phone and enable USB debugging mode accordingly. Let’s enable Debug Mode.
Note: Every manufacturer of Android devices varies. This article was written in 2010 and some things have changed but this should give you an idea of what to look out for.
Debugging Mode for Android
When paired with a computer running Android SDK (or another diagnostic program), Debug Mode can allow you to pull up all sorts of useful information about your phone. In the screenshot below I’m using the DDMS tool from the Android SDK to monitor where RAM is being used on my Samsung Galaxy S Android phone. But this is just one example of what you can do!

Enable USB Debugging Mode On Your Android Mobile Phone Device
Newer versions of Android (4.0+)
Step 1
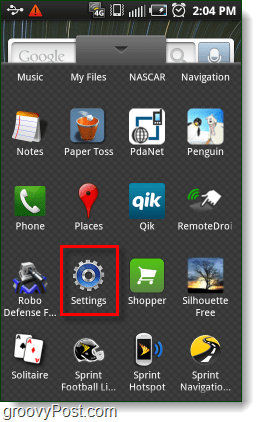
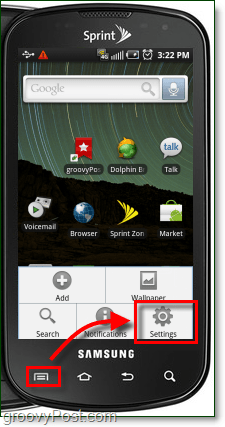
Launch the Settings app on your phone. This app can be found in your App Drawer, or by pressing the menu button on the outside of your device.

Step 2
In the Ice Cream Sandwich (4.0+) or a newer version of the Android OS, the System USB Debugging is now located under Developer Options > Android Debugging.
Done! That’s all there is to enable USB debugging in the new version of Android.
Older versions of Android
The same as above, except after entering the Settings menu you’ll need to enter Applications options.
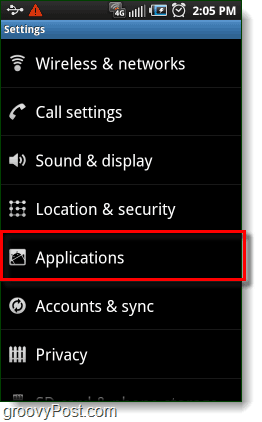
Next tap Development.

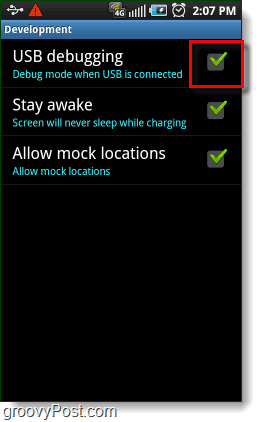
Check the box for USB debugging.
You can also Enable, Stay Awake, and Allow mock locations to make things easier when you are running tests.
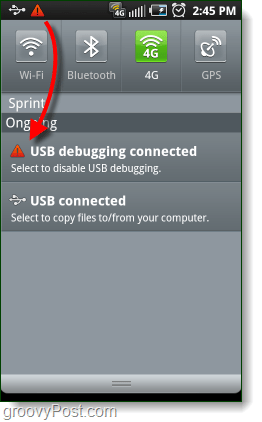
Your phone should now be in Debug Mode. If you go into the notification bar, you’ll find an Ongoing alert stating USB debugging connected. Note that even while USB debug mode is enabled you can still Mount your Android phone to your computer to transfer files without causing any problems!
79 Comments
Awesome – Is there a simple way to backup your phone this way also?
Thanks man totally worked!!
Yes, if your phone is rooted, Titanium Backup Pro is by far the best backup utility out there
Thank you, awesome it is so simple super.
hello there…!!1
i need to know if there is other ways that makes my android phone get in to hard reset mode because the three combination key wont work for me and i even tried to connect to mobogenie but how could i enable usb debug mode please help…. 1??
Thank you so much! Was really helpful;-)
i am locked out and cannot enable debbuging. not linked with google account and have no 3 button combi. “/ HEEEEEEEEEELPPPP need to master reset but adb wont connect to device, odin connects but hangs at file analysis. newB but im sure ive done EVERYTHING
@tanny I have the exact same problem, did you manage to do anything? Send me a reply pls if you found any solution. Any help would be appreciated
YES! i have my galaxy S working perfectly now 🙂 Go to youtube and Search Galaxy usb jig. when in download mode odin WILL flash but i just chose to reset. the youtube video does no justice for how fiddly the thing is to make, but it does work so be patient. dont buy a jig kit its only like 50pence to get all the bits you need.
please help bro .
your problem is now my problem
any solution please contact me
Excellent Dennis! Thanks for the feedback. I’m glad the article helped out!
Nice,, Thanks a lot.
Thanks for this info! I am using EasyTether Pro and I have a question. Once I check the box for ‘USB Debugging’ do I (and should I) leave this box check alway? Or should I manually check this box every time I go to use my EasyTether Pro app? Is there any danger in leaving the box for ‘USB Debuggin’ always checked?
Also, why wouldn’t something like USB Debugging be a default feature anyway?
Thanks for any help and information!
@Aaron,
Great feedback! To answer your question, once you check USB Debugging it should remain checked indefinitely. There are a few things that can disable it; certain apps, system updates, and total loss of battery life (in some cases).
There isn’t any danger in leaving USB debugging mode enabled, but the reason that it isn’t on by default is because it causes a lot of driver issues if you plug it into a computer. You’ll notice while USB debug mode is off that you can easily mount your phone as an external drive, enable (built-in subscription based) tethering, or just have it charge. With Debug mode on, you usually need to download/install an additional driver on your computer if you want to retain the same features.
USB debug mode also uses up more system resources on the phone, so if you need to use it while it is charging you might notice slower performance. But, most USB-based tethering apps need it enabled because it grants elevated access privileges.
Hope that helps. Thanks for the groovy question!
whenever i m trying to turn on USB debugging it restarts my phone & after the restart again debug mode is unchecked.. & same restarting thing is there… can’t connect my Phone to PC.. any solution
Can someone hack in your phone going through USB debugging. Is that what this is for. Do they need access to your phone to hack in it?
look at bet your bottom dollar on youtube the one with the guy in the mask
I have problem to log as debug mode even I have set the option to debug mode. It will still remain as USB storage, any advise on this? I am using Galaxy S, Android 2.3.3. Thanks.
Sir , Have you solved this problem ? Till now existing for me. If you got rid of this , pleaese show me the way.
i hope by now you have the issue resolved.two years down the line.
> i hope by now you have the issue resolved.two years down the line.
Yes – by buying a new phone with Android 4.1 (not because of the problem with USB debugging but because the old one had too small a memory and a lot of software doesn’t install on the SD card).
The new phone (Samsung Galaxy S II plus) has USB debugging switched OFF by default, which is what I want. Connecting it to the Win7-PC at home as a hard drive now works fine without having to switch off USB debugging manually every time.
Unfortunately, at work, where an old XP system without admin rights is installed, the PC does not find a driver for accessing the phone as a hard disk, so I cannot load pictures ONTO the phone (download of pictures still works with some XP-builtin camera app).
Older versions of Android like 2.3.3:
Task the following: Enter the Settings menu you’ll need to click Application options. Then click on development;you’ll see debug mode. Click on it….You should get it right now.
Is there a way to enable USB debugging with a broken screen?
Hi,
I don’t have the Development entry. What should I do ?
Android 2.3.4, kernel 2.6.32.9
infotmic “flytouch 3”
Thanks 🙂 Good Help
nice post. its really help for my Android IP Webcam.
Thanx a million Sir. It worked for my Samsung Galazy Note. Was struggling for a week. Wroked as a breeze..Thanx again.
You bet! And welcome to the groovyPost community!
I need a help with my phone Motorola XT531.
After its Rooted, i could move many apk files to SDcard and create a link file to place in the original folder.
So using this method was great.
But I dont remember exactly why, I guess I move motoswitch.apk from system/app and did not create de link to replace it.
So now i can not access the home and the worst the usb debug is not selected.
Does anybody know how can I enable it? Or use the Update.zip to restore just the system/app folder to the original place, because I’ve a original copy of it in the SDCard.
Thanks! Simple and easy to understand!
I have a Droid RAZR. Following your instructions it will not let me changer the USB debugging to USB charge. Can you help me.
Maybe you need to click some ones times on Adjust> About telephone> Compilation number
Just by switching off the USB debugging mode I resolved the issue tht had been driving me barmy.
Thanks for your help.
What issue were you having Geoff?
thanks for the post.
Like Geoff Berry, I need to switch *OFF* USB Debugging on my Samsung Galaxy Ace in order to connect it as a mass storage device to my PC.
The problem is that I have to do it every time again, which is a big hassle. Even when I have it switched off, as soon as I plug in the USB cable, it automatically switches on again, and I have to perform all the above steps again.
Do you know of a way of permanently switching OFF the USB debugging once and for all?
Thanks in advance.
Groooooveee Mannnnnnn! Yeah walked me right home, I love ya for this.
Thanks, was really helpful 🙂
NOT help
Have any ideas?
pls
Some time ago I was had a problem related some posts above tha was about I got blank screen after I had moved a system file.
So I asked for help on how to enable the usb debug without use settings menu, off course that was because if I got a blank screen i could not use settings menu.
So far I don’t know how to enable de usb debug, but the solution were this steps.
1 – Reset the cellPhone to default factory
2 – paste the missed file on the sdcard using a PC.
3 – using another phone send to you a sms and paste a link to an webmail.
4 – using a PC, send to yourself a link to the file posted on your sdcard described above using the webmail.
5 – turn on you phone, follow the initial setup screen.
6 – Your sms will be received and so click on the link, then the webmail will be launched.
7 – click on the link and select to install the missed file.
Doing this steps I solve my problems, good look to you.
thaanx. you are great!
Just great. Thanks!!
Once again, you are amazing!
dude… you literally saved my life…
The best post I have seen so far about USB debugging.
Well thank you very much!
For the last few days I have looked at debugging an Android phone or any indormation to connect an android phone. I have an HTC Magic which I received last Christmas from my son. He knows I like gadgets and buttons, it was an introduction to touch phone. I used it until some time in February and then on and off the next couple of months.
I have a very nice Nokia E5 which does GPS without going online and I can connect to the computer to transfer files and photos to my hearts content.
Now my needs from a mobile are that I can TXT, phone, take pictures and use the GPS.
Now the Magic, the camera pixels are less, the GPS you have to go online being Google, yes I can text and phone, but I cannot connect to the computer so I cannot upload Co-pilot which I bought. I have ticked the debug, and the phone tells me the software is up to date.
I am tempted to do a factory reset, do you know how dangerous that is, should I have the sim card out, it is the same card I use on my Nokia when I am fed up with the Magic.
By the way I live in rural France where mobile signals are optional, I am not a computer whiz but I get by and I am retired.
I’m not sure of what you’re tying to do. Co-pilot has a free android app which can be downloaded form the Google Play store. If you are trying to run the co-pilot Windows program on your phone that will not work, it only works on Windows computers.
If you purchased one of the area-specific premium Co-pilot apps from the Google Play Market, you don’t need USB debugging to transfer it to your phone. It should just be downloadable straight to your device. If the device isn’t listed as compatible, you can try forcing it by just transferring it to your device after mounting the SD.
Don’t forget to disable debug mode when its not in use. Leaving debug mode enabled is a security issue.
Источник


