The ways to enable USB Debugging mode, which is accounted for the key step in Android rooting process, vary from one Android version to another. USB Debugging is required by adb, which is used for rooting, backing up, installing a custom ROM, tacking screenshots from computer and more.
First, you need to enable «Developer Options Menu».
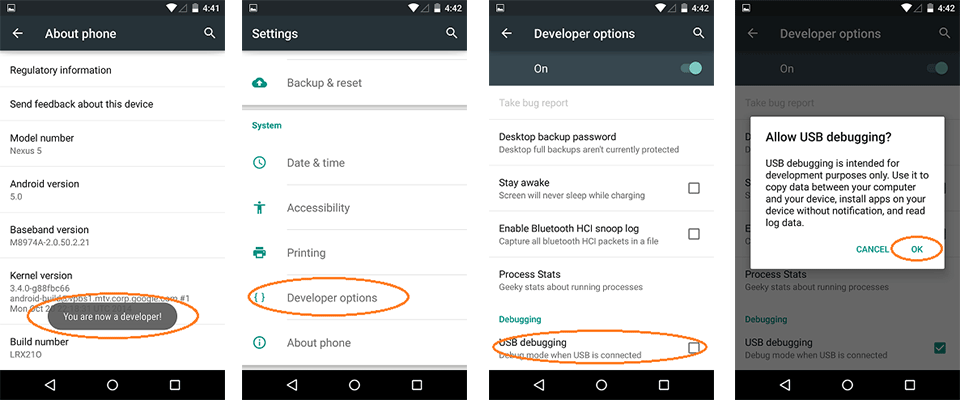
Tap the Build number field seven times to enable Developer Options. Tap a few times and you’ll see a countdown that reads «You are now 3 steps away from being a developer.»
When you are done, you’ll see the message «You are now a developer!».
Tap the Back button and you’ll see the Developer options menu under System on your Settings screen.
Now, you can enable USB Debugging mode.
Settings > About Phone > Build number > Tap it 7 times to become developer;
Settings > Developer Options > USB Debugging.
Warning USB Debugging should only be enabled when you need it. Leaving it enabled all the time is kind of a security risk for that this mode grants you high-level access to your device. Say if you connect your Android phone to a USB charging port in a public location, the port could use the USB access to your phone to access data on your phone or install malware. This could happen when and only when USB debugging mode is enabled.
To disable USB Debugging and other developer options when you don’t need them, slide the switch at the top of the screen to OFF.
Источник
Enabling USB Debugging on an Android Device
The steps to enable USB debugging depend on the version of Android running on the target device, as indicated in the following table:
Android Device
Instructions
Android 4.0 and newer (Jelly Bean)
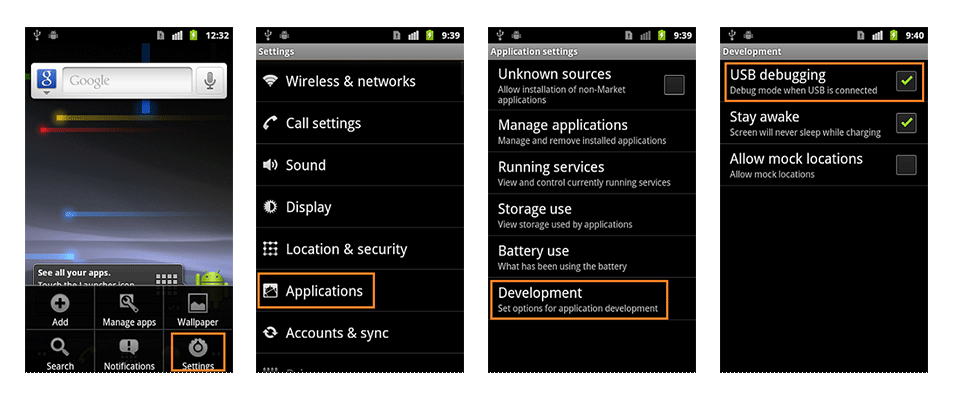
Enable the USB Debugging option under Settings > Developer options.
For Android 4.2 and newer, Developer options is hidden by default; use the following steps:
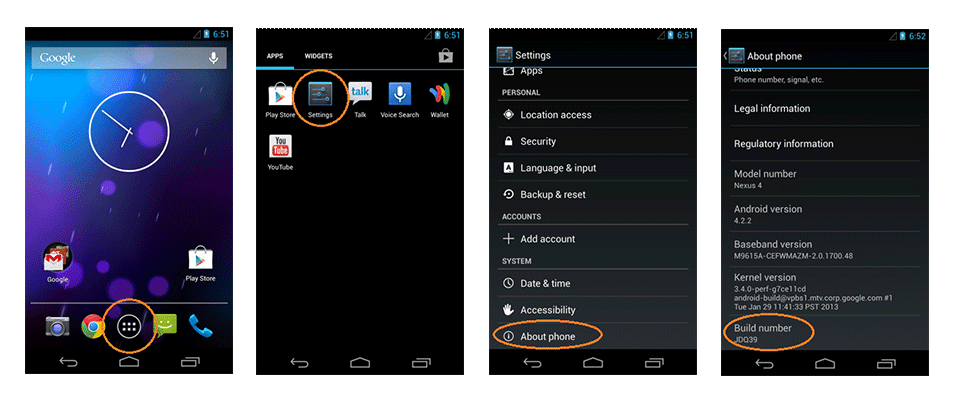
On the device, go to Settings > About .
Tap the Build number seven times to make Settings > Developer options available.
Then enable the USB Debugging option. Tip: You might also want to enable the Stay awake option, to prevent your Android device from sleeping while plugged into the USB port.
If you are running Windows 8, you must configure the USB connection as Camera (PTP). Depending on your Android version, you must do either of the following:
Drag down the status bar, tap Connected as under Notifications, and select Camera (PTP).
Go to Settings > Storage > Menu > USB computer connection, and select Camera (PTP).
Kindle Fire devices
Select Settings > Security and set Enable ADB to On. For more information, see the Amazon documentation.
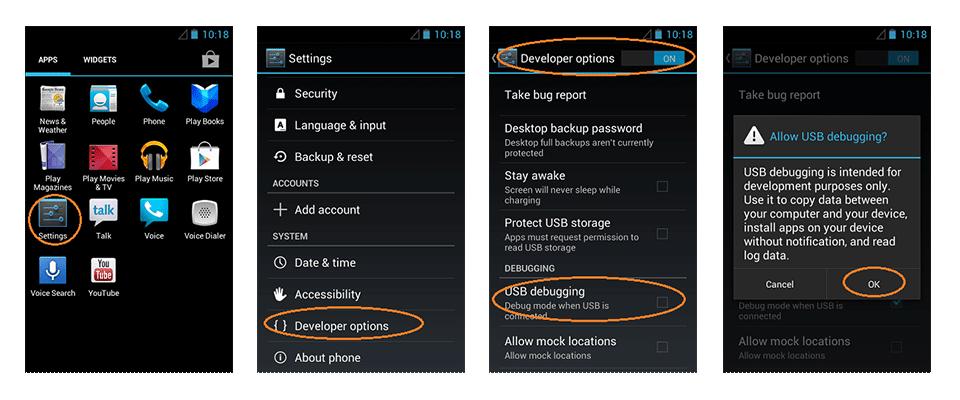
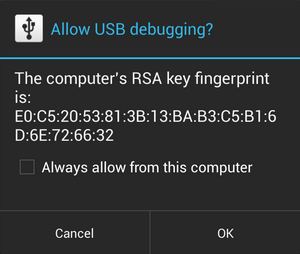
If you are running Android 4.2.2 or later, you may see the following dialog when you connect your device to your PC running RAD Studio:
Click OK to allow USB debugging on your PC. If you accidentally click Cancel, disconnect your device from your PC and connect it back to make the dialog show up again on your device.
Источник
Enabling USB Debugging on an Android Device
The steps to enable USB debugging depend on the version of Android running on the target device, as indicated in the following table:
Android Device
Instructions
Android 4.0 and newer (Jelly Bean)
Enable the USB Debugging option under Settings > Developer options.
For Android 4.2 and newer, Developer options is hidden by default; use the following steps:
On the device, go to Settings > About .
Tap the Build number seven times to make Settings > Developer options available.
Then enable the USB Debugging option. Tip: You might also want to enable the Stay awake option, to prevent your Android device from sleeping while plugged into the USB port.
Kindle Fire devices
Select Settings > Security and set Enable ADB to On. For more information, see the Amazon documentation.
If you are running Android 4.2.2 or later, you may see the following dialog when you connect your device to your PC running RAD Studio:
Click OK to allow USB debugging on your PC. If you accidentally click Cancel, disconnect your device from your PC and connect it back to make the dialog show up again on your device.
Troubleshooting
If your Android device is not correctly detected by RAD Studio or the system Device Manager, follow the steps above to verify that USB debugging is enabled.
For general information about development setup for Android devices, see the Android documentation.
Источник
Knowledge about USB Debugging Android
What is USB debugging? How do I enable USB debugging? Just follow the manual instructions in our guide, and you’ll be a master in no time.
(Recommended: Mirror Android phone after USB debugging? Tenorshare Phone Mirror can easily display Android screen on PC in real-time.)
Free Download For Windows 11/10/8.1/8/7
Part1
What is USB Debugging Android?
Part2
How to Enable USB Debugging?
Part3
How to Turn off USB Debugging?
What is USB Debugging?
In a word, USB debugging is a way for an Android device to communicate with the Android SDK (Software Developer Kit) using USB connectivity. It permits an Android device to communicate with computers directly, thus the Android device can receive terminal commands, files, etc. from the computer, and the computer can pull crucial information like log files of the Android device.
Why I need to enable USB Debugging Mode?
USB debugging mode grants you high-level access to your device. It is important when you need system-level clearance, such as coding a new app, transferring data between an Android device and the computer, mirroring Android to PC, rooting your device, flashing firmware with ADB commands, and reading log data of the Android device.
How to Enable USB Debugging on Android?
The steps to enable USB debugging depend on the version of Android and vary from the Android device brand to brand. If you are not sure about how to enable USB debugging on Samsung, Huawei, Xiaomi, HTC, LG, etc., follow the quick guide given below.
How to Enable USB Debugging on Samsung Devices
Step 1: Unlock your phone and go to «Settings» and select «About phone».
Step 2: Choose «Software information» and tap «Build number» about seven times until you see a message saying «Developer mode has been enabled».
Step 3: Go back to Settings and the «Developer options» menu is now under Settings.
Step 4: Enter «Developer options» and turn on the «USB debugging» button.
Step 5: If you see a messages «Allow USB Debugging», click «OK». Now you have enabled debugging on your Samsung Galaxy successfully.
Step 1: On your Samsung Galaxy S7/S7 Edge. Head to «Settings» > «About phone» > «Software info».
Step 2: Tap «Build number» several times until you see a message that says «Developer mode has been enabled».
Step 3: Go back to Settings and the «Developer options» menu is now under Settings.
Step 4: Enter «Developer options» and enable «USB debugging» option.
Step 5: When you connect your Samsung phone to computer using a USB cable, you will see a message «Allow USB debugging» for connection, click «OK».
Step 1: On your device, head to «Settings» > «About device» (About phone for S5).
Step 2: Scroll down and tap «Build number» several times until you see a message that says «Developer mode has been enabled».
Step 3: Go back to Settings and the «Developer options» menu is now under Settings.
Step 4: Select «Developer options» and enable the USB debugging option.
Step 5: Now you can connect your device to a desktop computer via USB and you will see a message «Allow USB debugging» for connection, click «OK».
Step 1: Turn on your Samsung Galaxy Note 10/9/8. Head to «Settings» > «About phone» > «Software information».
Step 2: Tap «Build number» about seven times and you will see a message saying «Developer mode has been enabled».
Step 3: Select on the Back button and tap on «Developer options» under Settings.
Step 4: Slide the «Developer Options» button to «On» and turn on «USB debugging». If prompted, tap OK to confirm.
Step 1: Unlock your phone and go to Settings > About device > Software info.
Step 2: Scroll down the screen and tap «Build number» several times until you see a message that says «You are now a developer! /Developer mode has been enabled».
Step 3: Go back to Settings. Tap on «Developer option» and drag the switch to right to turn it on.
Step 4: Under developer option, enable «USB debugging» and you will see a message “Allow USB debugging” when you connect your phone to the computer.
How to Enable USB Debugging on HUAWEI Devices
Step 1: Head to «Settings» > «About phone» at the bottom of the interface.
Step 2: Tap «Build number» about seven times until you get the prompt «You are now a developer!».
Step 3: Go back to setting and you can see the «Developer options», select Developer options.
Step 4: Turn on the “USB debugging”, and you have debugged your Huawei Mate 7 or Huawei Mate 8 successfully. Remember to tap «OK» to allow USB debugging when connect your Huawei phone to computer with the USB cable.
Step 1: Go to «Settings» > «About phone».
Step 2: Find «Build number» and tap seven times on it until you get a message saying that «You are now a developer!».
Step 3: Return to Settings and the «Developer options» menu in now under Settings. Select Developer options.
Step 4: Enter «Developer options» and slide to turn «USB debugging» on.
Step 5: After that, when connect your Huawei phone to computer via USB cable you will see a message «Allow USB debugging». Click «OK» to allow a connection.
Step 1: Unlock your phone and go to «Settings» > «About phone».
Step 2: Tap «Build number» seven times until you see a message saying that » You are now a developer!».
Step 3: Now you have enabled developer option. Go back to settings and you will see «Developer options» under Settings.
Step 4: Enter «Developer options» and slide to turn on the «USB debugging».
Step 5: Now you have successfully debugged your Huawei Honor 6/7/8. Next time when you connect your phone to computer using a USB cable and see a message «Allow USB debugging», click «OK» to allow a connection.
Источник
How To Enable USB Debugging Mode On Android Device
If you want to run an android app automation test using Appium on a physical Android device such as a phone or pad, you need to first enable USB debugging mode in your physical Android device and then connect it with your PC using a data line. Below are steps about how to do that.
1. Step-1: Enable Developer Options.
Below steps are the prerequisites before you can enable USB debugging mode on an android device. If you have already done this step before, then you can go to step 2 directly.
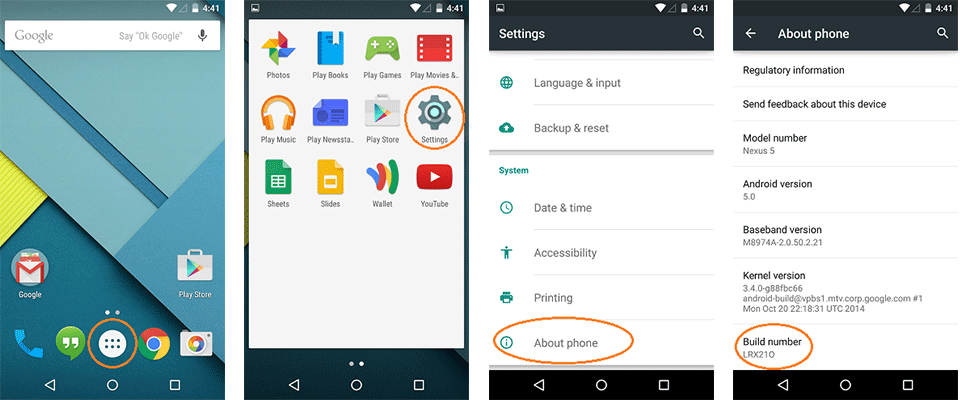
Click the Settings icon on the android OS main screen.
Scroll down in the Settings menu list, check whether there is a menu named ” Developer options ” at the bottom above the About phone menu item, if you can see that option you can type it to disable or enable it. If you can see that option, it also means you have done step-1 before, you can skip step-1 and go to step-2 directly. In my example, I can see that option because I had enabled it before.
If you can not see the ” Developer options ” menu, you should go to the ” About phone ” menu and tap it. The About phone menu is located at the bottom of the Settings menu list.
Scroll down to the ” Build number ” menu item in the ” About phone ” menu list.
You need totally tap seven times on the ” Build number ” menu item, after the first three-tap, it will popup message show you something like ” If you continue tap twice or more you will be a developer “, keep typing until you see another message like ” You are now a developer! “.
Then go back to the Settings menu list, you can see the ” Developer options ” menu item in it.
2. Step-2: Enable USB Debugging Mode.
After enabling the ” Developer options ” menu in step-1, you can enable USB debugging mode now. But what I want to remind you of is that do not make your android phone or pad in USB debugging mode always, just enable it when you needed. There are security risks in that mode because it permits high-level operation on your android device. So to make your android device ( phone or pad ) safe, you should disable this option immediately after you use it.
Type on the ” Developer options ” menu item in the Settings menu list.
Check the ” USB debugging (Debug mode when USN is connected)” checkbox to enable it.
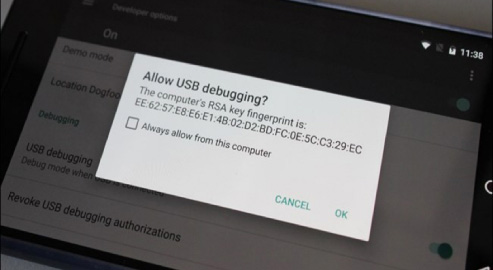
It will prompt you to ask whether ” Allow USB debugging ” or not, click the OK button.
The detailed message of the Allow USB debugging? popup dialog is as below.
Now the USB debugging mode has been enabled completed successfully.
3. Step 3: Check Whether Device Is Connected With PC Properly.
Use a USB line to connect your android device with the PC, then you can run the below dos command to verify that the android device in USB debugging mode is connected with the PC properly.
Open dos window.
Execute command ” adb devices ” in the dos window. Then you can see the connected android devices list.
If you can not see any device, maybe it is because of a connection issue or you do not enable USB debugging mode correctly. The most possible reason is that you do not install your android device’s USB driver correctly on your PC. Below are some general android device’s USB driver provider links.
Click here to download the Samsung device USB driver, Click here to download the Lenovo device USB driver, Click here to download the HTC device USB driver. Otherwise, you can go to your phone’s manufacturer’s website to download related USB drivers.
4. Install Google USB Driver In Android SDK Manager.
If you really can not find the correct USB driver for your android device, you can install google’s default USB driver, it can be used to install some android devices.
Launch Android Studio, click the ” Tools —> Android —> SDK Manager ” menu item.
In the pop-up dialog, click Appearance & Behavior —> System Settings —> Android SDK on the left side, then click the SDK Tools tab on the right side, then check the ” Google USB Driver ” checkbox, click Apply button. Then click the Finish button in the next dialog to complete the install.
Click the Windows Start menu, input “device manager” in the windows command input box. Press Enter key.
In the Device Manager window, right-click your portable devices in the path Laptop —> Portable Devices —> Nexus 7 (your portable device).
Click the Properties menu item in the above popup menu list. It will open the detail properties dialog with the title Nexus 7 Properties. Click the Driver tab, then click the ” Update Driver… ” button.
Browse to the Google USB driver saved directory. Commonly you can find the driver in your android SDK installation directory like C:\Users\Jerry\AppData\Local\Android\sdk\extras\google\usb_driver .
After installing google provided USB driver, you can see the connected android device uses adb devices command in the command line.
Now you can run a native android app automation test in your physical android device using Appium and selenium webdriver, we will introduce that in later articles.