- If you forgot your iPhone passcode
- Step 1: Make sure that you have a computer (Mac or PC)
- Step 2: Turn off your iPhone
- Step 3: Put your iPhone in recovery mode
- Step 4: Restore your iPhone
- Need more help?
- Use a passcode with your iPhone, iPad, or iPod touch
- Set up a passcode
- Change your passcode or passcode settings
- Get help
- If an alert says to change your passcode or you can’t adjust your passcode settings
- If you forgot your passcode
- Question: Q: Enter Old Passcode
- All replies
- Забыл пароль ограничений iPhone — что делать
- Забыл пароль ограничений iPhone — что делать
- 116 комментариев
If you forgot your iPhone passcode
Forgot your iPhone passcode? Learn how to get your iPhone into recovery mode so you can erase it and set it up again.
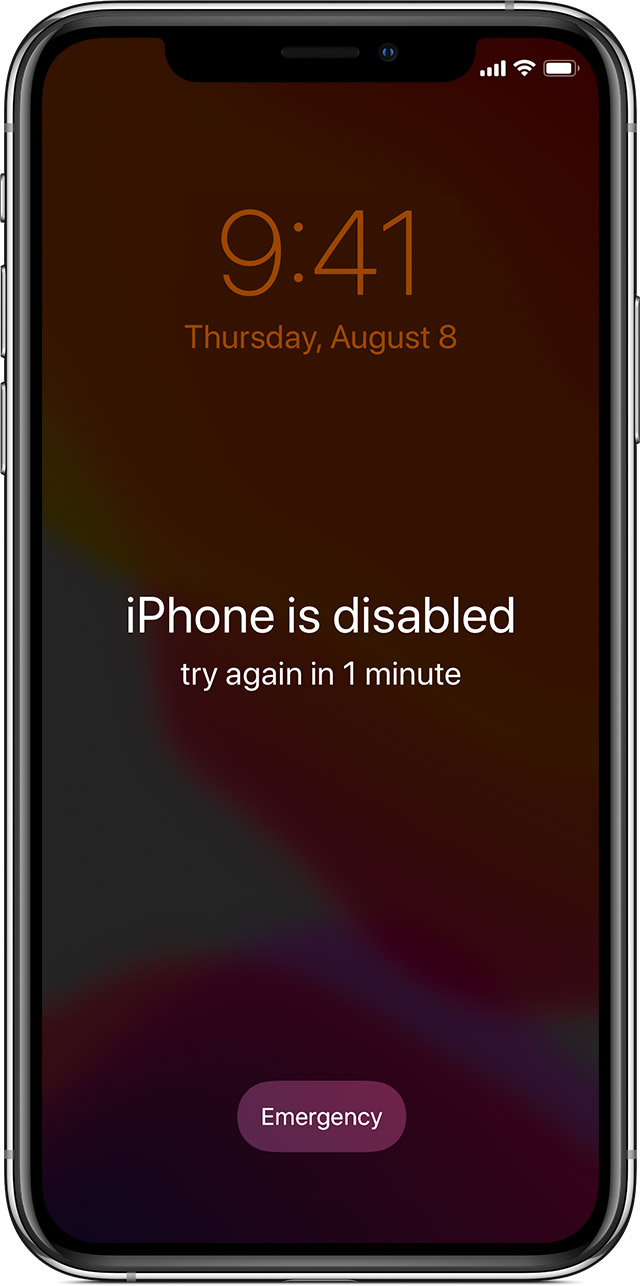
If you enter the wrong passcode on your iPhone Lock Screen too many times, an alert lets you know that your iPhone is disabled. If you can’t remember your passcode when you try again, you need to use a computer to put your iPhone in recovery mode. This process deletes your data and settings, including your passcode, giving you access to set up your iPhone again.
After you erase your iPhone, you can restore your data and settings from backup. If you didn’t back up your iPhone, you can set it up as a new device and then download any data that you have in iCloud.
![]()
Step 1: Make sure that you have a computer (Mac or PC)
This process requires a Mac or PC. If you’re using a PC, make sure that it has Windows 8 or later, and that iTunes is installed. You also need the cable that came with your iPhone, or another compatible cable, to connect your iPhone to the computer.
If you don’t have a computer and you can’t borrow one, you need to go to an Apple Retail Store or Apple Authorized Service Provider for help.

Step 2: Turn off your iPhone
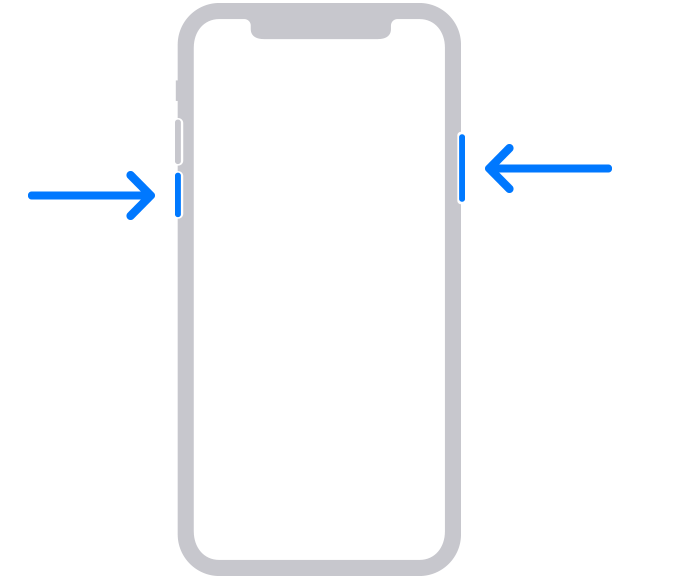
- Unplug your iPhone from the computer if it’s connected.
- Turn off your iPhone using the method for your iPhone model:
- iPhone X or later, iPhone SE (2nd generation), iPhone 8, and iPhone 8 Plus: Press and hold both the Side button and the Volume down button until the power off slider appears.

- iPhone 7 and iPhone 7 Plus: Press and hold the Side button until the power off slider appears.
- iPhone SE (1st generation), and iPhone 6s and earlier: Press and hold the Side (or Top) button until the power off slider appears.
- iPhone X or later, iPhone SE (2nd generation), iPhone 8, and iPhone 8 Plus: Press and hold both the Side button and the Volume down button until the power off slider appears.
- Drag the slider to turn off your iPhone, then wait a minute to make sure that it turns off completely.

Step 3: Put your iPhone in recovery mode
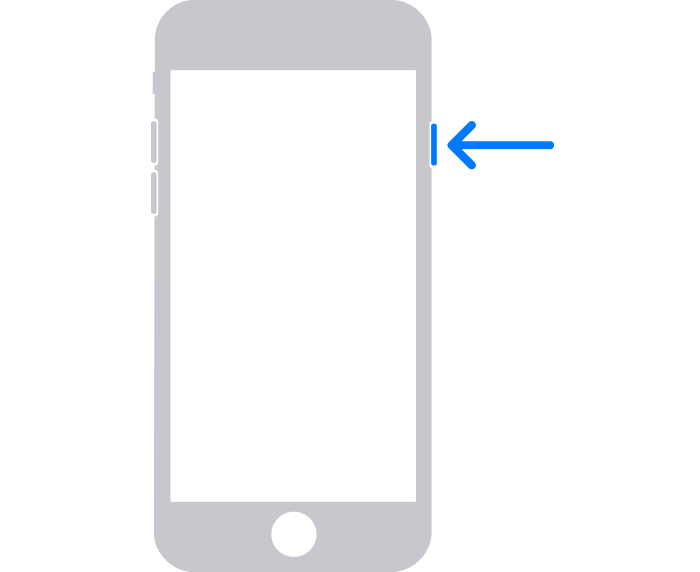
- Get ready by finding the button on your iPhone that you’ll need to hold in the next step:
- iPhone X or later, iPhone SE (2nd generation), iPhone 8, and iPhone 8 Plus use the Side button.
- iPhone 7 and iPhone 7 Plus use the Volume down button.
- iPhone SE (1st generation), and iPhone 6s and earlier use the Home button.
- Press and hold the correct button for your iPhone while immediately connecting your iPhone to the computer. Don’t let go of the button.
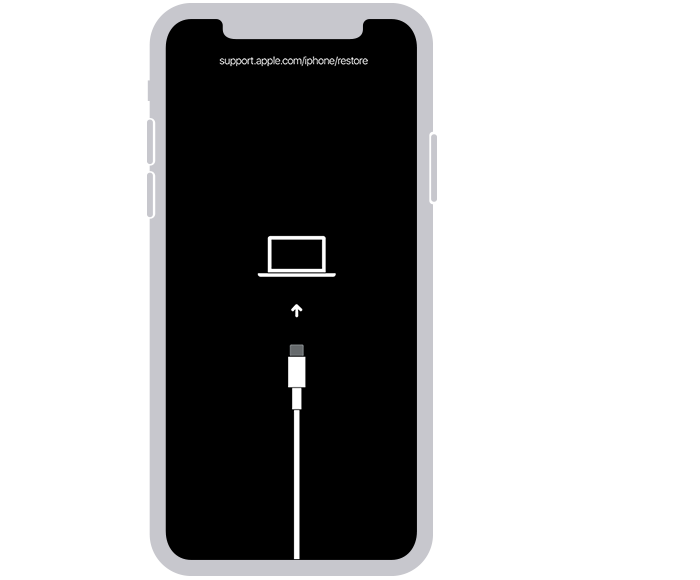
- Keep holding the button until you see the recovery mode screen on your iPhone, then let go.
If you see the passcode screen, you need to turn off your iPhone and start again.
If you can’t get your iPhone to show the recovery mode screen and you need help, contact Apple Support.
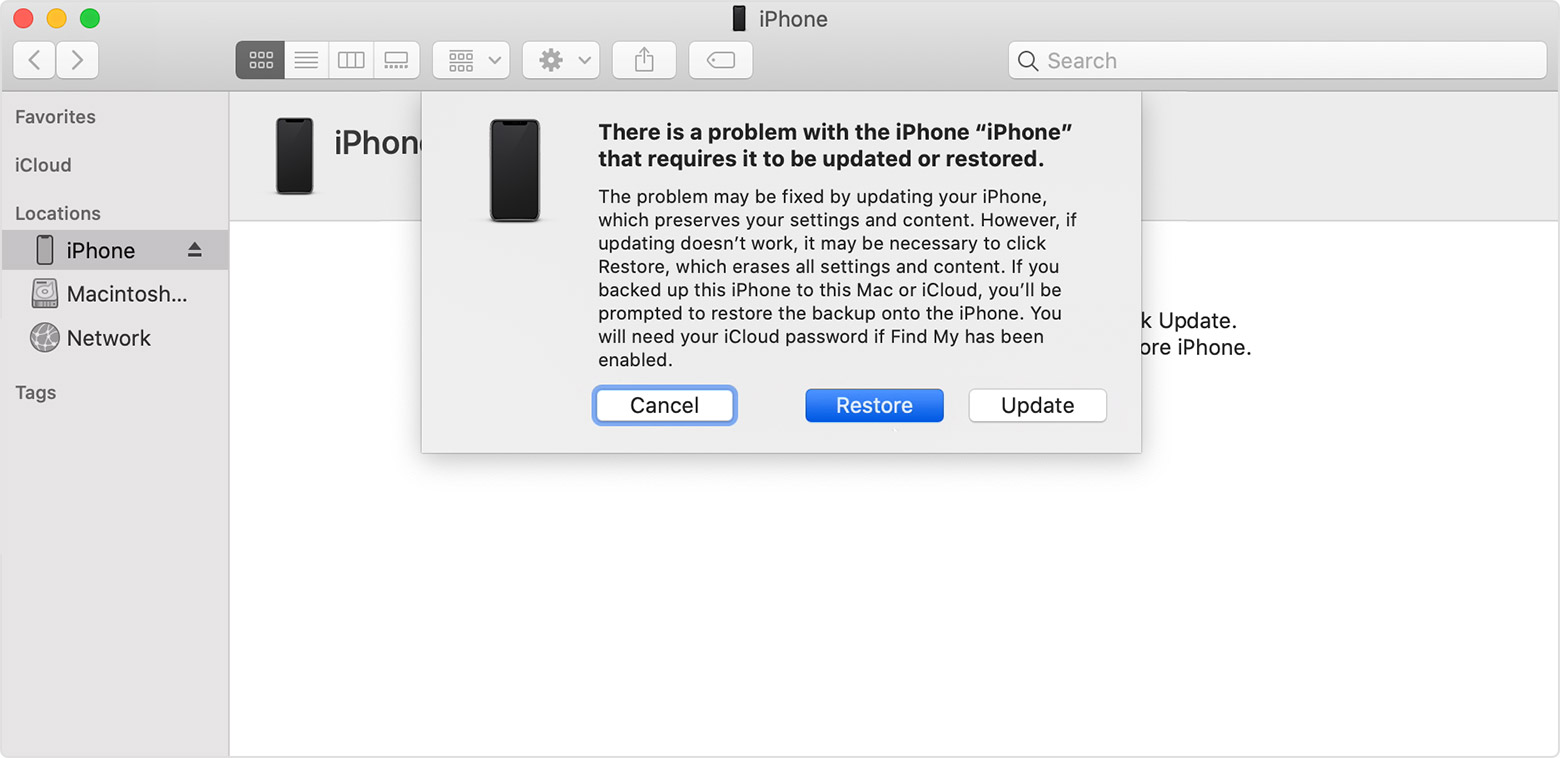
Step 4: Restore your iPhone
- Locate your iPhone in the Finder or in iTunes on the computer that it’s connected to. (Learn how to find your connected iPhone.)
- Choose Restore when you see the option to Restore or Update. Your computer downloads software for your iPhone and begins the restore process. If the download takes more than 15 minutes and your device exits the recovery mode screen, let the download finish, then turn off your iPhone and start again.
- Wait for the process to finish.
- Disconnect your iPhone from the computer, then set up and use your iPhone.
Need more help?
If you can’t complete any of these steps, if you’re still prompted for a passcode, or if you need any other assistance, contact Apple Support.
Источник
Use a passcode with your iPhone, iPad, or iPod touch
Learn how to set, use, and change a passcode on your iPhone, iPad, or iPod touch.
Set a passcode on your device to help protect your data. If your device supports Touch ID, you can often use your fingerprint instead of your passcode. If your device supports Face ID, you can use face recognition instead of your passcode. Your device will require your passcode when you do the following:
- Turn on or restart your device
- Press the Home button or swipe up to unlock your device (you can change this)
- Update your software
- Erase your device
- View or change passcode settings
- Install iOS or iPadOS Configuration profiles
![]()
Set up a passcode
Change your settings
Get help with passcode
Set up a passcode
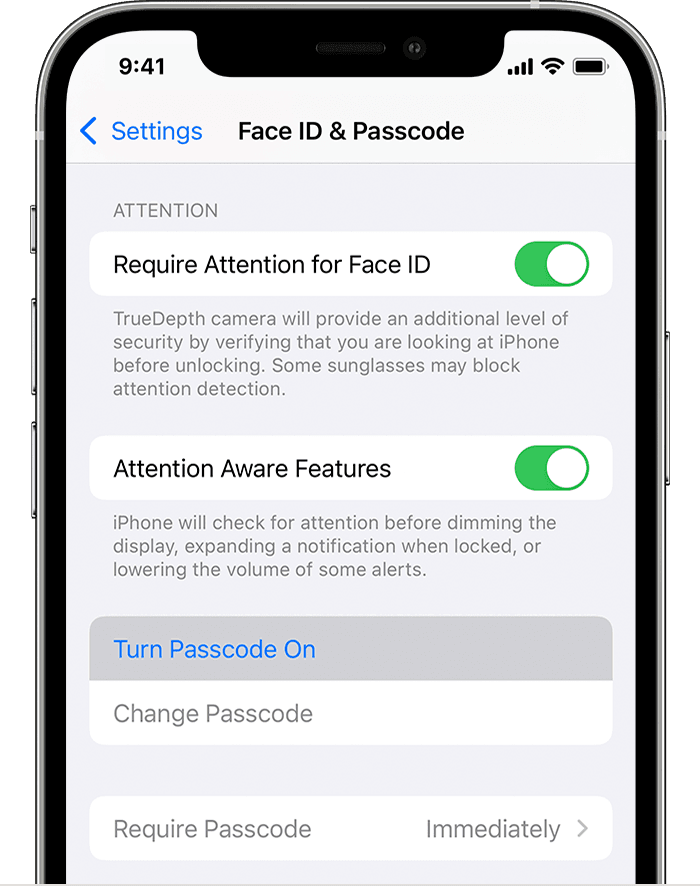
- On iPhone X and later, or iPad with Face ID, go to Settings > Face ID & Passcode. On earlier iPhone models, go to Touch ID & Passcode. On devices without Touch ID, go to Settings > Passcode.
- Tap Turn Passcode On.
- Enter a six-digit passcode. Or tap Passcode Options to switch to a four-digit numeric code, a custom numeric code, or a custom alphanumeric code.
- Enter your passcode again to confirm it and activate it.
Change your passcode or passcode settings
On iPhone X and later, or iPad with Face ID, go to Settings > Face ID & Passcode. On earlier iPhone models, go to Settings > Touch ID & Passcode. On devices without Touch ID, go to Settings > Passcode.
You’ll find several settings and options:
- Turn Passcode Off: Tap this option to turn off your passcode.
- Change Passcode: Enter a new six-digit passcode. Or tap Passcode Options to switch to a four-digit numeric code, a custom numeric code, or a custom alphanumeric code.
- Require Passcode: As soon as you lock your screen, the default for this setting will ask you to enter your passcode to unlock. If you don’t want an immediate passcode requirement, change this setting. (For your own security, if you use Touch ID or Apple Pay, you can’t change the immediate passcode requirement).
- Allow Access When Locked: Use this option to allow access to some features when your device is locked, including Today View, Notification Center, Control Center on iPhone and iPod touch or iPad, Siri, Reply with Message, Home Control, Wallet, Return Missed Calls, and USB accessories.
- Erase Data: Choose whether to erase your device automatically after ten failed passcode attempts. If you don’t enable this option, your device will need to be restored on a computer after ten failed attempts.
Get help
Follow the steps in this section for help with things like passcode settings, alerts, and forgotten passwords.
If an alert says to change your passcode or you can’t adjust your passcode settings
Configuration profiles and email accounts based on Microsoft Exchange (common with business or education devices) sometimes have passcode policies that cause issues like this:
- You can’t turn off your passcode.
- You can’t change passcode settings because they’re unavailable, gray, or dimmed.
- You see an alert about a Passcode Requirement. For example, you might see a message that says you must change your iPhone unlock passcode within 60 minutes.
Contact your IT administrator for help. If you don’t use a configuration profile or Microsoft Exchange account, or if your device is personally owned, make sure you update your device to the latest version of iOS or iPadOS.
If you forgot your passcode
If you or someone else enters the wrong passcode too many times, your device will disable itself temporarily. If so, get help with a forgotten passcode or disabled device. If you forgot your Restrictions passcode, learn what to do.
Источник
Question: Q: Enter Old Passcode
I am getting the following message on my iPhone after carrying out a reset to remove a lost / non-functional passcode:
Enter Old Passcode
Passwords, home and other
data are protected by the passcode previously used to unlock this iPhone
This passcode protects
your Apple ID, saved passwords and other data stored in iCloud. Your passcode
is encrypted and cannot be read by Apple.
Can anybody tell me what the «other data» that this message refers to is likely to be and what I am likely to loose if I choose the option to «reset encrypted data»?
I can currently access saved passwords on the iPhone. Will these disappear if I reset the encrypted data?
Posted on Aug 10, 2020 1:12 PM
All replies
Loading page content
Page content loaded
It sounds like the password for your encrypted backup has been forgotten, and you want to know how your data will be affected, is that right? We’d love to go over some information with you.
The encrypted backups feature in the Finder or iTunes locks and encodes your information, which allows encrypted backups to include information that unencrypted backups don’t. This may includes things such as passwords, Wi-Fi settings, website history, Health data, and call history. You can find more information about that here: About encrypted backups on your iPhone, iPad, or iPod touch
The «If you can’t remember the password for your encrypted backup» part of the above link explains what to do if you don’t recall your password, and goes over how data may be affected.
When you make a backup in iCloud, that automatically encrypts your information. You can find more information on iCloud encryption under the «End-to-end encrypted data» part of this page: iCloud security overview
Источник
Забыл пароль ограничений iPhone — что делать

Забыли пароль ограничений на iPhone или iPad, в результате чего некоторые функции устройства оказались заблокированными? В этой инструкции мы рассказали о самом простом способе восстановления пароля ограничений, использование которого занимает считанные секунды.
Мы уже рассказывали о том, как восстановить пароль ограничений на iPhone и iPad при помощи iBackupBot. Однако описанный ранее способ нельзя назвать простым, поскольку он предполагает взаимодействие пользователя с файловой системой мобильного устройства. Данный же способ не потребует от вас каких-либо специальных навыков.
Примечание: возможность восстановления пароля ограничений этим способом доступна на Windows, Mac и Linux.
Забыл пароль ограничений iPhone — что делать
Шаг 1. Подключите свой iPhone или iPad к компьютеру и запустите iTunes.
Шаг 2. Выберите устройство в iTunes, поставьте флажок на пункте «Зашифровать локальную копию» и нажмите «Создать копию сейчас» для создания резервной копии.

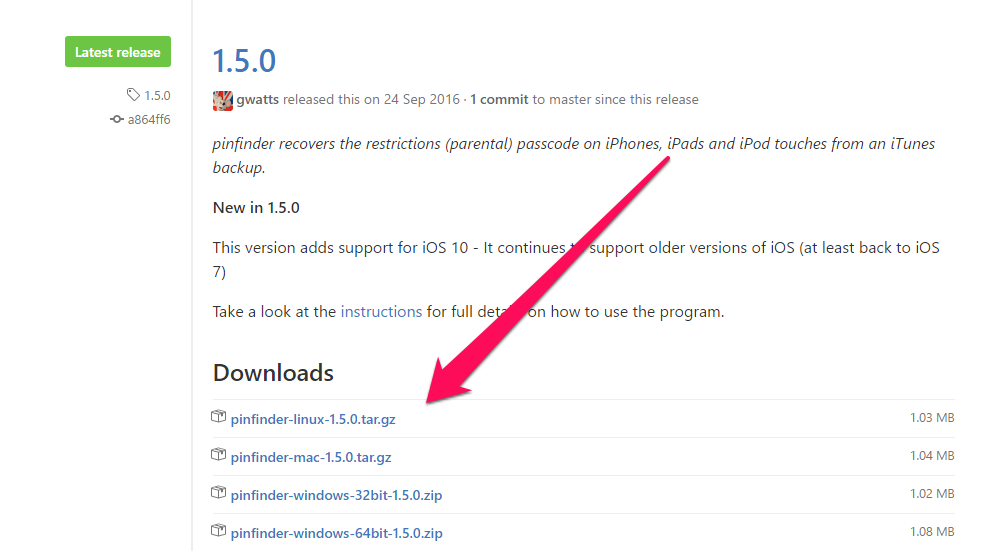
Шаг 3. Скачайте утилиту Pinfinder. Программа доступна на Windows, Mac и Linux. Если на вашем iPhone или iPad установлена iOS 10, то обязательно убедитесь в том, что вы загружаете Pinfinder 1.5.0.
Шаг 4. Запустите Pinfinder и в представленном сообщении обратите внимание на столбец Restrictions Passcode. В нем и показаны пароли ограничений для имеющихся на компьютере резервных копий ваших устройств.
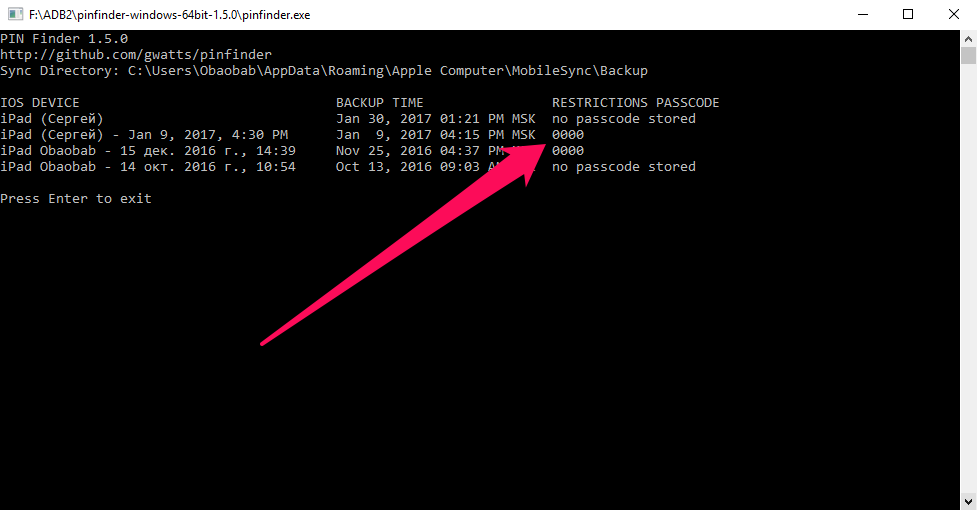
Вот таким простым образом, без необходимости трогать файловую систему iPhone или iPad, вы можете узнать забытый пароль ограничений. После вам останется лишь перейти в меню «Настройки» → «Основные» → «Ограничения» и указать найденный пароль.
Поставьте 5 звезд внизу статьи, если нравится эта тема. Подписывайтесь на нас Telegram , ВКонтакте , Instagram , Facebook , Twitter , YouTube .
- Следующая В декабре 2016 года Apple захватила 70% рынка премиальных смартфонов
- Предыдущая Вышла 64-битная версия Cydia с улучшенной поддержкой iOS 10
116 комментариев
Не получается, не показывает пороли… вообще ничего не показывает
Попробуйте запустить Pinfinder от имени администратора. И iTunes нужно обновить до последней версии.
Спасибо большое. Реально помогло
пишет в столбце restriction no passcode stored
Это значит, что проверяемой резервной копии не стоит пароль на ограничения. Нужно сделать свежую резервную копию устройства в iTunes и после уже запустить программу:
Шаг 2. Выберите устройство в iTunes и нажмите «Создать копию сейчас» для создания резервной копии. Отметим, что если резервная копия с паролем ограничений уже имеется, этот шаг можно пропустить.
Я изначально с него начал
На ios 10.2.1 результата не дал после чего увидел коментарий про новый способ
Хмм, а можете сделать скриншот командной строки после запуска программы?
привет решил проблему?
Все работает сначала не разобрался ну ребята с официальной группы помогли ))
Далее переключаем внимание на iBackupBot и идем в System Files – HomeDomain – Library – Preferences, где ищем файл com.apple.springboard.plist.
Для страховки можно скопировать и сохранить оригинальный файл кликнув по нему правой кнопкой мыши и выбрав в меню Export Selected item(s).
Далее дважды кликаем по файлу и нам открывается окно с предложением купить полную версию iBackupBot. Отклоняем предложение и продолжаем нашу работу по сбросу пароля.
После отказала от покупки и введения регистрационного кода нам открывается содержимое файла, куда нам необходимо вставить следующие строки кода:
Для вставки строчек кода ищем место куда их скопировать. У меня это будет между 83 и 84 строчками. Вставляем строчки кода и не забываем сохранить (иконка дискеты в верхнем правом углу).
етыре нуля указанные в последней строчке кода – это наш новый пароль к функции «Ограничения».
Далее запускаем iTunes, во вкладке «Обзор» кликаем по кнопке «Восстановить из копии» и выбираем самую последнюю, единственную копию и жмем «Восстановить».
В случае, если вы все сделали правильно, после восстановления ваш пароль ограничений станет «0000». Если же при вводе четырех нулей устройство сообщает вам о том, что пароль неверный, значит где-то была допущена ошибка и всю процедуру придется повторить вновь.
А это начало статьи:
В первую очередь хочется отметить, что для выполнения этого способа необходимо обзавестись дополнительным софтом – iBackupBot для iTunes, представляющий собой программу по управлению резервными копиями iPhone, iPad или iPod Touch.
Для установки iBackupBot необходимо перейти на специальную веб-страничку продукта и загрузить необходимую вам версию утилиты для Windows или Mac, пробная версия которой бесплатна для загрузки и использования.
Подключаем наше устройство к компьютеру при помощи USB-кабеля и запускаем iTunes. Идем в «Правка» – «Настройки» – «Устройства» и удаляем все резервные копии вашего iPhone или iPad для того, что бы в последствии не запутаться и облегчить себе дальнейшую работу.
Затем создаем уже новую, свежую резервную копию iPhone или iPad в iTunes путем выбора нужного девайса в боковой панели и, во вкладке «Обзор», кликаем по кнопке «Создать копию сейчас». Также, как вариант, можно кликнуть правой кнопкой мыши по отображаемому в левой боковой панели устройству и в открывшемся меню выбираем «Создать резервную копию».
Но представленный в данной статье способ значительно проще в использовании и работает со всеми версиями iOS, включая десятку.
Здравствуйте, при скачивании Pinfinder у меня появляется иконка при скачивании белый лист, с загнутым кончиком, после того, как открываешь этот файл, то открывается WinRAR и все, там так же иконка пустого листа. Файл можно открыть через разные программы: paint, word, блокнот и тд., но там только двоичный код. Я что-то делаю не так? Такого черного экрана с кодами, как у вас, у меня и в помине нет.
Источник


