- [2021] What Does Erase All Content and Settings Do on iPhone?
- What does Erase All Content and Settings do on iPhone?
- What does Permanently Erase All Content and Settings do on iPhone?
- What is Erase All Content and Settings do on Personal Data, iOS Software, Jailbreak, and Backup?
- The Best Way to Erase All Content and Settings on iPhone/iPad
- Part 1. Erase All Content and Setting on iPhone Manually
- Part 2. Erase all content and setting on iPhone using FoneDog — iOS Data Eraser
- Step 1. Download and Install FoneDog Tools
- Step 2. Connect your iPhone to PC
- Step 3. Erase All Content and Setting
- Part 3. Video Guide: How to Erase All Content and Setting on iPhone/iPad
- What to do before you sell, give away, or trade in your iPhone, iPad, or iPod touch
- If you still have your iPhone, iPad, or iPod touch
- Transfer information to your new device
- Remove your personal information from your old device
- If you no longer have your iPhone, iPad, or iPod touch
- If you’re trading in an Android device to Apple
- Learn more
[2021] What Does Erase All Content and Settings Do on iPhone?
home_icon Created with Sketch.
Home > Erase iPhone > [2021] What Does Erase All Content and Settings Do on iPhone?
![]()
August 4, 2017 (Updated: November 17, 2021)
The statement «what does erase all content and settings do on iPhone» is one of the several questions asked by iPhone users that are either sending their idevice for repair or changing to a brand new iPhone and would like to ensure their iPhone is completely wiped clean and can be utilized by the would-be owner. More so, erasing all content and settings may help with apps crashing, a blank or frozen screen, touchscreen/keypad problems, device making noises, inability to receive or make calls, and inability of the device to sync.
What does Erase All Content and Settings do on iPhone?
Erasing all content and settings implies that your iPhone and its settings will be restored to the way it was when the device was turned on for the first time. It will wipe everything from your iPhone, including personal data, iOS software, email accounts, system and app settings, Downloaded apps, Media and anything else, and your iPhone will be set up as a new one without any data or files or even settings — you will need to reconfigure your iPhone from the start.
After erasing all content and settings on your iPhone, it will force your idevice into recovery mode. The iPhone needs to be plugged into a computer that is pre-installed with iTunes and then restored.
What does Permanently Erase All Content and Settings do on iPhone?
Erasing all contents and settings off your iPhone does NOT mean the device will be completely erased. It might shock you to know that those deleted files and data are still very much on your idevice. Want to know what is erase all content and settings completely? Then you need the help of a professional tool. iMyFone Umate Pro or iMyFone Umate Pro for Mac is the best iOS data eraser and has the ability to completely and permanently destroy all contents and settings from your idevice, leaving no recovery traces.
iMyFone Umate Pro offers an efficient ways for you to erase data and free up space on your iPhone. The main features include:
- Erase Deleted Files: Erase the deleted files from your iPhone and avoid performance being hampered by items you will never use again.
- Erase Private Data: Remove your current private messages, call logs, WhatsApp data, WeChat messages, photos, videos, and any other kind of file—without recovery.
- Erase Private Fragments: As aims to protect your privacy, this function is unique because it can find out all private traces produced by third-party apps and permanently destroy them.
- 1-Click Free Up Space: Manage your storage space and free up space to improve performance in just one click.
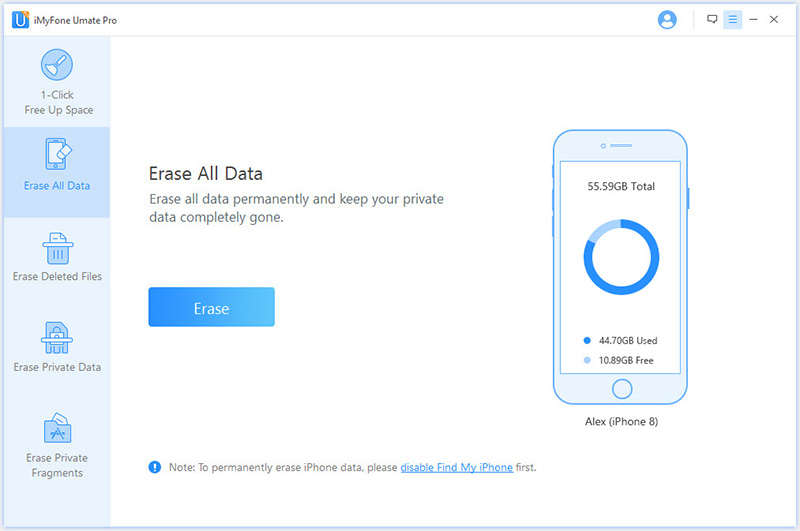
However, you can make use of “Erase All Data” to erase all contents and settings from your iPhone:
Step 1: Connect your iPhone with its USB cable to the computer and run iMyFone Umate Pro.
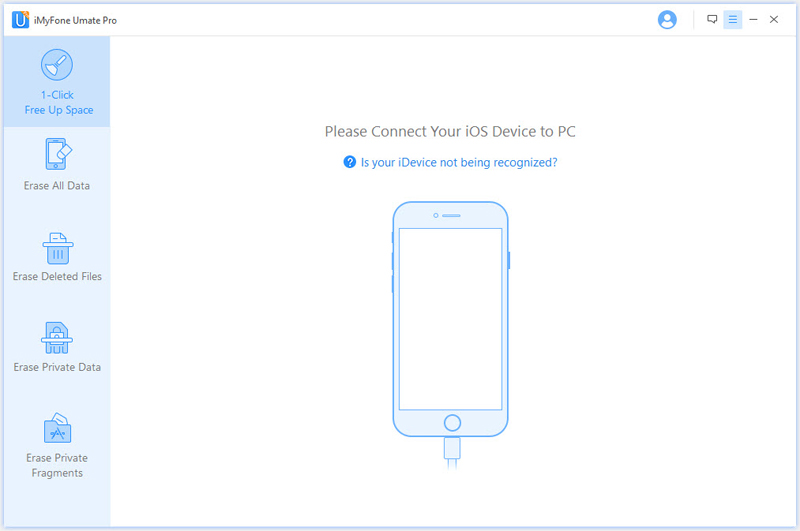
Step 2: Select “Erase All Data” tab and click on “Erase” button. Please remember to close all background apps.
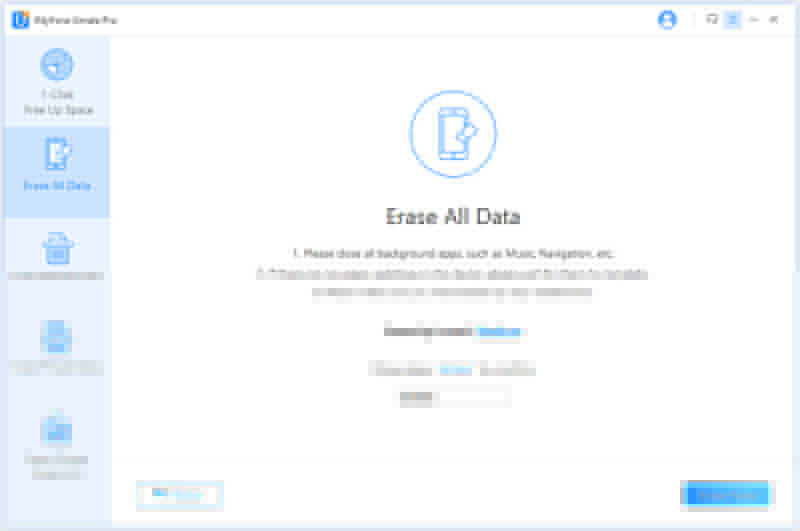
Step 3: Type “delete” into the box to confirm and click on erase now.
What is Erase All Content and Settings do on Personal Data, iOS Software, Jailbreak, and Backup?
Erase all content and settings will wipe off from your iPhone, any apps you have installed and all of your personal data, including appointments, contacts and notes among others. Although it does not wipe off the recently installed iOS software on the iPhone, including any upgrade you might have downloaded, erase all content and settings will wipe off the jailbreak software and other system apps since you are restoring the software back to its original factory settings. You will need to reinstall the jailbreak software after resetting.
In addition, those data copied to your PC during the sync operation remains when you erase all content and settings on iPhone. Should the iPhone develop an issue that can only be resolved by restoring it to original factory settings, you can restore the data by performing sync after the reset. If you fail to sync immediately prior to resetting, any personal data you have added to the iPhone since the last sync will be lost.
Источник
The Best Way to Erase All Content and Settings on iPhone/iPad
By Gina Barrow, Last updated: August 22, 2019
You may have googled «how to erase all content and setting on the iPhone?» Here you can find the solutions. Follow the guide and learn how to wipe information from your iPhone, iPad, or iPod touch.
Part 1. Erase All Content and Setting on iPhone Manually
The erase all content and settings are usually done whenever there are technical issues happening on the iPhone, giving it to a new owner and selling it. The way you have customized and personalized your phone like emails, calendars, apps, contacts and much more will be deleted once you do this kind of process. Erasing all content and settings on your iPhone means that it will revert to its factory conditions just like a brand new device so if you are planning to do this step on your iPhone, be careful with all your data stored inside. They will be gone too in just a matter of seconds if you haven’t set any backup. However, if you have automatically backed up your iPhone and wanted to erase all the content and settings of the device so you can put it on sale, yes you can. Backing up via iTunes and iCloud are the options given by Apple so below are few steps to manually check and erase all content and settings from your iPhone.
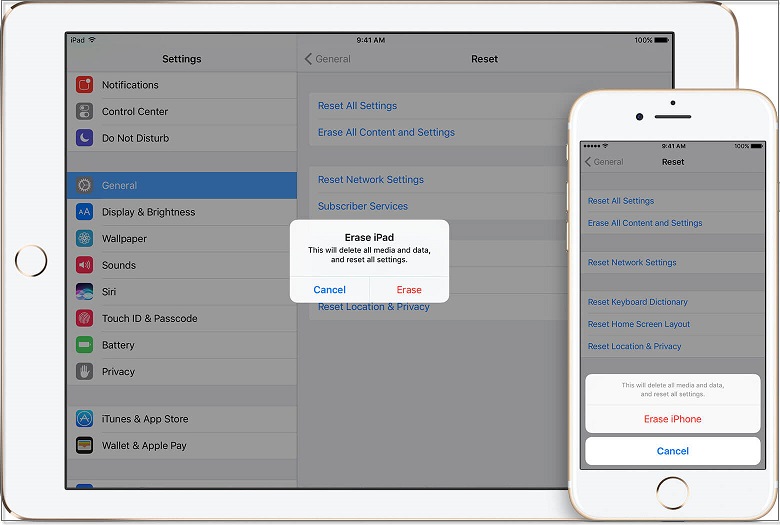
To erase all content and settings on the iPhone:
- Open Settings from your home screen
- Gently tap and open General
- Scroll to the bottom and look for Reset
- Tap Erase All Content and Settings and Tap Erase iPhone next
- You will need to tap Erase iPhone again and enter your pass code
Before you erase all Content and Settings on iPhone you need to do a backup first to make sure your contacts and other data are copied via iCloud. Follow the steps below:
- Go to Home screen and tap on Settings
- Tap iCloud and Tap Backup
- Tap Backup Now
Another option is to back up your iPhone files and data using iTunes which is easier but you might need to do this manually. Here’s how to do it:
- Connect iPhone to Mac or Windows computer using USB cable (original cable)
- Open iTunes and click on the iPhone symbol on the screen’s menu bar
- Click Backup Now and backup apps if prompted. You may also click to encrypt backup, this is to set a password on your backup file so no one can have any access to your files.
Now that you have manually and automatically backed up and erased all content and settings off your iPhone, you can now be confident that your personal files and data are safe. But how safe is your iPhone’s data really? There are actually recovery software that can still retrieve all your contacts, messages, photos and other important data from your iPhone. Though erase all content and settings give you the privilege to wipe out every personal data from the device, there are still traces where some of your privacy is exposed. Even Apple does not delete all your photos and videos instantly but rather save it on the “Recently Deleted” folder for a good 30 days or 1 month before it will be automatically removed off the device. So basically, your privacy is still not secured. This may seem too daunting to hear but yes most data are recoverable from your smart phones. Third party software is able to do this for you. Your identity is still accessible somewhere and still prone to any kinds of identity thefts. Instead, look for options on how to permanently erase all content and settings from the iPhone. There are third party software that specialize in erasing every bit of your personal details from any iOS devices.
Part 2. Erase all content and setting on iPhone using FoneDog — iOS Data Eraser
So to make sure all of your personal information is kept safe and hidden from any thieves, use a private data eraser which totally wipes out all content and settings from your iPhone. Meet FoneDog — iOS Data Eraser, this program will be your partner in deleting all those important files off your iPhone device and be confident that your phone identity and files are always safe. Don’t allow yourself to be a victim, protect your data by permanently deleting all important phone information. FoneDog — iOS Data Eraser is the best way to erase all content and settings on iPhone and provides a more convenient option to wipe out data with easy to use set up.
To use FoneDog — iOS Data Eraser follows the steps below:
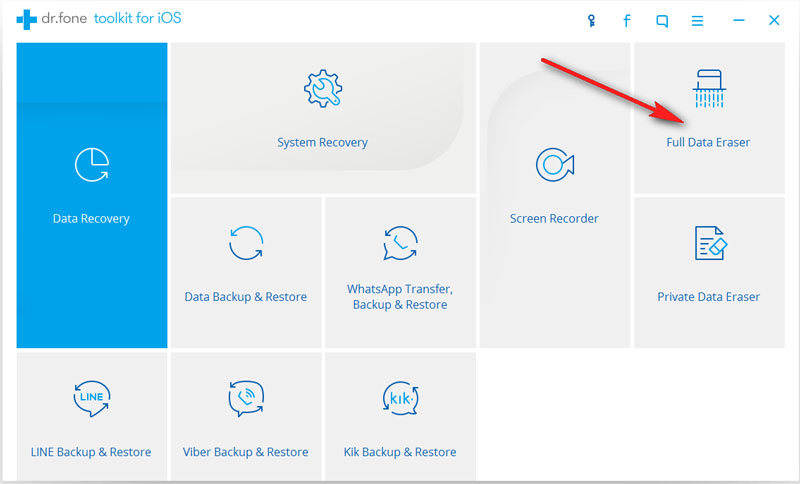
Step 1. Download and Install FoneDog Tools
- Download FoneDog — iOS Data Eraser, install and run it on your computer. (Windows or Mac)
- From the program screen, you will see different software tools. Click on “Full Data Eraser” to begin the process.
Step 2. Connect your iPhone to PC
On the next step, you will be asked to connect your iPhone and the computer using a USB cable. Make sure that the connection is stable and secure all throughout the process to avoid any arising issues.
After the successful connection, the program screen will now allow you to erase all the content and settings from your iPhone. (Note: During this step, all data will be wiped out permanently, so make sure you have made your own backup to restore and use on a new device)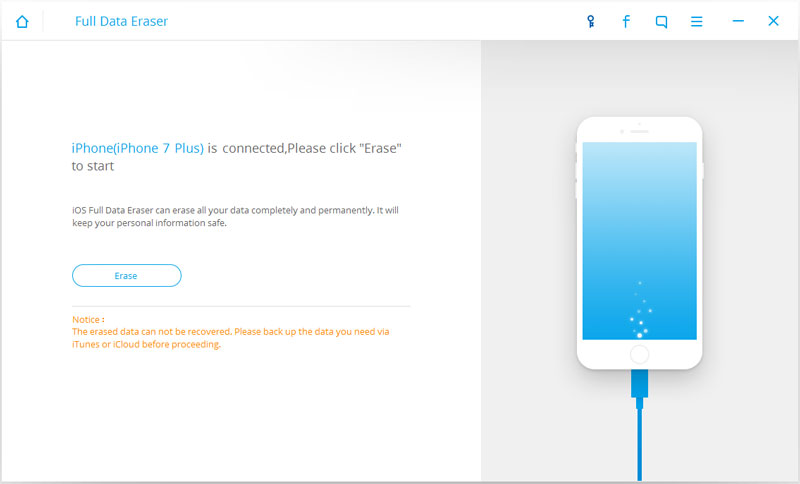
Tips:
If you want to Eraser your Data selectively. Follow this Guide: How to Delete Text Messages on Your iPhone Permanently
Step 3. Erase All Content and Setting
Click on “Erase” and reconfirm it by typing the word “delete” on the pop-up window with a text field. This process is just to verify if you really wanted to continue on the full erasing procedure. Click on “Erase Now” once confirmed and wait until the whole erasing process is finished.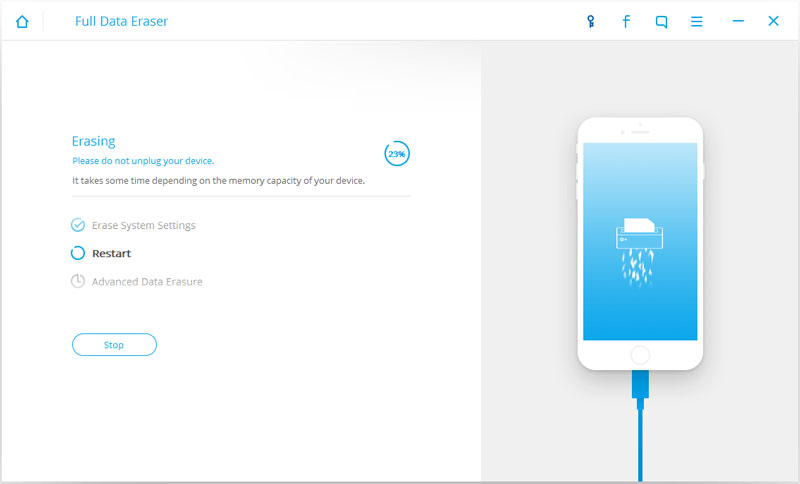
Part 3. Video Guide: How to Erase All Content and Setting on iPhone/iPad
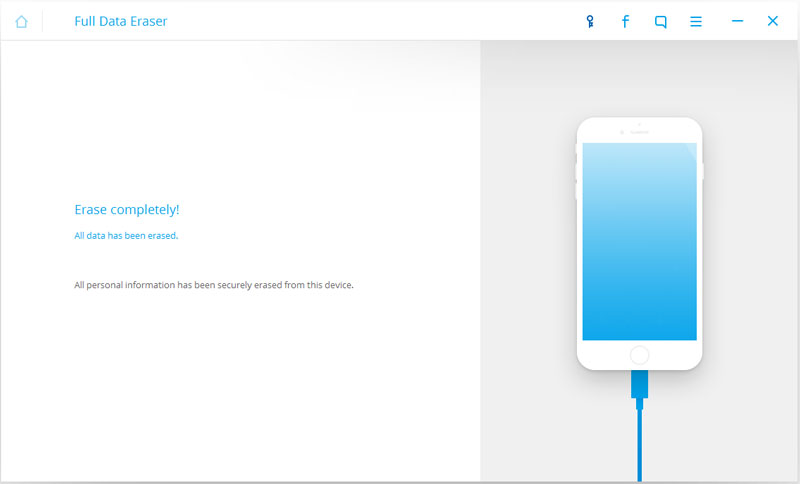
The erasing of all content and settings including contacts, accounts, media files, and documents may take a few minutes depending on a total load of data stored on the phone. It is important that you don’t disconnect the iPhone from the computer to avoid risks of other issues. You will be informed once the process is completed. An onscreen notification will show once the whole wiping out process is done. After the whole process is finished, you can now breathe freely and confidently sell your iPhone. You may now get yourself an upgraded iPhone model and restore all your backups on the new device. FoneDog — iOS Data Eraser will save you from all the headaches and heartaches just in case; so protect your identity from thieves.
Источник
What to do before you sell, give away, or trade in your iPhone, iPad, or iPod touch
Use these steps to transfer information to your new device, then remove your personal information from your old device.
Before you sell, give away, or trade in your device, you should first transfer information to your new device, then remove your personal information from your old device.
You shouldn’t manually delete your contacts, calendars, reminders, documents, photos, or any other iCloud information while you’re signed in to iCloud with your Apple ID. This would delete your content from the iCloud servers and any of your devices signed in to iCloud.
If you still have your iPhone, iPad, or iPod touch
Follow these steps to transfer information to your new device, then remove your personal information from your old device.
Transfer information to your new device
If you have a new iPhone, iPad, or iPod touch, you can use Quick Start to automatically transfer information from your old device to your new device if you’re using iOS 11 or later. Use iCloud, iTunes, or the Finder to transfer information to your new device if you’re using iOS 10 or earlier.
If your phone number will change with your new device, add additional trusted phone numbers to your account to ensure you don’t lose access. If you no longer have access to your old phone number, you can generate a two-factor authentication code on your old device if needed.
Remove your personal information from your old device
- If you paired an Apple Watch with your iPhone, unpair your Apple Watch.
- Back up your device.
- Sign out of iCloud and the iTunes & App Store.
- If you’re using iOS 10.3 or later, tap Settings > [your name]. Scroll down and tap Sign Out. Enter your Apple ID password and tap Turn Off.
- If you’re using iOS 10.2 or earlier, tap Settings > iCloud > Sign Out. Tap Sign Out again, then tap Delete from My [device] and enter your Apple ID password. Then go to Settings > iTunes & App Store > Apple ID > Sign Out.
- If you’re switching to a non-Apple phone, deregister iMessage.
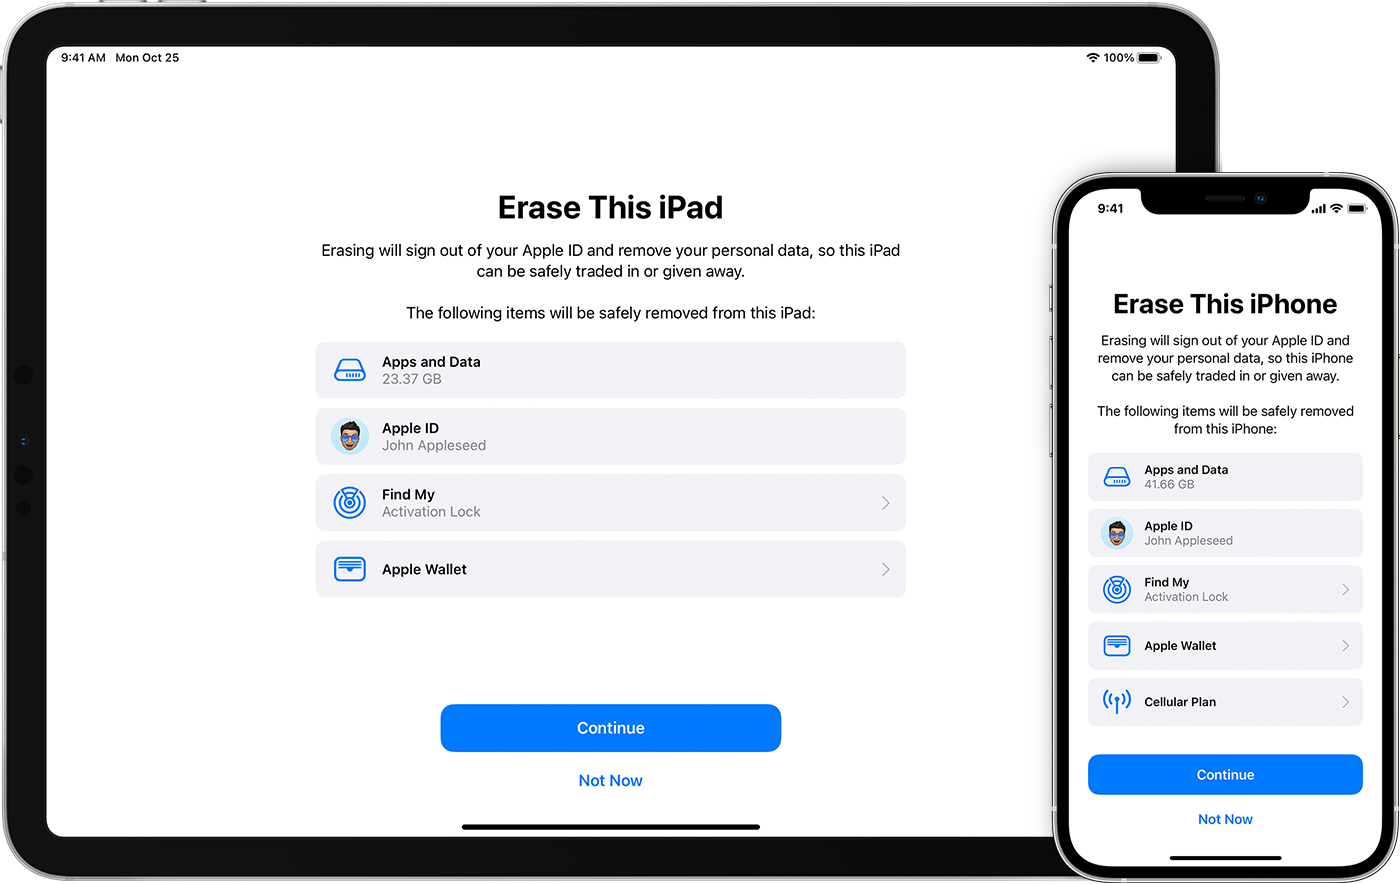
- Go back to Settings and tap General > Transfer or Reset [device] > Erase All Content and Settings. If you turned on Find My [device], you might need to enter your Apple ID and password. If your device uses eSIM, choose the option to erase your device and the eSIM profile when asked.
- If asked for your device passcode or Restrictions passcode, enter it. Then tap Erase [device].
- Contact your carrier for help transferring service to a new owner. If you aren’t using a SIM card with your device, you can contact them to get help transferring service to the new owner.
- Remove your old device from your list of trusted devices.
When you erase your iPhone, iPad, or iPod touch, Find My [device] and Activation Lock are turned off.

If you no longer have your iPhone, iPad, or iPod touch
If the steps above weren’t completed and you no longer have your device, use these steps:
- Ask the new owner to erase all content and settings using the above steps.
- If you’re using iCloud and Find My [device] on the device, sign in to iCloud.com/find or the Find My app on another device, select the device, and click Erase. After the device has been erased, click Remove from Account.
- If you can’t follow either of the above steps, change your Apple ID password. This won’t remove personal information that’s stored on your old device, but it prevents the new owner from deleting your information from iCloud.
- If you’re switching to a non-Apple phone, deregister iMessage.
- If you’re using Apple Pay, you can remove your credit or debit cards at iCloud.com. Choose Account Settings to see which devices are using Apple Pay, then click the device. Next to Apple Pay, click Remove.
- Remove your old device from your list of trusted devices.
If you’re trading in an Android device to Apple
Before you send in an Android device to Apple as a trade-in, be sure to do the following:
- Back up your data.
- Erase the device.
- Remove any SIM cards, memory cards, cases, and screen protectors.
Contact your device’s manufacturer if you need help.
Learn more
- Make a backup of your iPhone, iPad, or iPod touch or restore from a backup.
- Remove all of your cards from Apple Pay.
- Get help if your iPhone, iPad, or iPod touch is lost or stolen.
- Learn about Activation Lock.
- No matter the model or condition, we can turn your device into something good for you and good for the planet. Learn how to trade in or recycle your iPhone, iPad, or iPod touch with Apple Trade In.
When you tap Erase All Content and Settings, it completely erases your device, including any credit or debit cards you added for Apple Pay and any photos, contacts, music, or apps. It will also turn off iCloud, iMessage, FaceTime, Game Center, and other services. Your content won’t be deleted from iCloud when you erase your device.
Источник


