- Permanently Delete Everything from iPhone 7/6/5 without Recovery
- Method 1: ‘Simply Delete’ and ‘Factory Reset’ (100% Recovery)
- Method 2: Permanently Erase Everything on iPhone with SafeWiper
- How to Delete Data from iPhone without Recovery
- Deleted Data on iPhone
- Erase all Data on iPhone Permanently When You:
- Tutorial 1: How to Delete Private Data on iPhone,iPad Permanently
- Tutorial 2: How to Wipe Deleted Files on iPhone,iPad Permanently
- Tutorial 3: How to Erase All Data from iPhone, iPad and iPod Permanently
- What’s More about iPhone iPad Data Eraser:
- Comments
Permanently Delete Everything from iPhone 7/6/5 without Recovery
Privacy is a bit concern on iPhone as it plays an important role in our daily life, such as text messing, social networking, payment and business. So when we start to think selling the old device for a new one, the first thing we need to consider seriously is how to prevent our personal information being leaked.
Method 1: ‘Simply Delete’ and ‘Factory Reset’ (100% Recovery)
This is the simplest and fastest way to remove content and settings on your iPhone and this method has been widely adopted for general users. This is fairly enough for users who haven’t leave any important data on the iPhone. Below are the steps on how to achieve that:
Step 1: Tap on ‘Settings’ icon on iPhone homescreen.
Step 2: Scroll down from the list and choose ‘General’ option
Step 3: Select ‘Reset’ at the bottom of the list and choose «Delete All Content and Settings«
Dangerous : Easily Be Recovered by Most iPhone Data Recovery Softwares.
However, this method is not that secure in terms of high standards as the data can be recovered by utilizing this factory reset. In fact, after you deleted your data or factory reset your iPhone device, the data themselves still exist on somewhere in the memory and easily be recovered by some iPhone data recovery softwares in the market..
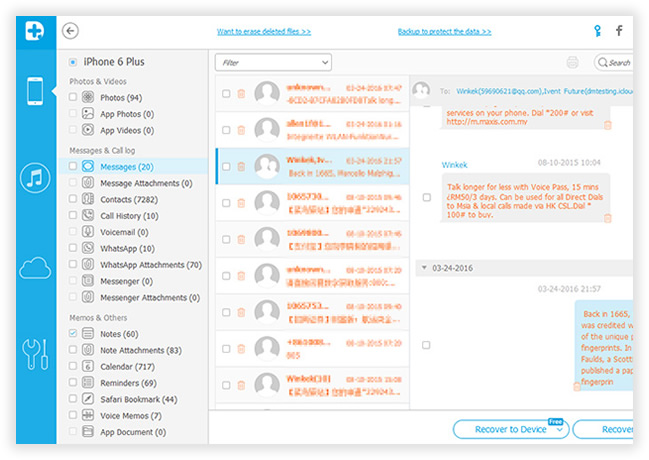
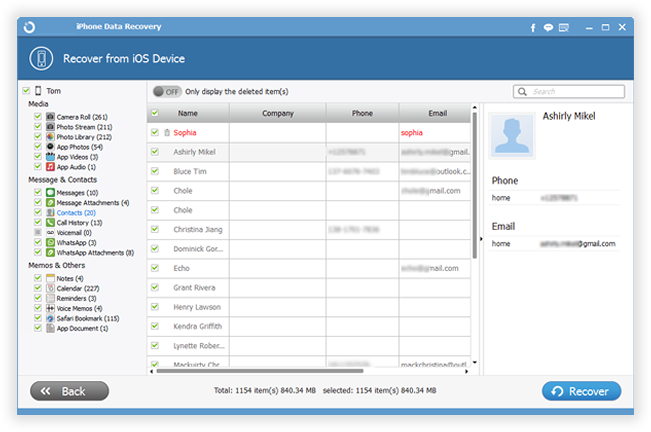
We have done the test with any two of iPhone data recovery softwares.
Testing 1 : Scanned out all messages, phone numbers, name and other data. Just one click, everyone can recover these data and save to computer.
Testing 2: Scanned out all contacts and other data.
If you really cared about your person information from being leaked, you should make sure that there is no chance to restore such content when you selling or handling the device to someone else.
It is highly recommend to use the following method I am gonna to mention in the next section, as the data will be deleted permanently even the military forces can’t get them back.
Method 2: Permanently Erase Everything on iPhone with SafeWiper
Maybe most people still don’t know that actual contents of file are not really deleted when performing simple deletion operation on your iPhone or other devices. But they are just marked for deletion and not shown in the file system of your iOS device. The actual data are still physically present on your iPhone. For iOS system, the only way to completely erase the data is to overwrite the original contents.
If you want to completely eliminate all traces of data on your iPhone, iPhone Data Wiper could be a good choice, it provides four erasing options to ensure all deleted data were overwritten and erased without the possibility of recovery by any practical software or hardware methods. It can erase text messages, photos, contacts, call history and other data for your iDevice without harming your device and data.
In this post, we’ll show you how to permanently erase everything from iPhone before selling.
Step 1 Install iPhone Data Eraser
Download the .exe file from below download link and double-click the file to begin installation process. There is a built-in wizard guiding you through the entire process. After that, the software will be opened automatically and a shortcut will display on computer desktop.
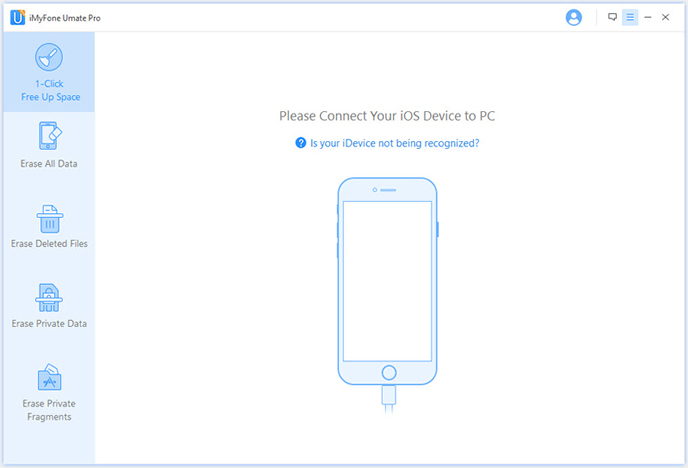
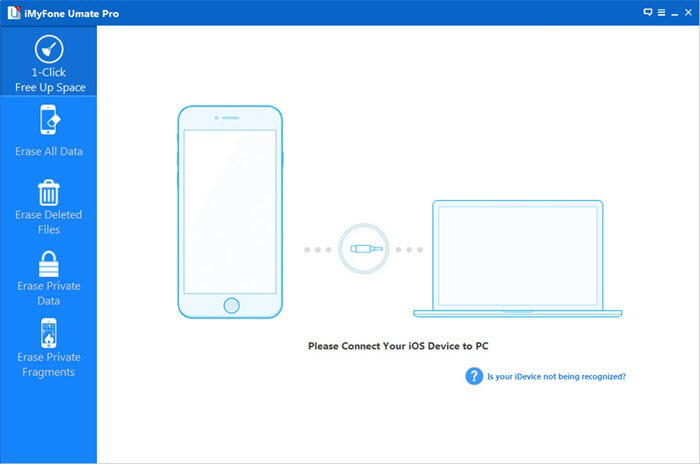
Step 2 Connect iPhone to a PC and Select Right Erasing Option
Plug the iPhone to computer via USB cable. The program will detect the device once it was well connected. Then you can proceed to the next step. However, if the program can’t detect the device, please make sure iPhone USB driver and iTunes are installed properly on the computer.
Note: The program offers 4 erasing option for your different demands: «1-Click Free UP Space«, «ERASE PRIVATE Data«, «ERASE DELETED FILES» and «ERASE ALL DATA«. You can select the appropriate option and give it a try. As we want to erase everything stored on the iPhone, so the first method is preferred in this case. Select «Erase Deleted Data» from the sidebar, which leads to the next step.
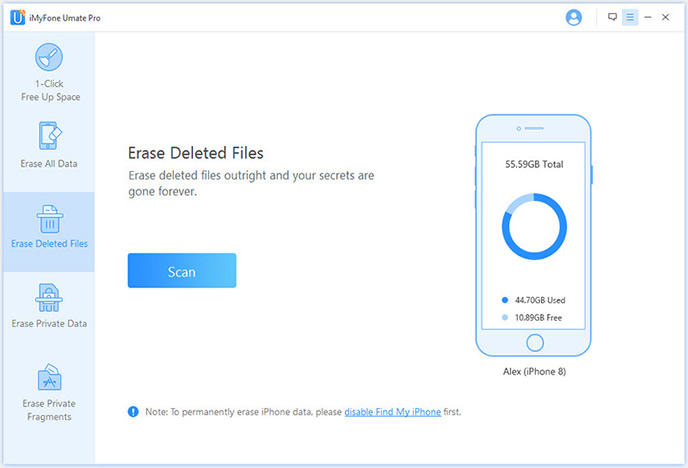
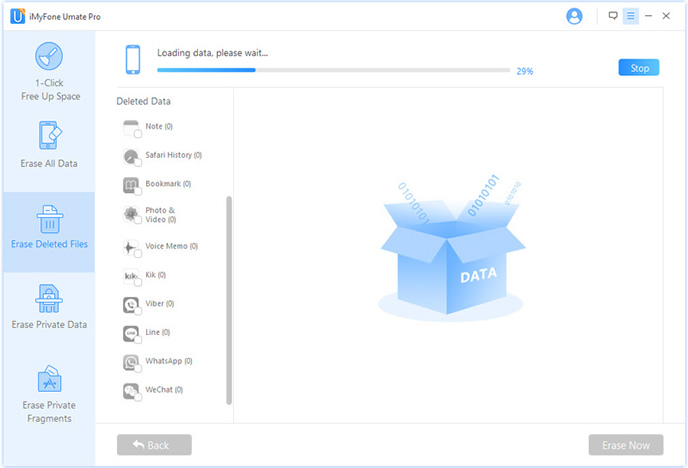
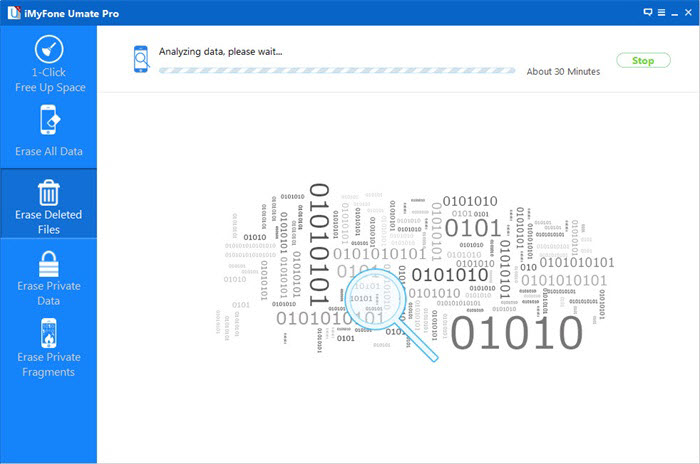
Step 3 Start Analyzing and Scanning the Data on Your iPhone.
In this step, it will automatically analyze and scan all your deleted files in your iPhone device; generally it takes few minutes to complete the process depending on the file. After scanning – select the deleted data to view detailed information on the file.
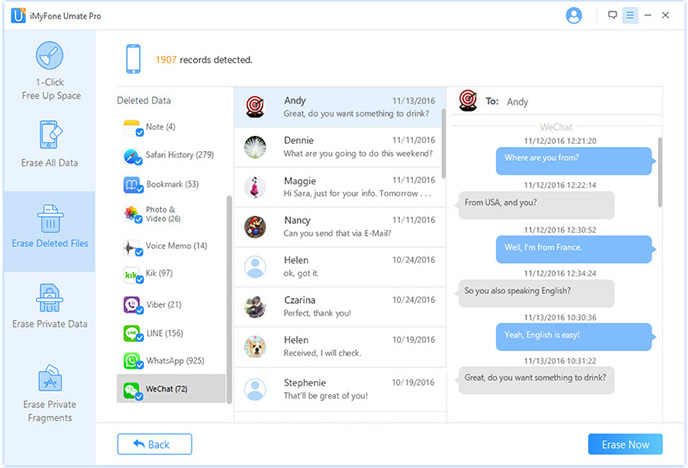
Step 4 Privew and Select the Data You Want to Erase
After scanning, all deleted data will be scanned out and presented as details, by default, all files will be selected. Unselect the files you wish to keep.
Step 5 Select the Erasing Algorithm and Start Erasing Everything on iPhone
You can change the security level to moreВ thoroughlyВ smash your data without recovery, the High Level will take more time to erase your data.
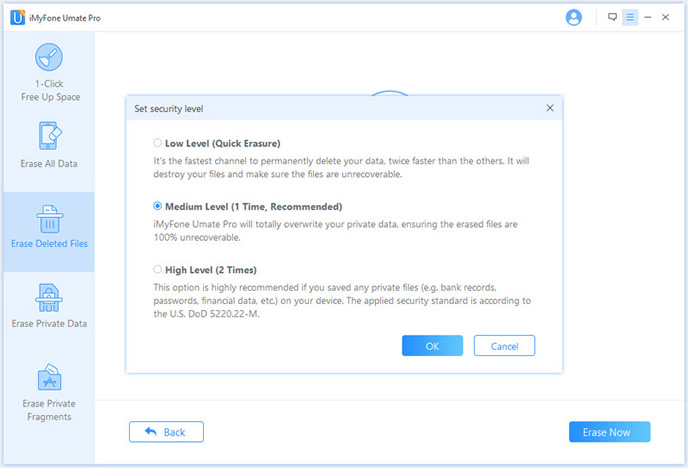
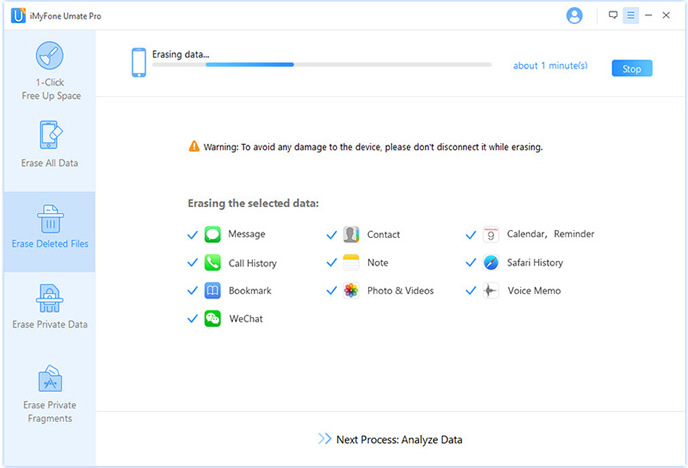
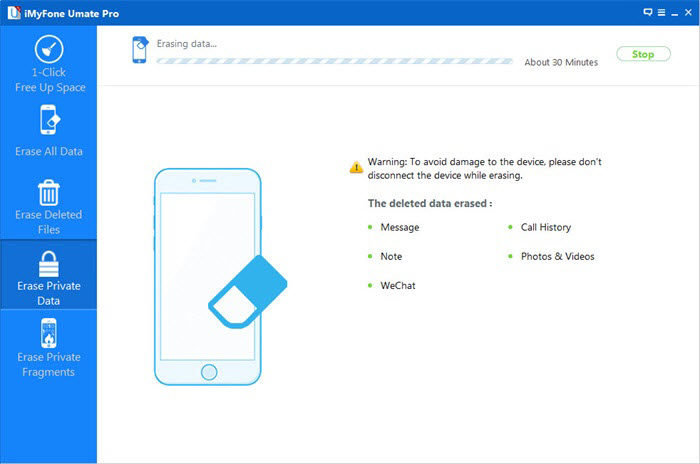
Input ‘delete’ and click Start Button to confirm that you are going to erase all the data on the iPhone. Then the program starts erasing apps, music, videos, photo, contacts, SMS and other files stored on the device. It only takes a few minutes to complete the task.
 ;
;
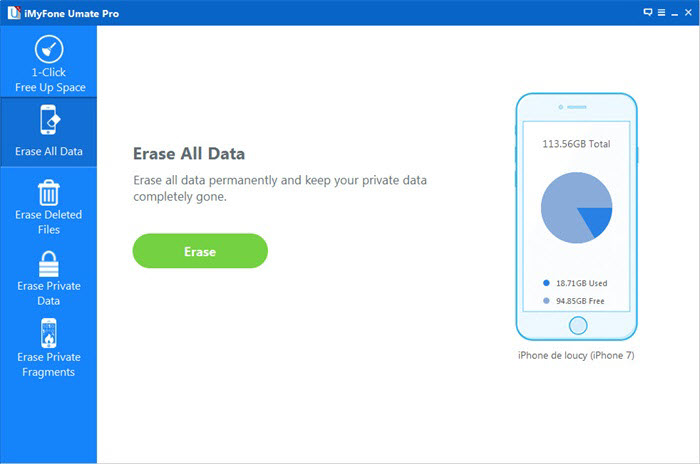
Step 6 Finally, We Highly Recommed Select «Erase All Data» Mode to Erase Again
After you erased already deleted data, you must erase all data again from your device by selecting Erase All Data. This time, it will erase all existingВ data on your device.
It will ask you for confirmation before it starts erasing so make sure you are certain you want to continue as this is your last chance to prevent data from being accidentally erased. You should be no longer worries about your privacy being leaked by using the fancy program. Let’s being said, even the most sophisticated data recovery software isn’t able to get any information from the given device. It’s definitely worth the money you spent on it. And there is no additional fee if you use the program on multiple devices in future.
Источник
How to Delete Data from iPhone without Recovery
Deleted Data on iPhone
By Selena Komez Updated on March 09, 2017
Before selling your old iPhone,please rememeber wipe all data on iPhone permanently without restore.
Deleting data from iPhone and other iOS devices become necessary when you want to sell it and protect your personal data from others. On iPhone we store lots of personal data like images, contacts iMessages etc so that before selling our old iPhone it is required to delete all the data permanently from old iPhone.But it is also necessary to create a backup file of the entire iPhone data before deleting it, because once you delete it permanently then you cannot access it without backup or without using iPhone data recovery tool. So to avoid botheration it is important to take a fresh backup of your iPhone. This will protect your data form inaccessibility.
Erase all Data on iPhone Permanently When You:
-Wish for to sell your old phone to any unknown person
-Recycle it to cell phone manufactures
-Want to deal it in for a new phone
-Want to donate your old phone
-To defend your privacy and precious data of your iPhone, iPad before selling your old ios devices, it is necessary to delete the entire data. You can erase iPhone data by many other options like “restore factory setting”, “Reset/Restore iPhone” or “upgrade to a new ios system” but it is not enough, because one can easily restore those data by using data recovery software available in the market.
So it is necessary to delete data on your iPhone permanently by the help of given iPhone data eraser tool,I am recommend you use this iPhone Data Eraser software,which can help you wipe all data on iPhone permanently without restore before selling it,the ios data eraser software can make you able to erase deleted files on iPhone permanently, so that one cannot recover it by using any recovery trick and third party iOS data recovery tool.
This iPhone iPad Data Eraser allows you to Eraser All Data/Already Deleted Files from iPhone, iPad and iPod, and it delete all types of contents permanently including:
Messages, Contacts, Mail, Calendar, Reminders, Notes, Voice Memos, Safari Bookmarks, Photos, Videos, Safari Favorites, Apps, System Settings, Keyboard Cache, Passbook, iTunes DB, iMessage, Call History, Safari History, Voicemail, Apple ID, iCloud ID, Game Center, Apple Maps, Weather, Stocks, Newsstand Facetime.


Note: Deleted Data, Safari Cache, Safari History, Safari Cookies ,Keyboard Cache, Messages, Messages Attachments, Call History and Notes, Photos are all deletable. Since the erased data can’t be recovered once wipe by this iPhone iPad Data Eraser, you need to backup data and restore to iPhone after erasing the device when you need,like contacts,text messages, photos, videos, notes,ect.If you have bought an new iPhone 7/6S/6/SE,you can also restore backed up data to new iPhone from computer easily.
Tutorial 1: How to Delete Private Data on iPhone,iPad Permanently
This erase mode can help you delete all private data (photos, messages, contacts,Apple ID,ect) from your iPhone,iPad permanently,then protecte your privacy data been stolen after selling the devices.
Step 1. Run the iOS Data Eraser and Connect iPhone to the Computer
Install iPhone Data Eraser first and open it. Connect through a USB cable and the software will automatically start to detect iDevice. Remember to click “Trust” on the screen of you iPhone.
Step 2. Select the Erase Mode “Erase Private Data”
In the middle of the interface, you will see the button “Start Scan”. Click it and wait until the end of the analysis. When it is finished, the items are to be listed for you to choose. Tick the one that is to be gone forever.
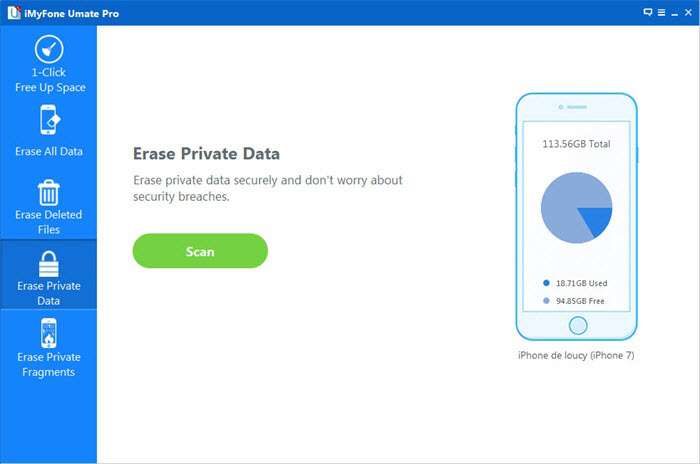
Step 3.Begin Analyzing and Scanning all Private Data Stored on Your iPhone
In this step, the program will automatically analyze and scan all your private files in your iPhone device,like contacts, calendars, reminders, documents, photo streams and other private files; generally it takes few minutes to complete the process depending on the file. After scanning – select the deleted data to view detailed information on the file.
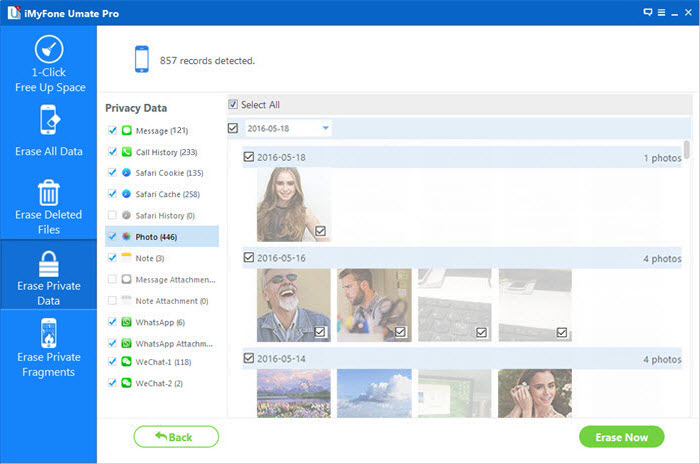
Note: The data can all be previewed when you highlight one of them.
Step 4. Start Erasing Private Data on iPhone Permanently
After you’ve selected private files want to erase, then click the “Erase Now” button,the window will show you this process bar to confirm,please type “delete” to confirm the erasing process.
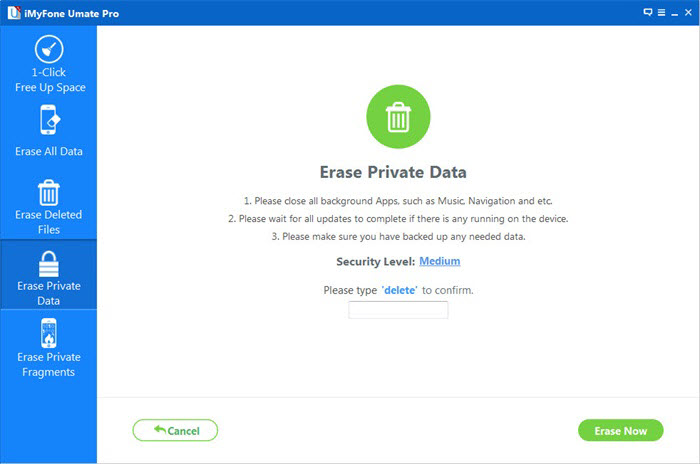
This should cost you more than 20 minutes. When it is ended, press “Done”.
Free download the iOS Data Eraser:
Tutorial 2: How to Wipe Deleted Files on iPhone,iPad Permanently
The already-deleted contents are still be in the iDevice. To guarantee that they can not be retrieved, you can use this mode.
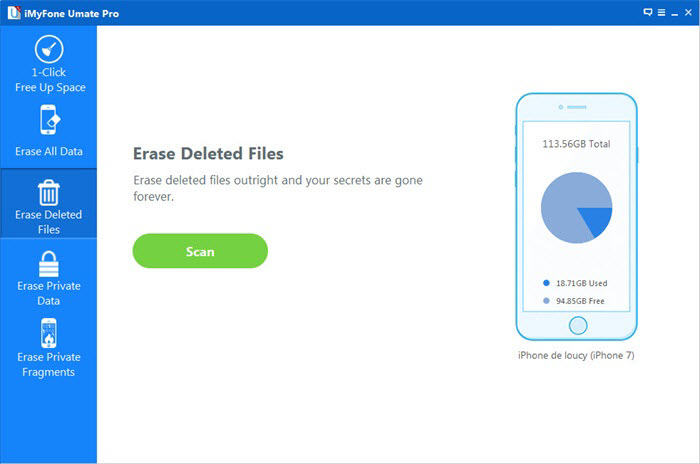
Step 1. Choose the “Erase Deleted File” Option to Get Rid of Deleted Files on iPhone
Plug iPhone into the PC first. Select “Erase Deleted Files”. Then, press “Start Scan” to proceed to the next step.
Step 2. Start Analyzing and Scanning Deleted Data Stored on Your iPhone
The program will automatically begin to analyze and scan the already deleted data on your iPhone device,including contacts, SMS, photos, videos, notes, call logs and other files that you have deleted them before.
Step 3. View and Select the Files You Want to Wipe from iPhone Device
When the scanning process finish, all deleted files stored in your iPhone will be scanned out and show for you, by default, all files will be selected. Please select what file type you want to erase permanently,and unselect the files you don’t want to delete and keep them.
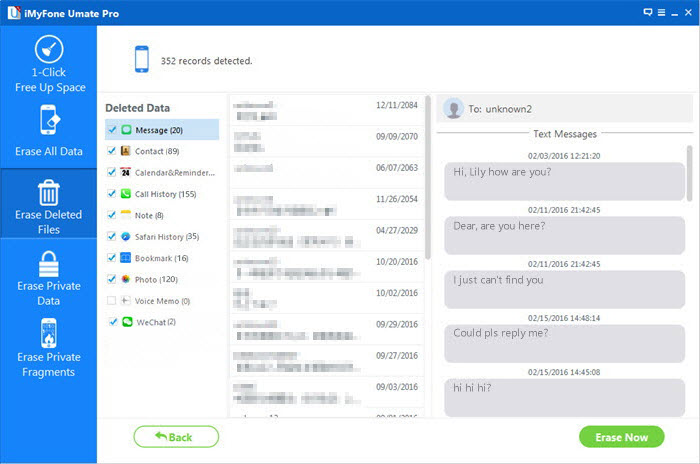
Preview the already deleted text messages before erasing them
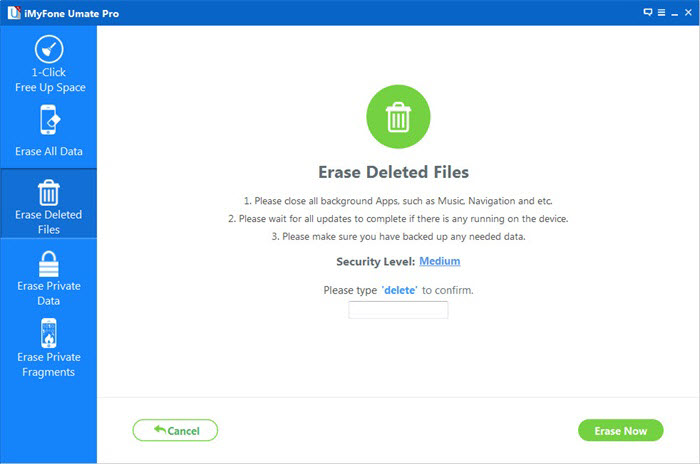
Step 4. Start Erasing Already Deleted Files on iPhone Permanently
There are a few minutes before the scanning process ends. Then, you can see the following interface. Tick the one you want and confirm by tapping “Erase Now”.
Press “Done” at the end.
Download the iOS Data Erase and try to erase already deleted data on your iPhone/iPad/iPod permanently
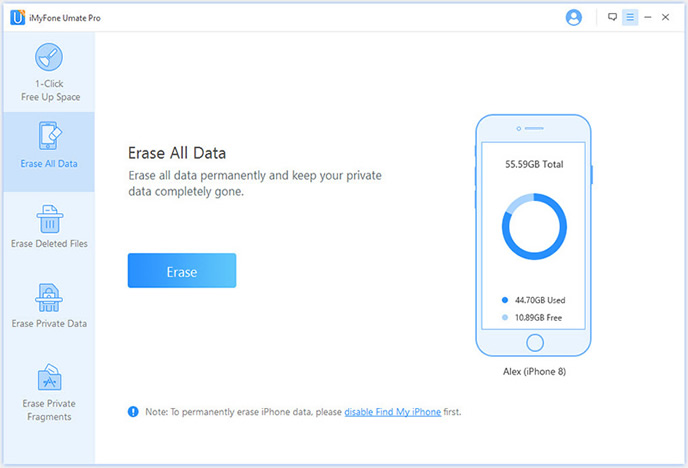
Tutorial 3: How to Erase All Data from iPhone, iPad and iPod Permanently
You should be careful when using this mode, because the whole phone will be erased, unlike the first two cases, and there is no coming back.However,you must to backup iPhone data to computer before the eraseing process begin.
Step 1. Run iPhone Data Eraser and Connect YOur iPhone to Computer
Click to open the software and then connect iPhone to PC. When the phone is detected, choose “Erase All Data” and you will come to the second step.
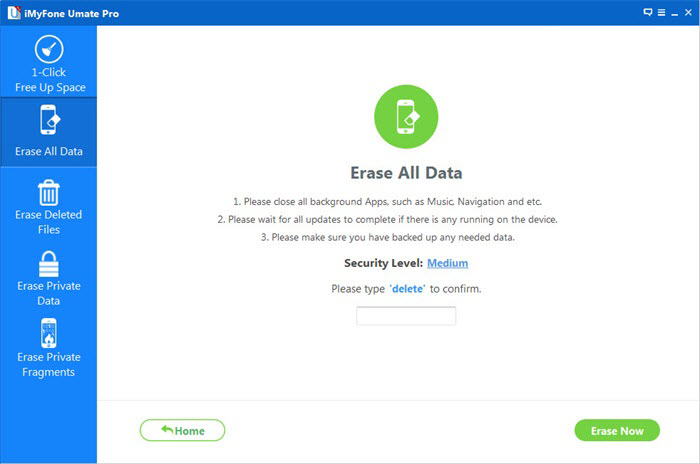
Step 2. Make Sure that You Really Want to Delete All the Files
What the title means is that you have to key in the word “delete” to confirm your order. The security level “Medium” is good enough for us. Press “Erase Now” and wait.
Note: A free version only allows you to clean the cache of the music apps and the video apps.
Have a try! You will find iPhone iPad Data Eraser worth every penny of it.
What’s More about iPhone iPad Data Eraser:
As we all know,the simple deletion can’t delete files on iPhone,iPad device permanently, many people still don’t know that the deleted data still can be recovered by iOS Data Recovery in market. If you want to sell or give away your iPhone, iPad or iPod device, you must to use a professional iPhone iPad Data Eraser to wipe everyting from iPhone,iPad,iPod completely and permanently,let’s learn the 6 features in iOS Data Eraser,select the features you need:
*Wipe Deleted Files: Permanently erase the “Already Deleted” files on your iPhone,iPad and iPod device without restore.
*Erase Private Data: Delete all private data stored on your iPhone,iPad permanently,if you want to selling the old devices
*Erase All Data: Permanently erase all already deleted data and existing files on your iOS device without restored.
*1-Click Cleanup: 1 click to clan up large junk files and release massive space on your iPhone/iPad/iPod touch.
*Photo Compressor: Directly Compress you photos on your iPhone,iPad devices to reclaim more space,or backup iPhone photos to computer to release more memory spcace.
*iOS Optimizer: Optimize Slow iPhone For Best Performance
Comments
Prompt: you need to log in before you can comment.
No account yet. Please click here to register.
Источник


