- What to do before you sell, give away, or trade in your iPhone, iPad, or iPod touch
- If you still have your iPhone, iPad, or iPod touch
- Transfer information to your new device
- Remove your personal information from your old device
- If you no longer have your iPhone, iPad, or iPod touch
- If you’re trading in an Android device to Apple
- Learn more
- Downgrade or cancel your iCloud+ plan
- What happens when you downgrade or cancel iCloud+
- Downgrade or cancel on your iPhone, iPad, or iPod touch
- Downgrade or cancel on your Mac
- Downgrade or cancel on your Windows PC
- If you subscribe to Apple One
- If you can’t select Done
- Learn more
- How to Completely Erase iPhone from iCloud
- Erase Data
- Part 1. How to Erase iPhone from iCloud with Find My iPhone
- Steps on How to Wipe Out Your iPhone Device from iCloud
- Part 2. How to Erase iPhone without iCloud
- dr.fone — Data Eraser (iOS)
- Steps on How to Erase iPhone without iCloud Using «Erase Private Data» Mode
- Erase a device in Find My iPhone on iCloud.com
- What happens when you erase a device in Find My iPhone?
- Remotely erase your device or a family member’s device
- Cancel an erase
What to do before you sell, give away, or trade in your iPhone, iPad, or iPod touch
Use these steps to transfer information to your new device, then remove your personal information from your old device.
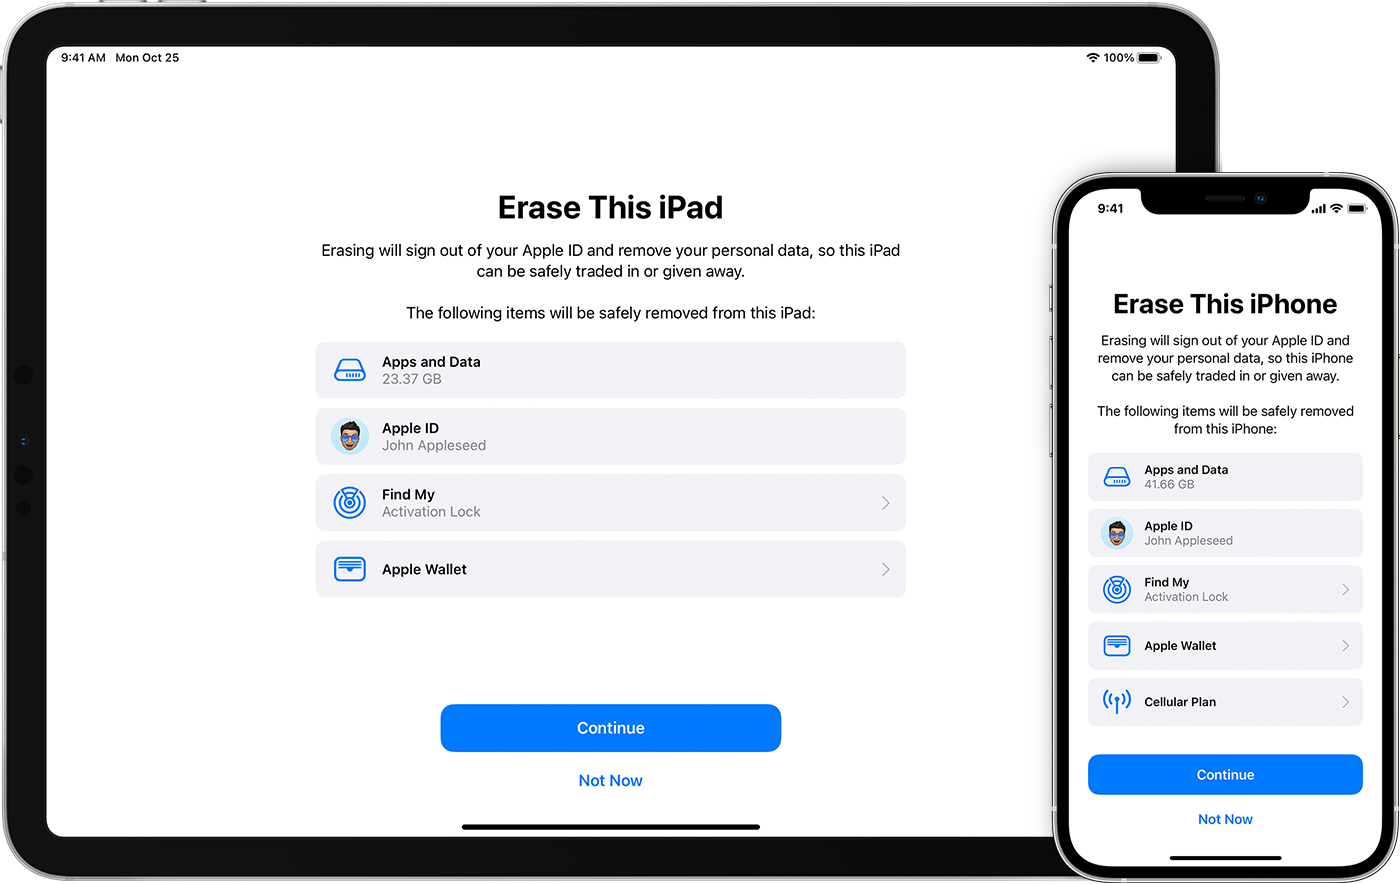
Before you sell, give away, or trade in your device, you should first transfer information to your new device, then remove your personal information from your old device.
You shouldn’t manually delete your contacts, calendars, reminders, documents, photos, or any other iCloud information while you’re signed in to iCloud with your Apple ID. This would delete your content from the iCloud servers and any of your devices signed in to iCloud.
If you still have your iPhone, iPad, or iPod touch
Follow these steps to transfer information to your new device, then remove your personal information from your old device.
Transfer information to your new device
If you have a new iPhone, iPad, or iPod touch, you can use Quick Start to automatically transfer information from your old device to your new device if you’re using iOS 11 or later. Use iCloud, iTunes, or the Finder to transfer information to your new device if you’re using iOS 10 or earlier.
If your phone number will change with your new device, add additional trusted phone numbers to your account to ensure you don’t lose access. If you no longer have access to your old phone number, you can generate a two-factor authentication code on your old device if needed.
Remove your personal information from your old device
- If you paired an Apple Watch with your iPhone, unpair your Apple Watch.
- Back up your device.
- Sign out of iCloud and the iTunes & App Store.
- If you’re using iOS 10.3 or later, tap Settings > [your name]. Scroll down and tap Sign Out. Enter your Apple ID password and tap Turn Off.
- If you’re using iOS 10.2 or earlier, tap Settings > iCloud > Sign Out. Tap Sign Out again, then tap Delete from My [device] and enter your Apple ID password. Then go to Settings > iTunes & App Store > Apple ID > Sign Out.
- If you’re switching to a non-Apple phone, deregister iMessage.
- Go back to Settings and tap General > Transfer or Reset [device] > Erase All Content and Settings. If you turned on Find My [device], you might need to enter your Apple ID and password. If your device uses eSIM, choose the option to erase your device and the eSIM profile when asked.
- If asked for your device passcode or Restrictions passcode, enter it. Then tap Erase [device].
- Contact your carrier for help transferring service to a new owner. If you aren’t using a SIM card with your device, you can contact them to get help transferring service to the new owner.
- Remove your old device from your list of trusted devices.
When you erase your iPhone, iPad, or iPod touch, Find My [device] and Activation Lock are turned off.

If you no longer have your iPhone, iPad, or iPod touch
If the steps above weren’t completed and you no longer have your device, use these steps:
- Ask the new owner to erase all content and settings using the above steps.
- If you’re using iCloud and Find My [device] on the device, sign in to iCloud.com/find or the Find My app on another device, select the device, and click Erase. After the device has been erased, click Remove from Account.
- If you can’t follow either of the above steps, change your Apple ID password. This won’t remove personal information that’s stored on your old device, but it prevents the new owner from deleting your information from iCloud.
- If you’re switching to a non-Apple phone, deregister iMessage.
- If you’re using Apple Pay, you can remove your credit or debit cards at iCloud.com. Choose Account Settings to see which devices are using Apple Pay, then click the device. Next to Apple Pay, click Remove.
- Remove your old device from your list of trusted devices.
If you’re trading in an Android device to Apple
Before you send in an Android device to Apple as a trade-in, be sure to do the following:
- Back up your data.
- Erase the device.
- Remove any SIM cards, memory cards, cases, and screen protectors.
Contact your device’s manufacturer if you need help.
Learn more
- Make a backup of your iPhone, iPad, or iPod touch or restore from a backup.
- Remove all of your cards from Apple Pay.
- Get help if your iPhone, iPad, or iPod touch is lost or stolen.
- Learn about Activation Lock.
- No matter the model or condition, we can turn your device into something good for you and good for the planet. Learn how to trade in or recycle your iPhone, iPad, or iPod touch with Apple Trade In.
When you tap Erase All Content and Settings, it completely erases your device, including any credit or debit cards you added for Apple Pay and any photos, contacts, music, or apps. It will also turn off iCloud, iMessage, FaceTime, Game Center, and other services. Your content won’t be deleted from iCloud when you erase your device.
Источник
Downgrade or cancel your iCloud+ plan
If you have more space in iCloud than you need, you can downgrade or cancel your iCloud+ plan on your iPhone, iPad, iPod touch, Mac, or PC.
What happens when you downgrade or cancel iCloud+
- If your iCloud storage exceeds your new storage plan capacity, iCloud won’t sync or update your information. iCloud updates again when you increase your storage capacity or delete information to make more space.
- If you downgrade to the free iCloud plan, your storage will be reduced to 5GB and you will no longer have access to iCloud+ features like Hide My Email, Private Relay, and HomeKit Secure Video support.*
- When you downgrade or cancel your plan, the storage change takes effect after your current subscription billing period ends.**
- To make sure you don’t lose any information, learn how to copy what’s in iCloud.
* Not all features are available in all countries or regions.
** Partial refunds are available where required by law. If you recently changed your iCloud storage plan, contact Apple within 14 days for a refund. Learn how to request a refund.
![]()
Downgrade or cancel on your iPhone, iPad, or iPod touch
- Go to Settings > [your name] > iCloud > Manage Storage or iCloud Storage.
- Tap Change Storage Plan.
- Tap Downgrade Options and enter your Apple ID password.
- Choose a different plan.
- Tap Done. Can’t tap Done?
![]()
Downgrade or cancel on your Mac
- Choose Apple menu > System Preferences, then click Apple ID. If you’re using macOS Mojave or earlier, you don’t need to click Apple ID.
- Click iCloud.
- Click Manage.
- Click Change Storage Plan.
- Click Downgrade Options.
- Enter your Apple ID password, then click Manage.
- Choose a different plan.
- Click Done. Can’t click Done?
![]()
Downgrade or cancel on your Windows PC
- Open iCloud for Windows.
- Click Storage.
- Click Change Storage Plan.
- Click Downgrade Options.
- Enter your Apple ID password, then click Manage.
- Choose a different plan.
- Click Done. Can’t click Done?
![]()
If you subscribe to Apple One
Apple Music, Apple TV+, Apple Arcade, iCloud+, and more are combined into one simple plan with Apple One. If you already have an iCloud+ plan, you don’t need to cancel it when you sign up for Apple One. Learn what happens to your iCloud+ plan when you subscribe.
If you pay for both Apple One and an iCloud+ plan, you can downgrade or cancel the iCloud+ plan and just use the iCloud+ plan included in Apple One.
If you downgrade or cancel the iCloud+ plan included in Apple One, you also cancel your Apple One subscription. Learn how to see or cancel your subscriptions.
If you can’t select Done
If you can’t click Done, make sure you are signed in with the same Apple ID as your iCloud storage plan. You can also try following these steps on a different device. If you still need help, contact Apple Support.
![]()
Learn more
- iCloud+ bills to the payment method that you use with your Apple ID. You can add, remove, or change your payment method.
- Discover what iCloud backs up.
- If you want to turn off some iCloud features off or turn off iCloud completely, learn what to do.
- If you don’t have one of these devices, contact Apple Support to change your iCloud+ plan.
Information about products not manufactured by Apple, or independent websites not controlled or tested by Apple, is provided without recommendation or endorsement. Apple assumes no responsibility with regard to the selection, performance, or use of third-party websites or products. Apple makes no representations regarding third-party website accuracy or reliability. Contact the vendor for additional information.
Источник
How to Completely Erase iPhone from iCloud
Find out some tips on how to permanently erase all data on iPhone/iPad devices with and without iCloud.
Erase Data

Basil Rathbone
• Filed to: Erase iPhone • Proven solutions
If you have lost your iPhone or you’re planning to sell or give it away, it’s always advisable to permanently delete all the sensitive date saved on the device. This shields the data from unauthorized access.
Would you like erase iPhone from iCloud? Are you wondering this right now? Well, we have a solution for that. In this post, you’re going to learn two TOP methods of erasing all content and settings on your iPhone from iCloud. The methods have been outlined in clear step-by-step guides to make it easy for you to comprehend.
Part 1. How to Erase iPhone from iCloud with Find My iPhone
Find My iPhone is an App developed by iPhone to help all the iOS device and Mac users track their lost devices. Other than this, the app helps you permanently delete all the data saved on your iPhone.
Steps on How to Wipe Out Your iPhone Device from iCloud
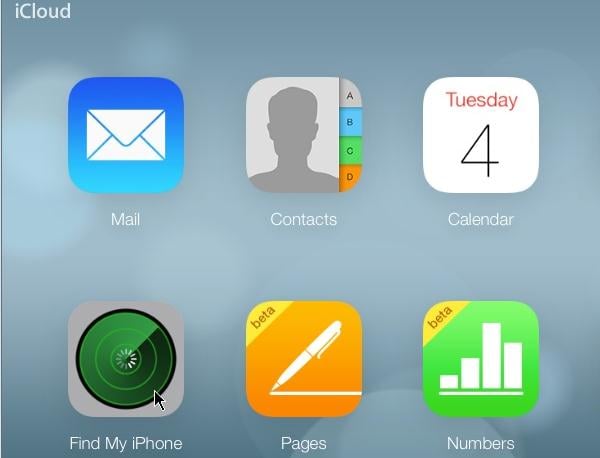
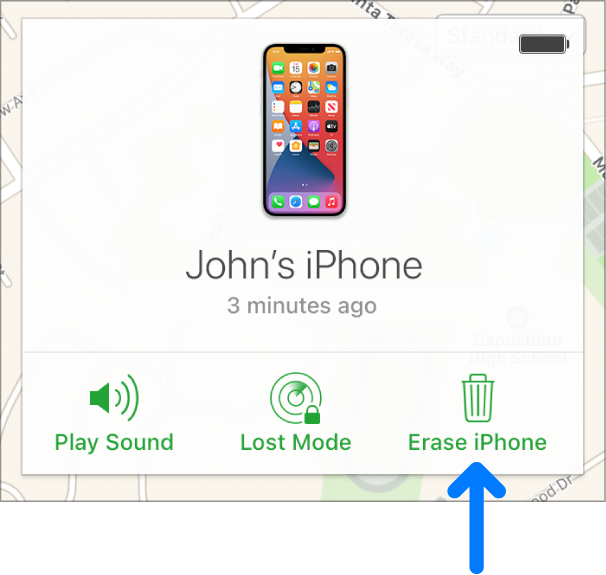
Step 1. Click on the «Find My iPhone» on your iCloud account.
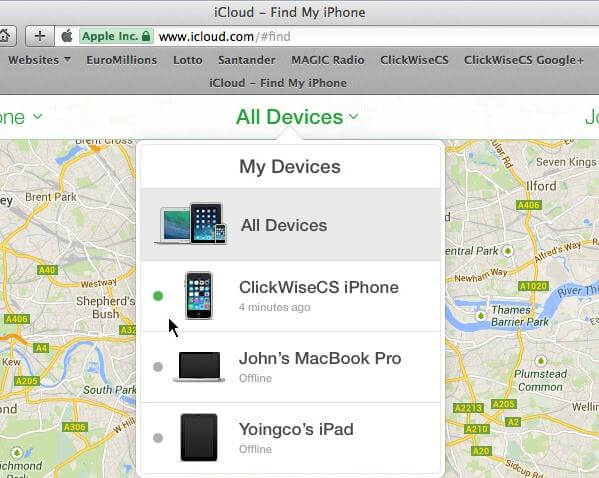
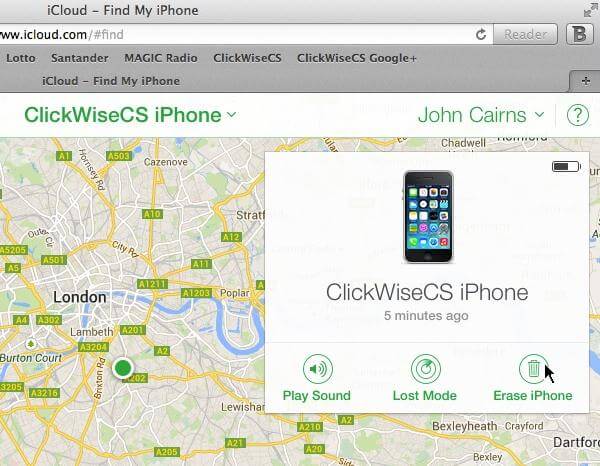
Step 2. Next, click on “All the devices” and select the device you want to delete from iCloud. Then a Window will pop up for your device. Simply click “Erase iPhone” to initiate the process.
Step 3. Once you click on the «Erase» button, you’re directed to a page where you are supposed to enter your Apple ID password.
Part 2. How to Erase iPhone without iCloud
There is another option that lets you erase iPhone without iCloud. As is known to us, factory resetting your device isn’t the safest method to erase your data permanently. The dr.fone — Data Eraser (iOS) is created to allow you to permanently erase all the deleted files from your iPhones.

dr.fone — Data Eraser (iOS)
Erase all Data permanently on iOS Devices
- It can erases a wide range of content, e.g. messages, call logs, videos, photos, voice memos, browsing history.
- It can ensure that all the private data you don’t want to fall into the wrong hands is permanently deleted.
- The program can also remove all the unnecessary processes running in the background and junk files.
- It supports all iOS (iOS10) devices, including latest iPhone (iPhone xs Mac), iPad, iPod touch.
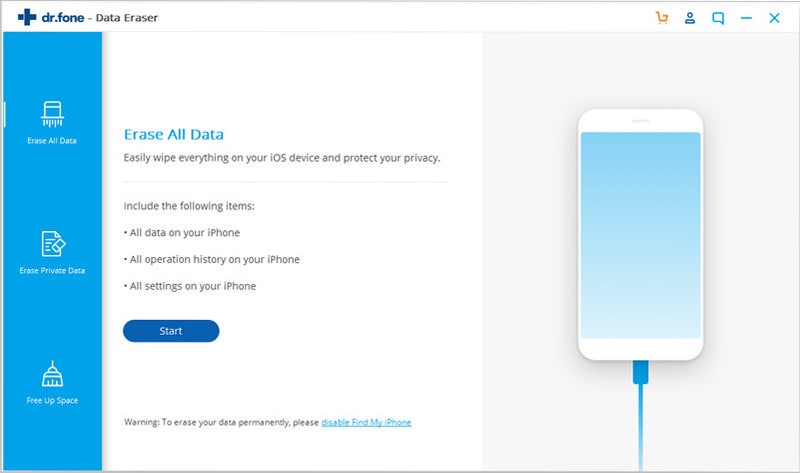
Steps on How to Erase iPhone without iCloud Using «Erase Private Data» Mode
Step 1. First, download and install the dr.fone. Then launch it and click on the «Erase» and «Erase all data» respectively.
Step 2. Tthe program will automatically starts scanning and analyzing the data stored on your device.
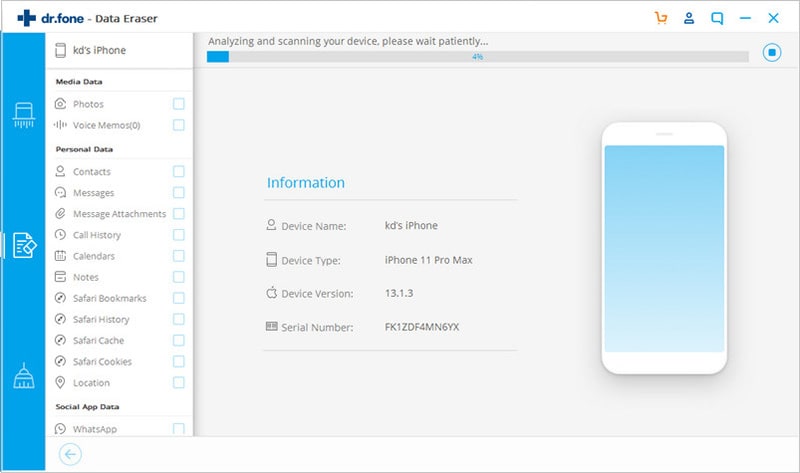
Step 3. When the scan is over, the program displays various private data in categories. Simply select the data you wish to erase.
Источник
Erase a device in Find My iPhone on iCloud.com
If your iPhone, iPad, iPod touch, Mac, or Apple Watch is lost or stolen, you can erase it in Find My iPhone on iCloud.com.
To sign in to Find My iPhone, go to icloud.com/find.
What happens when you erase a device in Find My iPhone?
A confirmation email is sent to your Apple ID email address.
Activation Lock remains on to protect it. Your Apple ID and password are required to reactivate the device.
If you erase a device that had iOS 15, iPadOS 15, or later installed, you can use Find My to locate or play a sound on the device. Otherwise, you won’t be able to locate or play a sound on it. You may still be able to locate your Mac or Apple Watch if it’s near a previously used Wi-Fi network.
Apple Pay is disabled for your device. Any credit or debit cards set up for Apple Pay, student ID cards, and Express Transit cards are removed from your device. Credit, debit, and student ID cards are removed even if your device is offline. Express Transit cards are removed the next time your device goes online. See the Apple Support article Manage the cards that you use with Apple Pay.
If you use two-factor authentication, the device that you erased is removed from your list of trusted devices.
If you erase but then find your device, you can restore the information on it with an existing backup. See the Apple Support articles Restore your iPhone, iPad, or iPod touch from a backup, Restore your Mac from a backup, and Restore Apple Watch from a backup.
Remotely erase your device or a family member’s device
In Find My iPhone on iCloud.com, click All Devices, then select the device you want to erase.
If you don’t see All Devices, it’s because you’ve already selected a device. Click the name of the current device in the center of the toolbar to access the Devices list, then select a new device.
Click Erase [device].
Do one of the following, depending on what you want to erase:
iPhone, iPad, iPod touch, or Apple Watch: Enter your Apple ID password or your family member’s Apple ID password. If you’re not using a trusted browser, answer your security questions or enter the verification code that’s sent to your other devices. If you’re using your own computer and want to skip the verification step in the future, click Trust. If you’re using a friend’s computer, click Don’t Trust.
Mac: Enter your Apple ID password or your family member’s Apple ID password. If you’re not using a trusted browser, answer your security questions or enter the verification code that’s sent to your other devices. If you’re using your own computer and want to skip the verification step in the future, click Trust. If you’re using a friend’s computer, click Don’t Trust. Enter a passcode to lock the Mac (you need to use the passcode to unlock it).
If the device is lost and you’re asked to enter a phone number or message, you may want to indicate that the device is lost or how to contact you. The number and message appear on the device’s Lock screen.
If your device is online, the remote erase begins after you follow the onscreen instructions. If your device is offline, the remote erase begins the next time it’s online.
For more information about trusted devices and verification codes, see the Apple Support article Two-factor authentication for Apple ID.
Cancel an erase
If your device is offline, the remote erase happens the next time it’s online. If you find the device before it’s erased, you can cancel the request.
In Find My iPhone on iCloud.com, click All Devices, then select the device.
If you don’t see All Devices, it’s because you’ve already selected a device. Click the name of the current device in the center of the toolbar to access the Devices list, then select a new device.
Click Stop Erase Request, then enter your Apple ID password.
You can also use Find My on any device that’s signed in with the same Apple ID. See Use Find My to locate people, devices, and items.
If Find My isn’t set up on your missing device, see the Apple Support article If your iPhone, iPad, or iPod touch is lost or stolen.
Note: If you don’t expect to find your iPhone, iPad (Wi-Fi + Cellular models), or Apple Watch (Wi-Fi + Cellular models), contact your wireless service provider to suspend service so you aren’t responsible for phone calls or other charges.
Источник


