- Erase a device in Find My iPhone on iCloud.com
- What happens when you erase a device in Find My iPhone?
- Remotely erase your device or a family member’s device
- Cancel an erase
- Erase a device in Find My iPhone on iCloud.com
- What happens when you erase a device in Find My iPhone?
- Remotely erase your device or a family member’s device
- Cancel an erase
- Erase a device in Find My iPhone on iCloud.com
- What happens when you erase a device in Find My iPhone?
- Remotely erase your device or a family member’s device
- Cancel an erase
- If you forgot your iPhone passcode
- Step 1: Make sure that you have a computer (Mac or PC)
- Step 2: Turn off your iPhone
- Step 3: Put your iPhone in recovery mode
- Step 4: Restore your iPhone
- Need more help?
Erase a device in Find My iPhone on iCloud.com
If your iPhone, iPad, iPod touch, Mac, or Apple Watch is lost or stolen, you can erase it in Find My iPhone on iCloud.com.
To sign in to Find My iPhone, go to icloud.com/find.
What happens when you erase a device in Find My iPhone?
A confirmation email is sent to your Apple ID email address.
Activation Lock remains on to protect it. Your Apple ID and password are required to reactivate the device.
If you erase a device that had iOS 15, iPadOS 15, or later installed, you can use Find My to locate or play a sound on the device. Otherwise, you won’t be able to locate or play a sound on it. You may still be able to locate your Mac or Apple Watch if it’s near a previously used Wi-Fi network.
Apple Pay is disabled for your device. Any credit or debit cards set up for Apple Pay, student ID cards, and Express Transit cards are removed from your device. Credit, debit, and student ID cards are removed even if your device is offline. Express Transit cards are removed the next time your device goes online. See the Apple Support article Manage the cards that you use with Apple Pay.
If you use two-factor authentication, the device that you erased is removed from your list of trusted devices.
If you erase but then find your device, you can restore the information on it with an existing backup. See the Apple Support articles Restore your iPhone, iPad, or iPod touch from a backup, Restore your Mac from a backup, and Restore Apple Watch from a backup.
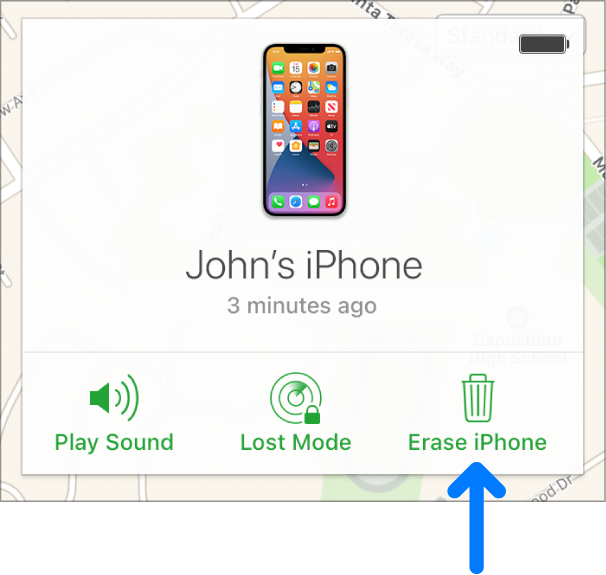
Remotely erase your device or a family member’s device
In Find My iPhone on iCloud.com, click All Devices, then select the device you want to erase.
If you don’t see All Devices, it’s because you’ve already selected a device. Click the name of the current device in the center of the toolbar to access the Devices list, then select a new device.
Click Erase [device].
Do one of the following, depending on what you want to erase:
iPhone, iPad, iPod touch, or Apple Watch: Enter your Apple ID password or your family member’s Apple ID password. If you’re not using a trusted browser, answer your security questions or enter the verification code that’s sent to your other devices. If you’re using your own computer and want to skip the verification step in the future, click Trust. If you’re using a friend’s computer, click Don’t Trust.
Mac: Enter your Apple ID password or your family member’s Apple ID password. If you’re not using a trusted browser, answer your security questions or enter the verification code that’s sent to your other devices. If you’re using your own computer and want to skip the verification step in the future, click Trust. If you’re using a friend’s computer, click Don’t Trust. Enter a passcode to lock the Mac (you need to use the passcode to unlock it).
If the device is lost and you’re asked to enter a phone number or message, you may want to indicate that the device is lost or how to contact you. The number and message appear on the device’s Lock screen.
If your device is online, the remote erase begins after you follow the onscreen instructions. If your device is offline, the remote erase begins the next time it’s online.
For more information about trusted devices and verification codes, see the Apple Support article Two-factor authentication for Apple ID.
Cancel an erase
If your device is offline, the remote erase happens the next time it’s online. If you find the device before it’s erased, you can cancel the request.
In Find My iPhone on iCloud.com, click All Devices, then select the device.
If you don’t see All Devices, it’s because you’ve already selected a device. Click the name of the current device in the center of the toolbar to access the Devices list, then select a new device.
Click Stop Erase Request, then enter your Apple ID password.
You can also use Find My on any device that’s signed in with the same Apple ID. See Use Find My to locate people, devices, and items.
If Find My isn’t set up on your missing device, see the Apple Support article If your iPhone, iPad, or iPod touch is lost or stolen.
Note: If you don’t expect to find your iPhone, iPad (Wi-Fi + Cellular models), or Apple Watch (Wi-Fi + Cellular models), contact your wireless service provider to suspend service so you aren’t responsible for phone calls or other charges.
Источник
Erase a device in Find My iPhone on iCloud.com
If your iPhone, iPad, iPod touch, Mac, or Apple Watch is lost or stolen, you can erase it in Find My iPhone on iCloud.com.
To sign in to Find My iPhone, go to icloud.com/find.
What happens when you erase a device in Find My iPhone?
A confirmation email is sent to your Apple ID email address.
Activation Lock remains on to protect it. Your Apple ID and password are required to reactivate the device.
If you erase a device that had iOS 15, iPadOS 15, or later installed, you can use Find My to locate or play a sound on the device. Otherwise, you won’t be able to locate or play a sound on it. You may still be able to locate your Mac or Apple Watch if it’s near a previously used Wi-Fi network.
Apple Pay is disabled for your device. Any credit or debit cards set up for Apple Pay, student ID cards, and Express Transit cards are removed from your device. Credit, debit, and student ID cards are removed even if your device is offline. Express Transit cards are removed the next time your device goes online. See the Apple Support article Manage the cards that you use with Apple Pay.
If you use two-factor authentication, the device that you erased is removed from your list of trusted devices.
If you erase but then find your device, you can restore the information on it with an existing backup. See the Apple Support articles Restore your iPhone, iPad, or iPod touch from a backup, Restore your Mac from a backup, and Restore Apple Watch from a backup.
Remotely erase your device or a family member’s device
In Find My iPhone on iCloud.com, click All Devices, then select the device you want to erase.
If you don’t see All Devices, it’s because you’ve already selected a device. Click the name of the current device in the center of the toolbar to access the Devices list, then select a new device.
Click Erase [device].
Do one of the following, depending on what you want to erase:
iPhone, iPad, iPod touch, or Apple Watch: Enter your Apple ID password or your family member’s Apple ID password. If you’re not using a trusted browser, answer your security questions or enter the verification code that’s sent to your other devices. If you’re using your own computer and want to skip the verification step in the future, click Trust. If you’re using a friend’s computer, click Don’t Trust.
Mac: Enter your Apple ID password or your family member’s Apple ID password. If you’re not using a trusted browser, answer your security questions or enter the verification code that’s sent to your other devices. If you’re using your own computer and want to skip the verification step in the future, click Trust. If you’re using a friend’s computer, click Don’t Trust. Enter a passcode to lock the Mac (you need to use the passcode to unlock it).
If the device is lost and you’re asked to enter a phone number or message, you may want to indicate that the device is lost or how to contact you. The number and message appear on the device’s Lock screen.
If your device is online, the remote erase begins after you follow the onscreen instructions. If your device is offline, the remote erase begins the next time it’s online.
For more information about trusted devices and verification codes, see the Apple Support article Two-factor authentication for Apple ID.
Cancel an erase
If your device is offline, the remote erase happens the next time it’s online. If you find the device before it’s erased, you can cancel the request.
In Find My iPhone on iCloud.com, click All Devices, then select the device.
If you don’t see All Devices, it’s because you’ve already selected a device. Click the name of the current device in the center of the toolbar to access the Devices list, then select a new device.
Click Stop Erase Request, then enter your Apple ID password.
You can also use Find My on any device that’s signed in with the same Apple ID. See Use Find My to locate people, devices, and items.
If Find My isn’t set up on your missing device, see the Apple Support article If your iPhone, iPad, or iPod touch is lost or stolen.
Note: If you don’t expect to find your iPhone, iPad (Wi-Fi + Cellular models), or Apple Watch (Wi-Fi + Cellular models), contact your wireless service provider to suspend service so you aren’t responsible for phone calls or other charges.
Источник
If you forgot your iPhone passcode
Forgot your iPhone passcode? Learn how to get your iPhone into recovery mode so you can erase it and set it up again.
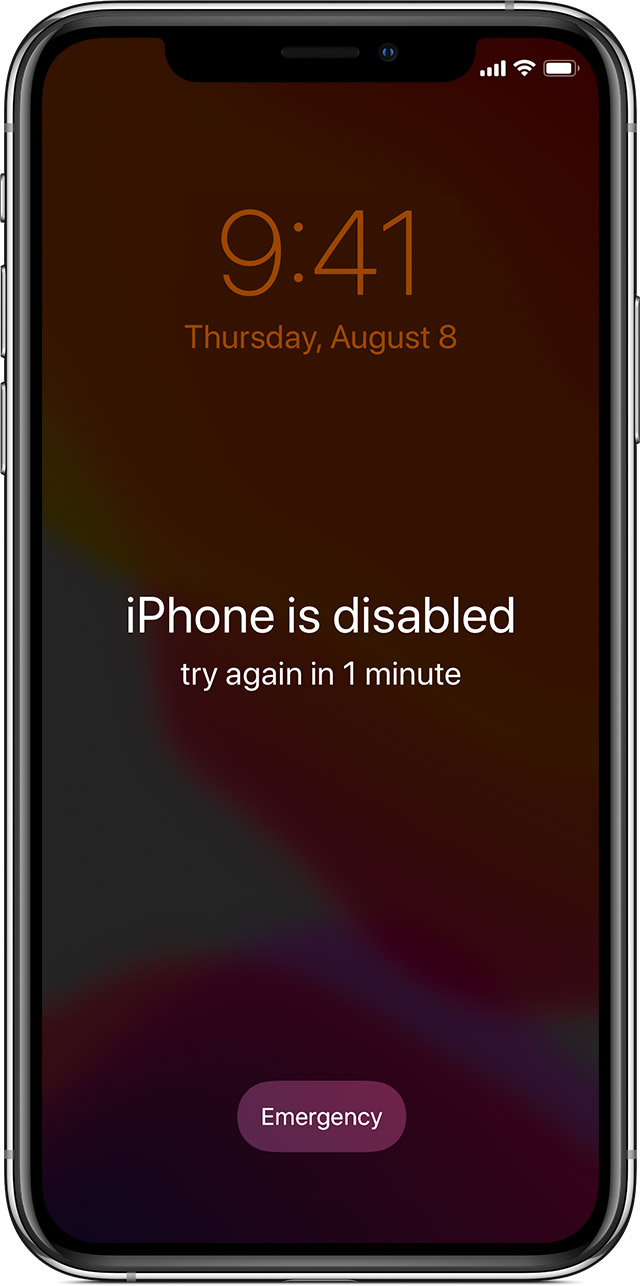
If you enter the wrong passcode on your iPhone Lock Screen too many times, an alert lets you know that your iPhone is disabled. If you can’t remember your passcode when you try again, you need to use a computer to put your iPhone in recovery mode. This process deletes your data and settings, including your passcode, giving you access to set up your iPhone again.
After you erase your iPhone, you can restore your data and settings from backup. If you didn’t back up your iPhone, you can set it up as a new device and then download any data that you have in iCloud.
![]()
Step 1: Make sure that you have a computer (Mac or PC)
This process requires a Mac or PC. If you’re using a PC, make sure that it has Windows 8 or later, and that iTunes is installed. You also need the cable that came with your iPhone, or another compatible cable, to connect your iPhone to the computer.
If you don’t have a computer and you can’t borrow one, you need to go to an Apple Retail Store or Apple Authorized Service Provider for help.

Step 2: Turn off your iPhone
- Unplug your iPhone from the computer if it’s connected.
- Turn off your iPhone using the method for your iPhone model:
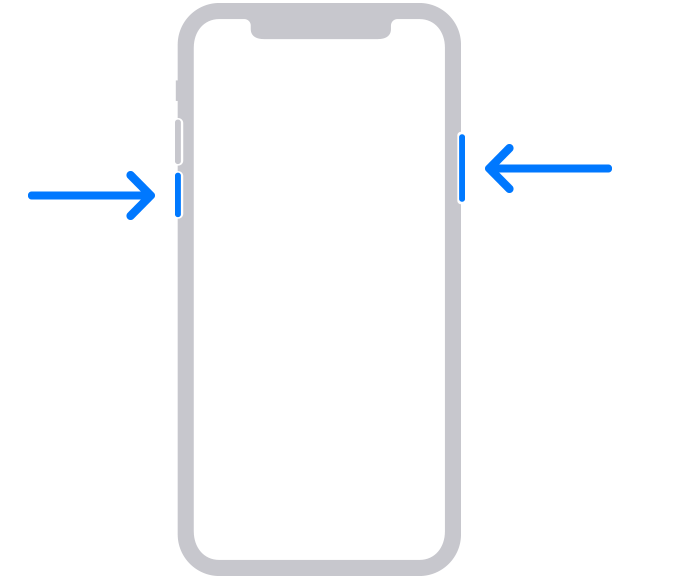
- iPhone X or later, iPhone SE (2nd generation), iPhone 8, and iPhone 8 Plus: Press and hold both the Side button and the Volume down button until the power off slider appears.

- iPhone 7 and iPhone 7 Plus: Press and hold the Side button until the power off slider appears.
- iPhone SE (1st generation), and iPhone 6s and earlier: Press and hold the Side (or Top) button until the power off slider appears.
- iPhone X or later, iPhone SE (2nd generation), iPhone 8, and iPhone 8 Plus: Press and hold both the Side button and the Volume down button until the power off slider appears.
- Drag the slider to turn off your iPhone, then wait a minute to make sure that it turns off completely.

Step 3: Put your iPhone in recovery mode
- Get ready by finding the button on your iPhone that you’ll need to hold in the next step:
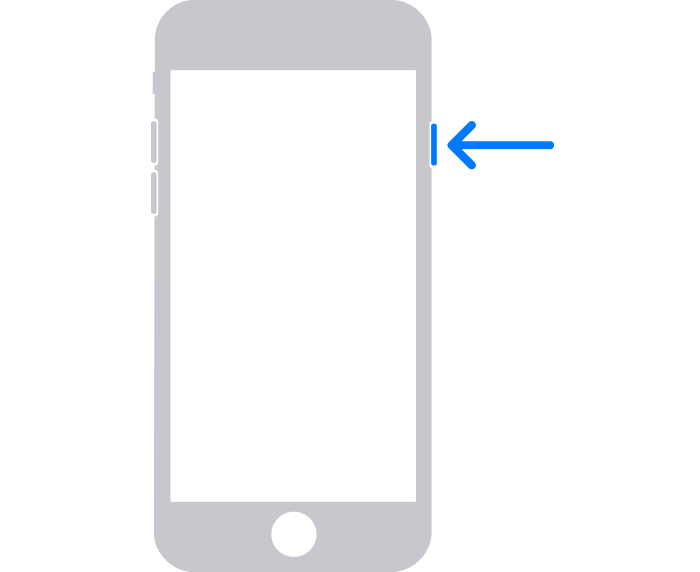
- iPhone X or later, iPhone SE (2nd generation), iPhone 8, and iPhone 8 Plus use the Side button.
- iPhone 7 and iPhone 7 Plus use the Volume down button.
- iPhone SE (1st generation), and iPhone 6s and earlier use the Home button.
- Press and hold the correct button for your iPhone while immediately connecting your iPhone to the computer. Don’t let go of the button.
- Keep holding the button until you see the recovery mode screen on your iPhone, then let go.
If you see the passcode screen, you need to turn off your iPhone and start again.
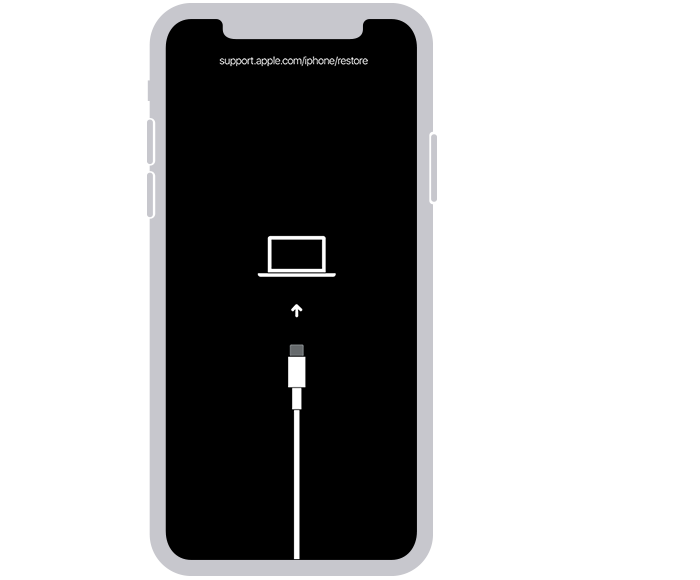
If you can’t get your iPhone to show the recovery mode screen and you need help, contact Apple Support.
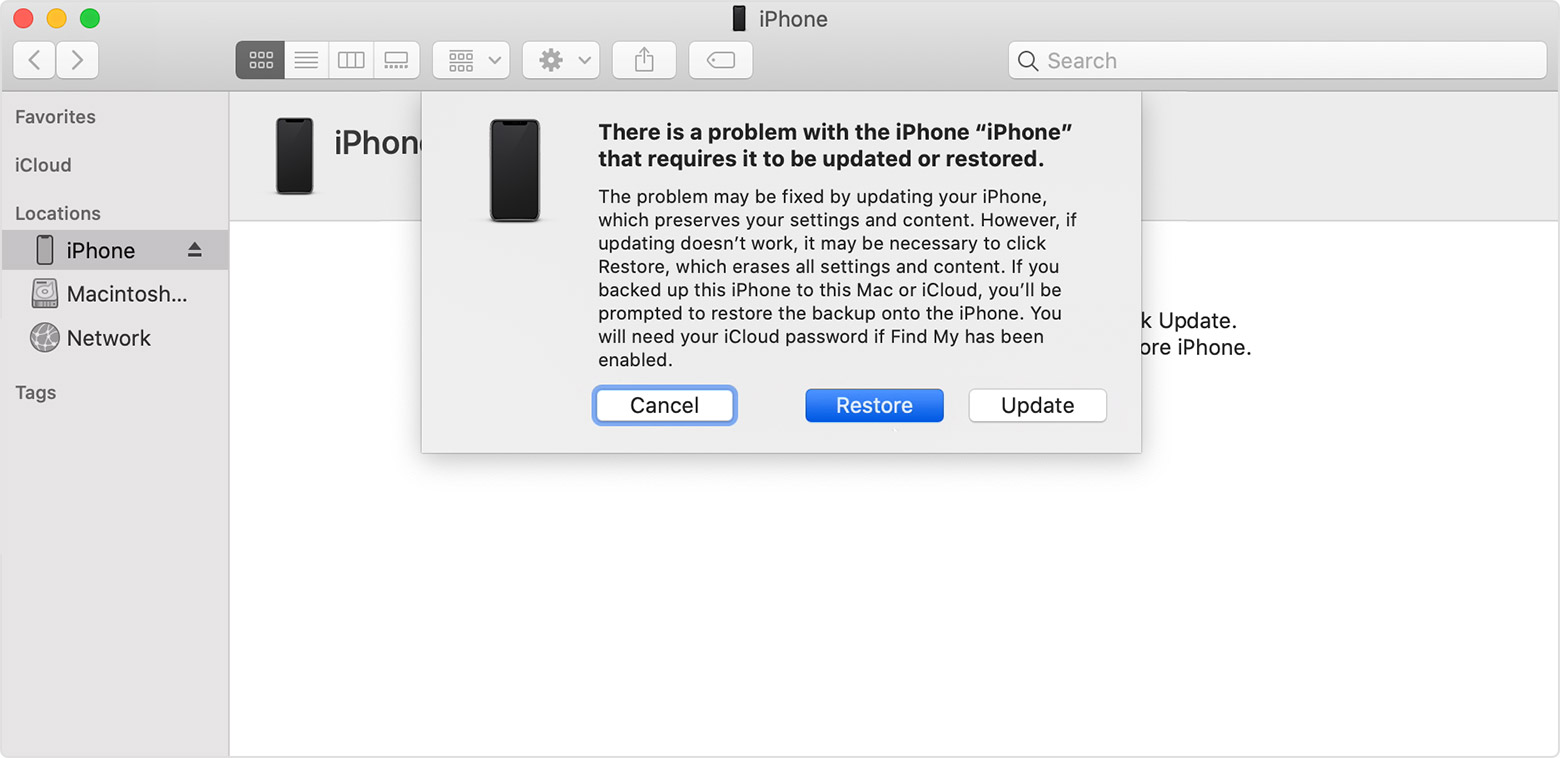
Step 4: Restore your iPhone
- Locate your iPhone in the Finder or in iTunes on the computer that it’s connected to. (Learn how to find your connected iPhone.)
- Choose Restore when you see the option to Restore or Update. Your computer downloads software for your iPhone and begins the restore process. If the download takes more than 15 minutes and your device exits the recovery mode screen, let the download finish, then turn off your iPhone and start again.
- Wait for the process to finish.
- Disconnect your iPhone from the computer, then set up and use your iPhone.
Need more help?
If you can’t complete any of these steps, if you’re still prompted for a passcode, or if you need any other assistance, contact Apple Support.
Источник


