- [Solved] ADB Device Not Found Error on Windows
- Pick the way you prefer:
- Way 1: Install the correct driver for your ADB device manually through Device Manager
- Way 2: Install the correct driver for your ADB device automatically through Driver Easy [Recommended]
- Fix: ADB Devices Not Found
- What Causes the ADB Device Not Found Error?
- Method 1: Enable Developer Options and USB Debugging
- Method 2: Change Connection Mode
- Method 3: Update ADB Interface
- Method 4: Install Universal ADB Windows Driver
- Method 5: Reset the ADB Process
- Method 6: Change the Cable
- Исправлено: устройства ADB не найдены —
- В чем причина отсутствия устройства ADB Device?
- Способ 1. Включение параметров разработчика и отладки по USB
- Способ 2: изменение режима подключения
- Метод 3: Обновление интерфейса ADB
- Способ 4: установка универсального драйвера ADB для Windows
- Метод 5: Сброс процесса
- Способ 6: замена кабеля
[Solved] ADB Device Not Found Error on Windows
Last Updated: 7 months ago
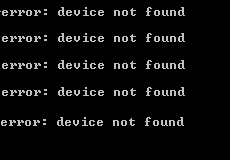
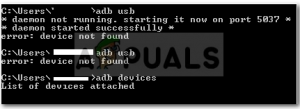
ADB, short for Android Debug Bridge, is a command-line utility. It can allow you control your device over USB from a computer. And it’s included by Google’s Android SDK. The annoying thing is, many users and you encounter the error device not found when you try to use it.
Don’t worry. It’s not a problem that cannot be solved any more. Here in this article, you’ll learn how to fix ADB device not found step by step.
ADB Device Not Found Error is always a driver issue. In other words, if you found ADB device not found error on your computer, it’s very likely there is problem with your ADM device driver.So you can probably fix this problem through installing the correct driver for the ADB device.
Here you’ll be shown with two ways to install the correct driver for your ADB device.
Pick the way you prefer:
Way 1: Install the correct driver for your ADB device manually through Device Manager
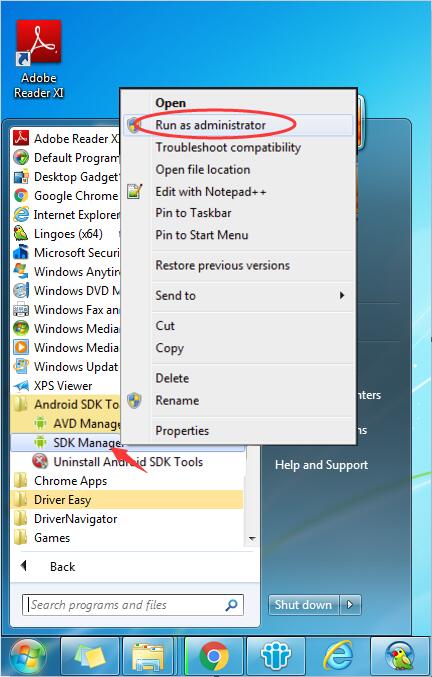
1) Find your SDK manager from Start list. Right-click on it and choose Run as administrator. Then click Yes when prompted by User Account Control.
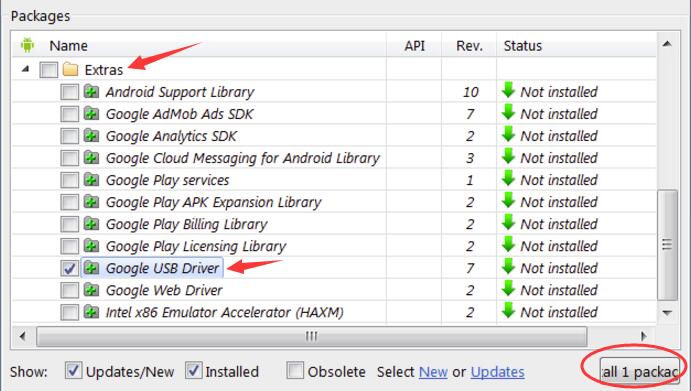
2) When SDK manager is open, find and expand Extras folder. Go on to find and tick on Google USB Driver under Extras folder. Then click Install 1 package at the bottom right.
3) When finish installing the driver, plug in your android device.
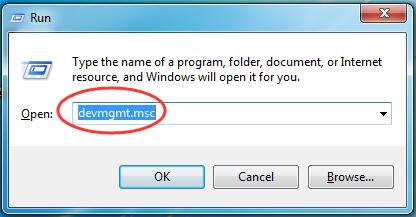
4) On your keyboard, press the Windows logo key  + R key at the same time.
5) Type devmgmt.msc in the box and press Enter to open Device Manager.
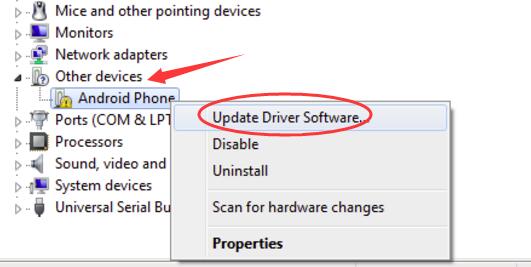
6) Find your android device. It’s probably under Other devices section with a yellow mark. Then right-click on it and choose Update Driver Software…
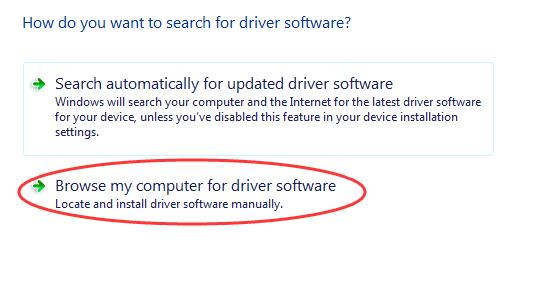
7) Click Browse my computer for driver software.
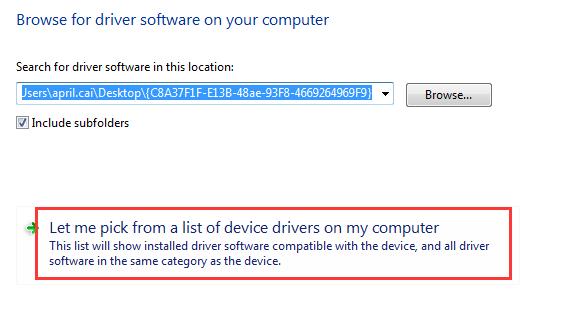
8) Go on to click Let me pick from a list of device drivers on my computer.
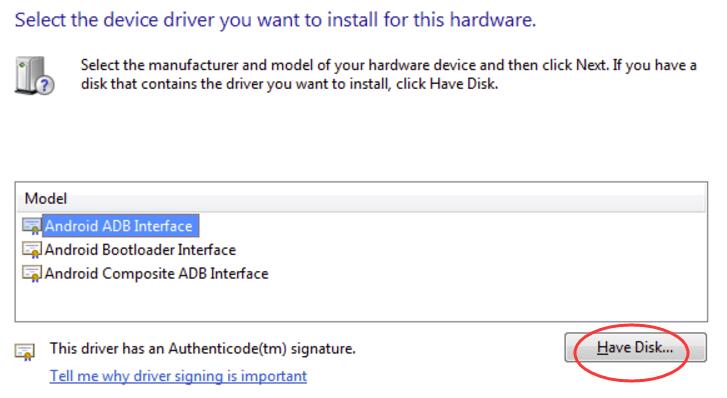
9) Click Have Disk.
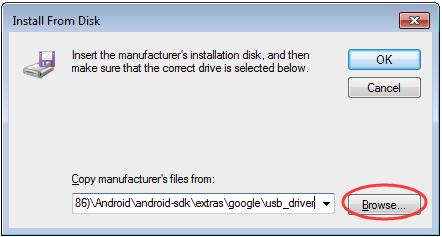
10) Click Browse to choose the Google USB Driver you downloaded at the beginning. Or you can enter the following address into the box.
C:\Program Files (x86)\Android\android-sdk\extras\google\usb_driver
Then click OK.
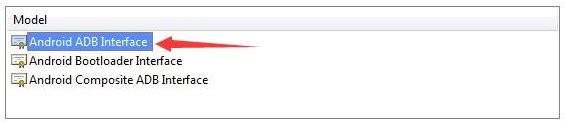
11) Double-click on Android ADB Interface.
12) Go on to follow the easy on-screen instructions to complete installing the driver.
After it’s done, please restart your computer to make the new driver take effect.
Now your problem should be solved, try to use ADB now.
Way 2: Install the correct driver for your ADB device automatically through Driver Easy [Recommended]
If you don’t have the time, patience or computer skills to update your ADB device driver manually, you can, instead, do it automatically with Driver Easy. Driver Easy will automatically recognize your system and find the correct driver for your exact ADB device, and your variant of Windows system, and it will download and install it correctly :
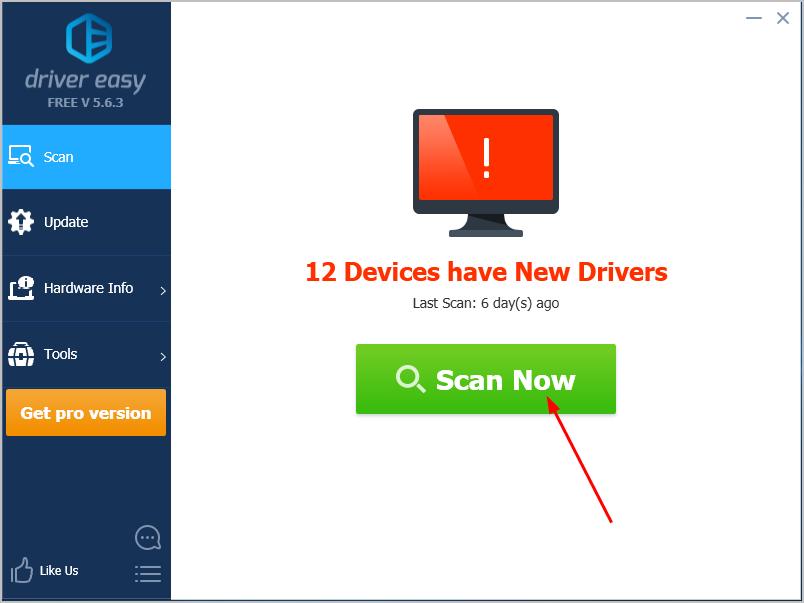
1) Download and install Driver Easy.
2) Run Driver Easy and click the Scan Now button. Driver Easy will then scan your computer and detect any problem drivers.
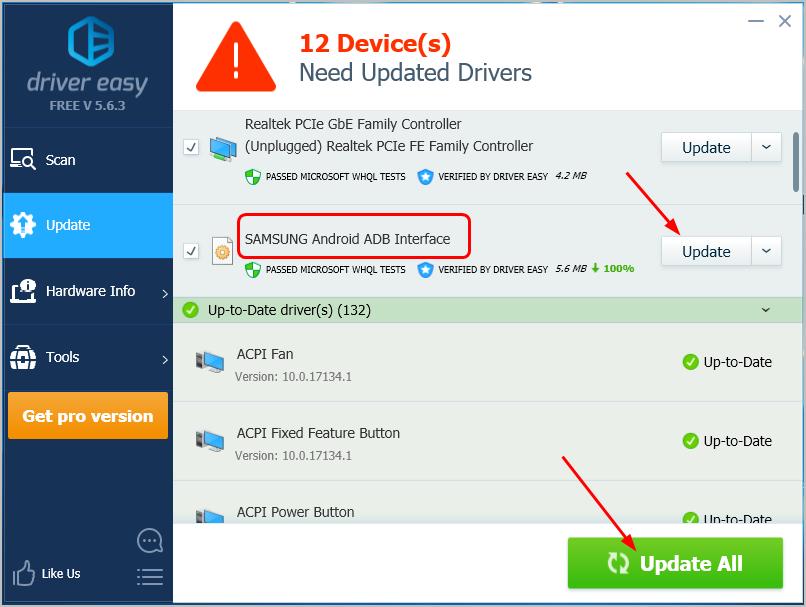
3) Click the Update button next to the flagged ADB device driver to automatically download and install the correct version of that driver (you can do this with the FREE version).
Or click Update All to automatically download and install the correct version of all the drivers that are missing or out of date on your system. (This requires the Pro version which comes with full support and a 30-day money back guarantee. You’ll be prompted to upgrade when you click Update All.)
4) After it’s done, please restart your computer to make the new driver take effect.
Now your problem should be solved, try to use ADB now.
Hopefully this has helped you fix the problem. Feel free to comment below with your own experiences.
Источник
Fix: ADB Devices Not Found
With smartphones being present everywhere, the need for transferring files from your personal computer to your smartphone and vice versa arises. Not only that, you might need to debug certain apps or install new ones, etc. for which a command-line utility called ADB or Android Debug Bridge is often used.
Occasionally, people end up with the issue of not being able to connect to their smartphones, even though, according to them, they’ve done everything right. Well, don’t worry, this is what we’re here for. This guide will let you in on how to solve the ‘Error: device not found’ problem — so sit back, relax and follow the instructions.
What Causes the ADB Device Not Found Error?
Before we jump into the solutions, you might want to know what causes this problem. Well, many things can result in this issue —
- The drivers are not updated. The drivers are the actors responsible for communicating with the interface and your OS. If it is not updated, you might encounter this error.
- USB debugging is not enabled. This mode is necessary for ADB to work on your Android device.
- Selection of wrong connection mode. A correct connection mode should be selected for the type of transfer you want to initiate.
Note: Make sure that you have ADB installed.
Method 1: Enable Developer Options and USB Debugging
To start, make sure you’ve enabled USB Debugging on your device since ADB doesn’t work otherwise. To do that:
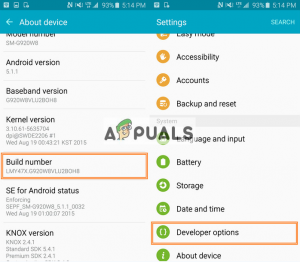
- Go to your phone Settings and select About.
- In About menu, tap on ‘Builder number’ seven times which enables Developer Options.
- After that, go back and select Developer options.
 Enable Developer Options
 - Scroll down and tap ‘USB Debugging’.
 Enable Developer Options
Method 2: Change Connection Mode
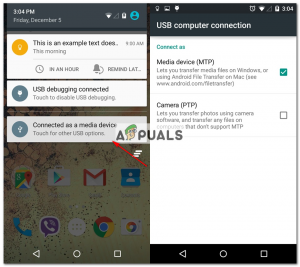
Android has different connection modes which can sometimes cause this problem. In the case of adb, we need MTP (Media Transfer Protocol). One thing to note is that your smartphone might have Transfer files instead of MTP which is the same. For this, what you have to do is:
- Make sure your device is correctly plugged in.
- Pull down the notification window and select the USB connection notification.
- There, select MTP as the connection mode. Select MTP as the connection mode
 Select MTP as the connection mode
 Note: Some people have reported that selecting the PTP mode worked for them, make sure to try that as well.
Method 3: Update ADB Interface
Sometimes, the issue is due to an outdated ADB interface driver. To update the driver, what you have to do is:
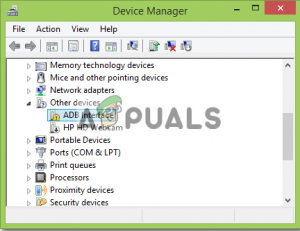
- On your computer, right-click on ‘My Computer’ and select Device Manager.
- Under Other Devices, you’ll see ‘Android ADB Interface’ or ‘Android Phone’. Right-click it and select ‘Update Driver Software’. ADB Interface Driver Update
- After that, select ‘Browse my computer for driver software’.
- Then, select ‘Let me pick from a list of device drivers on my computer’.
- A window will pop up, make sure ‘Show all devices’ is highlighted and click Next. Highlight Show All Devices
- Click the ‘Have Disk’ option.
- Go to where you’ve installed your SDK which is usually
 ADB Interface Driver Update
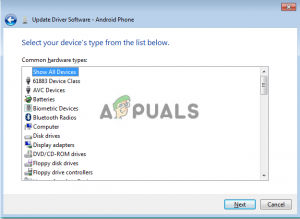 Highlight Show All Devices
where you’ll have to double click android_winusb.inf
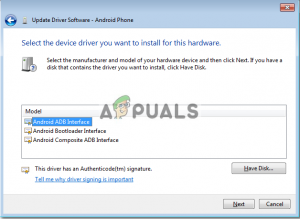 Select Android ADB Interface
You can try reconnecting your device if it doesn’t recognize it already.
Method 4: Install Universal ADB Windows Driver
If you are sure that the above-mentioned solutions are not going to work for you or didn’t work for you, installing Universal ADB Windows Driver might be the solution for you. It is pretty simple, download the driver from their official website and install it.
Method 5: Reset the ADB Process
It sometimes happens that everything else is working but you still can’t list your smartphone – meaning you have installed the USB driver, enabled USB debugging, etc. In such cases, killing the server and starting it again might help you out. To do that, type the following commands in the command line
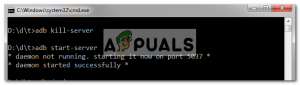 ADB Kill/Start Server
Method 6: Change the Cable
Finally, if nothing works out for you, getting a new cable might be the way for you. The chances of your cable being faulty are high which means no matter what you do, your problem will remain as the problem is not with your driver but rather with the hardware. To check whether your cable is faulty or not, try the following:
- Connect your cable to a port on a charger.
- Try charging your smartphone with that cable.
If it doesn’t start charging, this means your cable is at fault and you’ll have to get another.
Источник
Исправлено: устройства ADB не найдены —
Поскольку смартфоны присутствуют повсюду, возникает необходимость переноса файлов с вашего персонального компьютера на смартфон и наоборот. Мало того, вам может понадобиться отладить определенные приложения или установить новые и т. Д., Для которых часто используется утилита командной строки под названием ADB или Android Debug Bridge.
Иногда люди сталкиваются с проблемой невозможности подключения к своим смартфонам, хотя, по их мнению, они все сделали правильно. Ну, не волнуйтесь, это то, для чего мы здесь. Это руководство расскажет вам, как решить проблему «Ошибка: устройство не найдено» — так что расслабьтесь и следуйте инструкциям.
 Устройство ADB не найдено
В чем причина отсутствия устройства ADB Device?
Прежде чем мы перейдем к решениям, вы можете узнать, что действительно вызывает эту проблему. Ну, есть ряд вещей, которые могут привести к этой проблеме —
- драйверы не обновляются. Драйверы — это субъекты, отвечающие за взаимодействие с интерфейсом и вашей ОС. Если он не обновлен, вы можете столкнуться с этой ошибкой.
- USB отладки не включен Этот режим необходим для работы ADB на вашем устройстве Android.
- Выбор неправильного режима подключения. Правильный режим соединения должен быть выбран для типа передачи, которую вы хотите инициировать.
Примечание: если вы еще не установили adb, вы можете следовать нашему руководству, чтобы сделать это.
Способ 1. Включение параметров разработчика и отладки по USB
Для начала убедитесь, что на вашем устройстве включена отладка по USB, поскольку в противном случае ADB не работает. Для этого:
- Зайдите в настройки вашего телефона и выберите About.
- В меню «О программе» семь раз нажмите «Номер строителя», чтобы включить «Параметры разработчика».
- После этого вернитесь и выберите Параметры разработчика. Включить параметры разработчика
- Прокрутите вниз и нажмите «Отладка по USB».
 Включить параметры разработчика
Способ 2: изменение режима подключения
Android имеет разные режимы подключения, что иногда является причиной этой проблемы. В случае с adb нам нужен MTP (Media Transfer Protocol). Стоит отметить, что на вашем смартфоне вместо MTP может использоваться программа «Передача файлов», которая является такой же. Для этого вам необходимо:
- Убедитесь, что ваше устройство подключено правильно.
- Сверните окно уведомлений и выберите уведомление о подключении USB.
- Там выберите MTP в качестве режима подключения. Выберите MTP в качестве режима подключения
 Выберите MTP в качестве режима подключения
 Примечание. Некоторые люди сообщают, что выбор режима PTP работал для них, поэтому обязательно попробуйте это.
Метод 3: Обновление интерфейса ADB
Иногда проблема связана с устаревшим драйвером интерфейса ADB. Чтобы обновить драйвер, вам нужно сделать следующее:
- На вашем компьютере щелкните правой кнопкой мыши «Мой компьютер» и выберите «Диспетчер устройств».
- В разделе «Другие устройства» вы увидите «Android ADB Interface» или «Android Phone». Щелкните правой кнопкой мыши и выберите «Обновить драйвер». Обновление драйвера интерфейса ADB
- После этого выберите «Просмотреть мой компьютер для поиска драйверов».
- Затем выберите «Позвольте мне выбрать из списка драйверов устройств на моем компьютере».
- Появится окно, убедитесь, что «Показать все устройства» выделено, и нажмите «Далее». Выделить Показать все устройства
- Нажмите «Установить с диска».
- Перейдите туда, где вы установили свой SDK, обычно это C: \ Program Files \ Android \ android-sdk \ extras \\ google \ usb_driver \, где вам нужно будет дважды щелкнуть по android_winusb.inf
- Выберите «Интерфейс Android ADB» из списка. Выберите интерфейс Android ADB
- Нажмите «Да», а затем «Установить».
- Подождите, пока установка завершится, а затем закройте окно.
 Обновление драйвера интерфейса ADB
 Выделить Показать все устройства
 Выберите интерфейс Android ADB
Вы можете попробовать повторно подключить ваше устройство, если оно не распознает его.
Способ 4: установка универсального драйвера ADB для Windows
Если вы уверены, что вышеупомянутые решения не будут работать для вас или не работают для вас, установка универсального драйвера Windows ADB может быть решением для вас. Это довольно просто, скачайте драйвер с официального сайта и установите его.
Вы можете скачать драйвер здесь.
Метод 5: Сброс процесса
Иногда случается, что все остальное работает, но вы все равно не можете перечислить свой смартфон — это означает, что вы установили драйвер USB, включили отладку USB и т. Д. В таких случаях может помочь вам отключение сервера и его повторный запуск. Для этого введите следующие команды в командной строке
 ADB Kill / Start Server
Способ 6: замена кабеля
Наконец, если у вас ничего не получится, вам может пригодиться новый кабель. Вероятность того, что ваш кабель неисправен, высока, что означает, что независимо от того, что вы делаете, ваша проблема останется, так как проблема не в вашем драйвере, а скорее в аппаратном обеспечении. Чтобы проверить, неисправен ли ваш кабель, попробуйте следующее:
- Подключите кабель к порту на зарядном устройстве.
- Попробуйте зарядить свой смартфон этим кабелем.
Если он не начинает заряжаться, это означает, что ваш кабель неисправен, и вам придется приобрести другой.
Источник


