- Android Testing Part 1:Espresso Basics
- Note:You can have more than one method annotated with any of the annotations like @Before,@Beforeclass etc. But the order in which JUnit finds methods is not guaranteed.Like if there is two methods annotated with @Before, There is no guarantee which one will be executed.
- Android UI Testing With Espresso
- Precise Example
- Steps to Perform the UI Test
- Explanation of code
- Espresso android testing пример
- About
Android Testing Part 1:Espresso Basics

Human beings are prone to mistakes and this very nature of humans make software vulnerable to bugs, defects and errors. So before shipping your software, testing
- can detect the errors and bugs made during the development
- makes sure of the Customer’s reliability and their satisfaction in the application
- ensures the quality of the product which helps in gaining the confidence of the customer
This article is about testing the UI of the Android applications.
“Testing leads to failure, and failure leads to Understanding”
Android has mainly two types of tests
T esting every method/function (or unit) of your code for e.g: given a function, calling it with param x should return y. These tests are run on JVM locally without the need of an emulator or Device.
I nstrumentation tests are used for testing Android Frameworks such as UI,SharedPreferences and So on.Since they are for Android Framework they are run on a device or an emulator.
Instrumentation tests use a separate apk for the purpose of testing. Thus, every time a test case is run, Android Studio will first install the target apk on which the tests are conducted. After that, Android Studio will install the test apk which contains only test related code.
What is Espresso?
Espresso is an instrumentation Testing framework made available by Google for the ease of UI Testing.


Go to your app/build.gradle
2.Add to the same build.gradle file the following line in
This sets up the Android Instrumentation Runner in our app.
AndroidJUnitRunner is the instrumentation runner. This is essentially the entry point into running your entire suite of tests. It controls the test environment, the test apk, and launches all of the tests defined in your test package
In order to test a UI create a new test class in the Location
And annotate it with @RunWith(AndroidJUnit4::class)
The instrumentation runner will process each test class and inspect its annotations. It will determine which class runner is set with @RunWith, initialize it, and use it to run the tests in that class. In Android’s case, the AndroidJUnitRunner explicitly checks if the AndroidJUnit4 class runner is set to allow passing configuration parameters to it.
There are 6 types of annotations that can be applied to the methods used inside the test class,which are @Test, @Before, @BeforeClass, @After, @AfterClass, @Rule
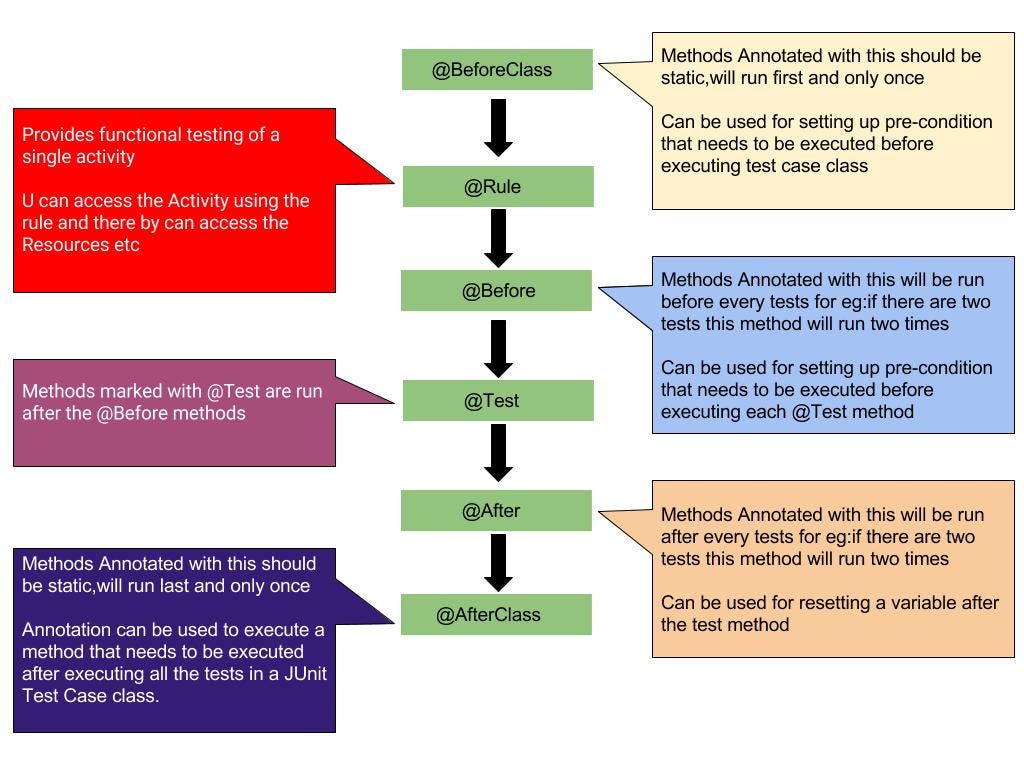
Important things to note is that
- The activity will be launched using the @Rule before test code begins
- By default the rule will be initialised and the activity will be launched( onCreate, onStart, onResume) before running every @Before method
- Activity will be Destroyed( onPause, onStop, onDestroy) after running the @After method which in turn is called after every @Test Method
- The activity’s launch can be postponed by setting the launchActivity to false in the constructor of ActivityTestRule ,in that case you will have to manually launch the activity before the tests
Note:You can have more than one method annotated with any of the annotations like @Before,@Beforeclass etc. But the order in which JUnit finds methods is not guaranteed.Like if there is two methods annotated with @Before, There is no guarantee which one will be executed.
The espresso test of a view contains


Espresso uses onView (Matcher viewMatcher) method to find a particular view among the View hierarchy. onView() method takes a Matcher as argument. Espresso provides a number of these ViewMatchers which can be found in this Espresso Cheat sheet.
Every UI element contains properties or attributes which can be used to find the element.Suppose for finding an element with
2.Performing actions on the View

After finding the View you can perform actions on the View or on its Descendant using ViewActions of the Espresso.Some of the Most common actions are click(),clearText() etc.
Note: In cases where the View isn’t directly visible such as in a case where the view is in a scroll view and isn’t you will have to perform the scrollTo() function first and then perform the action.
3.Checking the ViewAssertions

After performing an action on the View we will want to see if the view behaves as we want, This can be done using check (ViewAssertion viewAssert)
In the example below we do the testing of a login screen where we search the login and password edit text and enter the values and after that we test the two scenarios Login success and Login Failure
Источник
Android UI Testing With Espresso

Testing your application to ensure it functions as expected is also as important as written code. One big mistake we all make at some point is releasing applications without testing and when it gets into production, we might start noticing some bugs.
Given that it is crucial for testing applications, we will see how to perform UI testing in a simple android application using Espresso . Not to take much time, Espresso is used to test user interactions within an android application.Say you have a login form where the user types their user name, password, and then hits the submit button and if certain criteria are met, the user is logged in successfully.
Precise Example
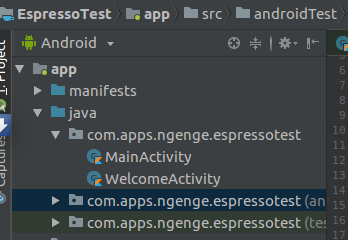
The application we will be testing has two activities, which are MainActivity and WelcomeActivity. Now for a login to be successful, the following must be met
- User name must not be empty
- Password must be greater than or equal to 6 in length
Here are the screens
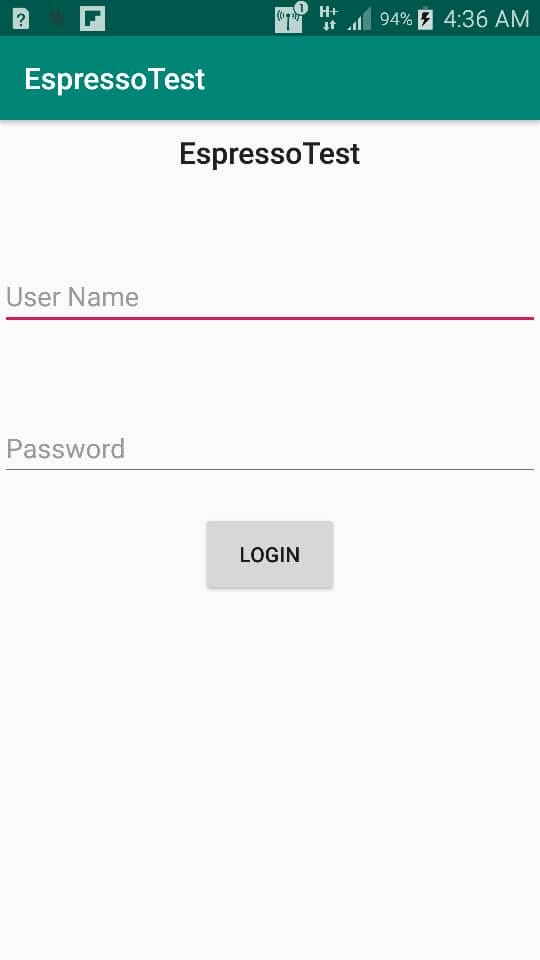


On a successful login, the middle screen appears(WelcomeActivity), while on failure to login, loginButton disappears and the failedLogin text view at the bottom becomes visible.
Create a new Android studio project to follow along. Add the following dependencies in your app/build.gradle file
As seen, we added the espresso dependency and other test dependencies like junit 4.
We are using kotlin android extensions as well, thus we won’t be using any findViewByIds. Here is the code for activity_main.xml
As seen, loginFailure’s visibility is initially set to gone.
Here is the code for MainActivity.java
Steps to Perform the UI Test
The steps required to perform any test on the UI are as follows
- Locate the View(for example EditText)
- Perform action(for example typing text)
- Verify if condition holds(for example, is ImageView displayed?)
The first step is performed using Espresso’s onView method. You can verify button with text “Hello World”,with id R.id.helloButton etc.
Here are the steps taken above in the order specified
- Locate EditText with id name_field
- Type the word “Steve” in the name field
- Locate the button with id greet_button and click
- Check if the View with text “Hello Steve” is displayed.
If the above steps are passed, then this test case is successful otherwise, the test will fail.
To follow, change your project view to Android,open the androidTest package and create a LoginTest class file.
To create a test for MainActivity, we create what is referred to as an activity test rule for MainActivity(activity currently under test),then we write our tests. Here is the code.
Explanation of code
- We create our LoginTest class and annotate it with @RunWith(AndroiJUnit4) class.
- Create mActivityTestRule variable for MainActivity(Activity we want to run test on).
- create our test function ,test_Login_HasPasswordOfMoreThan6Letters and annotate it with, @Test .
- Locate EditText with id , username and perform an action by typing the text,”ngengesenior”.
- Locate EditText with id,password and perform action by typing the text,”password”.
- Check if button with id,buttonLogin is displayed and click the button
- Check if the ImageView with id,appIcon is displayed.
In this case, test is passed since our user name is not empty,our password is greater than 6.
Here is how the automated test works
I actually manged to use androidx and Kotlin in this project.
Источник
Espresso android testing пример
Android testing samples
A collection of samples demonstrating different frameworks and techniques for automated testing.
BasicSample — Basic Espresso sample
CustomMatcherSample — Shows how to extend Espresso to match the hint property of an EditText
DataAdapterSample — Showcases the onData() entry point for Espresso, for lists and AdapterViews
FragmentScenarioSample — Basic usage of FragmentScenario with Espresso.
IdlingResourceSample — Synchronization with background jobs
IntentsBasicSample — Basic usage of intended() and intending()
IntentsAdvancedSample — Simulates a user fetching a bitmap using the camera
MultiWindowSample — Shows how to point Espresso to different windows
RecyclerViewSample — RecyclerView actions for Espresso
ScreenshotSample — Screenshot capturing and saving using Espresso and androidx.test.core APIs
WebBasicSample — Use Espresso-web to interact with WebViews
BasicSampleBundled — Basic sample for Eclipse and other IDEs
MultiProcessSample — Showcases how to use multiprocess Espresso.
BasicSample — Basic UI Automator sample
AndroidJunitRunnerSample — Showcases test annotations, parameterized tests and testsuite creation
JUnit4 Rules Sample
**All previous samples use ActivityTestRule or IntentsTestRule but there’s one specific to ServiceTestRule:
BasicSample — Simple usage of ActivityTestRule
IntentsBasicSample — Simple usage of IntentsTestRule
ServiceTestRuleSample — Simple usage of ServiceTestRule
- Android SDK v28
- Android Build Tools v28.03
These samples use the Gradle build system. To build a project, enter the project directory and use the ./gradlew assemble command or use «Import Project» in Android Studio.
- Use ./gradlew connectedAndroidTest to run the tests on a connected emulator or device.
- Use ./gradlew test to run the unit test on your local host.
There is a top-level build.gradle file if you want to build and test all samples from the root directory. This is mostly helpful to build on a CI (Continuous Integration) server.
AndroidX Test Library
Many of these samples use the AndroidX Test Library. Visit the Testing site on developer.android.com for more information.
Experimental Bazel Support
![]()
Some of these samples can be tested with Bazel on Linux. These samples contain a BUILD.bazel file, which is similar to a build.gradle file. The external dependencies are defined in the top level WORKSPACE file.
This is experimental feature. To run the tests, please install the latest version of Bazel (0.12.0 or later) by following the instructions on the Bazel website.
For more information, check out the documentation for Android Instrumentation Tests in Bazel. You may also want to check out Building an Android App with Bazel, and the list of Android Rules in the Bazel Build Encyclopedia.
- Building of APKs is supported on Linux, Mac and Windows, but testing is only supported on Linux.
- android_instrumentation_test.target_device attribute still needs to be specified even if —config=local_device is used.
- If using a local device or emulator, the APKs are not uninstalled automatically after the test. Use this command to remove the packages:
- adb shell pm list packages com.example.android.testing | cut -d ‘:’ -f 2 | tr -d ‘\r’ | xargs -L1 -t adb uninstall
Please file Bazel related issues against the Bazel repository instead of this repository.
- Google+ Community: https://plus.google.com/communities/105153134372062985968
- Stack Overflow: http://stackoverflow.com/questions/tagged/android-testing
If you’ve found an error in this sample, please file an issue: https://github.com/googlesamples/android-testing
Patches are encouraged, and may be submitted by forking this project and submitting a pull request through GitHub. Please see CONTRIBUTING.md for more details.
Copyright 2015 The Android Open Source Project, Inc.
Licensed to the Apache Software Foundation (ASF) under one or more contributor license agreements. See the NOTICE file distributed with this work for additional information regarding copyright ownership. The ASF licenses this file to you under the Apache License, Version 2.0 (the «License»); you may not use this file except in compliance with the License. You may obtain a copy of the License at
Unless required by applicable law or agreed to in writing, software distributed under the License is distributed on an «AS IS» BASIS, WITHOUT WARRANTIES OR CONDITIONS OF ANY KIND, either express or implied. See the License for the specific language governing permissions and limitations under the License.
About
A collection of samples demonstrating different frameworks and techniques for automated testing
Источник


