- Полный список
- Create Custom Big Notifications
- 2 Answers 2
- Android — Notifications
- Create and Send Notifications
- Step 1 — Create Notification Builder
- Step 2 — Setting Notification Properties
- Step 3 — Attach Actions
- Step 4 — Issue the notification
- The NotificationCompat.Builder Class
- Example
- Big View Notification
Полный список
В Android 4.1 (API 16) появились расширенные уведомления. Если потянуть вниз такое уведомление, то оно отобразит дополнительную информацию.
Чтобы создать расширенное уведомление, необходимо добавить стиль к билдеру. Стилей существует несколько. Все они наследники абстрактного класса NotificationCompat.Style. Из названия стиля обычно понятно, для чего он может быть использован.
Рассмотрим, например, стиль BigTextStyle, чтобы отобразить длинный текст.
Далее я буду приводить только код билдера. А как из билдера получить и отобразить уведомление, вы можете посмотреть в предыдущих уроках.
В билдере уведомления вызываем метод setStyle, в который нам необходимо передать стиль. Создаем стиль BigTextStyle и передаем ему длинный текст в метод bigText.
Теперь при раскрытии уведомления будет отображаться длинный текст.

Стиль BigPictureStyle поможет отобразить большую картинку:
Создаем bitmap и передаем его в BigPictureStyle.
При раскрытии уведомление отобразит картинку

Стиль InboxStyle — разместит до 5 ваших строк в виде списка
Методом addLine добавляем строки

Стиль MessagingStyle удобен для отображения последних сообщений из чата:
В конструкторе MessagingStyle вам необходимо указать, под каким именем пользователь будет видеть свои сообщения. Обычно в чатах используют слово You (или Me).
В setConversationTitle указывается название чата. Обычно это используется, когда в чате более двух собеседников.
Далее, методом addMessage добавляются сообщения. Сообщение состоит из трех полей: текст, время, отправитель. Если отправитель — null, то это считается сообщением пользователя, и будет использовано имя, которое мы указывали в конструкторе MessagingStyle, т.е. You.
Добавлять можно сколько угодно сообщений, но после того, как количество сообщений будет больше, чем MessagingStyle.MAXIMUM_RETAINED_MESSAGES, старые сообщения начнут удаляться. Это удобно и позволяет не заморачиваться проверками на количество.
Отображаться сообщения будут в том же порядке, что вы их добавили.
Выглядеть это будет так:

Время сообщений не отображается. Насколько я понял, поверхностно посмотрев исходники, оно пока вообще нигде не используется. Может быть в будущих релизах это изменится.
Метод addMessage также работает с объектом Message. Этот объект содержит поля: текст, время и автор. Но кроме них есть метод setData для указания MIME-данных, например картинок.
У некоторых стилей есть пара общих методов, которые могут быть полезны: setBigContentTitle и setSummaryText.
Рассмотрим их на примере с InboxStyle:
Код почти тот же, что мы рассматривали ранее. Добавлены два метода:
setBigContentTitle — позволяет указать заголовок уведомления, который будет показан при раскрытии уведомления
setSummaryText — текст будет отображен внизу расширенного уведомления

При раскрытии уведомления меняется заголовок и в нижней части отображен summary текст.
Присоединяйтесь к нам в Telegram:
— в канале StartAndroid публикуются ссылки на новые статьи с сайта startandroid.ru и интересные материалы с хабра, medium.com и т.п.
— в чатах решаем возникающие вопросы и проблемы по различным темам: Android, Kotlin, RxJava, Dagger, Тестирование
— ну и если просто хочется поговорить с коллегами по разработке, то есть чат Флудильня
— новый чат Performance для обсуждения проблем производительности и для ваших пожеланий по содержанию курса по этой теме
Источник
Create Custom Big Notifications
I wanted to create a Notification including some controls. Since text and controls are small with default notification size (64dp), i wanted have it larger than default size.
It is possible to create larger notifications, and I think it is possible to have a custom layout, too, but I don’t know how.
To be more specific, the following screenshot shows the notification from spotify (image take from here): 
As you can see, the size is bigger than default. Further, it has some kind of ImageButtons without text — if you use Notification.Builder.addAction(), you may provide an icon but also need to provide a CharSequence as a description — if you leave the description empty, there will still be space reserved for the text and if you pass null, it will crash.
Can anybody tell me how to create a big notification with a custom layout?

2 Answers 2
Update due to API changes:
From API 24 on, the Notification.Builder contains a setCustomBigContentView(RemoteViews)-method. Also the NotificationCompat.Builder (which is part of the support.v4 package) contains this method.
Please note, that the documentation for the NotificationCompat.Builder.setCustomBigContentView states:
Supply custom RemoteViews to use instead of the platform template in the expanded form. This will override the expanded layout that would otherwise be constructed by this Builder object. No-op on versions prior to JELLY_BEAN.
Therefore, this will also only work for API >= 16 (JELLY_BEAN).
Original Answer
So after excessive google usage, I found this tutorial explaining how to use custom big layouts. The trick is not to use setStyle() but manually set the bigContentView field of the Notification after building it. Seems a bit hacky, but this is what I finally came up with:
Building Notification in code:
Edit
As noted by chx101, this only works for API >= 16. I did not mention it in this answer, yet it was mentioned in the given linked tutorial above:
Expanded notifications were first introduced in Android 4.1 JellyBean [API 16].
Источник
Android — Notifications
A notification is a message you can display to the user outside of your application’s normal UI. When you tell the system to issue a notification, it first appears as an icon in the notification area. To see the details of the notification, the user opens the notification drawer. Both the notification area and the notification drawer are system-controlled areas that the user can view at any time.
Android Toast class provides a handy way to show users alerts but problem is that these alerts are not persistent which means alert flashes on the screen for a few seconds and then disappears.
To see the details of the notification, you will have to select the icon which will display notification drawer having detail about the notification. While working with emulator with virtual device, you will have to click and drag down the status bar to expand it which will give you detail as follows. This will be just 64 dp tall and called normal view.
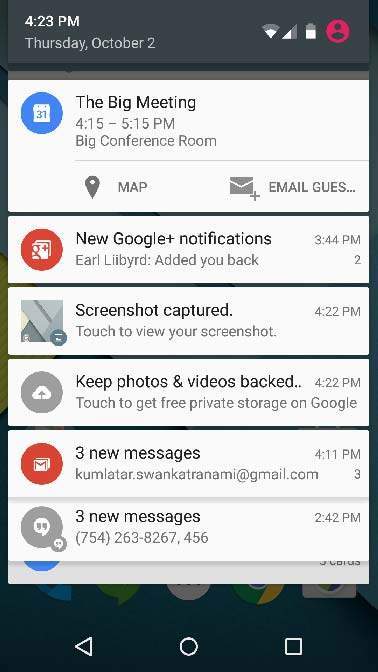
Above expanded form can have a Big View which will have additional detail about the notification. You can add upto six additional lines in the notification. The following screen shot shows such notification.
Create and Send Notifications
You have simple way to create a notification. Follow the following steps in your application to create a notification −
Step 1 — Create Notification Builder
As a first step is to create a notification builder using NotificationCompat.Builder.build(). You will use Notification Builder to set various Notification properties like its small and large icons, title, priority etc.
Step 2 — Setting Notification Properties
Once you have Builder object, you can set its Notification properties using Builder object as per your requirement. But this is mandatory to set at least following −
A small icon, set by setSmallIcon()
A title, set by setContentTitle()
Detail text, set by setContentText()
You have plenty of optional properties which you can set for your notification. To learn more about them, see the reference documentation for NotificationCompat.Builder.
Step 3 — Attach Actions
This is an optional part and required if you want to attach an action with the notification. An action allows users to go directly from the notification to an Activity in your application, where they can look at one or more events or do further work.
The action is defined by a PendingIntent containing an Intent that starts an Activity in your application. To associate the PendingIntent with a gesture, call the appropriate method of NotificationCompat.Builder. For example, if you want to start Activity when the user clicks the notification text in the notification drawer, you add the PendingIntent by calling setContentIntent().
A PendingIntent object helps you to perform an action on your applications behalf, often at a later time, without caring of whether or not your application is running.
We take help of stack builder object which will contain an artificial back stack for the started Activity. This ensures that navigating backward from the Activity leads out of your application to the Home screen.
Step 4 — Issue the notification
Finally, you pass the Notification object to the system by calling NotificationManager.notify() to send your notification. Make sure you call NotificationCompat.Builder.build() method on builder object before notifying it. This method combines all of the options that have been set and return a new Notification object.
The NotificationCompat.Builder Class
The NotificationCompat.Builder class allows easier control over all the flags, as well as help constructing the typical notification layouts. Following are few important and most frequently used methods available as a part of NotificationCompat.Builder class.
| Sr.No. | Constants & Description | |||||||||||||||
|---|---|---|---|---|---|---|---|---|---|---|---|---|---|---|---|---|
| 1 |
| Step | Description |
|---|---|
| 1 | You will use Android studio IDE to create an Android application and name it as tutorialspoint under a package com.example.notificationdemo. |
| 2 | Modify src/MainActivity.java file and add the code to notify(«»), if user click on the button,it will call android notification service. |
| 3 | Create a new Java file src/NotificationView.java, which will be used to display new layout as a part of new activity which will be started when user will click any of the notifications |
| 4 | Modify layout XML file res/layout/activity_main.xml to add Notification button in relative layout. |
| 5 | Create a new layout XML file res/layout/notification.xml. This will be used as layout file for new activity which will start when user will click any of the notifications. |
| 6 | No need to change default string constants. Android studio takes care of default string constants |
| 7 | Run the application to launch Android emulator and verify the result of the changes done in the application. |
Following is the content of the modified main activity file src/com.example.notificationdemo/MainActivity.java. This file can include each of the fundamental lifecycle methods.
Following will be the content of res/layout/notification.xml file −
Following is the content of the modified main activity file src/com.example.notificationdemo/NotificationView.java.
Following will be the content of res/layout/activity_main.xml file −
Following will be the content of res/values/strings.xml to define two new constants −
Following is the default content of AndroidManifest.xml −
Let’s try to run your tutorialspoint application. I assume you had created your AVD while doing environment set-up. To run the APP from Android Studio, open one of your project’s activity files and click Run  icon from the toolbar. Android Studio installs the app on your AVD and starts it and if everything is fine with your setup and application, it will display following Emulator window −
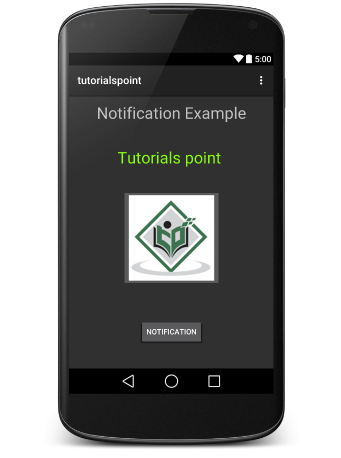
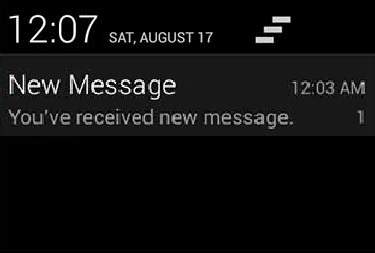
Now click button, you will see at the top a message «New Message Alert!» will display momentarily and after that you will have following screen having a small icon at the top left corner.
Now lets expand the view, long click on the small icon, after a second it will display date information and this is the time when you should drag status bar down without releasing mouse. You will see status bar will expand and you will get following screen −
Big View Notification
The following code snippet demonstrates how to alter the notification created in the previous snippet to use the Inbox big view style. I’m going to update displayNotification() modification method to show this functionality −
Now if you will try to run your application then you will find following result in expanded form of the view −
Источник


