- Getting Started with the Facebook SDK for Android
- Quick Start
- Android Studio Setup
- Add Your Facebook App ID and Client Token
- Sending Images or Videos
- Running Sample Apps
- Create a Development Key Hash
- Create a Release Key Hash
- Use the Facebook SDK for Android with Maven
- Troubleshooting Sample Apps
- Подключаем Facebook SDK для Xamarin.Forms
- Создаем приложение в Facebook
- Подключаем Facebook SDK к проектам iOS и Android
- Подключаем в Android
- Подключаем в iOS
- Интегрируем с Xamarin.Forms
- Реализация для Android
- Реализация для iOS
- Подключаем в Xamarin.Forms
- Используем
- Об авторе
- Component SDKs of the Facebook SDK for Android
- Download
Getting Started with the Facebook SDK for Android
This documentation explains how to get started integrating your Android app with Facebook by using the Facebook SDK for Android. The current version of the Facebook SDK for Android is version 12.0.0 and requires the Android API 15. For more information about versions and features, see Facebook SDK for Android.
Beginning with SDK v13.0, set to release in early 2022, a Client Token will be required for all calls to the Graph API.
You can set up your app to use the Facebook SDK for Android in the following ways:
- By using the Quick Start.
- By setting up your project with the Facebook SDK for Android.
Quick Start
To get a Facebook App ID, configure your app’s settings, and import the Facebook SDK for Android, click on the button below and follow the instructions.
Android Studio Setup
To use the Facebook SDK in an Android Studio project, add the SDK as a build dependency and import the SDK.
- Go to Android Studio | New Project | Minimum SDK.
- Select API 15: Android 4.0.3 (IceCreamSandwich) or higher and create your new project.
- After you create a new project, open Gradle Scripts | build.gradle (Project: and do the following:
- Add the following to the buildscript < repositories <>> section of the build.gradle (Project) file:
- Save and close build.gradle (Project: ) .
- Open Gradle Scripts | build.gradle (Module: app) and do the following:
- Add the following to the dependencies <> section of your build.gradle (module: app) file to compile the latest version of the Facebook SDK for Android:
When you use the Facebook SDK, some events in your app are automatically logged and collected unless you disable automatic event logging. For details about what information is collected and how to disable automatic event logging, see Automatic App Event Logging.
Add Your Facebook App ID and Client Token
Add your Facebook App ID and Client Token to your project’s strings file and update your Android manifest:
1. Open your /app/res/values/strings.xml file.
2. Add a string element with the name attribute facebook_app_id and value as your Facebook App ID to the file. For example
3. Open /app/manifests/AndroidManifest.xml
4. Add a uses-permission element to the manifest:
5. Add a meta-data element to the application element:
Sending Images or Videos
If you’re sharing links, images or video via the Facebook for Android app, you also need to declare the FacebookContentProvider in the manifest.
Append your app id to the end of the authorities value. For example if your Facebook app id is 1234 , the declaration looks like:
Running Sample Apps
The following samples come with the Facebook SDK for Android:
- HelloFacebookSample — Demonstrates profile access, status updates and photo upload.
- RPSSample — Use Native Share Dialog, Open Graph publishing, pickers, invites, and deep linking.
- Scrumptious — Login, requests, pickers, picture uploads, and Open Graph publishing.
You can experiment with samples by importing the Facebook SDK into an Android Studio project. The samples have a project dependency rather than a central repository dependency via maven central or jcenter. This is so that when a local copy of the SDK gets updates, the samples reflect the changes.
To run samples apps quickly, you can generate key hashes for your development environments. Add these to your Facebook developer profile for the sample apps. Keytool, for generating the key hashes, is included with the Java SE Development Kit (JDK) that you installed as part of setting up your development environment. OpenSSL is available for download from OpenSSL.
On Windows, you need the following:
Run the following command in a command prompt in the Java SDK folder. This generates a 28 character string.
Go to the Facebook Developer site. Log into Facebook and, using the dropdown menu in the top-right, go to Developer Settings:

In your developer settings, select Sample App from the menu, and add and save your key hash into your profile:
You can add multiple key hashes if you develop with multiple machines.
You can now compile and run all of the samples — including those that use Facebook Login.
Create a Development Key Hash
Facebook uses the key hash to authenticate interactions between your app and the Facebook app. If you run apps that use Facebook Login, you need to add your Android development key hash to your Facebook developer profile.
For the version of your app that you release to you also need to generate and set a Release Key Hash.
On either OS X or Windows you can get a key hash by generating it or by using the value returned by Settings.getApplicationSignature(Context) . For instructions, see Running Sample Apps .
Create a Release Key Hash
To authenticate the exchange of information between your app and the Facebook, you need to generate a release key hash and add this to the Android settings within your Facebook App ID. Without this, your Facebook integration may not work properly when you release your app to the store.
In a previous step, you should have updated your Facebook Developer Settings with the key hashes for your development environments.
When publishing your app, it is typically signed with a different signature to your development environment. Therefore, you want to make sure you create a Release Key Hash and add this to the Android settings for Facebook App ID.
To generate a hash of your release key, run the following command on Mac or Windows substituting your release key alias and the path to your keystore.
On Windows, you need the following:
Run the following command in a command prompt in the Java SDK folder:
Make sure to use the password that you set when you first created the release key.
This command should generate a 28 characher string. Copy and paste this Release Key Hash into your Facebook App ID’s Android settings.
You should also check that your Facebook App ID’s Android setting also contain the correct package name and main activity class for your Android package.
Use the Facebook SDK for Android with Maven
You can declare the Maven dependency with the latest available version of the Facebook SDK for Android.
Troubleshooting Sample Apps
If you have a problem running a sample app, it may be related to the key hash. You may see one of the following scenarios:
- A native Login Dialog appears but after accepting the permissions you are still in a logged out state. The logcat also contains an exception:
- A non-native Login Dialog appears with an error message: »..App is Misconfigured for facebook login. ».
Check your key hash and you can make sure you use the correct key hash. I
You can also manually modify the sample code to use the right key hash. For example in HelloFacebookSampleActivity class make a temporary change to the onCreate() :
Save your changes and re-run the sample. Check your logcat output for a message similar to this:
Save the key hash in your developer profile. Re-run the samples and verify that you can log in successfully.
Источник
Подключаем Facebook SDK для Xamarin.Forms
Социальные сети, и особенно Facebook, уже давно используются в мобильных приложениях. Сегодня мы рассмотрим, как подключить нативные Facebook SDK к проекту на базе Xamarin.Forms (iOS и Android) для удобной авторизации пользователей и получения о них базовой информации. Вы также легко сможете расширить описанные в статье методы для того, чтобы реализовать полноценное взаимодействие с этим замечательным сервисом. Тема простая и понятная, поэтому без теорий и прелюдий перейдем сразу к практике.
Создаем приложение в Facebook
Для тех, кто впервые создает своё приложение в Facebook, мы кратко расскажем о том, как это делается.
Сам по себе процесс это довольно простой и потребует от вас следующих данных:
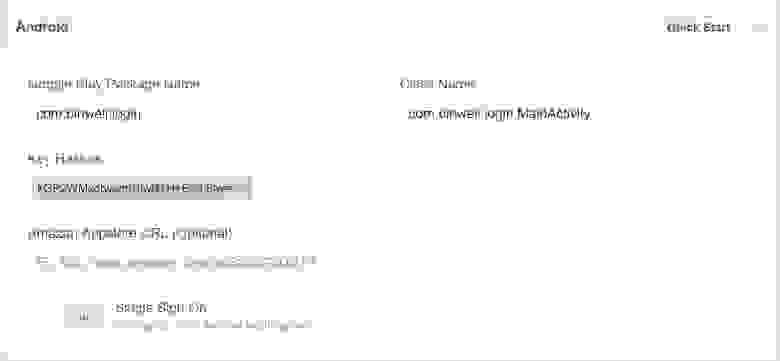
- Package Name для Android-проекта (например, com.binwell.login )
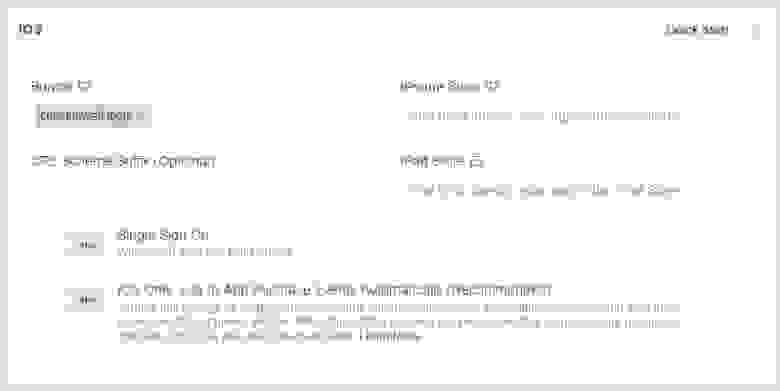
- Bundle Identifier для iOS-проекта (например, com.binwell.login )
Для Android ещё потребуются Key Hashes, которые можно получить командой:
Вместо [USERNAME] необходимо подставить ваше имя пользователя в системе. Плюс можно прописать путь до openssl , если путь до него не указан в PATH . Скачать openssl для Windows можно здесь.
На выходе мы и получим нужные Key Hashes следующего вида: kGP2WMxohvxm/NiwR7H+Eb3/8qw=
Теперь заходим на developers.facebook.com и создаём новое приложение. Отдельно для iOS и Android. При создании приложения мы можем использовать режим с подсказками (Quick Start), где дополнительно описано как настроить проект. Из этого руководства нам и потребуются примеры кода.
Подключаем Facebook SDK к проектам iOS и Android
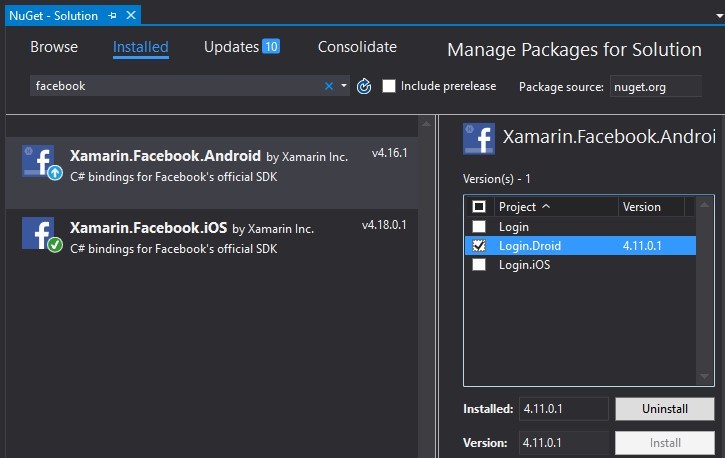
Для начала необходимо установить пакеты Facebook SDK от Xamarin для iOS и Android из Nuget:
Обратите внимание, что с Xamarin.Forms 2.3 на текущий момент совместима только версия Xamarin.Facebook.Android 4.11.0.1. Версия Xamarin.Facebook.iOS ограничений по совместимости не имеет.
Подключаем в Android
Для начала нам необходимо прописать специальные значения в файле Resources/values/strings.xml :
Где, 1102463466549096 это ваш App ID из настроек приложения Facebook. Дополнительно нам потребуется внести следующие изменения в AndroidManifest.xml :
Далее вносим небольшие доработки в MainActivity.cs :
На этом первичная инициализация Facebook SDK завершена.
Подключаем в iOS
По аналогии с Android, нам будет необходимо внести правки в файл Info.plist , вставить следующие строки между . :
И немного кода в AppDelegate.cs :
На этом предварительная подготовка завершена и мы можем переходить к использованию Facebook SDK в нашем приложении.
Интегрируем с Xamarin.Forms
Использовать Facebook SDK мы будем через механизм DependencyService . Для этого в первую очередь опишем нужные данные и интерфейс сервиса:
Одной из целей подключения социальных сетей является возможность простого и удобного получения пользовательских данных, поэтому нам потребуется дополнительный запрос для получения email, который Facebook не отдает по умолчанию. Данные запросы будет необходимо реализовать отдельно для каждой платформы.
Реализация для Android
Для Android реализация интерфейса выглядит следующим образом:
Дополнительно потребуется добавить обработчик в MainActivity.cs :
Реализация для iOS
Делаем реализацию интерфейса для Facebook iOS SDK.
Подключаем в Xamarin.Forms
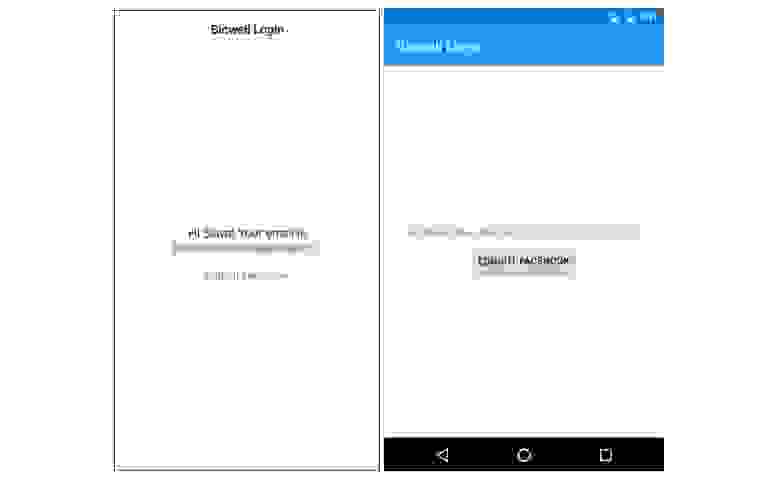
Для доступа к созданным реализациям достаточно вставить следующий обработчик события Clicked для кнопки «Facebook Login»:
На этом кодирование завершено!
Используем
Итак, волнительный момент. Делаем сборку, запускаем и… легко авторизуемся с помощью нативных SDK.
Полный код проекта с пошаговыми изменениями расположен в репозитории на Bitbucket.
Итак, сегодня мы подключили нативные Facebook SDK к приложению на Xamarin.Forms. Уже работает авторизация и получение базовой информации о пользователе, но при желании вы можете легко расширить набор методов для доступа ко всем возможностям Facebook SDK. В следующий раз мы возьмем задачку поинтересней и подключим нативные ВКонтакте SDK.
Оставайтесь на связи, задавайте ваши вопросы в комментариях и вступайте в группу Xamarin Developers в Telegram!
Об авторе
Вячеслав Черников — руководитель отдела разработки компании Binwell. В прошлом — один из Nokia Champion и Qt Certified Specialist, в настоящее время — специалист по платформам Xamarin и Azure. В сферу mobile пришел в 2005 году, с 2008 года занимается разработкой мобильных приложений: начинал с Symbian, Maemo, Meego, Windows Mobile, потом перешел на iOS, Android и Windows Phone.Источник
Component SDKs of the Facebook SDK for Android
The Facebook SDK for Android consists of the following component SDKs:
If you don’t need the functionality of the full Facebook SDK for Android, you can save space by using only the component SDKs that you need to support the Facebook products that you want to use in your app.
When you use the Facebook SDK, some events in your app are automatically logged and collected unless you disable automatic event logging. For details about what information is collected and how to disable automatic event logging, see Automatic App Event Logging.
To link with Maven to one of the component SDKs in your project, add one of the following implementation statements to your build script:
- implementation ‘com.facebook.android:facebook-applinks:latest.release’
- implementation ‘com.facebook.android:facebook-common:latest.release’
- implementation ‘com.facebook.android:facebook-core:latest.release’
- implementation ‘com.facebook.android:facebook-gamingservices:latest.release’
- implementation ‘com.facebook.android:facebook-login:latest.release’
- implementation ‘com.facebook.android:facebook-messenger:latest.release’
- implementation ‘com.facebook.android:facebook-share:latest.release’
To add an implementation statement:
- In your project, open your_app | Gradle Scripts | build.gradle (Project) and add the following repository to the buildscript < repositories <>> section to download the SDK from the Maven Central Repository:
Download
You can also download the entire Facebook SDK for Android.
Источник
- Add the following to the dependencies <> section of your build.gradle (module: app) file to compile the latest version of the Facebook SDK for Android:


 Вячеслав Черников — руководитель отдела разработки компании Binwell. В прошлом — один из Nokia Champion и Qt Certified Specialist, в настоящее время — специалист по платформам Xamarin и Azure. В сферу mobile пришел в 2005 году, с 2008 года занимается разработкой мобильных приложений: начинал с Symbian, Maemo, Meego, Windows Mobile, потом перешел на iOS, Android и Windows Phone.


