- Исправляем ошибку «Сбой проверки, не удалось выполнить вход»
- Устранение ошибки «Сбой проверки, не удалось выполнить вход»
- Способ 1: Перезагрузка
- Способ 2: Проверка серверов Apple
- Способ 3: Проверка соединения
- Способ 4: Проверка даты
- Способ 5: Проверка версии приложения
- Способ 6: Проверка версии iOS
- Способ 7: Вход через сайт
- If you see a Could Not Create Apple ID or Could Not Set Up iCloud message
- If you see a Could Not Create Apple ID message
- If you see a Could Not Set Up iCloud message
- Why did I see this message?
- What should you do?
- iOS update and restore errors
- Try these steps first
- Choose your error number or message
- Update the software on your Mac or PC
- Make sure that your device can communicate with Apple servers
- Cellular Update Failed or Apple Pay Not Available alert
- Check your security software
- Check your USB connections
- Check your hardware
- Check for outdated or modified software
- Apple Mobile Device Failed to Start — Here Are 3 Solutions
- 1. Restart the Apple Mobile Device Service
- 2. Remove the QTMovieWin.dll
- 3. Remove and Re-Install iTunes and Other Software Components
- Tip 4. The Fundamental Method — Fix iTunes by Repairing the AMDS Component
Исправляем ошибку «Сбой проверки, не удалось выполнить вход»
Большинство обладателей современных гаджетов сталкиваются с некоторыми ошибками во время процесса пользования девайсом. Пользователи устройств на системе iOS исключением не стали. Проблемы с устройствами от Apple не редко заключаются в невозможности войти в свой Apple ID.
Apple ID — единый аккаунт, который используется для связи между всеми сервисами компании Apple (iCloud, iTunes, App Store и т.д.). Однако очень часто возникают трудности с подключением, регистрацией или входом в свой аккаунт. Ошибка «Сбой проверки, не удалось выполнить вход» — одна из таких трудностей. Данная статья укажет на пути решения появившейся ошибки, избавление от которой позволит использовать возможности устройства на сто процентов.
Устранение ошибки «Сбой проверки, не удалось выполнить вход»
Ошибка возникает при попытке входа в аккаунт при использовании официальных приложений Apple. Существует несколько способов, которыми можно решить появившуюся проблему. Заключаются они, в основном, в проведении стандартных процедур по оптимизации некоторых настроек вашего устройства.
Способ 1: Перезагрузка
Стандартный метод решения большинства проблем, не вызывающий никаких вопросов и трудностей. В случае с обсуждаемой ошибкой, перезагрузка позволит перезапустить проблемные приложения, через которые производится вход в аккаунт Apple ID.
Способ 2: Проверка серверов Apple
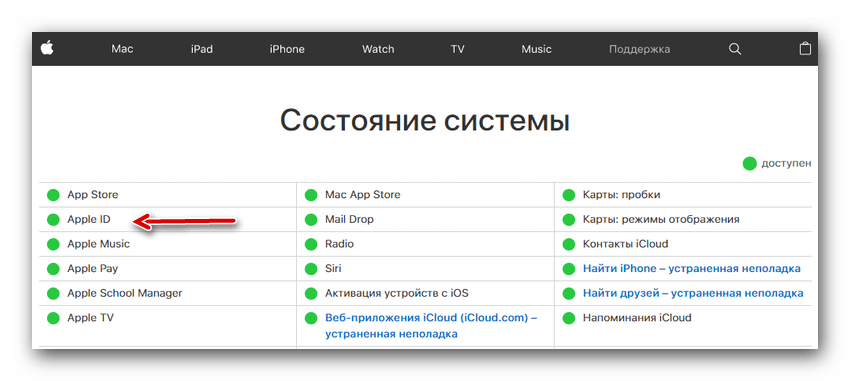
Подобная ошибка часто появляется в том случае, если на серверах Apple ведутся какие-то технические работы или если сервера временно отключены в связи с неправильной работой. Проверить работоспособность серверов довольно просто, для этого необходимо:
- Перейти через браузер в раздел «Состояние системы», который находится на официальном сайте Apple.
- Найти среди многочисленных сервисов необходимый нам Apple ID и проверить его работоспособность. В случае, если с серверами все хорошо — значок рядом с названием будет зеленого цвета. Если же сервера находятся на технических работах или временно не функционируют, то иконка будет красного цвета и тогда придется искать решение через другие способы.

Способ 3: Проверка соединения
Проверьте ваше интернет-соединение. Сделать это можно различными методами, самый простой — зайти в любое другое приложение, требующее постоянное подключение к интернету. При условии, что проблема действительно кроется в плохом соединении, достаточно будет узнать причину нестабильной работы интернета, а настройки устройства можно будет и не трогать вовсе.
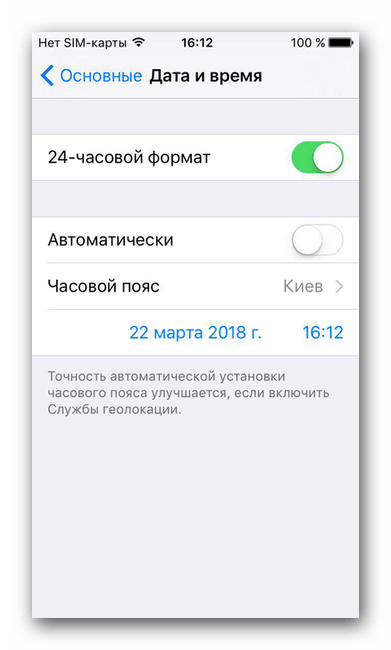
Способ 4: Проверка даты
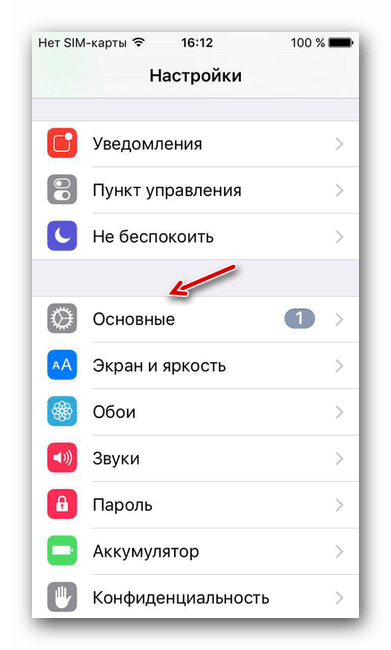
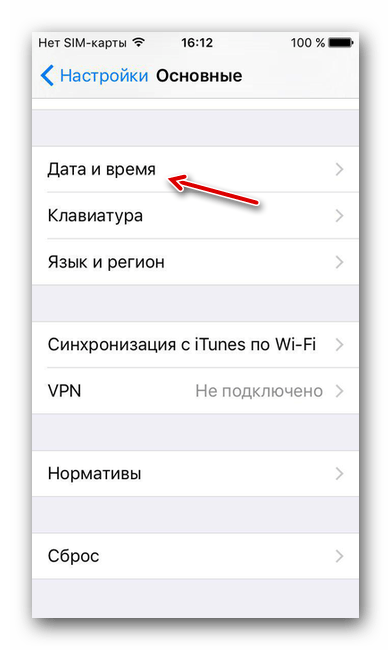
Неправильные установки даты и времени на устройстве могли повлиять на работоспособность Apple ID. Для проверки существующих установок даты и дальнейших изменений необходимо:
- Открыть «Настройки» из соответствующего меню.
- Найти раздел «Основные» и зайти в него.
- Пролистать список вниз до пункта «Дата и время», нажать на этот пункт.
- Проверить, действительно ли на устройстве стоят неактуальные настройки даты и времени и в случае чего поменять их на действительные. При желании, можно оптимизировать этот аспект автоматически, достаточно тапнуть по соответствующей кнопке.
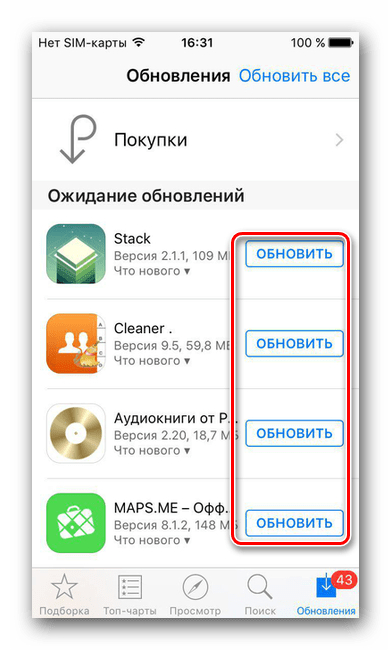
Способ 5: Проверка версии приложения
Ошибка может возникнуть из-за устаревшей версии приложения, через которое производится вход в Apple ID. Проверить, обновлено ли приложение до последней версии довольно легко, для этого необходимо сделать следующее:
- Открыть «App Store» на своем устройстве.
- Перейти во вкладку «Обновления».
- Напротив необходимого приложения нажать на кнопку «Обновить», тем самым установив последнюю версию программы.

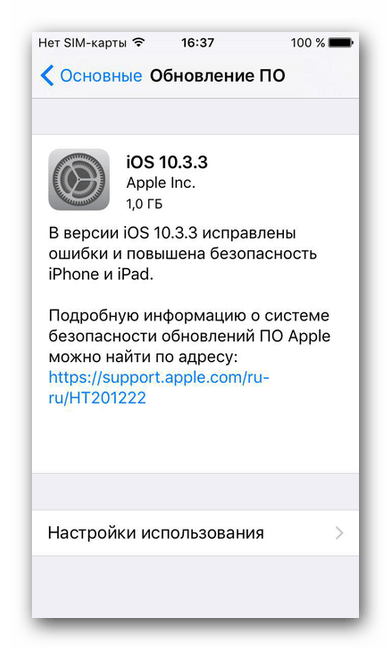
Способ 6: Проверка версии iOS
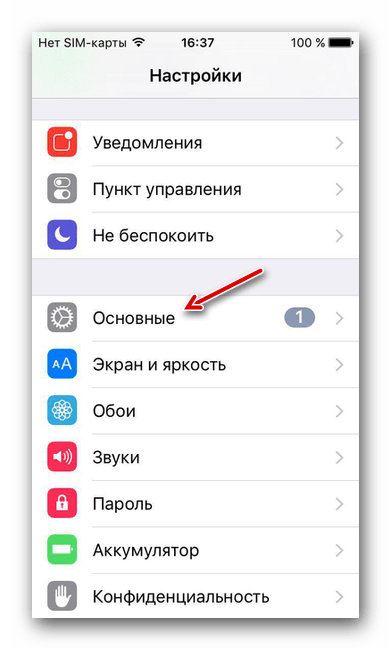
Для нормальной работы многих приложений необходимо периодически проверять устройство на наличие новых обновлений. Обновить операционную систему iOS можно, если:
- Открыть «Настройки» из соответствующего меню.
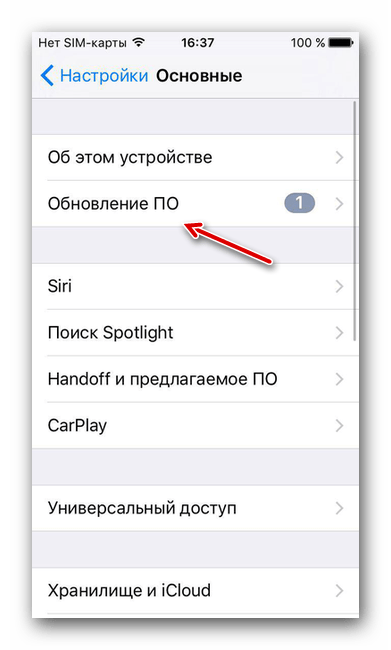
- Найти раздел «Основные» и зайти в него.
- Нажать на пункт «Обновление ПО».
- Следуя инструкции, произвести обновление устройства до актуальной версии.
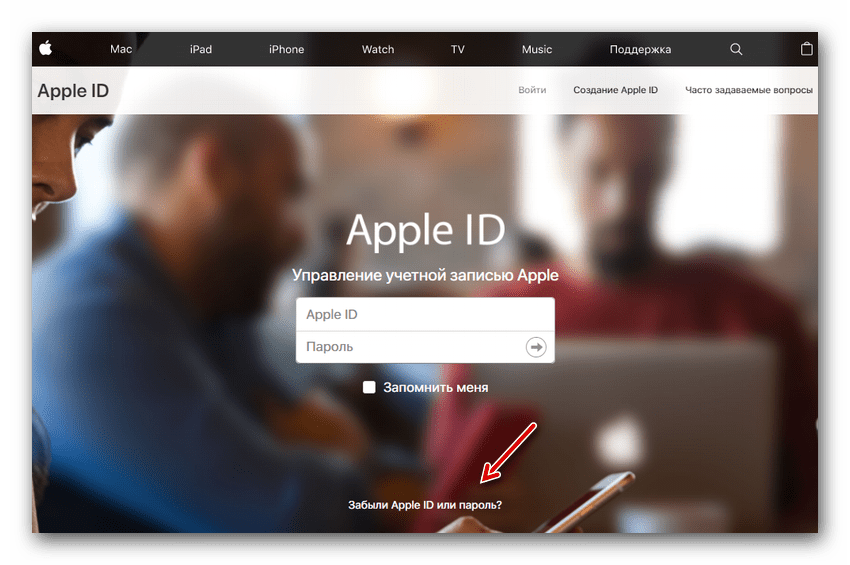
Способ 7: Вход через сайт
Определить, в чем именно заключается неисправность — в приложении, через которое производится вход в аккаунт, или в самой учетной записи, можно очень просто. Для этого требуется:
- Перейти на официальный сайт компании Apple.
- Произвести попытку входа в свой аккаунт. В случае, если вход был успешно выполнен, то проблема исходит со стороны приложения. Если же войти в свой аккаунт не получилось, то следует обратить внимание на свою учетную запись. На этом же экране можно воспользоваться кнопкой «Забыли Apple ID или пароль?», которая поможет восстановить доступ к аккаунту.
Некоторые или даже все из этих способов, скорее всего, помогут избавиться от появившейся неприятной ошибки. Надеемся, что статья помогла вам.
Помимо этой статьи, на сайте еще 12483 инструкций.
Добавьте сайт Lumpics.ru в закладки (CTRL+D) и мы точно еще пригодимся вам.
Отблагодарите автора, поделитесь статьей в социальных сетях.
Источник
If you see a Could Not Create Apple ID or Could Not Set Up iCloud message
If you try to set up iCloud on your iPhone, iPad, iPod touch, or Mac and see an alert, learn what to do.
If you see a Could Not Create Apple ID message
If you see a Could Not Create Apple ID message, it means that you have exceeded the number of new Apple IDs you can set up with iCloud on a single device in one year.
If you see a Could Not Set Up iCloud message
If you see a Could Not Set Up iCloud message, it means that you have exceeded the number of Apple IDs you can set up with iCloud on a single device in one year.
Why did I see this message?
You may see this message when:
- Signing in with an Apple ID you already created on the web, an Apple TV, or a third-party device, but have not yet set up with iCloud
- Signing in with an Apple ID that has web-only access to iCloud
What should you do?
If you have another iPhone, iPad, iPod touch, or Mac, you can try setting up iCloud with your Apple ID on that device. Sign in with your Apple ID, then follow the onscreen steps to start using iCloud.
Or, if you already have an Apple ID set up with iCloud, sign in with that Apple ID instead.
If you still need to set up iCloud with this Apple ID, contact Apple Support for help.
Your Apple ID is the account you use to access Apple services like the App Store, Apple Music, iCloud, iMessage, FaceTime, and more. You sign in to all Apple services with this single Apple ID and password.
Источник
iOS update and restore errors
Learn how to solve iOS update and restore errors.
Try these steps first
- On a Mac with macOS Catalina 10.15 or later, make sure your Mac is up to date. If you have a Mac with macOS Mojave 10.14 or earlier, or a PC, make sure you have the latest version of iTunes.
- If your device couldn’t be restored and you get a message that «an unknown error occurred [error number],» use these steps.
If you still see the error, try the steps below.
Choose your error number or message
To learn what to do, choose your error:

Update the software on your Mac or PC
If you see error 10, your iOS device might have a newer version of iOS than is supported by your computer. You’ll need to update the software on your Mac or iTunes on Windows before you can update or restore your iOS device.
macOS 10.11 and later:
- Disconnect and then reconnect your iOS device to your computer. You might need to unlock your iOS device before it is recognized by your Mac.
- When you see a message that says a software update is required to connect to your iOS device, click Install to download and install the software so your Mac can update or restore your iOS device.
If you continue to see error 10, or you don’t see a dialog asking you to update the software on your mac, contact Apple Support.
Make sure that your device can communicate with Apple servers
If you see error 1671, your computer is downloading necessary software. Wait for the download to finish, then try again.
If you see one of the errors below, your computer might not be able to connect to Apple servers or your iPhone, iPad, or iPod touch:
- 17, 1638, 3014, 3194, 3000, 3002, 3004, 3013, 3014, 3015, 3194, 3200
- «There was a problem downloading the software.»
- «The device isn’t eligible for the requested build.»
Here’s what to check:
If you see error 4037, your computer is unable to update your device because it’s passcode locked and the device wasn’t unlocked for the update or restore. Unlock your device and try again. Learn what to do if you forgot your passcode.
If you still see an error, contact Apple Support.
Cellular Update Failed or Apple Pay Not Available alert
If you see either «Cellular Update Failed» or «Apple Pay requires an Update on this iPhone» alert after an update, learn what to do.
Check your security software
- If you see error 9, use these steps.
- If you see errors 2, 4, 6, or 1611, check your third-party security software. Then check your USB connection.
- If you still see an error, contact Apple Support.
Check your USB connections
If you see error 4005, 4013, or 4014, use these steps.
If you see one of the errors below, check your USB connection, USB cable, USB port, or computer:
- 13, 1600, 1601, 1602, 1603, 1604, 1611, 1643–1650
- 2000, 2001, 2002, 2005, 2006, 2009
- An error that includes «invalid response»
Here’s what to check. Try again after each step:
- Use the USB cable that came with your device. If you don’t have it, try a different Apple USB cable.
- Switch to a different USB port on your computer. Don’t plug into your keyboard.
- Switch to a USB port on a different computer.
- If you still see the error, check for other USB issues, check your third-party security software, then check your hardware.
If you still see an error, contact Apple Support.
Check your hardware
If you see error 53, use these steps.
If you see one of the errors below, you might have a hardware issue:
- 1, 3, 11, 12, 13, 16
- 20, 21, 23, 26, 27, 28, 29, 34, 35, 36, 37, 40, 56
- 1002, 1004, 1011, 1012, 1014, 1667, 1669
Here’s what to check. Try again after each step:
- If iTunes is already open, quit and reopen it.
- Check your third-party security software.
- Make sure that your USB cable, computer, and network are reliable. Then try twice more to restore your device.
- Check for outdated or modified software.
If you still see the error, contact Apple Support.
Check for outdated or modified software
If you see error 1015 or a message that «the required resource can’t be found,» your device might have unauthorized software modifications (jailbreaking). Or you might be trying to install an earlier version of iOS (downgrading).
To restore your device to the latest version of software, use recovery mode on your iPhone or recovery mode on your iPad.
If you still see an error, contact Apple Support.
Источник
Apple Mobile Device Failed to Start — Here Are 3 Solutions
home_icon Created with Sketch.
Home > iPhone Issues > Apple Mobile Device Failed to Start — Here Are 3 Solutions
![]()
May 15, 2017 (Updated: July 30, 2021)
«I have been getting an error message that says: ‘Apple Mobile Device Service failed to start. Verify that you have sufficient privileges to start system services’ when I install iTunes. Does anyone have a solution for this?»
It is likely that what you are experiencing is a problem with the Apple Mobile Device Service (AMDS) especially if you are using a Windows system. The following solutions should help you get around the problem.
1. Restart the Apple Mobile Device Service
Follow these steps to restart AMDS and see if iTunes will respond.
Step 1: Close iTunes and if you had connected an iOS device, disconnect it.
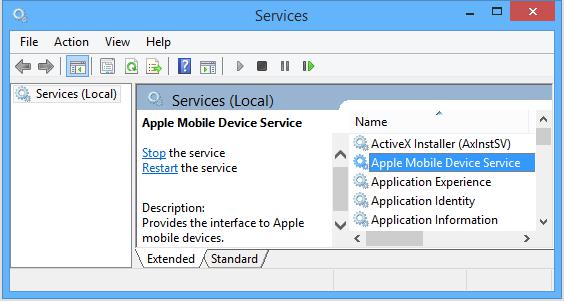
Step 2: Open the Run command on your Windows computer. You can do that by pressing the Windows logo Key and the R key on your keyboard.
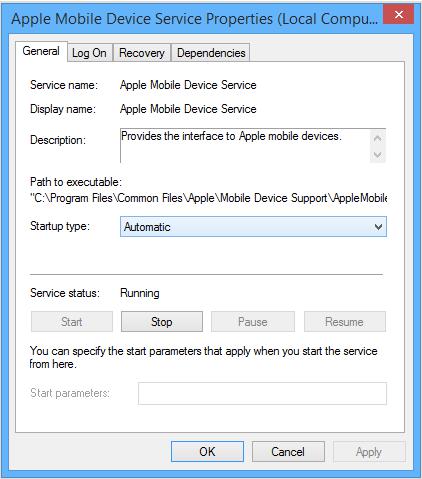
Step 3: Type in «services.msc» and then click «OK.» This should open the services console. Right click on «Apple Mobile Device Service» and choose «Properties.»
Step 4: Set the startup type popup menu to Automatic and click «Stop.»В Click «Start» and then Click «OK.»
Step 5: Restart the computer and try using iTunes again.
2. Remove the QTMovieWin.dll
If you are still having issues with iTunes on Windows, here’s another solution that many have found very helpful.
Step 1: Open the folder C:Program FilesiTunes (for 32-bit systems) or C:Program Files (x86)iTunes (64-bit systems).
Step 2: look for the file with the name QTMovieWin.dll in the folders above only. If you can find it, delete it.
Step 3: Now start iTunes and see if it runs normally.
3. Remove and Re-Install iTunes and Other Software Components
If you are still unable to use iTunes even after the above troubleshooting steps, you may want to remove and reinstall iTunes and other software components that may also have been affected. Follow this guide.
Step 1: Remove all of the following items in the order listed.
- QuickTime
- iTunes
- Apple Software Update
- Apple Mobile Device Support (if it will not uninstall, repair it first.)
- iCloud
- MobileMe
- Bonjour
- Apple Application Support
Step 2: Reboot the computer and then delete the following programs if you can find them.
- C:Program FilesBonjour
- C:Program FilesCommon FilesApple
- C:Program FilesiPod
- C:Program FilesiTunes
If you are using a 64-bit system, they will appear as
- C:Program Files (x86)Bonjour
- C:Program Files (x86)Common FilesApple
- C:Program Files (x86)iPod
- C:Program Files (x86)iTunes
Tip 4. The Fundamental Method — Fix iTunes by Repairing the AMDS Component
Ultimately, this may be due to the lack of this component.The ultimate solution is to install the component for the purpose of a real fix.Through my research, I found out that there is a tool called TunesFix, which is specially designed to solve various problems of iTunes.One of the features addresses this problem. Let’s see how it works.
Step 1: Download and Launch iMyFone TunesFix
Firstly, you need to download the app to your Windows computer, and then launch it to get started.
Step 2: Detect the iTunes Componets.
After launching, the software will start to detect your iTunes automatically and its related components. Then it will show you the details, like which one is lost, or which one is corrupted, etc.
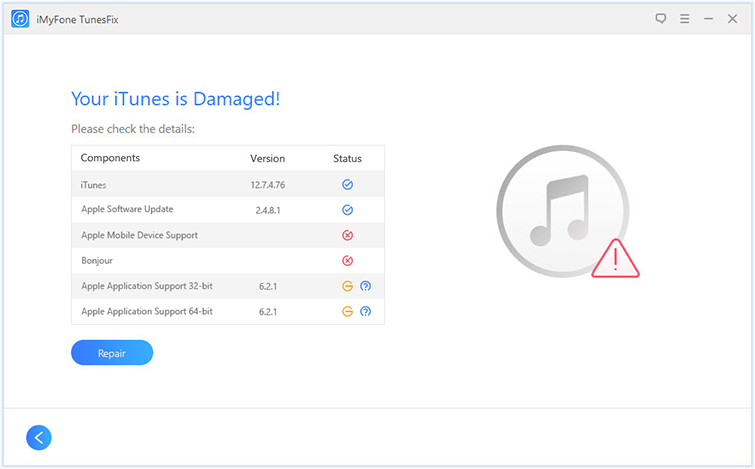
Step 3: Now Repair iTunes Components Issues
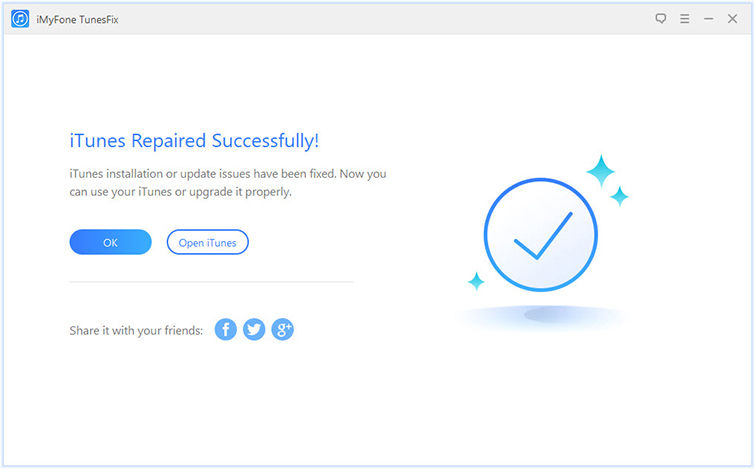
Click on “Repair” and it will start to repair your iTunes and components. Please ensure your iTunes is connected to stable network while repairing.
Keep in mind that C: may also be replaced with a drive letter of your system drive.
Step 3: Delete any iTunes or other Apple software shortcuts that may be in your Start Menu or Desktop.
Step 4: Once all of this is done, download an older version of iTunes or try the iTunes 12.1.3 for Windows (64-bit — for older video cards) set-up file as a workaround for installation or performance issues at https://support.apple.com/kb/DL1784?viewlocale=en_US and run it to install. Make sure that you use an account with administrative rights. You can do this by right clicking on the downloaded file and choosing «Run as Administrator.»
Once it is installed, it should work just fine. You may however have to re-install other programs like the iCloud Control Panel if you had deleted it.
![]()


(Click to rate this post)
Generally rated 4.7 ( 256 participated)
You have already rated this article, please do not repeat scoring!
Источник


