- Ошибка при билде игры в unity 2020.3.17f1, что делать?
- В консоль выводит данные ошибки
- AndroidX dependencies are not automatically added in Unity 2020.1 with the Firebase 6.16.0 SDK when using a mainTemplate.gradle #810
- Comments
- patm1987 commented Oct 5, 2020
- [REQUIRED] Please fill in the following fields:
- [REQUIRED] Please describe the issue here:
- Steps to reproduce:
- Relevant Code:
- vimanyu commented Oct 6, 2020
- patm1987 commented Oct 6, 2020
- vimanyu commented Oct 6, 2020
- vimanyu commented Nov 3, 2020
- How to Fix “Failed to install the following Android SDK packages as some licenses have not been accepted” Error in Android Studio?
- What are Android SDK packages?
- How To Solve Failed to install the following Android SDK packages?
- Method 1
- Method 2
- Method 3
- Method 4
- Method 5
Ошибка при билде игры в unity 2020.3.17f1, что делать?
При билде игры на андроид появляется ошибка
Failed to update Android SDK package list. See the console for details.
В консоле 4 ошибки
первая ошибка:
Exception in thread «main» java.lang.NoClassDefFoundError: com/google/common/collect/Multimap
at com.android.sdklib.tool.sdkmanager.SdkManagerCliSettings.(SdkManagerCliSettings.java:65)
at com.android.sdklib.tool.sdkmanager.SdkManagerCli.main(SdkManagerCli.java:57)
at com.android.sdklib.tool.sdkmanager.SdkManagerCli.main(SdkManagerCli.java:48)
Caused by: java.lang.ClassNotFoundException: com.google.common.collect.Multimap
at java.net.URLClassLoader.findClass(URLClassLoader.java:381)
at java.lang.ClassLoader.loadClass(ClassLoader.java:424)
at sun.misc.Launcher$AppClassLoader.loadClass(Launcher.java:349)
at java.lang.ClassLoader.loadClass(ClassLoader.java:357)
. 3 more
Picked up JAVA_TOOL_OPTIONS: -Dfile.encoding=UTF-8
вторая ошибка:
CommandInvokationFailure: Failed to update Android SDK package list.
D:\UnityI\2020.3.17f1\Editor\Data\PlaybackEngines\AndroidPlayer\SDK\tools\bin\sdkmanager.bat —list
stderr[
Exception in thread «main» java.lang.NoClassDefFoundError: com/google/common/collect/Multimap
at com.android.sdklib.tool.sdkmanager.SdkManagerCliSettings.(SdkManagerCliSettings.java:65)
at com.android.sdklib.tool.sdkmanager.SdkManagerCli.main(SdkManagerCli.java:57)
at com.android.sdklib.tool.sdkmanager.SdkManagerCli.main(SdkManagerCli.java:48)
Caused by: java.lang.ClassNotFoundException: com.google.common.collect.Multimap
at java.net.URLClassLoader.findClass(URLClassLoader.java:381)
at java.lang.ClassLoader.loadClass(ClassLoader.java:424)
at sun.misc.Launcher$AppClassLoader.loadClass(Launcher.java:349)
at java.lang.ClassLoader.loadClass(ClassLoader.java:357)
. 3 more
Picked up JAVA_TOOL_OPTIONS: -Dfile.encoding=UTF-8
]
stdout[
]
exit code: 1
UnityEditor.Android.Command.WaitForProgramToRun (UnityEditor.Utils.Program p, UnityEditor.Android.Command+WaitingForProcessToExit waitingForProcessToExit, System.String errorMsg) (at :0)
UnityEditor.Android.Command.Run (System.Diagnostics.ProcessStartInfo psi, UnityEditor.Android.Command+WaitingForProcessToExit waitingForProcessToExit, System.String errorMsg) (at :0)
UnityEditor.Android.AndroidSDKTools.RunAndroidSdkTool (System.String toolName, System.String arguments, System.Boolean updateCommand, System.String errorMsg, System.String toolsDir, System.String[] warningsToIgnore) (at :0)
UnityEditor.Android.AndroidSDKTools.ListComponentsVersions () (at :0)
UnityEditor.Android.SDKManager.UpdatePackagesList () (at :0)
UnityEditor.Android.SDKManager.HighestVersionInstalled (UnityEditor.Android.SDKManager+Component tool) (at :0)
UnityEditor.Android.PostProcessor.Tasks.CheckAndroidSDK+SDKToolsDetector.GetVersion () (at :0)
UnityEditor.Android.PostProcessor.Tasks.CheckAndroidSDK+SDKComponentDetector.Detect (System.Version minVersion, UnityEditor.Android.PostProcessor.ProgressHandler onProgress) (at :0)
UnityEditor.Android.PostProcessor.Tasks.CheckAndroidSDK.EnsureSDKComponentVersion (System.Version minVersion, UnityEditor.Android.PostProcessor.Tasks.CheckAndroidSDK+SDKComponentDetector detector) (at :0)
UnityEditor.Android.PostProcessor.Tasks.CheckAndroidSDK.Execute (UnityEditor.Android.PostProcessor.PostProcessorContext context) (at :0)
UnityEditor.Android.PostProcessor.PostProcessRunner.RunAllTasks (UnityEditor.Android.PostProcessor.PostProcessorContext context) (at :0)
UnityEngine.GUIUtility:ProcessEvent(Int32, IntPtr, Boolean&)
третья ошибка:
Build completed with a result of ‘Failed’ in 59 seconds (58609 ms)
UnityEngine.GUIUtility:ProcessEvent (int,intptr,bool&)
четвертая ошибка:
UnityEditor.BuildPlayerWindow+BuildMethodException: 3 errors
at UnityEditor.BuildPlayerWindow+DefaultBuildMethods.BuildPlayer (UnityEditor.BuildPlayerOptions options) [0x002ca] in :0
at UnityEditor.BuildPlayerWindow.CallBuildMethods (System.Boolean askForBuildLocation, UnityEditor.BuildOptions defaultBuildOptions) [0x00080] in :0
UnityEngine.GUIUtility:ProcessEvent (int,intptr,bool&)
Я уже 5 раз переустановил Unity, что делать?
(Может это не поможет, но при начале установки во всех 5 попытках была ошибка по типу — не удалось удалить старые версии Android Build)
Источник
В консоль выводит данные ошибки
Скажите пожалуйста, о чем эти ошибки говорят и как решить проблему с их появлением?
1)
CommandInvokationFailure: Unable to list target platforms. Please make sure the android sdk path is correct. See the Console for more details.
C:/Program Files/Java/jdk-10\bin\java.exe -Xmx2048M -Dcom.android.sdkmanager.toolsdir=»C:/Users/User/AppData/Local/Android/Sdk\tools» -Dfile.encoding=UTF8 -jar «D:\Unity\Editor\Data\PlaybackEngines\AndroidPlayer/Tools\sdktools.jar» —
stderr[
Error:Invalid command android
]
stdout[
]
exit code: 64
UnityEditor.Android.Command.Run (System.Diagnostics.ProcessStartInfo psi, UnityEditor.Android.WaitingForProcessToExit waitingForProcessToExit, System.String errorMsg)
UnityEditor.Android.AndroidSDKTools.RunCommandInternal (System.String javaExe, System.String sdkToolsDir, System.String[] sdkToolCommand, Int32 memoryMB, System.String workingdir, UnityEditor.Android.WaitingForProcessToExit waitingForProcessToExit, System.String errorMsg)
UnityEditor.Android.AndroidSDKTools.RunCommandSafe (System.String javaExe, System.String sdkToolsDir, System.String[] sdkToolCommand, Int32 memoryMB, System.String workingdir, UnityEditor.Android.WaitingForProcessToExit waitingForProcessToExit, System.String errorMsg)
UnityEditor.HostView:OnGUI()
2)
CommandInvokationFailure: Failed to re-package resources.
C:\Users\User\AppData\Local\Android\android-sdk\build-tools\23.0.1\aapt.exe package —auto-add-overlay -v -f -m -J «gen» -M «AndroidManifest.xml» -S «res» -I «C:/Users/User/AppData/Local/Android/android-sdk\platforms\android-23\android.jar» -F bin/resources.ap_
stderr[
AndroidManifest.xml:5: error: Error: String types not allowed (at ‘configChanges’ with value ‘mcc|mnc|locale|touchscreen|keyboard|keyboardHidden|navigati on|orientation|screenLayout|uiMode|screenSize|smallestScreen Size|fontScale|layoutDirection|density’).
]
stdout[
Configurations:
(default)
v14
v21
mdpi-v4
xhdpi-v4
Источник
AndroidX dependencies are not automatically added in Unity 2020.1 with the Firebase 6.16.0 SDK when using a mainTemplate.gradle #810
Comments
patm1987 commented Oct 5, 2020
[REQUIRED] Please fill in the following fields:
- Unity editor version: 2020.1.6f1
- Firebase Unity SDK version: 6.16.0
- Source you installed the SDK: Unity Package Manager (.unitypackage or Unity Package Manager)
- Problematic Firebase Component: Database (Auth, Database, etc.)
- Other Firebase Components in use: Database (Auth, Database, etc.)
- Additional SDKs you are using: none (Facebook, AdMob, etc.)
- Platform you are using the Unity editor on: Mac (Mac, Windows, or Linux)
- Platform you are targeting: Android (iOS, Android, and/or desktop)
- Scripting Runtime: Mono (Mono, and/or IL2CPP)
[REQUIRED] Please describe the issue here:
When building a Firebase project (in this case, the Database test app) with a mainTemplate.gradle , I get the following issue:
It will go away if I also generate a gradleTemplate.properties file with android.useAndroidX=true in it or if I delete the mainTemplate.gradle file.
(Please list the full steps to reproduce the issue. Include device logs, Unity logs, and stack traces if available.)
Steps to reproduce:
- Check out one of the test apps (I used the Database one).
- Add a mainTemplate.gradle file

Restart Unity (you may get a resolution failed error if you don’t perform this step) - Click «Build And Run» for Android

Android Resolver Settings: 
Workaround (if you need a mainTemplate.gradle file, it works fine without one):
- Also generate a gradleTemplate.properties file:
- Add android.useAndroidX=true to the end of it. Note that just generating this file is not enough, but it must be modified as well.

Have you been able to reproduce this issue with just the Firebase Unity quickstarts (this GitHub project)?
What’s the issue repro rate? 100%
If you have a downloadable sample project that reproduces the bug you’re reporting, you will
likely receive a faster response on your issue.
Relevant Code:
The text was updated successfully, but these errors were encountered:
vimanyu commented Oct 6, 2020
I could not reproduce this on my end. I tried both in 2019.4 and 2020.2. Here are the steps I followed,
- Fresh checkout of Unity firebase database quickstart testapp
- Launch Unity (2019 or 2020)
- Player Settings -> Settings for Android -> Publishing Settings -> Enable Custom Gradle Template
- Add Google Package Registry (manually modifying Package.manifest in 2019 and using Project Settings -> Package Manager -> Scoped Registries in 2020)
- Install Firebase Database via UPM
- Assets -> External Dependency Manager -> Android Resolver -> Settings -> Enable «Use Jetifier»
- Assets -> External Dependency Manager -> Android Resolver -> Force Resolve
Expected error:
- Player Settings -> Settings for Android -> Publishing Settings -> Enable Custom Gradle Properties Template
- Force Resolve again (should be successful)
- Build
Error on first build:
- Restart Unity -> Build
Everything works aside from that build error on first time builds.
patm1987 commented Oct 6, 2020
After some experimenting, I have verified that a «Force Resolve» after generating a gradleTemplate.properties file does add the necessary entries:
vimanyu commented Oct 6, 2020
Talking to @patm1987, the difference was that I ran a «Force resolve» before building. The bug here is that a build should trigger this resolution automatically and that isn’t happening.
vimanyu commented Nov 3, 2020
There were many corner cases and we ended up resorting to a strategy to ensure we resolve dependencies atleast once «Auto resolve on Build» is enabled. There are several triggers (eg: change in Build Settings or Android Resolver settings) that dictate to the system whether it should resolve dependencies or not. Aside from that, we were also optimizing based on if the module is already loaded.
Newer versions of Unity do not reload the entire app domain. This caused our optimization to not function as expected.
Now, we are utilizing a Unity post-build callback to reset things after a build. The issue is that this reset only happens after a successful build. If the build fails, it is highly advisable to manually «Force Resolve» from the menu.
You can’t perform that action at this time.
You signed in with another tab or window. Reload to refresh your session. You signed out in another tab or window. Reload to refresh your session.
Источник
How to Fix “Failed to install the following Android SDK packages as some licenses have not been accepted” Error in Android Studio?
When you download the latest Android SDK tools version using the command line to install SDKs and you just try to build gradle then this error shows up:
You may face this error even after typing y as the answer for the question: Do you accept the license ‘android-sdk-license-c81a61d9’ [y/n]: y. So we need to look at why this error is popping up? Because of this error, we cannot compile our project. So In this article, we will talk about how to solve this error using five different methods. But before directly jumping to solutions first let’s see something about Android SDK.
What are Android SDK packages?
SDK stands for software development kit or devkit for short. The Android SDK consists of an emulator, development tools, sample projects with source code, and the required libraries to build Android applications. The Android SDK Manager, manages various Android SDK versions, tools, and various other useful packages that you can select and download, to keep your development environment up-to-date.
How To Solve Failed to install the following Android SDK packages?
Method 1
You need to accept the licenses before building. According to Android SDK docs, you can use the following command depending on the SDK manager location: Docs on –licenses option seems to be missing though. yes | sdkmanager –licenses
Windows:
Step 1: Navigate to %ANDROID_HOME%/tools/bin .
%ANDROID_HOME% is the path to SDK. By default it is located at : C:\Users\UserName\AppData\Local\android\Sdk . If you have moved SDK to another directory location then you can follow below steps :
- Search for edit the system environment variables.
- Then in the environment variables, you will see ANDROID_HOME.
- Navigate to that path in cmd
Step 2:
After successfully navigating just type below command and you are done.
GNU/Linux Distributions:
macOS:
export JAVA_HOME=/Applications/Android\ Studio.app/Contents/jre/jdk/Contents/Home
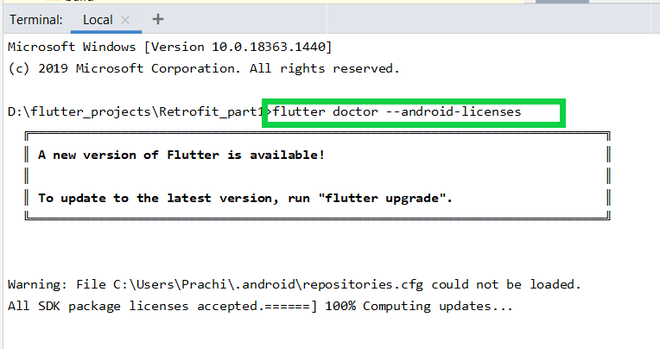
Flutter Users:
Just type flutter doctor –android-licenses in the terminal and wait for few seconds. You will see “All SDK package licenses accepted” on your screen.
Method 2
Step 1: In Android Studio go to Tools > SDK Manager.
Step 2: Go to the SDK Tools tab as shown in the below image.
Step 3: Select the Android SDK Command-line Tools (latest) and download by pressing Apply.
Method 3
in Windows OS go to your sdkmanager path then execute
You can find your sdkmanager at: \Android\tools\bin
IF you don’t know where is your SDK located, then follow these steps:
- Open Android Studio
- Navigate to Your Project > Files > Setting > Appearance and Behavior > Android SDK
Method 4
Step 1:Go to your $ANDROID_HOME/tools/bin and fire the cmd and type the below command:

Accept All licenses listed there.
Step 2:
After this just go to the licenses folder in SDK.
Check that it’s having these five files:
- android-sdk-license
- android-googletv-license
- android-sdk-preview-license
- google-gdk-license
- mips-android-sysimage-license
Step 3:
Give a retry and build again, still, Jenkins giving ‘licenses not accepted” then you have to give full permission to your ‘SDK’ directory and all its parent directories. Here is the command:
If you having sdk in /opt/ directory.
Method 5
For Windows users:
Step 1: Go to the location of your sdkmanager.bat file. By default, it is at Android\sdk\tools\bin inside the %LOCALAPPDATA% folder.
Step 2: Open a terminal window there by typing cmd into the title bar. Then go to the above path(Android\sdk\tools\bin as highlighted by the white line in the below image) and type :
Источник


