- Troj80 / Setup Android build environment on Fedora
- danpawlik / Setup Android build environment on Fedora
- HOWTO Setup Android Development
- Contents
- Abstract
- Target Fedora version
- Requirements
- Android Emulator
- Install ADT plugin for Eclipse
- Install Android SDK
- Android Emulator
- 32 bit packages
- AVD device
- Running Emulator
- Hello Fedora
- Configure Android in Eclipse
- Create a New Android Project
- Development and Execution
- Hello Fedora Code
- Compiling Android from Source
- streetsamurai00mi / Setup Android build environment on Fedora
Troj80 / Setup Android build environment on Fedora
This file contains bidirectional Unicode text that may be interpreted or compiled differently than what appears below. To review, open the file in an editor that reveals hidden Unicode characters. Learn more about bidirectional Unicode characters
| #! /bin/bash |
| if [ $UID != » 0 » ] ; then |
| echo » ERROR: You must run this script as root! « |
| exit 1 |
| fi |
| dnf install \ |
| @development-tools \ |
| android-tools \ |
| automake \ |
| bison \ |
| bzip2 \ |
| bzip2-libs \ |
| ccache \ |
| curl \ |
| dpkg-dev \ |
| gcc \ |
| gcc-c++ \ |
| gperf \ |
| libstdc++.i686 \ |
| libxml2-devel \ |
| lz4-libs \ |
| lzop \ |
| make \ |
| maven \ |
| ncurses-compat-libs \ |
| openssl-devel \ |
| pngcrush \ |
| python \ |
| python3 \ |
| python3-mako \ |
| python-mako \ |
| python-networkx \ |
| schedtool \ |
| squashfs-tools \ |
| syslinux-devel \ |
| zip \ |
| zlib-devel \ |
| zlib-devel.i686 |
| curl http://commondatastorage.googleapis.com/git-repo-downloads/repo > /usr/bin/repo && chmod +x /usr/bin/repo |
You can’t perform that action at this time.
You signed in with another tab or window. Reload to refresh your session. You signed out in another tab or window. Reload to refresh your session.
Источник
danpawlik / Setup Android build environment on Fedora
This file contains bidirectional Unicode text that may be interpreted or compiled differently than what appears below. To review, open the file in an editor that reveals hidden Unicode characters. Learn more about bidirectional Unicode characters
| #! /bin/bash |
| export USER= $( whoami ) |
| dnf update -y |
| dnf install -y \ |
| @development-tools \ |
| android-tools \ |
| automake \ |
| bc \ |
| bison \ |
| bzip2 \ |
| bzip2-libs \ |
| ccache \ |
| curl \ |
| dpkg-dev \ |
| gcc-c++ \ |
| git \ |
| gperf \ |
| hostname \ |
| ImageMagick-devel.x86_64 \ |
| ImageMagick-c++-devel.x86_64 \ |
| java-1.8.0-openjdk \ |
| libstdc++.i686 \ |
| libxml2-devel \ |
| lz4-libs \ |
| lzop \ |
| make \ |
| maven \ |
| ncurses-compat-libs \ |
| optipng \ |
| pngcrush \ |
| python \ |
| python3 \ |
| python3-mako \ |
| python-mako \ |
| python-networkx \ |
| rsync \ |
| schedtool \ |
| squashfs-tools \ |
| syslinux-devel \ |
| zip \ |
| zlib-devel \ |
| zlib-devel.i686 |
| curl http://commondatastorage.googleapis.com/git-repo-downloads/repo > /usr/bin/repo && chmod +x /usr/bin/repo |
| # ### |
| dnf install -y vim htop |
You can’t perform that action at this time.
You signed in with another tab or window. Reload to refresh your session. You signed out in another tab or window. Reload to refresh your session.
Источник
HOWTO Setup Android Development

Contents
Abstract
This page should provide «how-to» document about using Fedora Linux for developing applications for Android platform.
This document will cover requirements, steps how to go from source code till final application and how to use Android Emulator for testing of application.
Target Fedora version
Requirements
Android Emulator

- Eclipse IDE (3.5 and higher is needed because of ADT plugin dependency on Equinox P2) can be installed using DNF:
Download SDK from page
Install ADT plugin for Eclipse
-
- Start Eclipse, then select Help > Install new software.
- Click on the Available Software site hyperlink.
- In Available software sites dialog, click Add.
- In the Add Site dialog that appears, enter a name for the remote site (for example «Eclipse Update») in the «Name» field. In the Location field, enter one of these URLs, depending on your version of Eclipse. For Eclipse version 3.5 use:
or for Eclipse version 3.6 use:
For Eclipse version 3.7 (Fedora 16 and current Rawhide (as of Oct. 10, 2011)), use:
For Eclipse version 4.2 (Fedora 17 and current Rawhide (as of Jun. 6, 2012)), use:
For Eclipse version 4.3 (Fedora 19 and current Rawhide (as of Jun. 5, 2013)), use:
For Eclipse version 4.4 (Fedora 21 and current Rawhide (as of March 5, 2015)), use:
If you’re unsure which version of Eclipse you are using, check it at Help > About Eclipse.
This will add dependency which are required for ADT plugin.
-
- Again click on Add button and enter a name for the another remote site (for example, «Android Plugin») in the «Name» field. In the «Location» field, enter this URL:
Note: If you have trouble acquiring the plugin, you can try using «http» in the URL, instead of «https» (https is preferred for security reasons).Click OK.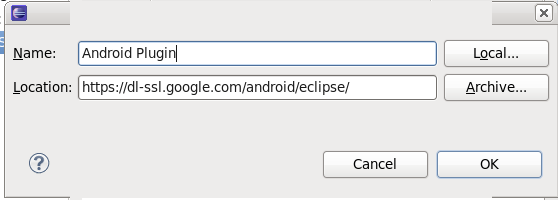
-
- Click on each of the added sites and click Reload
- Back in the Available Software view, next to «Work with:», you should now see «Android Plugin» in the drop down list, select it. In the box below, you will see «Developer Tools» added to the list. Select the checkbox next to Developer Tools, this will automatically select the nested tools Android DDMS and Android Development Tools. Click Next.
- In the resulting Install Details dialog, the Android DDMS and Android Development Tools features are listed. Click Next to read and accept the license agreement and install any dependencies, then click Finish.
- Restart Eclipse.
Install Android SDK
- Download the SDK from [1]
- Unpack it in your home directory, then rename it to
/AndroidSDK
Add into path environment variable
/AndroidSDK in .bash_profile file in your home directory.
For example:
- Logout and login back to apply path change
Android Emulator
32 bit packages
Install in Fedora 22 and later versions using DNF:
Or with YUM in Fedora 21 and earlier versions:
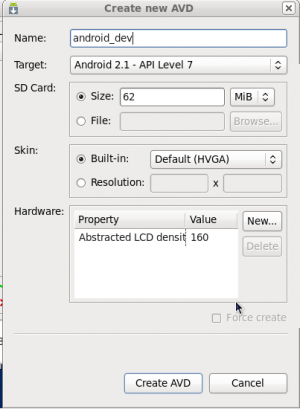
AVD device
/AndroidSDK directory and run tools/android to configure and create your first Android Virtual Device.
- SDK Platform Android 2.1
- Documentation for Android SDK
- Platform Tools
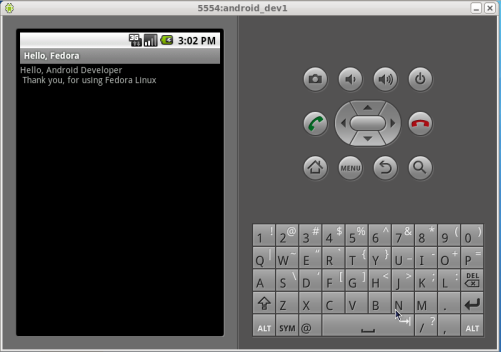
Running Emulator

Now we have created Android Virtual Device and we should start it, however, due to issues in AndroidSDK with sound, we will need to run it from command line
And this will start emulator for us.
Hello Fedora
Configure Android in Eclipse
- Go to Window -> Preferences, click on Android and set SDK location to directory. (for example /home/user/AndroidSDK) and click on Apply.
- Click on apply to reload available targets
- choose target android SDK
- click on OK
Create a New Android Project
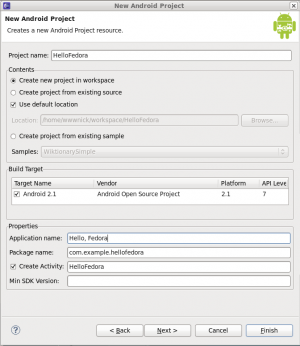
After you’ve created an AVD, the next step is to start a new Android project in Eclipse.
- From Eclipse, select File > New > Project. If the ADT Plugin for Eclipse has been successfully installed, the resulting dialog should have a folder labeled «Android» which should contain «Android Project». (After you create one or more Android projects, an entry for «Android XML File» will also be available.)
- Select «Android Project» and click Next.
- On next screen type Project Name («HelloFedora»), Application name (Hello, Fedora), package name (com.example.hellofedora) which represent your namespace and name of activity in «Create Activity» box (HelloFedora). Choose target (if you have multiple targets) and click on «Finish». This will create project for you.
Development and Execution
- open HelloFedora.java and paste there example code from Hello Fedora Code section.
- click on windows -> preferences. In new window, open Android -> Launch and into «Options» text box insert «-noaudio»
- open separate console, cd
/AndroidSDK/tools and execute ./emulator -noaudio @android_dev1 to start emulator. Wait for start of emulator (it could take several minutes)
Hello Fedora Code
Compiling Android from Source
Since Android is open source software, we can compile the platform ourselves on our Fedora machines. You need to have at least 6GB of disk space free to build Android.
- Make sure you have Java installed (Java
- If your device is not in the ‘lunch’ list, it’s because there is no official open source device config for your particular device. For example, at this point in time, the only device configs that come with the source trees, are the G1 (dream), MyTouch (sapphire), Nexus One (passion), and Nexus S (crespo). This is because they are directly related with Google and therefore just as open source as the rest of the platform.
- If none of these are your Android device, luckily for us, there are open source developers that work on creating these for various devices. What you want to do is obtain the configuration repo, and put it in
/android/source/device. The easiest way to do this is to use ‘git’ (provided by the «Development Tools» dnf|yum group. Git can be installed with DNF by command dnf install git ). You can search http://github.com to see if anyone has started working on a config for your specific device.
—Hpejakle 11:25, 2 April 2010 (UTC)
Copyright © 2021 Red Hat, Inc. and others. All Rights Reserved. For comments or queries, please contact us.
The Fedora Project is maintained and driven by the community and sponsored by Red Hat. This is a community maintained site. Red Hat is not responsible for content.
Источник
streetsamurai00mi / Setup Android build environment on Fedora
This file contains bidirectional Unicode text that may be interpreted or compiled differently than what appears below. To review, open the file in an editor that reveals hidden Unicode characters. Learn more about bidirectional Unicode characters
| #! /bin/bash |
| if [ $UID != » 0 » ] ; then |
| echo » ERROR: You must run this script as root! « |
| exit 1 |
| fi |
| dnf install \ |
| @development-tools \ |
| android-tools \ |
| automake \ |
| bison \ |
| bzip2 \ |
| bzip2-libs \ |
| ccache \ |
| curl \ |
| dpkg-dev \ |
| gcc \ |
| gcc-c++ \ |
| gperf \ |
| libstdc++.i686 \ |
| libxml2-devel \ |
| lz4-libs \ |
| lzop \ |
| make \ |
| maven \ |
| ncurses-compat-libs \ |
| openssl-devel \ |
| pngcrush \ |
| python \ |
| python3 \ |
| python3-mako \ |
| python-mako \ |
| python-networkx \ |
| schedtool \ |
| squashfs-tools \ |
| syslinux-devel \ |
| zip \ |
| zlib-devel \ |
| zlib-devel.i686 |
| curl http://commondatastorage.googleapis.com/git-repo-downloads/repo > /usr/bin/repo && chmod +x /usr/bin/repo |
You can’t perform that action at this time.
You signed in with another tab or window. Reload to refresh your session. You signed out in another tab or window. Reload to refresh your session.
Источник


