- Let’s Build a File Explorer in Kotlin
- Kotlin File Explorer
- Tutorial Series
- Part 1 — Introduction and Set up
- Part 2 — Reading files from paths
- Part 3 — Navigating through File System
- Part 4 — Adding Breadcrumbs
- Part 5 — Creating/Deleting files and folders
- Part 6— Copying/Moving files and folders
- Kotlin Native: следите за файлами
- Среда
- Немного настроек
- Добро пожаловать в мир C
- Немного выводов
- Build a File Explorer in Kotlin – Part 1 – Introduction and Set up
- Published by Gurleen Sethi on August 8, 2018
- Introduction
- Brief breakdown of upcoming tutorials
- Setting up the project
- Build a File Explorer in Kotlin – Part 2 – Reading files from paths
- Published by Gurleen Sethi on August 4, 2018 August 4, 2018
- Setting up FilesListFragment
- Sprinkle Kotlin Magic
- Reading files at path
- Never miss a post from TheTechnoCafe
- Displaying files at path
Let’s Build a File Explorer in Kotlin


Have you been away from Kotlin for a while? Wanna practice your Kotlin skills? Wanna build an Android app in Kotlin?
If yes, then I have something for you.
I have written a 5 part tutorial series, in which you will build a basic File Explorer application in Android using Kotlin.
You will start from scratch, setting up the UI and then implementing the corresponding functionality. I will guide you through every feature that is included in the application and keep showing you tips and tricks about Kotlin every now and then. All in all this is a great way to refresh your Kotlin skills.
Kotlin File Explorer
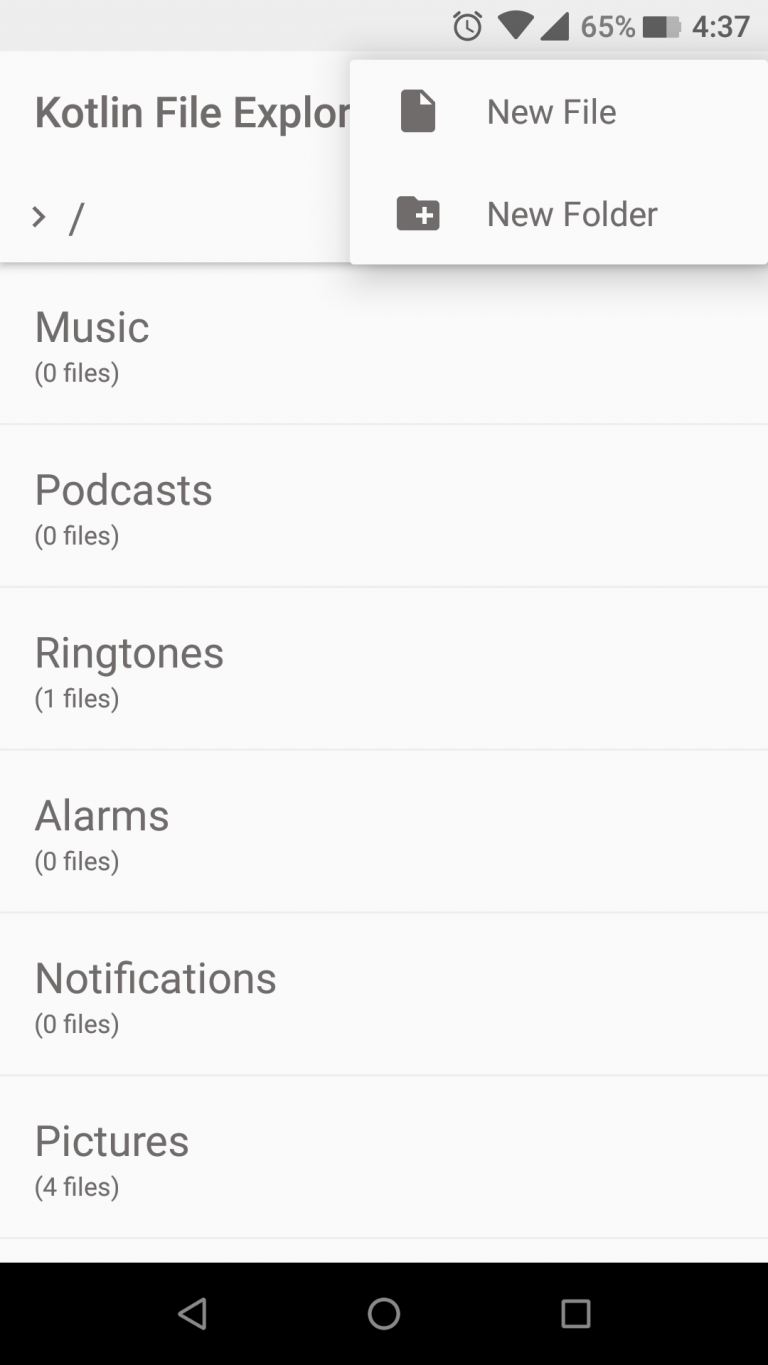
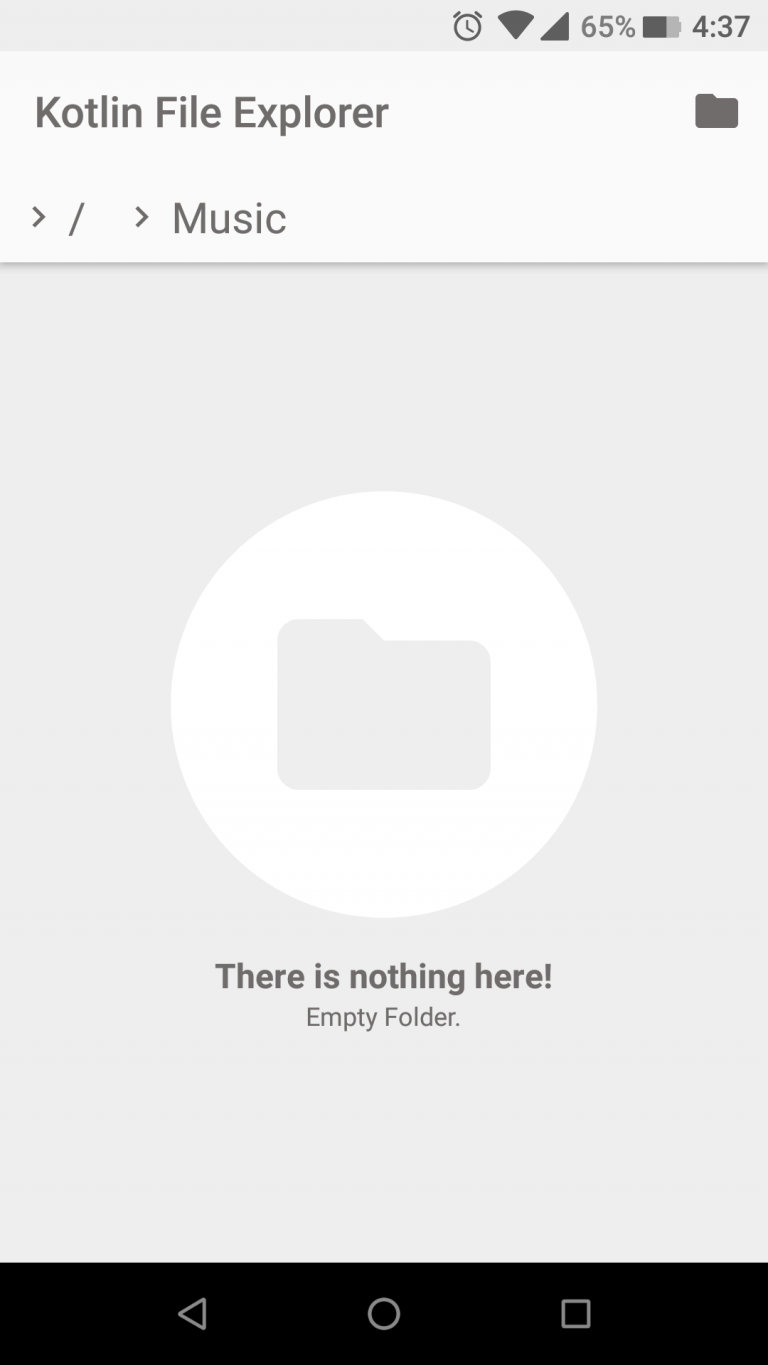
Below are screenshots of completed application.


The source code of completed application can be found at this GitHub repo (Clone the repo as it will help you whenever you are stuck).
Tutorial Series
Part 1 — Introduction and Set up
You will start with setting up an empty project and configure permissions that are required for accessing the file system in Android. You will add a basic File Provider which is required as of Android 7.0.
Part 2 — Reading files from paths
In this part you will set up functions that will read files from a particular path in the file system. Then you will display these files in RecyclerView for the user to see and interact with. This might sound simple but we will implement this functionality with reusability in mind so there is more to it than you think!
Part 3 — Navigating through File System
After you are done reading files from a path, you will add the functionality for the user to navigate through the file system i.e. whenever the user clicks on a folder, you will open up the list of files contained inside that folder and so on.
Part 4 — Adding Breadcrumbs
Now comes the fun part. You might have seen in many file manager applications, in the Toolbar they have a way to navigate back to a point in the file system where you came from, these are called breadcrumbs. You will implement this feature!
Part 5 — Creating/Deleting files and folders
In this part you will add feature to create/delete file and folders anywhere in the file system.
Part 6— Copying/Moving files and folders
I have written a 5 part tutorial series, and you might wonder why is 6th part mentioned. No! this is not a tutorial. This is your homework 😀
I hope you enjoy this short series on Kotlin.
Источник
Kotlin Native: следите за файлами
Когда вы пишите command line утилиту, последнее, на что вам хочется полагаться, так это на то, что на компьютере где она будет запущена установлен JVM, Ruby или Python. Так же хотелось бы на выходе иметь один бинарный файл, который будет легко запустить. И не возиться слишком много с memory management’ом.
По вышеозначенным причинам, в последние годы всегда, когда мне нужно было писать подобные утилиты, я использовал Go.
У Go относительно простой синтаксис, неплохая стандартная библиотека, есть garbage collection, и на выходе мы получаем один бинарник. Казалось бы, что еще нужно?
Не так давно Kotlin так же стал пробовать себя на схожем поприще в форме Kotlin Native. Предложение звучало многообещающе — GC, единый бинарник, знакомый и удобный синтаксис. Но все ли так хорошо, как хотелось бы?
Задача, которую нам предстоит решить: написать на Kotlin Native простой file watcher. Как аргументы утилита должна получать путь к файлу и частоту проверки. Если файл изменился, утилита дожна создать его копию в той же папке с новым именем.
Иначе говоря, алгоритм должен выглядеть следующим образом:
Ладно, с тем чего хотим добиться вроде бы разобрались. Время писать код.
Среда
Первое, что нам потребуется — это IDE. Любителей vim попрошу не беспокоиться.
Запускаем привычный IntelliJ IDEA и обнаруживаем, что в Kotlin Native он не может от слова совсем. Нужно использовать CLion.
На этом злоключения человека, который в последний раз сталкивался с C в 2004 еще не окончены. Нужен toolchain. Если вы используете OSX, скорее всего CLion обнаружит подходящий toolchain сам. Но если вы решили использовать Windows и на C не программируете, придется повозиться с tutorial’ом по установке какого-нибудь Cygwin.
IDE установили, с toolchain’ом разобрались. Можно уже начать код писать? Почти.
Поскольку Kotlin Native еще несколько экспериментален, плагин для него в CLion не установлен по умолчанию. Так что прежде, чем мы увидим заветную надпись «New Kotlin/Native Application» придется его установить вручную.
Немного настроек
И так, наконец-то у нас есть пустой Kotlin Native проект. Что интересно, он основан на Gradle (а не на Makefile’ах), да еще на Kotlin Script версии.
Заглянем в build.gradle.kts :
Единственный плагин, который мы будем использовать называется Konan. Он то и будет производить наш бинарный файл.
В konanArtifacts мы указываем имя исполняемого файла. В данном примере получится file_watcher.kexe
Пора бы уже и код показать. Вот он, кстати:
Обычно у command line утилиты бывают так же опциональные аргументы и их значения по умолчанию. Но для примера будем предполагать, что аргумента всегда два: path и interval
Для тех, кто с Kotlin уже работал можем показаться странным, что path оборачивается в свой собственный класс File , без использования java.io.File . Объяснение этому — черезе минуту-другую.
Если вы вдруг не знакомы с функцией require() в Kotlin — это просто более удобный способ для валидации аргументов. Kotlin — он вообще про удобство. Можно было бы написать и так:
В целом, тут пока обычный Kotlin код, ничего интересного. А вот с этого момента станет повеселей.
Давайте будем пытаться писать обычный Kotlin-код, но каждый раз, когда нам нужно использовать что-нибудь из Java, мы говорим «упс!». Готовы?
Вернемся к нашему while , и пусть он отпечатывает каждый interval какой-нибудь символ, к примеру точку.
Thread — это класс из Java. Мы не можем использовать Java классы в Kotlin Native. Только Kotlin’овские классы. Никакой Java.
Кстати, потому в main мы и не использовали java.io.File
Хорошо, а что тогда можно использовать? Функции из C!
Добро пожаловать в мир C
Теперь, когда мы знаем что нас ждет, давайте посмотрим как выглядит функция exists() из нашего File :
File это простой data class , что дает нам имплементацию toString() из коробки, которой мы потом воспользуемся.
«Под капотом» мы вызываем C функцию access() , которая возвращает -1 , если такого файла не существует.
Дальше по списку у нас функция modified() :
Функцию можно было бы немного упростить используя type inference, но тут я решил этого не делать, чтобы было понятно, что функция не возвращает, к примеру, Boolean .
В этой фукнции есть две интересные детали. Во-первых, мы используем alloc() . Поскольку мы используем C, иногда нужно выделять структуры, а делается это в C вручную, при помощи malloc().
Высвобождать эти структуры тоже нужно вручную. Тут на помощь приходит функция memScoped() из Kotlin Native, которая это сделает за нас.
Нам осталось рассмотреть наиболее увесистую функцию: сopyAside()
Тут мы используем С функцию copyfile_state_alloc() , которая выделяет нужную для copyfile() структуру.
Но и высвобождать нам эту структуру приходится самим — используя
copyfile_state_free(state)
Последнее, что осталось показать — это генерация имен. Тут просто немного Kotlin:
Это довольно наивный код, который игнорирует многие кейсы, но для примера сойдет.
Теперь как все это запускать?
Один вариант — это конечно использовать CLion. Он все сделает за нас.
Но давайте вместо этого используем command line, чтобы лучше понять процесс. Да и какой-нибудь CI не будет запускать наш код из CLion.
Первым делом мы компилируем наш проект используя Gradle. Если все прошло успешно, появится следующее сообщение:
Шестнадцать секунд?! Да, в сравнение с каким-нибудь Go или даже Kotlin для JVM, результат неутешителен. И это еще крошечный проект.
Теперь вы должны увидеть бегущие по экрану точки. И если вы измените содержимое файла, об этом появится сообщение. Что-то вроде такой картины:
Время запуска замерить сложно. Зато мы можем проверить, сколько памяти занимает наш процесс, используя к примеру Activity Monitor: 852KB. Неплохо!
Немного выводов
И так, мы выяснили что при помощи Kotlin Native мы можем получить единый исполняемый файл с memory footprint’ом меньше, чем у того же Go. Победа? Не совсем.
Как это все тестировать? Те кто работал с Go или Kotlin’ом знаю, что в обоих языках есть хорошие решения для этой важной задачи. У Kotlin Native с этим пока что все плохо.
Вроде бы в 2017ом JetBrains пытались это решить. Но учитывая, что даже у официальных примеров Kotlin Native нет тестов, видимо пока не слишком успешно.
Другая проблема — crossplatform разработка. Те, кто работали с C побольше моего уже наверняка заметили, что мой пример будет работать на OSX, но не на Windows, поскольку я полагаюсь на несколько функций доступных только с platform.darwin . Надеюсь что в будущем у Kotlin Native появится больше оберток, которые позволят абстрагироваться от платформы, к примеру при работе с файловой системой.
Все примеры кода вы можете найти тут
И ссылка на мою оригинальную статью, если вы предпочитаете читать на английском
Источник
Build a File Explorer in Kotlin – Part 1 – Introduction and Set up
Published by Gurleen Sethi on August 8, 2018
Introduction
This tutorial series will guide you through building a simple Android File Explorer application in Kotlin. You will develop a file explorer application with core functionalities of creating, deleting, copying and moving files/folders. I assume that you have a good understanding of Android Development and Kotlin language. These tutorials are not meant to teach you Kotlin or Android. Think of this series as practicing/refreshing your Kotlin/Android skills. We will not be focusing on making the best file explorer application or the best architecture application ever! As I said this series is meant for practicing and refreshing your skills.
Brief breakdown of upcoming tutorials
I have divided this series in segments of short to medium sized tutorials. In this tutorial we will be setting up our project. In next tutorial you will build the core part of the application which is browsing through the file system structure. Then you will follow up by adding breadcrumbs to provide navigation to any point previously opened in the file structure. After that you will add feature to create/delete files and folders. Followed by that you will add options to copy and move files from one directory to another. Finally we will end the series with a tutorial on miscellaneous stuff!
Throughout the tutorial I will not be providing the complete code, as I expect you have a fair knowledge of Android Development, code that is too verbose will not be shown. The complete code for the project we are building is available on this GitHub repo. I recommend that you download the complete project, in case you get stuck at any point, you can refer the completed project.
Setting up the project
Make sure you have the latest Android Studio version installed. Open it and create a new project, make sure to turn on Kotlin support.

Once the project is created, add the permission for accessing external storage.
Источник
Build a File Explorer in Kotlin – Part 2 – Reading files from paths
Published by Gurleen Sethi on August 4, 2018 August 4, 2018
So now that you have set up the project, lets start coding and making this File Explorer come to life! (If you haven’t read the first part of this series, please read it here.)
Setting up FilesListFragment
The first thing you are going to do is create a Fragment named FilesListFragment. In this fragment you will take a path as an argument, read all the files/directories on that path and show them in a RecyclerView.
Here is the layout file for FilesListFragment. As you can see it has a RecyclerView and Layout that we will show when a folder is empty and doesn’t have and files in it.
Sprinkle Kotlin Magic
In the app.gradle file make sure you have added the kotlin-extensions plugin.
We will use Builder pattern in the Fragment to instantiate its objects.
Go ahead and a new Builder class inside FilesListFragment.
In the companion object of FilesListFragment add a build function that takes in an extension function on Builder applies it on a new Builder instance and calls the build, method to return the instance of FilesListFragment.
The concept is relatively simple here, the build functions takes an extension function on Builder so you have access to all variables in the Builder class, then you create a new Builder instance and apply this function on it, which will set the variables to whatever value was assigned in the extension function. These are also known as receiver functions. Lets build and set this Fragment in MainActivity.
Initially the path will to the user’s public directory. Below is the layout file of MainActivity.
Your application might crash when you run it, because we haven’t yet request file permission on runtime, we will do that later, for time being go to Settings > Apps > Kotlin File Explorer > Permissions, and grant the files permission. Re run this app, it should now work perfectly.
Reading files at path
Before we start reading files, lets do some set up!
In a folder named common, create a new enum named FileType. This enum will help us denote the file type of current file, whether is a directory or a simple file.
Create a new data class named FileModel, this class will contain all the data we require related to a file.
Now create a new file named FileUtils, this file will contain all of the code related to reading, creating, deleting, copying and moving files.
Let’s add a function to FileUtils that reads all the files from a path. You can do that simple create an instance of File with the given path and call listFiles() on it. We will also add two extra parameters, once to toggle the viability of hidden files(files starting with a ‘.’), and other to view just folder.
In the same FileUtils let’s create a function that converts List to List . We will also add a function convert the file size of MB.
Never miss a post from TheTechnoCafe
Displaying files at path
Now that we are done getting a list of files, lets show them in the RecyclerView in FilesListFragment.
Create a layout file for a single recycler view item named item_recycler_file.xml.
Now create a adapter for the RecyclerView named FilesRecyclerAdapter.
As you can see we have set up click and long click listener for a single item which we will use in future tutorials. There is an updateData method that updates the content inside the adapter. In the ViewHolder’s bindView method you can see that when the FileType is Folder we have hidden the totalSizeTextView, reason is that android doesn’t actually return the exact size of folder, it works fine for individual files though. So we hide the size in case of FileType.Folder and show a normal TextView with text “Folder”.
Jump into the FilesListFragment and set up the Adapter for RecyclerView.
Источник


