- File transfer usb cable android
- Top 3 Ways to Transfer Files from Android to PC Using USB Cable
- Part 1: How to Transfer Photos from Android to PC Using USB Cable & Windows File Explorer
- Part 2: How to Transfer Files from Android to PC/Mac Using USB Cable & Coolmuster Android Assistant
- Part 3: How to Transfer Files from Android to Mac via USB Cable & Android File Transfer
- How To Transfer Files From Android To PC Using USB Cable
- Transfer Files Between Internal and External Storage
- Transfer Files Between Android Devices
- Android USB Settings
- Common Questions and Answers
- Q- Can I delete files from my Android tablet/phone from my PC.
- Q- Can I transfer Files to an External SD card?
- Q- Can I access Android system files using this method?
- Q- Do I need any special software on my PC/laptop to do this?
File transfer usb cable android
Краткое описание:
Одним из самых популярных и простых способов передачи файлов между Android и Mac является использование приложения от Google под названием Android File Transfer.
Описание:
Android File Transfer — файл-менеджер для доступа к файлам Andoid с компьютеров Mac от Google. Автоматически обнаруживает подключенное устройство и открывает окно для передачи данных.
Android File Transfer — Быстро и просто
Устанавливаем Android File Transfer
Одним из самых популярных и простых способов передачи файлов между Android и Mac является использование приложения от Google под названием Android File Transfer. В то время как поисковый гигант первоначально разработал это приложение для передачи файлов между Android и Chrome OS, программное обеспечение было оптимизировано и для пользователей MacOS.
Вот как использовать Android File Transfer. Для начала загрузите приложение и на своем Mac дважды щелкните загруженный файл, чтобы установить программу. После распаковки, перетащите ярлык Android File Transfer в папку «Приложения». Подключите устройство Android к компьютеру Mac с помощью кабеля USB, открывайте программу и после завершения процесса синхронизации устройств, ваш смартфон или планшет будет отображаться как обычный каталог. Просто скопируйте файл в нужное место на вашем устройстве Mac. При этом, используя Android File Transfer, вы можете легко переносить файлы и папки как с Android на Mac, так и в обратном порядке.
Важно отметить, что Android File Transfer для Mac не будет работать с новыми MacBook, оснащенными портами USB-Type C. Только если у вас нет Google Pixel портом USB-type C. В противном случае вам нужно будет использовать переходник. Но не беспокойтесь! Мы также рассмотрим и беспроводные методы для передачи файлов с Android на Mac.
Android File Transfer – это специализированный инструмент для подключения телефонов на базе ОС Android к устройствам с OS X. Разработан и поддерживается компанией Google. Распространяется программа в виде скачиваемого dmg-образа и в дальнейшем может использоваться для подключения различных устройств на базе ОС Android. На сегодняшний день это лучший инструмент для приема и передачи данных со смартфона на Mac.
КАК РАБОТАЕТ ANDROID FILE TRANSFER
Для инсталляции Android File Transfer скачайте файл .dmg и запустите на компьютере с OS Mac. Сразу же после запуска программа будет добавлена в общий список установленных приложений.
ANDROID FILE TRANSFER
После запуска программы Android File Transfer на экране появится окошко со всеми папками, файлами и подкаталогами вашего устройства. К сожалению, двухоконный режим, как в Total Commander, не поддерживается, поэтому придется открыть рядом окно Finder для передачи файлов между смартфоном и «саком». Теперь вы сможете в несколько кликов скопировать важные файлы на компьютер, загрузить музыку или фильмы, либо перелить на компьютер фотографии и видео, снятые мобильником.
Программа работает быстро, автоматически открывается при подключении устройства к компьютеру, показывает все файлы и папки, включая подкатегории.
В век беспроводных технологий к USB относятся с пренебрежением, а зря. Традиционный кабель обеспечивает самую высокую скорость передачи данных. Сложность может возникнуть лишь с USB‑портами, которых не найти на современных Mac. Но в этом случае помогут переходники с USB‑C или другие способы из нашей статьи.
Загрузите утилиту Android File Transfer с официального сайта разработчиков ОС и установите на Mac, перетащив иконку приложения в папку «Программы».
Подключите Android‑устройство к Mac с помощью USB‑кабеля и, сделав свайп вниз, выберите «Зарядка через USB» → «Передача файлов».
Android File Transfer: подключите Android-устройство к Mac Android File Transfer: выберите «Передача файлов»
Запустите Android File Transfer и перейдите в менеджере файлов в нужный раздел памяти: внутренний накопитель или SD‑карту.
Запустите Android File Transfer
Выберите файлы, которые необходимо перенести на Mac, и перетащите их на рабочий стол или в любую другую папку.
Android File Transfer: выберите файлы и перетащите их
Таким же образом данные можно скопировать с компьютера на мобильный гаджет.
Browse and transfer files between your Mac computer and your Android device.
Supports macOS 10.7 and higher.
By downloading, you agree to our Terms of Service and Privacy Policy.
How to use it
Download the app.
Open AndroidFileTransfer.dmg.
Drag Android File Transfer to Applications.
Use the USB cable that came with your Android device and connect it to your Mac.
Double click Android File Transfer.
Browse the files and folders on your Android device and copy files.
Требуется Android: macOSX 10.7 и выше
Русский интерфейс: Да
Скачать:
Версия: 1.0.12  AndroidFileTransfer.rar ( 3.53 МБ )
Сообщение отредактировал iMiKED — 01.12.20, 13:45
Источник
Top 3 Ways to Transfer Files from Android to PC Using USB Cable

Technological innovation has made everything easier these days. Mobile phone storage is getting larger by the day. As a result, people can store huge amount of data on their phones. However, files stored on a mobile phone are at risk because the device can crash and you could end up losing valuable information.
For this reason, mobile phone users need to back up their files and data from the phone to their personal computers. The following are the methods that can be used to transfer files from Android to PC using USB cable.
Part 1: How to Transfer Photos from Android to PC Using USB Cable & Windows File Explorer
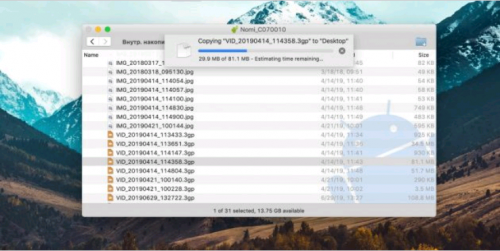
Android phone users can also use Windows explorer to move files from their Android phones to their computers. However, you need to know that in this method, you have to copy the data in bits. This is why it is appropriate to photos, videos, and music. When copying pictures from the phone to the computer using this method, you have to follow the following steps.
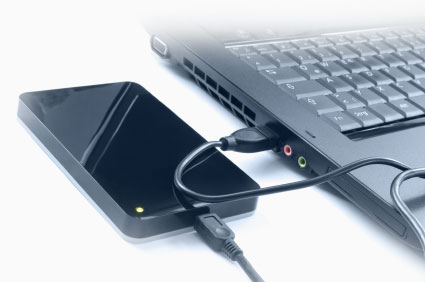
Step one: Use a USB cable to connect the Android phone to the personal computer.
Step two: The phone will request to know the kind of connection you want to create. Select the «Transfer files» option.
Step three: On your computer, open the Windows File Explorer.
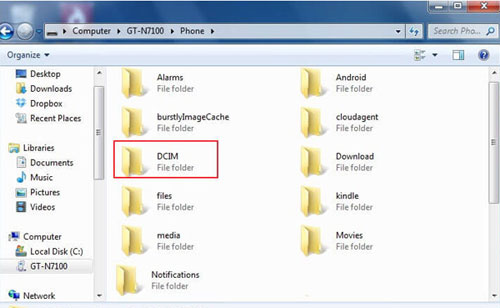
Step four: On the left side of the screen, there is a list. Select your phone.
Step five: Go through the photos from «DCIM» («Photos» or other image folder) and highlight the ones you want to transfer from Android phone.
Step six: Right click and select the «Copy» option, then navigate to desktop on PC (or other location), and right click to choose «Paste» to store the copied images.
Alternatively, drag and drop them to your preferred location on the computer, the transfer process will begin automatically.
Step seven: After you have moved all the files, the computer will notify you once the transfer is complete. Right click on your phone’s name and select the «eject» option.
Step eight: Unplug the phone and the USB cable.
Part 2: How to Transfer Files from Android to PC/Mac Using USB Cable & Coolmuster Android Assistant
When it comes to Android USB File Transfer, using Coolmuster Android Assistant is the easiest way of moving files from an Android phone to a personal computer or Mac. Android users can manage their data with just one click.
Features
* The method supports all types of data including contacts, text messages, call logs, apps, music, photos, music, videos, books (ePubs & PDFs), audios and more.
* Users can move data selectively to Windows PC or Mac after preview, using USB cable or Wi-Fi connection.
* It offers one-click Backup & Restore feature to back up and restore Android files with ease.
* It transfer files very fast and retains its quality by 100%.
* It allows users to add, edit, delete, import, export, unduplicate Android files directly on computer.
* It is fully compatible with almost all Android phones and tablets from Android 2.0 to Android 9.0 (or later), including Samsung Galaxy S10/S10+/S10e/S9+/S9/S8+, HTC U11+/U11/10 M10H, HUAWEI Mate X/Mate 20/Mate 10 Pro/Mate 10, Xiaomi 9/9 SE/8/8 SE/Play/6X, ZTE, Sony, OPPO, LG and more.
Download the free trial version of Coolmuster Android Assistant on your PC/Mac below:


The following are the three significant steps involved in this procedure:
Step one: Launch the program on your computer.
After installation, please run the software on computer. In this step, the Coolmuster program assistant (Android version) will be installed on your phone for successful connection.
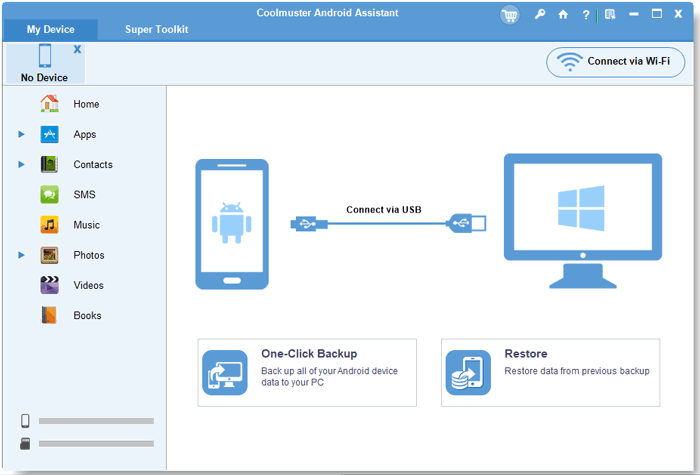
Step two: Connect the Android phone to the computer.
— Connect the phone to the computer using a USB cable to ensure that the program has recognized the Android phone.
— Enable USB debugging on the Android phone by clicking on the «Allow» on the notification bar.
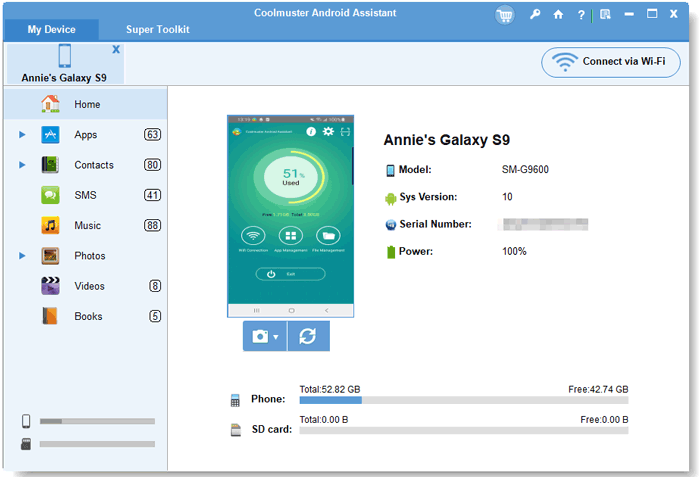
— When your phone is successfully connected, the following interface will be shown.
Step three: Transfer and manage files with one click
— Choice 1: Transfer files from Android to PC using USB cable selectively (in batches or individually)
After Coolmuster Android Assistant has detected the phone, you can select the files that you want to move from the main interface, such as «Contacts», «Photos», etc. Click the «Export» button. The transfer will begin automatically.
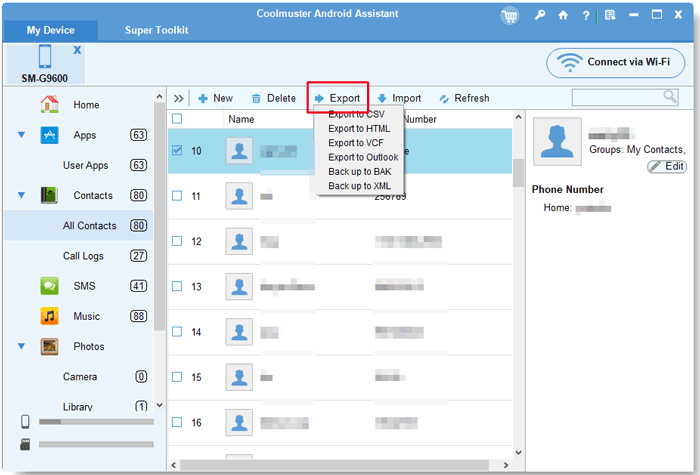
Similarly, how to transfer photos from Android to PC using USB? Simply click «Export» button after choosing the pictures you want.

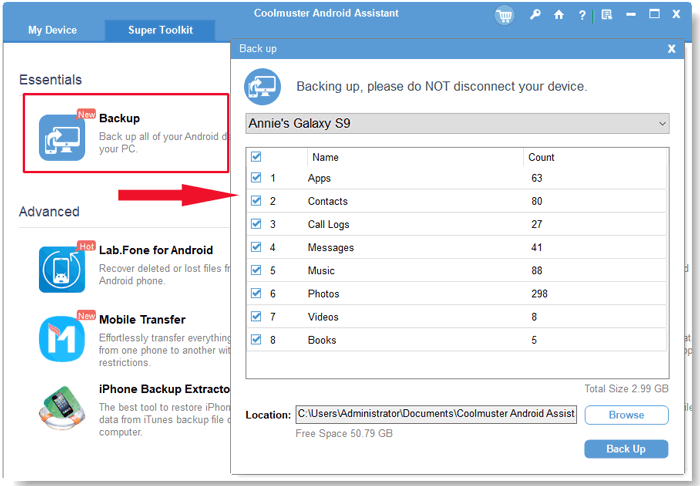
— Choice 2: One Click to Transfer files from Android to PC using USB cable (all at once or by category)
After having your phone connected, please go to «Super Toolkit» > «Backup» > choose your device > choose file types to transfer > (choose location to store backup file on PC) > «Back Up». Done!
Note that the connection must be stable until the transfer process is complete. Using Coolmuster software for transferring files to the machine is easy and convenient because you can move files of any size. It is also swift because, with one click, the data are safe.
Video Tutorial
Check how to backup Android phone to computer effectively with Coolmuster Android Assistant below:
Part 3: How to Transfer Files from Android to Mac via USB Cable & Android File Transfer
One of the advantages of transferring files using Android File Transfer is that you do not need an internet connection. Several steps have to be followed in this process.
The things that you need:
* An Android phone
* A Mac computer with macOS 10.7 and higher
When moving the files from the Android phone to a Mac, please follow these steps below.
Here’s how:
Step one: Open the Mac finder or spotlight search to find the Android File Transfer on your list of programs. In case it is not available, download Android File Transfer here.
Step two: Launch the Android File Transfer after downloading and installing it on the computer.
Step three: Use a USB cable to connect the phone to the Mac
Step four: On the options that appear on the screen, select the «Transfer files» option.
Step five: Open the Android drive icon on the Mac.
Step six: Highlight the files and the folders from your phone and transfer them to the computer.
Step seven: Once the transfer process is complete, open the Finder sidebar, go to Devices and select the «Eject» button.
Step eight: Unplug the Android phone from the computer.
![]()
Summary
Every person who owns a phone should be concerned about the security of their personal and business data and information. Human error, natural calamity, and loss of devices are some of the factors that can lead to loss of valuable data. To be on the safe side, you should consider transferring the data from the Android device to the personal computer or Mac using the above methods.
Источник
How To Transfer Files From Android To PC Using USB Cable
Last Updated: February 11, 2016
![]()
The easiest way of transferring files from Android to or from your Windows PC or laptop is to use a USB cable.
Using a USB cable you can transfer files:
- To and from Android internal and external storage and your PC/laptop
- Between the internal and external storage on the Android tablet or phone.
- Transfer files from one Android device to another Android device e.g from phone to tablet
To transfer files plug the USB cable (micro usb ) into your android device, and the other end into a USB port on your PC.
Note: Works with Windows XP,Vista, Windows 7,8,10
- Locate your drives and devices on your PC.The android device appears as a portable hard drive. In my case it shows as nexus 7.
Note: your tablet/phone needs to be switched on
![]()
2.Double click the phone icon (nexus 7 icon), and you will see a disk icon, double click this disk icon to show the files and folders on the attached android device. (screen shot below)

You should note that not all files and folders on your Android device are accessible to your PC.
Android system files are protected and are not visible.
3. You can now transfer files from Android to your PC, and vice-versa just by dragging and dropping as you would when moving files between folders on Windows.
Here is a short video showing how it is done
If you have an external SD card installed on the device it will show as a second hard drive (see below) and you can move files to and from your PC to the external storage/SD card.
Note: You can also transfer files to a Mac but you will need to install and use the Android File Transfer program on Your Mac.
Transfer Files Between Internal and External Storage
You can also use your PC to transfer files between Internal and external storage on your android phone or tablet.

When you open a device that has an external SD card installed you will see both the internal and external storage displayed as two separate drives.
You can open each drive in a new window and move files between them just as if they were on your PC.
Transfer Files Between Android Devices
You can also use a Windows PC to transfer files between two Android devices using two USB cables.
Attach each device to your PC using a USB cable and the devices should appear under drives and devices.
![]()
Open the drives in Windows File manager and drag and drop the files to the desired location.
Android USB Settings
If you have problems transferring files then check that your device is configured to transfer files using MTP.
To check/change the setting then go to Settings and under devices select storage by pressing it.

Press the menu icon (top right and you should see USB connection tab appear.

Press it and the settings are displayed. Check that it is configured to use MTP.

Common Questions and Answers
Q- Can I delete files from my Android tablet/phone from my PC.
A- Yes you can.
Q- Can I transfer Files to an External SD card?
A- Yes if your phone/tablet has an external SD card then it shows as a separate hard drive.
Q- Can I access Android system files using this method?
A- No you can’t. You are limited to your SDcard folder.
Q- Do I need any special software on my PC/laptop to do this?
A- No You can use the standard Windows File Manager.
Источник


