- Полный список
- Android Recyclerview Search Filter Example
- 1. Creating New Project
- 2. Load Data From API to Recyclerview using Retrofit
- 3. Adding Android Recyclerview Search Filter
- List View Filter Android
- 3 Answers 3
- Kotlin Android Search/Filter Lists
- Concept 1: Filter ListView using Spinner or SearchView
- Concepts You will Learn
- (a). How to filter a ListView using a dropdown/spinner.
- Step 1 – Dependencies
- Step 2 – Code
- Step 3: Layouts
- Step 4: Run
- Step 5: Download
- (b). How to filter a listview using dropdown/spinner in Kotlin
- Step 1: Dependencies
- Step 2: Code
- Step 3: Layouts
- Step 4: Run
- Step 5: Download
- Example 3: Android Filter GridView Using Spinner/Dropdown
- Layouts
- Java Code
- Part 2 – Filtering Using a Searchview
- Example 1: Android ListView – Search/Filter
- Step 1: Gradle Files
- Step 2: Create Layouts
- Step 3 Write Java Code
- 1. Create Model Class:
- 2. Create Item Click Listener
- 3. Create ViewHolder
- Create an Adapter class
- Create a Custom Filter
- Create activity
- Example 2: Android Custom Filter/Search ListView With Images Text [BaseAdapter]
- Step 1: Our Player Class
- Step 2 : Our Custom Adapter class
- Step 3: Our MainActivity class
- Step 4 : Our ActivityMain.xml layout
- Step 5: Create Our Model.xml Layout
- Example 3: Android ListView – Download JSON Images Text then Search/Filter
- We are Building a Vibrant YouTube Community
- Resources
- Step 1: Create Colors
- Step 2: Create Styles
- Step 3: Add Necessary Permissions
- Step 4: Create Main Activity Layout
- Step 5: Create ListView Item Layout:
- Activities
- Create Main Activity
- Concept 2: Android RecyclerView Search Filter Examples
- Oclemy
Полный список
— вызываем Activity, используя неявный вызов и Intent Filter
Последние уроки получились перегруженными теорией. Эту теорию необходимо понять, чтобы не было проблем с практикой. Эти темы являются основой – Task, Lifecycle, Intent. Если что-либо осталось непонятно, то вы всегда можете снова открыть и перечитать материал. А далее мы будем реализовывать примеры, которые будут эту теорию подтверждать и все станет понятнее.
На прошлых уроках мы научились вызывать Activity с помощью Intent и явного указания класса. Также мы знаем, что есть и другой способ вызова Activity – неявный. Он основан на том, что Activity вызывается не по имени, а по функционалу. Т.е. мы хотим выполнить определенные действия, создаем и настраиваем соответствующий Intent и отправляем его искать те Activity, которые могли бы справиться с нашей задачей.
Давайте посмотрим, как это реализуется на практике. Мы создадим приложение, которое будет отображать нам текущее время или дату. Сделаем мы это с помощью трех Activity:
— первое будет содержать две кнопки: Show time и Show date
— второе будет отображать время
— третье будет отображать дату
Нажатие на кнопку Show time будет вызывать второе Activity, а нажатие на кнопку Show date – третье Activity. Но реализуем мы это не через прямое указание классов Activity в Intent, а через Intent Filter.
Project name: P0261_IntentFilter
Build Target: Android 2.3.3
Application name: IntentFilter
Package name: ru.startandroid.develop.p0261intentfilter
Create Activity: MainActivity
Открываем main.xml и рисуем две кнопки:
Пишем реализацию MainActivity.java:
В коде мы определили кнопки и присвоили им Activity как обработчик нажатий. В методе onCilck мы определяем какая кнопка была нажата и создаем Intent.
Для создания Intent используем конструктор: Intent (String action). Т.е. мы при создании заполняем атрибут объекта Intent, который называется action. Это обычная строковая константа. Action обычно указывает действие, которое мы хотим произвести. Например, есть следующие системные action-константы: ACTION_VIEW — просмотр, ACTION_EDIT – редактирование, ACTION_PICK – выбор из списка, ACTION_DIAL – сделать звонок.
Если действие производится с чем-либо, то в пару к action идет еще один Intent-атрибут – data. В нем мы можем указать какой-либо объект: пользователь в адресной книге, координаты на карте, номер телефона и т.п. Т.е. action указывает что делать, а data – с чем делать.
Про data мы еще поговорим на следующих уроках, а пока будем использовать только action. Выше я уже перечислил некоторые системные action-константы, но мы можем использовать и свой action.
Как вы видите из кода, я придумал и использую такие action:
ru.startandroid.intent.action.showtime
ru.startandroid.intent.action.showdate
Первый будет означать, что я хочу вызвать Activity, которое мне покажет текущее время. Второй – Activity с датой.
Здесь надо четко понимать следующее: action – это просто текст. И я мог с таким же успехом придумать action abcdefg123456. Но текст showtime – отражает то, что я хочу сделать, он нагляднее и понятнее. А префикс ru.startandroid.intent.action я использую, чтобы не было коллизий. В системе может быть приложение, которое уже использует action showtime — я не хочу с ним пересекаться. Поэтому мой action – это ru.startandroid.intent.action.showtime.
Итак, мы создали Intent с action и запустили его в систему искать Activity. Чтобы Activity подошла, надо чтобы ее Intent Filter содержал атрибут action с тем же значением, что и action в Intent. Значит нам осталось создать две Activity, настроить их Intent Filter и реализовать отображение времени и даты.
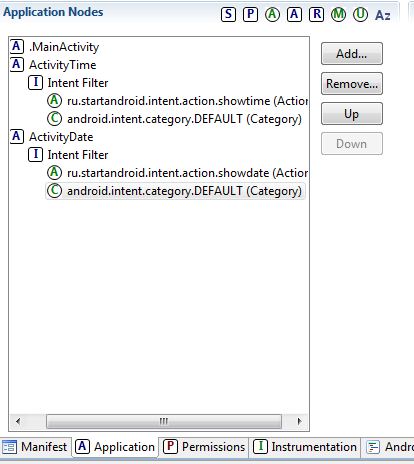
Activity создается как обычно — создаем класс ActivityTime с суперклассом android.app.Activity и прописываем его в манифесте как Activity. После того, как прописали в манифесте, надо будет там же создать Intent Filter. Для этого выделяем ActivityTime, жмем Add, выбираем Intent Filter и жмем ОК.
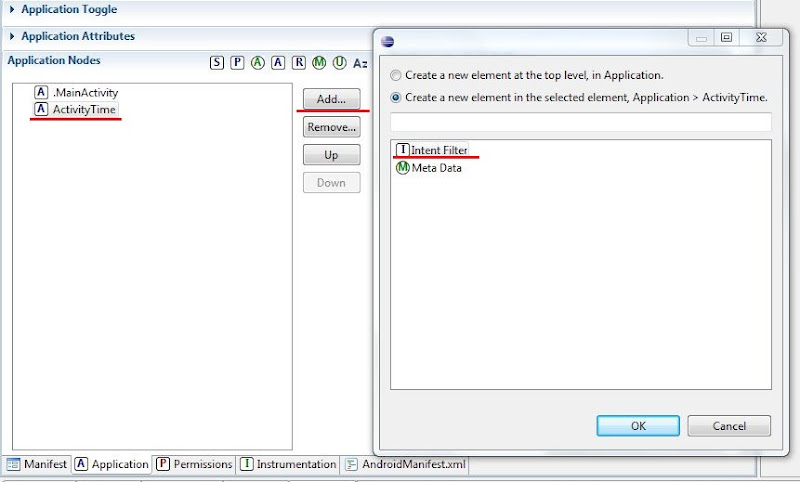
Далее в Intent Filter аналогично создаем Action и в поле Name прописываем ru.startandroid.intent.action.showtime
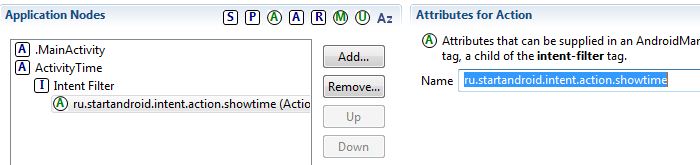
Также в Intent Filter надо создать Category и в поле name выбрать из списка android.intent.category.DEFAULT. Пока не будем разбираться детально зачем она нужна. Но без этого вызов startActivity(Intent) не найдет Activity.

Создадим layout для нового Activity, назовем его time.xml:
Пишем код в ActivityTime.java:
Тут все просто — вычисляем текущее время и показываем его в TextView.
Все сохраним и запустим приложение.

Жмем кнопку Show time:

отобразилось время. Т.е. Intent с action = ru.startandroid.intent.action.showtime нашел и отобразил Activity, у которого action также равен ru.startandroid.intent.action.showtime в Intent Filter.
Вернемся назад (кнопка Back) и нажмем теперь кнопку Show date. Приложение выдаст ошибку, т.к. оно не смогло найти Activity, которое соответствовало бы Intent с action = ru.startandroid.intent.action.showdate (мы создали только для showtime).
Давайте создадим такое Activity, назовем его ActivityDate. Действия все те же самые, что и при создании ActivityTime:
— создание класса
— создание Activity в манифесте и создание для него Intent Filter (c action = ru.startandroid.intent.action.showdate и category = android.intent.category.DEFAULT)
Layout-файл назовем date.xml:
Все сохраняем, запускаем приложение, жмем Show date и видим дату. Это значит, что Intent с action = ru.startandroid.intent.action.showdate нашел и отобразил ActivityDate подходящее ему по Intent Filter.
Чтобы закрепить тему, проделаем еще кое-что. Если помните, в уроке №22, где я рассказывал про Intent Filter, я говорил, что один Intent может найти несколько подходящих Activity. В этом случае пользователю предоставляется выбор, какое Activity использовать. Давайте сами спровоцируем такой случай. Мы сделаем еще одно Activity, которое будет реагировать на Intent с action = ru.startandroid.intent.action.showdate. И будет отображать текущую дату аналогично ActivityDate. Но формат отображения даты будет немного другой.
Давайте создадим такое Activity, назовем его ActivityDateEx. Действия все те же самые, что и при создании ActivityDate:
— создание класса
— создание Activity в манифесте и создание для него Intent Filter (с action = ru.startandroid.intent.action.showdate и category = android.intent.category.DEFAULT)
Новый layout-файл создавать не будем, используем уже существующий date.xml. В принципе, все три Activity у нас могли использовать один layout, т.к. они совершенно одинаковы – один TextView.
Как видим, отличие от ActivityDate только в формате даты.
Сохраним все и запустим. Жмем Show date и видим такой выбор:

Intent нашел два Activity, но показал для каждого из них название родительского приложения и package. В нашем случае – оба Activity из нашего приложения, поэтому текст одинаков и не разберешь, какое из них какое. Давайте пофиксим это, прописав нормальные имена.
Нажмите Back, чтобы закрыть диалог выбора. Идем в манифест и для Activity пропишем label:

Date basic для ActivityDate
Date extended для ActivityDateEx
Сохраняем и запускаем. Жмем Show date и видим такой выбор:

Так значительно лучше. Жмем Date extended и видим дату в расширенном формате на ActivityDateEx.
Итак, мы создавали и посылали Intent с action. Этот Intent находил Activity с подходящим Intent Filter и отображал его. Если находил несколько – давал выбор. Примеры отлично показывают механизм.
Если запутались, чего и где создавать, привожу скрин проекта и содержимое манифеста.

Содержимое манифеста (вкладка AndroidManifest.xml):
На следующем уроке:
— читаем action из Intent
Присоединяйтесь к нам в Telegram:
— в канале StartAndroid публикуются ссылки на новые статьи с сайта startandroid.ru и интересные материалы с хабра, medium.com и т.п.
— в чатах решаем возникающие вопросы и проблемы по различным темам: Android, Kotlin, RxJava, Dagger, Тестирование
— ну и если просто хочется поговорить с коллегами по разработке, то есть чат Флудильня
— новый чат Performance для обсуждения проблем производительности и для ваших пожеланий по содержанию курса по этой теме
Источник
Android Recyclerview Search Filter Example

Earlier, I explained about Recyclerview and Cardview in details. Now, I am going to explain about Android Recyclerview Search Filter with Example.
SearchView which can be used to filter the data displayed in the RecyclerView. While use Toolbar’s search widget to input the search query.
So, Follow the steps to develop the application with Android Recyclerview Search Filter.
1. Creating New Project
1.First of all, Create New Project in Android Studio.
3. Also, Open AndroidManifest.xml and add INTERNET permission as we are going to make HTTP calls.
2. Load Data From API to Recyclerview using Retrofit
Again, Check out my Retrofit Android Example to know more about Retrofit.
Also, Add the data to Recyclerview in MainActivity.java,
3. Adding Android Recyclerview Search Filter
Early we added the data to the Recyclerview. Then, I am going to add the Searchview for the data in the Recyclerview.
1. Add new Menu Resource File.
goto File > New > Android Resource File.
Likewise, Enter menu file name. Press Enter. Now, the menu file got Created.
Add the Search Item to the menu file.
2. In Addition, Inflate Searchview menu to the MainActivity. Add setOnQueryTextListener to the Searchview to get search String.Then, based on the request string change the Recyclerview adapter.
After that, Android provides Filterable class to filter the data by a filter (condition). Usually, the getFilter() method have to override in the adapter class in which the filter condition is provided to search through a list.
Источник
List View Filter Android
I have created a list view in android and I want to add edit text above the list and when the user enter text the list will be filtered according to user input
can anyone tell me please if there is a way to filter the list adapter in android ?

3 Answers 3
Add an EditText on top of your listview in its .xml layout file. And in your activity/fragment..
The basic here is to add an OnTextChangeListener to your edit text and inside its callback method apply filter to your listview’s adapter.
EDIT
To get filter to your custom BaseAdapter you»ll need to implement Filterable interface.
Inside performFiltering() you need to do actual comparison of the search query to values in your database. It will pass its result to publishResults() method.

Implement your adapter Filterable:
then create your Filter class:
this way, your adapter is Filterable, you can pass filter item to adapter’s filter and do the work. I hope this will be helpful.

In case anyone are still interested in this subject, I find that the best approach for filtering lists is to create a generic Filter class and use it with some base reflection/generics techniques contained in the Java old school SDK package. Here’s what I did:
And afterwards, the only thing you need to do is to create the filter as a member class (possibly within the View’s «onCreate») passing your adapter reference, your list, and the method to be called for filtering:
The only thing missing now, is to override the «getFilter» method in the adapter class:
All done! You should successfully filter your list — Of course, you should also implement your filter algorithm the best way that describes your need, the code bellow is just an example.. Hope it helped, take care.
Источник
Kotlin Android Search/Filter Lists
In this tutorial you will learn various ways in which you can search various types of lists. By lists we mean:
- RecyclerView
- ListView
- GridView
- Spinner etc.
NOTE: BECAUSE THIS TUTORIAL COVERS MANY CONCEPTS WE HAVE SPLIT IT INTO THREE PAGES:
- Page 1: Filter Listview using spinner or searchview.
- Page 2: Filter RecyclerView
- Page 3: Filter Spinner.
Concept 1: Filter ListView using Spinner or SearchView
The oldest view for listing or rendering lists of items in android is the listview. If you want the simplest way to list items then it is the way to go. However after listing items you may wish to filter or search items. if that’s the case then this tutorial is for you.
Concepts You will Learn
This tutorial basically teaches you various ways of filtering data. You will learn the following:
- Filtering items in a listview or gridView using a dropdown/spinner.
- Filtering/Searching items in a listvew or gridview using a search view.
- How to filter a custom listview.
- How to filter JSON data downloaded via Retrofit.
We follow an example based approach whereby you learn by following source code. The code is well commented.
(a). How to filter a ListView using a dropdown/spinner.
Tools Used
Here are the tools used in this project:
- IDE: Android Studio
- Programming language: Java
Step 1 – Dependencies
This project doesn’t require any third party libraries.
Step 2 – Code
Let’s write some code:
First Start by adding the necessary imports:
Extend the activity or the appcompatactivity to create for us an activity:
As instance properties of this activity, declare some components we will need: like ListView and spinner, as well as an array to host our filter parameters:
Now generate our comsic bodies using the following method. These cosmic bodies are what the user will be filtering:
Here is the fill code for this activity:
. MainActivity.java
Add the following code in your main activity:
That’s the whole code required.
Step 3: Layouts
Copy the layout from the source code.
Step 4: Run
If your run the project you’ll get the following:
![]()
Step 5: Download
Download the code below:
| No. | Link |
|---|---|
| 1. | Browse/Download Code |
| 2. | Follow @Oclemy |
(b). How to filter a listview using dropdown/spinner in Kotlin
These days kotlin is the goto language for android development. Solet’s see the first example re-written for Kotlin.
This example:
- Filters a listview using a dropdown/spinner.
Step 1: Dependencies
No third party dependencies used.
Step 2: Code
We have only one file:
MainActivity.kt
Step 3: Layouts
Copy layout from the source code reference.
Step 4: Run
If you run the project you get the following:
![]()
Step 5: Download
Download the code below:
| No. | Link |
|---|---|
| 1. | Browse/Download Code |
| 2. | Follow @Oclemy |
Example 3: Android Filter GridView Using Spinner/Dropdown
Android Filter GridView using Spinner Example
In this tutorial we want to see how to filter a gridview using a spinner widget. You select a category from the spinner or dropdown and that is used as a constraint thus allowing us filter a simple gridview.
Here’s the gif demo of the project:
Layouts
We have only a single layout:
(a). activity_main.xml
Our mainactivity’s layout. Here we have a header textview, a spinner which is our dropdown widget and a gridview which is our adapterview.
This is our only layout and it gets inflated into our main activity.
Java Code
We have one class:
(a). MainActivity.java
The main activity is the entry point to our Kotlin app. We have cleanly commented the code for inline explanations.
Download
You can download the full source code below or watch the video from the link provided.
| No. | Location | Link |
|---|---|---|
| 1. | GitHub | Direct Download |
| 2. | GitHub | Browse |
| 3. | YouTube | Video Tutorial |
| 4. | YouTube | ProgrammingWizards TV Channel |
Part 2 – Filtering Using a Searchview
In this part we will see how to filter search a gridview or listview using a searchview.
Example 1: Android ListView – Search/Filter
In this example, we’ll see how to search filter an android listview.
We’ll use a SearchView component.
Step 1: Gradle Files
We do not need any special dependencies for this project.
Step 2: Create Layouts
We’ll have these three layouts in our project:
1. activity_main.xml
Our main activity’s layout:
2. content_main.xml
- This layout will hold our ListView and SearchView.
3. model.xml
This layout will define the model for our custom rows.Our ListView will have images and text.
Step 3 Write Java Code
Here are our Java classes:
1. Create Model Class:
Movie.java
- Our data object.
- Will represent a single movies.
2. Create Item Click Listener
ItemClickListner
An interface.It will define the signature for our OnItemClick() method.
3. Create ViewHolder
MyViewHolder.java
Our View holder class.
Create an Adapter class
MyAdapter.java
Our adapter class.It will Derive from BaseAdapter.It Implements Filterable interface.
Create a Custom Filter
CustomFilter.java
This class is responsible for our custom filtering.It Derives from android.widget.Filter .
Create activity
MainActivity.java
This is Our launcher activity. It References both our ListView and SearchView.It Then sets the adapter to ListView. It also Listens to OnQueryTextChange events on the searchview.
Example 2: Android Custom Filter/Search ListView With Images Text [BaseAdapter]
We cover how to perform a Custom Filter against data in your ListView.Our adapter is BaseAdapter and we shall be searching ListView with images and text.We shall implement Filterable interface and derive from Filter class.
PLATFORM : Android Java
TOOLS : Eclipse,Bluestacks Emulator
Step 1: Our Player Class
Purpose :
- Is our POJO class.Plain Old Java Object
- Holds data consisting of a single Player.
Step 2 : Our Custom Adapter class
Purpose:
- Adapts our images and Text to our ListView
- Is where we bind data to views
- Has an inner class CustomFilter that implements Filtering or Searching for us.
- Implements Filterable method hence we override getFilter() method that in turn returns a filter object.
Step 3: Our MainActivity class
Purpose :
- Our launcher activity
- We set reference our ListView from XML and attach its BaseAdapter subclass to it.
- We reference our SearchView and implement its onQueryTextChangeListener.
Step 4 : Our ActivityMain.xml layout
Purpose :
- Acts as our template Layout.
- Hold our ListView and SearchView
Step 5: Create Our Model.xml Layout
Purpose :
- Acts as our Row Model.Remember we want to display Listview with images and text.So its how a single row in our ListView shall appear.
- Contains Images andText.
Example 3: Android ListView – Download JSON Images Text then Search/Filter
This is an android tutorial for searching json data bound to a custom listview with images and text.
We retrieve both images and text json data and bind to a custom listview. We then search/filter these data on the client side.
This is because we are dealing with raw json without any server side processing like with php or something. However our JSON comes from online and we make a HTTP GET request to download it.
While downloading our JSON data we show an indetereminate progress bar. The downloded json data as we said contains images and text.
In fact it contains text with image urls. Then via Picasso Image Loader, the images are fetched and bound to a custom listview with cardviews.
The user can then search this data via a searchview.
We are Building a Vibrant YouTube Community
Here’s this tutorial in Video Format.
Resources
I want to use a custom material design theme so I will start by setting up some resources:
Step 1: Create Colors
Colors that will color our application:
colors.xml
We are using a custom material design theme so first we will create some material colors.This is optional. Add these to your colors.xml :
Step 2: Create Styles
(a). styles.xml
I am creating a custom material theme called MyCustomMaterialTheme .
I specify it’s parent. Copy this code to your styles.xml . However if you don’t desire the custom theme skip this part and move to layouts.
(b). styles.xml(v21)
Another skippable part. Create another XML values resource under the res/values folder. Name it styles-v21 , this will target android lollipop.
Add the following code:
Step 3: Add Necessary Permissions
You need to add the necessary permissions like the internet permission in your android manifest file. We also need to register our android components like the activities.
AndroidManifest.xml
This part is a must, add the permission for internet connectivity as we’ve done in your AndroidManifest.xml :
Step 4: Create Main Activity Layout
activity_main.xml
This layout is our Main Activity’s layout file. It defines the user interface of our main activity.
We write in XML which stands for eXtensible Markup Language. In android development, user interfaces are normally created in XML. However it’s also possible to create them programmatically in Java/Kotlin.
But XML is the easier yet more flexible option.
So as our root element we have a LinearLayout. LinearLayout usually arranges it’s child elements in a linear manner, either vertcially or horizontally.
So you have to specify the orientation. Am ranging my widgets vertically, one on top of another.
Then I create a textView to act as my header label. I will make it bold and give it the accent color.
Below the header label I will have a SearchView, which we will use to type our queries.Please assign it an id as we will need to reference it from java code.
Below the SearchView I will have a progressbar, which will show us the progress of the download of json data.
Finally we will have a ListView which will render our json data.
Step 5: Create ListView Item Layout:
model.xml
Here’s the json data we will use:
Activities
Create Main Activity
MainActivity.java
Now move to next page to see how to search filter a recyclerview or a spinner.
Concept 2: Android RecyclerView Search Filter Examples
 report this ad
Oclemy
Thanks for stopping by. My name is Oclemy(Clement Ochieng) and we have selected you as a recipient of a GIFT you may like ! Together with Skillshare we are offering you PROJECTS and 1000s of PREMIUM COURSES at Skillshare for FREE for 1 MONTH. To be eligible all you need is by sign up right now using my profile .
Источник


