- How To Set Android SDK Path In Windows And Mac
- 1. Configure Android SDK Variable In Windows.
- 1.1 Get Android SDK Install Directory Path.
- 1.2 Set %ANDROID_HOME% and %Path% System Environment Variable.
- 2. Configure Android SDK Variable In macOS.
- How to Fix “SDK location not found” in Android Studio?
- When switching from one IDE to another (Like from Eclipse to Android Studio)
- How to Set Java SDK Path in Android Studio?
- How to Fix the Java SDK Path?
- Method #1: For Android Studio Version 4.2 and Above
- Method #2: For Android Studio Version Below 4.2
- Method #3: Adding a new SDK to Your Android Studio
- Method #4: For the Command Line Enthusiasts
- Method #5: Using the Embedded SDK
- Method #6: Setting and Viewing SDK using the Studio Project Structure
- Install and configure the NDK and CMake
- Install NDK and CMake automatically
- Install the NDK and CMake
- Configure a specific version of CMake
- Groovy
- Kotlin
- Install a specific version of the NDK
- Configure specific versions of the NDK in your project
- Groovy
- Kotlin
- Default NDK version per AGP version
How To Set Android SDK Path In Windows And Mac
After you installed android studio, you still need to configure some android SDK environment variables then you can use it easily. This article will tell you how to correctly configure Android SDK environment variables such as ANDROID_HOME, PATH on Windows and macOS.
1. Configure Android SDK Variable In Windows.
1.1 Get Android SDK Install Directory Path.
Before you can configure it, you should first get the android SDK install directory follow below steps.
- Open android studio, click File —> Settings menu item in the top men bar.
- Expand Appearance & Behavior —>System Settings —>Android SDK menu item on the left side of the popup window. Then you can find the Android SDK Location directory path on the right side ( in this example, the Android SDK location path is C:\Users\Jerry\AppData\Local\Android\Sdk ), remember it.
1.2 Set %ANDROID_HOME% and %Path% System Environment Variable.
- Right-click the computer icon in Windows file explorer left side, click Properties menu item in the popup menu list. This will open the windows system configuration window.
- Click the Advanced system settings link on left panel, it will popup the System Properties window, click the Environment Variables button to open Environment Variables window.
- Click the New… button to add a new system variable, input ANDROID_HOME as the variable name, and input the Android SDK location directory path ( such as C:\Users\Administrator\AppData\Local\Android\Sdk ) as the variable value.
- Select variable Path and click Edit button and add ;%ANDROID_HOME%\tools;%ANDROID_HOME%\tools\bin;%ANDROID_HOME%\platform-tools at the end of its value. Please note the ; must be English character otherwise it will not take effect .
- Click OK to close the system environment variables settings window, open a dos window, type command adb in it. If you see output like below that means the android SDK path variable has been configured successfully.
2. Configure Android SDK Variable In macOS.
- Open Android Studio on macOS, then click Android Studio —> Preferences menu item at the left top toolbar.
- Input search keyword sdk in the search box of the popup Preferences dialog window left side.
- It will focus on the Android SDK menu item on the left side, and you can get the Android SDK Location directory path value on the right side Android SDK Location text box.
- Generally, the Android SDK is installed in the /Users/user-name/Library/Android/sdk folder on macOS.
- If you can not find the above folder in macOS finder or terminal, this is because the Library folder is a hidden folder by default, you should make the hidden folder visible by executing the command $ defaults write com. apple . finder AppleShowAllFiles TRUE in a macOS terminal window ( please read article How To Show Hidden Files In Mac OS Finder And Select Hidden Files In Html Upload File Form ).
- You can also see the hidden Library folder by opening a macOS Finder window, then click Go —> Go to Folder… menu item, and input
/Library in the popup dialog input text box, then click Go button.
Источник
How to Fix “SDK location not found” in Android Studio?
Google developed Android SDK which is a Software Development Kit developed by Google for the Android platform. You can create Android apps using Android SDK, and you don’t need to be an expert to use it. Android SDK and Android Studio come bundled together, with Google’s official integrated development environment (IDE) for the Android operating system.
In this article, we see how to fix an error that is related to the main Android building component of Android Studio that is the Android SDK. The most common error related to Android SDK is “SDK location not found“. This message pops up stating that the location of Android SDK was not detected when the path of SDK is assigned incorrectly. There can also be other reasons for this error message as well and we will see ways to get rid of this error.
When switching from one IDE to another (Like from Eclipse to Android Studio)
Method 1
In this case, follow the below steps:
Method 2
In case the above procedure doesn’t work then add the ANDROID_HOME variable in “Environment Variables” as C:\Users\Username\AppData\Local\Android\Sdk.
Method 3
In case it does not work even then, then you need to change the directory path on Project Structure as well.
- Close the current project and you’ll see a pop-up with a dialog which will then proceed to Configure option.
- Configure -> Project Defaults -> Project Structure -> SDKs on left column -> Android SDK Home Path -> give the exact path as you did on local.properties and select Valid Target.
Method 4
A settings.gradle file might be missing from the project. Make sure that the file exists from the project you are importing. If not add the settings.gradle file with the following:
Save the file and put it in the top-level folder in your project.
Источник
How to Set Java SDK Path in Android Studio?
The Java SDK for Android is a sophisticated suite of tools for managing, monitoring, profiling, and debugging Java code written in Android Studio. But sometimes as software is unpredictable you might be caught in an error that Android Studio stopped compiling projects and says that it can’t locate the 1.7.0_21 folder. Well, this is exactly what is referred to as a missing Java SDK Path.
How to Fix the Java SDK Path?
There are several methods that can help you resolve this issue, the ones which have the highest score in fixing this problem are mentioned below:
Method #1: For Android Studio Version 4.2 and Above
Navigate to File > Project Structure > SDK Location. Upon navigating there you will find that a tab named “JDK Location”, select that and then you can set the JDK path for the current project on which you’re working.
Image I. Setting Project SDK location in 4.2 & +
Method #2: For Android Studio Version Below 4.2
Chances are that you might be rocking an older version of Android Studio, if yes then
Navigate to File > Project Structure > [Platform Settings] > SDKs
You’ll then need to either update your current SDK setup to make use of the new directory or create a new directory and then adjust the settings in your project to make use of the new directory. This will make it applicable to the present project.
Method #3: Adding a new SDK to Your Android Studio
Sometimes only updating your SDKs won’t allow you to compile projects just because the SDK has lived its life and requires an update to itself. In that scenario, you’ll need to recreate the configurations from 0.
- Navigate to Project Structure > Platform Settings > SDKs and click the “+” button.
- Go to your Android SDK folder and select “Choose” on the pop-up.
- A new pop-up window will open, asking which SDK and JDK you’d want to use. Select any Android SDK and the JDK 1.7.
Note: Change your Project SDK to the one you just established under Project Structure > Project Settings > Project. The name of the SDK should now include the new Java version that you installed.
Method #4: For the Command Line Enthusiasts
If you want to be a Geek and the above methods are just too much GUI for you, you might want to handle the SDK path using the terminal. In order to achieve that using the command line, follow the below commands in the Android Studio’s Terminal
and just like that, you’ve achieved the desired result
Note: the ‘oldjre‘ here refers to your old JRE path
Method #5: Using the Embedded SDK
If you are on Android Version 3.2 or older then you’ll be having the option of using the embedded JDK & SDK for your project and that is one of the optimal ways you can fix this issue as Android Studio will handle the management of the services in the Backend!
Navigate to File > Project Structure > JDK Location and Checkmark the box saying “Use embedded JDK (recommended)”.
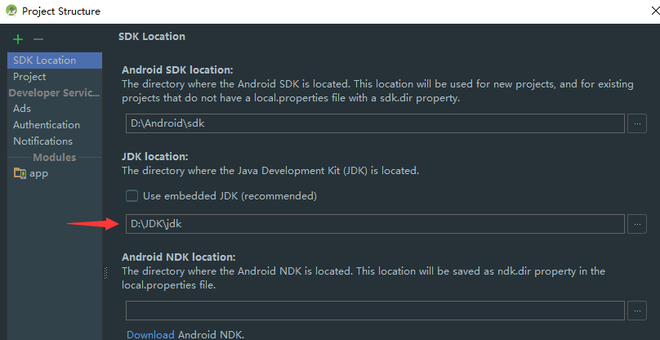
Image II. Checking the Recommended JDK Location
Method #6: Setting and Viewing SDK using the Studio Project Structure
If all the above-mentioned ways didn’t work out for you, the best you can do is to get the SDK path of another Android Studio Project and then providing that path to your particular project (as in Method #1)
Press Ctrl (Command on Mac) + Alt + Shift + S
Then in the SDK Location tab, you will find your SDK Location, just copy it and paste it in the SDK Location as mentioned in Method #1.
Источник
Install and configure the NDK and CMake
To compile and debug native code for your app, you need the following components:
- The Android Native Development Kit (NDK): a set of tools that allows you to use C and C++ code with Android.
- CMake: an external build tool that works alongside Gradle to build your native library. You do not need this component if you only plan to use ndk-build.
- LLDB: the debugger Android Studio uses to debug native code. By default, LLDB will be installed alongside Android Studio.
This page describes how to install these components automatically, or by using Android Studio or the sdkmanager tool to download and install them manually.
Install NDK and CMake automatically
Android Gradle Plugin 4.2.0+ can automatically install the required NDK and CMake the first time you build your project if their licenses have been accepted in advance. If you’ve already read and agree to the license terms, then you can pre-accept the licenses in scripts with the following command:
Install the NDK and CMake
When you install the NDK, Android Studio selects the latest available NDK. For most projects, installing this default version of the NDK is sufficient. If your project needs one or more specific versions of the NDK, though, you can download and configure specific versions. Doing so helps you ensure reproducible builds across projects that each depend on a specific version of the NDK. Android Studio installs all versions of the NDK in the android-sdk /ndk/ directory.
To install CMake and the default NDK in Android Studio, do the following:
With a project open, click Tools > SDK Manager.
Click the SDK Tools tab.
Select the NDK (Side by side) and CMake checkboxes.
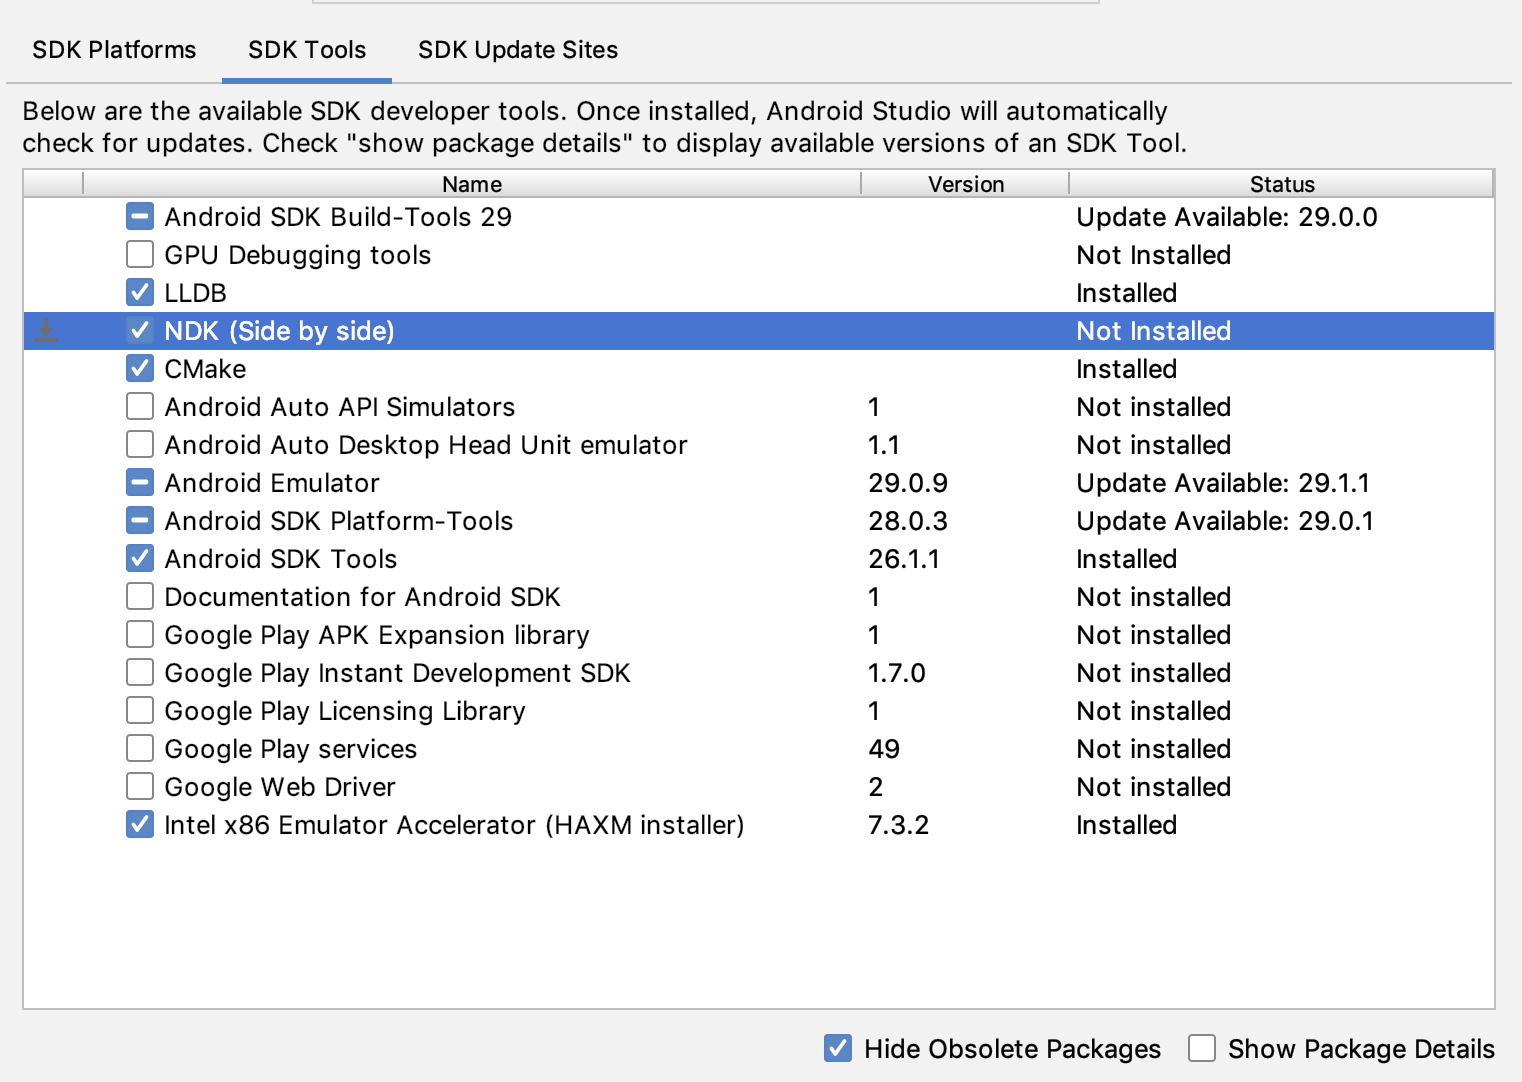 Figure 1: The SDK Tools window showing the NDK (Side by side) option
Click OK.
A dialog box tells you how much space the NDK package consumes on disk.
Click OK.
When the installation is complete, click Finish.
Your project automatically syncs the build file and performs a build. Resolve any errors that occur.
Configure a specific version of CMake
The SDK Manager includes the 3.6.0 forked version of CMake and version 3.10.2. Projects that don’t set a specific CMake version are built with CMake 3.10.2. To set the CMake version, add the following to your module’s build.gradle file:
Groovy
Kotlin
If you want to use a CMake version that is not included by the SDK Manager, follow these steps:
- Download and install CMake from the official CMake website.
- Specify the CMake version you want Gradle to use in your module’s build.gradle file.
Either add the path to the CMake installation to your PATH environment variable or include it in your project’s local.properties file, as shown. If Gradle is unable to find the version of CMake you specified in your build.gradle file, you get a build error.
If you don’t already have the Ninja build system installed on your workstation, go to the official Ninja website, and download and install the latest version of Ninja available for your OS. Make sure to also add the path to the Ninja installation to your PATH environment variable.
Install a specific version of the NDK
To install a specific version of the NDK, do the following:
With a project open, click Tools > SDK Manager.
Click the SDK Tools tab.
Select the Show Package Details checkbox.
Select the NDK (Side by side) checkbox and the checkboxes below it that correspond to the NDK versions you want to install. Android Studio installs all versions of the NDK in the android-sdk /ndk/ directory.
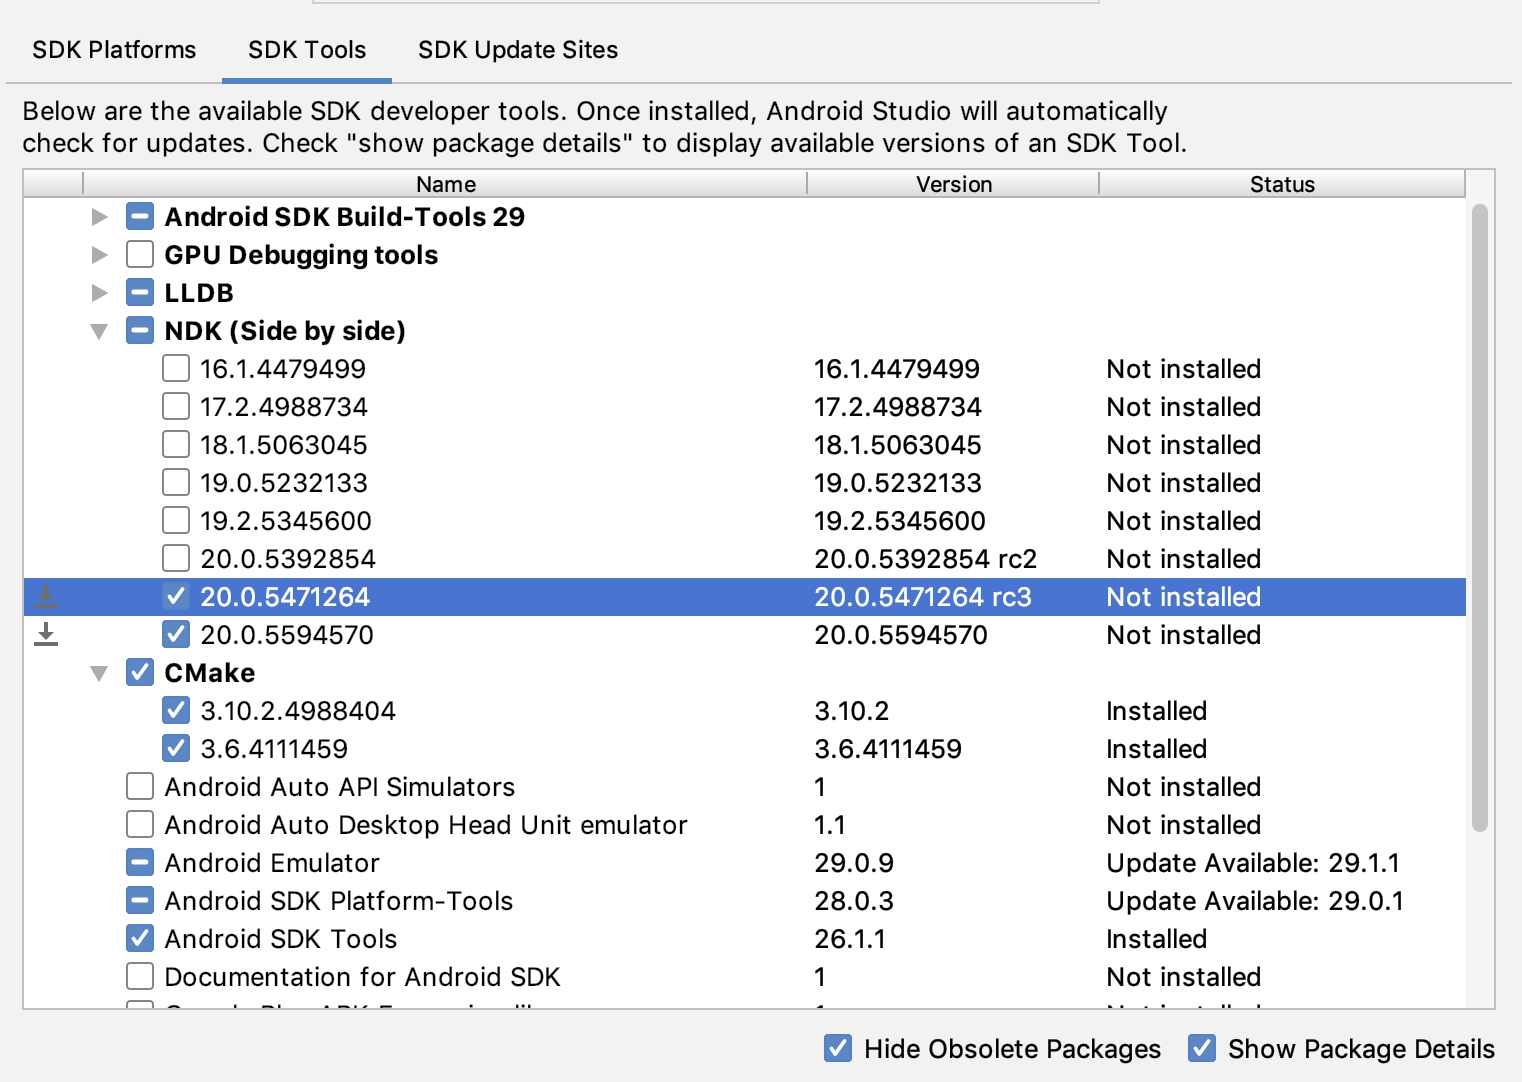 Figure 2: The SDK Tools window showing the NDK (Side by side) options
Click OK.
A dialog box tells you how much space the NDK package(s) consumes.
Click OK.
When the installation is complete, click Finish.
Your project automatically syncs the build file and performs a build. Resolve any errors that occur.
Configure each module with the version of the NDK you want it to use. When using Android Studio 3.6 or higher, if you do not specify the version, the Android Gradle plugin chooses a version that it is known to be compatible with.
Configure specific versions of the NDK in your project
You may need to configure the version of the NDK in your project if one of the following is true:
- Your project is inherited and you need to use specific versions of the NDK and the Android Gradle plugin (AGP). For more information, see Configure the NDK for the Android Gradle plugin.
You have multiple versions of the NDK installed and you want to use a specific one. In this case, specify the version using the android.ndkVersion property in the module’s build.gradle file, as shown in the following code sample.
Groovy
Kotlin
Default NDK version per AGP version
Before release, each AGP version is thoroughly tested with the latest stable NDK release at that time. For AGP version 3.6 and above, that NDK version will be used to build your projects if you do NOT specify an NDK version in the build.gradle file. The default NDK version is documented inside the AGP release notes. The current default NDK versions are listed in the following table:
| Android Studio/Gradle Plugin Version | |||||||
|---|---|---|---|---|---|---|---|
| 7.0 | 4.2 | 4.1 | 4.0 | 3.6 | 3.5 | 3.4 | |
| Default NDK version specified for the version of AGP | 21.4.7075529 | 21.4.7075529 | 21.1.6352462 | 21.0.6113669 | 20.0.5594570 | No default specified | |
Content and code samples on this page are subject to the licenses described in the Content License. Java is a registered trademark of Oracle and/or its affiliates.
Источник


