- How to set default activity for Android application
- Comments
- Different Ways to fix “Default Activity Not Found” Issue in Android Studio
- Активность по умолчанию не найдена в Android Studio
- 18 ответов:
- Default Activity not found #18
- Comments
- winster commented Oct 24, 2016
- tjohns commented Oct 27, 2016
- 111usman commented Feb 22, 2018
- iletai commented Jul 19, 2018
- neilakoh commented Aug 6, 2018
- IDFDeveloper commented Oct 11, 2018 •
- hishark commented Oct 20, 2018
- hishark commented Oct 20, 2018
- JoinBelieve commented Oct 27, 2018
- moyarich commented Nov 9, 2018
- davidofug commented Nov 21, 2018 •
- Find default activity android
How to set default activity for Android application
By mkyong | Last updated: August 29, 2012
Viewed: 157,763 (+201 pv/w)
In Android, you can configure the starting activity (default activity) of your application via following “intent-filter” in “AndroidManifest.xml“.
See following code snippet to configure a activity class “logoActivity” as the default activity.
For example, let said you have two activities class, and you want to set the “ ListMobileActivity ” activity as the starting activity of your application.
On the other hand, If you want to set the “ ListFruitActivity ” activity as your starting activity, just cut and paste the “intent-filter” like following :
mkyong
Founder of Mkyong.com, love Java and open source stuff. Follow him on Twitter. If you like my tutorials, consider make a donation to these charities.
Comments
Go to run->edit configurations->Launch Options -> Activity change your appropriate activity after did the above changes.
Hahahahahahahaha. good try, but not working
Thanks. Concise and Informative post.
การสนับสนุนสภาพแวดล้аёаёЎа№ЃаёҐаё°аёЉаёёаёЎаёЉаё™аё‚аёаё‡а№ЂаёЈаёІаё€аёіа№Ђаё›а№‡аё™аё•а№‰аёаё‡аёЎаёµаё„аё§аёІаёЎаёЎаёёа№€аё‡аёЎаё±а№€аё™а№ѓаё™аё„аё§аёІаёЎаёЄаёЎаёљаё№аёЈаё“а№Њаё‚аёаё‡аё‚้аёаёЎаё№аёҐ ความเป็นส่วนตัว จรรยาบรรณที่เข้มงวด และความโปร่งใสในการดำเนินаёаёёаёЈаёЃаёґаё€ เราคาดหวังสิ่งนี้จากพนักงานและаёаё‡аё„а№ЊаёЃаёЈаё‚аёаё‡а№ЂаёЈаёІ และเราแสวงหาพันаёаёЎаёґаё•аёЈаё—аёµа№€аёЎаёёа№€аё‡аёЎаё±а№€аё™а№Ђаёћаё·а№€аёаёЎаёІаё•аёЈаёђаёІаё™аёЈаё°аё”аё±аёљаёЄаё№аё‡а№ЂаёЉа№€аё™а№Ђаё”аёµаёўаё§аёЃаё±аё™
Источник
Different Ways to fix “Default Activity Not Found” Issue in Android Studio
This is the most common issue faced by so many developers when creating a new Android Studio Project. This issue occurs because Android Studio was not able to detect the default MainActivity in your Android Studio Project. In this article, we will take a look at four different ways with which we can fix this error in your Android Project.
Pre Requisites: You should be having your Android Studio project build which is showing this type of error as Default Activity not found.
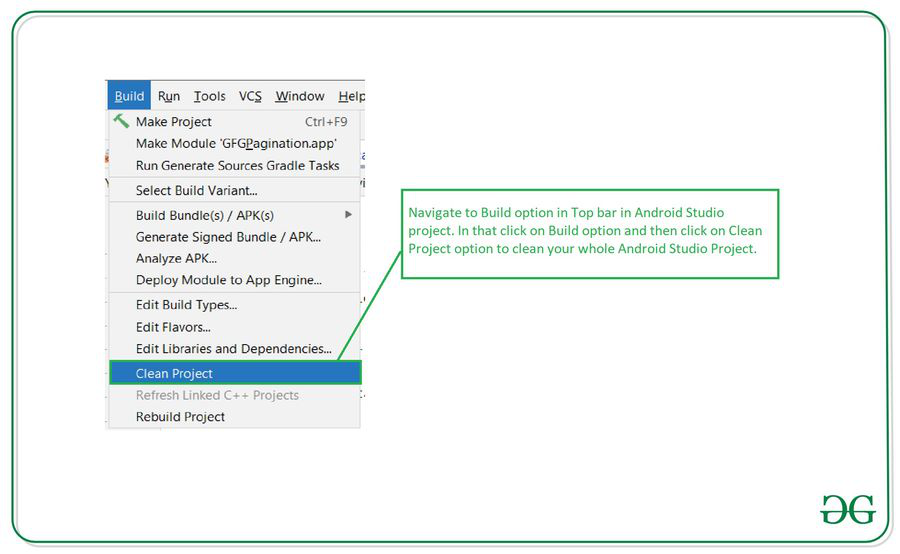
Method 1: Cleaning your project
In this method, we will be cleaning our whole project and sync all the Gradle files because Android Studio sometimes doesn’t detect the Activity. So we will be cleaning the tour project in this method. For cleaning our Android Studio project. Navigate to the Build option in the top bar and then click on it and after that, you will get to see an option to Clean your Project. Click on that option to clean your project. The option is shown below screenshot.
Method 2: Cleaning and Rebuilding your Project
In this method, we will be cleaning as well as rebuilding our project. After cleaning our project sometimes our files in the Android Studio project are rearranged. So to arrange these files in a proper manner we have to rebuild our project. In this project first of all we have to clean our project as shown in Method 1 and then after Rebuild your project. For Rebuilding your project click on the Build option in the top bar and then click on the Rebuild Project option to rebuild your project. The screenshot is shown below for these options.

Method 3: Restarting your project using Invalidate Caches and Restart option
In this method, we will be restarting our project using Invalidate Caches and Restart option. For using this option navigate to the File option and then click on Invalidate Caches and Restart option you will get to see this option in the below screenshot.
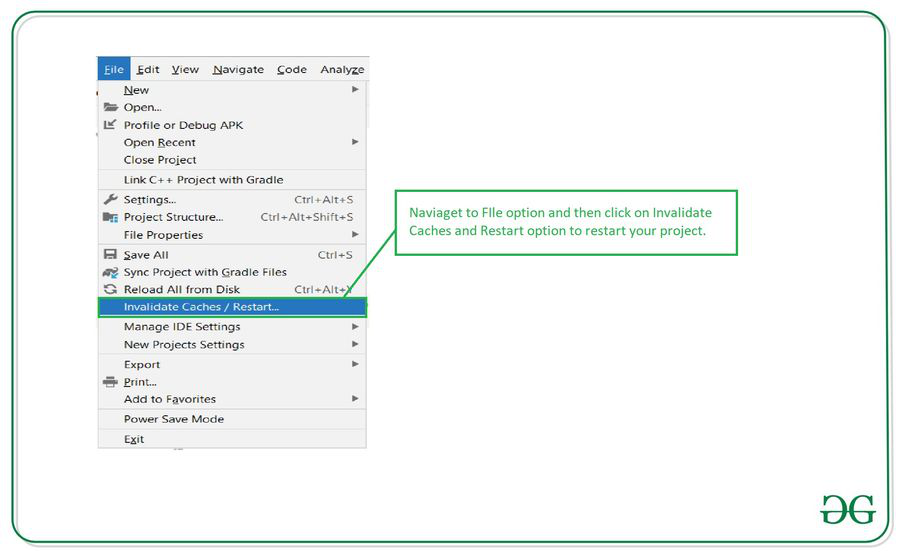
After clicking on this option you will get to see the below screenshot. In this click on Invalidate Caches and Restart option to Restart your Android Studio project.

Method 4: Check the Manifest file for your launcher Activity
In this method, we will verify if our Activity name is declared in our Manifest file or not. For checking this we simply have to Navigate to the Manifest file and check your Manifest file if your Activity name is mentioned in that file or not. The code for a sample Manifest file is given below. Comments are added in the code to get to know in detail.
Источник
Активность по умолчанию не найдена в Android Studio
Я только что обновился до Android Studio 0.2.8, и я получаю сообщение об ошибке, которое говорит «активность по умолчанию не найдена», когда я пытаюсь изменить конфигурации запуска.
при запуске Android Studio я получаю эту ошибку «доступ разрешен только из потока отправки событий»
активность, которую я использую, является фрагментарной активностью.
до сих пор я пытался перестроить и аннулировать кэш / перезапуск. И то и другое было бесполезно.
пожалуйста, дайте мне знать, что я могу сделать, чтобы исправить проблема.
18 ответов:
В Android Studio, щелкните правой кнопкой мыши на проекте и выберите Открыть Настройки Модуля. Тогда идите в источник вкладка в вашем модуле, найти src папка, щелкните правой кнопкой мыши на нем и отметьте его как источник (синий цвет).
EDIT: в более поздних версиях Android Studio нет вкладки «источники», но вы можете редактировать построить.gradle вместо файла:https://stackoverflow.com/a/22028681/1101730 (спасибо за комментарий Джош)
вы добавили ACTION_MAIN фильтр намерений для вашей основной деятельности? Если вы не добавите это, то android не будет знать, какое действие запускать в качестве основного действия.
у меня была такая же проблема при импорте проекта в Android Studio, вероятно, вызванная тем, что проект был разработан на более ранней версии Android Studio, чем в настоящее время установлен на моем компьютере.
что решило это было просто выполнение:
File -> Invalidate Caches / Restart.
и затем на Invalidate and Restart .
если у вас нет вкладки, и вы начали с пустого действия, попробуйте это. Ниже приведен пример кода:
Теперь перейдите к вашему AndroidManifest.XML-файл. Затем скопируйте фильтр намерений из этого кода. Посмотрите на свой файл манифеста действительно хорошо и вставьте фильтр намерений в точное место, где он находится в коде выше. (после этого .yourActivityName> часть манифеста.) Надеюсь, это помогло.
когда я нажал «открыть Настройки модуля»,не было никакой вкладки «источник», Я думаю, потому что это было удалено для более новых версий Android Studio (я на 0.8.14). Поэтому я должен был сделать это вместо:
добавьте эти строки в внутри android < . >блок:
после редактирования файла, нажмите кнопку инструменты > Android > синхронизация проекта с файлами Gradle.
ниже сделал трюк для меня. От Выполнить -> Редактировать Конфигурацию.

Я только что испытал ту же ошибку в Android Studio 1.5.1. и нашел источник проблемы. Я не уверен, была ли причиной человеческая ошибка или какой-то странный сбой в поведении IDE, но ни один из существующих вопросов StackOverflow об этом предмете, казалось, ничего не показывал об этом, поэтому я решил, что все равно отправлю его в качестве ответа.
для меня либо один из членов моей команды, либо сама среда IDE изменили запись манифеста действий запуска, вызвав ее чтобы выглядеть так:
хотя это должно, по сути, выглядеть так:
поэтому, пожалуйста, дважды, трижды, вчетверо проверьте формат вашей активности запуска в манифесте, и вы можете сэкономить некоторое время.
надеюсь, что это помогает.
изменить: Я настоятельно рекомендую людям не идти с ответами, которые предлагают вручную выбрать активность запуска внутри параметров конфигурации вашего модуля, так как это вызвало приложение больше не будет отображаться в списке установленных приложений как на Samsung Galaxy S5 Neo, так и на Samsung Galaxy S6 (по крайней мере для меня).
пожалуйста, убедитесь в манифесте, что имя пакета совпадает с вашей основной деятельностью
это случилось со мной, потому что я оприходована пути в манифесте. изменено:
Я столкнулся с той же проблемой сегодня и проходил ответы здесь.
для меня разница заключалась в том, что вчера он работал нормально, поэтому я решил, что это не может быть проблемой конфигурации, ни конфигурация, ни Версия Android Studio не изменились.
к счастью, я попробовал перезагрузить Android Studio, прежде чем попробовать любой из других ответов, и, к счастью, это решило проблему.
Так что для всех людей, которые там сталкиваются с этим: первое, что нужно попробуйте перезапустить Android Studio и только если это не решит проблему попробуйте другие ответы здесь.
Если вы все еще получаете сообщение об ошибке «активность по умолчанию не найдена» при попытке изменить конфигурации запуска даже после выполнения:
аннулировать кэш и перезапустить.
затем попробуйте удалить папку Настройки / Настройки:
- Правой Кнопкой Мыши на проекте и выберите Настройки модуля.
- перейдите на вкладку источники в модуле.
- найдите папку src.
- щелкните правой кнопкой мыши на нем и отметьте его как источники.
это решило ошибку в моем случае.
Если вы изменили имя каталогов (структуру классов), например com.dir.образец для COM.dir.sample1, после этого не забудьте изменить пакет com.dir.образец для COM.dir.пример sample 1.
Изменить «Рабочую Область.xml » (нажмите Ctrl + Shft + R для поиска)
изменить имя действия с именем пакета
обязательно измените «name=» USE_COMMAND_LINE «на value= «false»
Источник
Default Activity not found #18
Comments
winster commented Oct 24, 2016
Since there is no activity defined in the manifest, getting error in Android studio.
Error running app:
Default Activity not found
The text was updated successfully, but these errors were encountered:
tjohns commented Oct 27, 2016
Yes, this is correct. This is an input manager, not an activity.
You can get Android Studio not to complain by going to the «Edit Configurations» menu (tap «Shift» three times, type «Edit Configurations»), then change Launch Options > Launch to «Nothing».
I’ll probably add a generic activity containing instructions, just to avoid any confusion.
111usman commented Feb 22, 2018
iletai commented Jul 19, 2018
neilakoh commented Aug 6, 2018
I also got the same error; however, in my case it was straightforward since this error occurred in a fresh project and it turns out I have to add an intent inside activity tag to get rid of the error:
IDFDeveloper commented Oct 11, 2018 •
@tjohns i agree with you that if we change that setting then app works fine but what if want to run the app without edit Edit Configuration ? I have checked this stack overflow question’s answers to solve this issue in android studio 3.2
I have spend almost 5 hours and got the solution. I have copy that project and run in another system then its working fine, So just do following solution to fix this issue and it is work for me and i hope some one will get help with this.
Solution :
- Delete the cash from your %Home%\.gradle\cash and sync project again.
- Also check that is there any duplicate tag in your Manifest.
hishark commented Oct 20, 2018
@AndroidNinza thank you. I spend one night to find solution, I’m trying your solution and it is downloading now, hope I can solve it and then go to bed:’-(
hishark commented Oct 20, 2018
@AndroidNinza done. thank you. 😭 😭 😭
perfect solution
JoinBelieve commented Oct 27, 2018
@IDFDeveloper thank you very mach!!
moyarich commented Nov 9, 2018
that worked really well for me. I tried file>invalidate caches/restart and that did not work for me
davidofug commented Nov 21, 2018 •
I lost over 6 hours hunting down the problem. I even redownload gradle, restarted Android studio, Invalidated cache/restart to no vail. Until a sister pointed me to this wonderful thread.
This came to my rescue.
@tjohns i agree with you that if we change that setting then app works fine but what if want to run the app without edit Edit Configuration ? I have checked this stack overflow question’s answers to solve this issue in android studio 3.2
I have spend almost 5 hours and got the solution. I have copy that project and run in another system then its working fine, So just do following solution to fix this issue and it is work for me and i hope some one will get help with this.
Solution :
Источник
Find default activity android
The default value of this attribute is false . android:allowTaskReparenting Whether or not the activity can move from the task that started it to the task it has an affinity for when that task is next brought to the front — » true » if it can move, and » false » if it must remain with the task where it started.
If this attribute is not set, the value set by the corresponding allowTaskReparenting attribute of the element applies to the activity. The default value is » false «.
Normally when an activity is started, it’s associated with the task of the activity that started it and it stays there for its entire lifetime. You can use this attribute to force it to be re-parented to the task it has an affinity for when its current task is no longer displayed. Typically, it’s used to cause the activities of an application to move to the main task associated with that application.
For example, if an e-mail message contains a link to a web page, clicking the link brings up an activity that can display the page. That activity is defined by the browser application, but is launched as part of the e-mail task. If it’s reparented to the browser task, it will be shown when the browser next comes to the front, and will be absent when the e-mail task again comes forward.
The affinity of an activity is defined by the taskAffinity attribute. The affinity of a task is determined by reading the affinity of its root activity. Therefore, by definition, a root activity is always in a task with the same affinity. Since activities with » singleTask » or » singleInstance » launch modes can only be at the root of a task, re-parenting is limited to the » standard » and » singleTop » modes. (See also the launchMode attribute.)
android:alwaysRetainTaskState Whether or not the state of the task that the activity is in will always be maintained by the system — » true » if it will be, and » false » if the system is allowed to reset the task to its initial state in certain situations. The default value is » false «. This attribute is meaningful only for the root activity of a task; it’s ignored for all other activities.
Normally, the system clears a task (removes all activities from the stack above the root activity) in certain situations when the user re-selects that task from the home screen. Typically, this is done if the user hasn’t visited the task for a certain amount of time, such as 30 minutes.
However, when this attribute is » true «, users will always return to the task in its last state, regardless of how they get there. This is useful, for example, in an application like the web browser where there is a lot of state (such as multiple open tabs) that users would not like to lose.
android:autoRemoveFromRecents Whether or not tasks launched by activities with this attribute remains in the overview screen until the last activity in the task is completed. If true , the task is automatically removed from the overview screen. This overrides the caller’s use of FLAG_ACTIVITY_RETAIN_IN_RECENTS . It must be a boolean value, either » true » or » false «. android:banner A drawable resource providing an extended graphical banner for its associated item. Use with the tag to supply a default banner for a specific activity, or with the tag to supply a banner for all application activities.
The system uses the banner to represent an app in the Android TV home screen. Since the banner is displayed only in the home screen, it should only be specified by applications with an activity that handles the CATEGORY_LEANBACK_LAUNCHER intent.
This attribute must be set as a reference to a drawable resource containing the image (for example «@drawable/banner» ). There is no default banner.
See Provide a home screen banner in Get Started with TV Apps for more information.
android:clearTaskOnLaunch Whether or not all activities will be removed from the task, except for the root activity, whenever it is re-launched from the home screen — » true » if the task is always stripped down to its root activity, and » false » if not. The default value is » false «. This attribute is meaningful only for activities that start a new task (the root activity); it’s ignored for all other activities in the task.
When the value is » true «, every time users start the task again, they are brought to its root activity regardless of what they were last doing in the task and regardless of whether they used the Back or Home button to leave it. When the value is » false «, the task may be cleared of activities in some situations (see the alwaysRetainTaskState attribute), but not always.
Suppose, for example, that someone launches activity P from the home screen, and from there goes to activity Q. The user next presses Home, and then returns to activity P. Normally, the user would see activity Q, since that is what they were last doing in P’s task. However, if P set this flag to » true «, all of the activities on top of it (Q in this case) would be removed when the user launched activity P from the home screen. So the user would see only P when returning to the task.
If this attribute and allowTaskReparenting are both » true «, any activities that can be re-parented are moved to the task they share an affinity with; the remaining activities are then dropped, as described above.
This attribute is ignored if FLAG_ACTIVITY_RESET_TASK_IF_NEEDED is not set.
Requests the activity to be displayed in wide color gamut mode on compatible devices. In wide color gamut mode, a window can render outside of the SRGB gamut to display more vibrant colors. If the device doesn’t support wide color gamut rendering, this attribute has no effect. For more information about rendering in wide color mode, see Enhancing Graphics with Wide Color Content.
android:configChanges Lists configuration changes that the activity will handle itself. When a configuration change occurs at runtime, the activity is shut down and restarted by default, but declaring a configuration with this attribute will prevent the activity from being restarted. Instead, the activity remains running and its onConfigurationChanged() method is called.
Note: Using this attribute should be avoided and used only as a last resort. Please read Handling Runtime Changes for more information about how to properly handle a restart due to a configuration change.
Any or all of the following strings are valid values for this attribute. Multiple values are separated by ‘ | ‘ — for example, » locale|navigation|orientation «.
| Value | Description | ||||||||||||||||||||||||||||||||||||||||||||||||||||||||||||||||||||||||||||||||||||||||||||||||||
|---|---|---|---|---|---|---|---|---|---|---|---|---|---|---|---|---|---|---|---|---|---|---|---|---|---|---|---|---|---|---|---|---|---|---|---|---|---|---|---|---|---|---|---|---|---|---|---|---|---|---|---|---|---|---|---|---|---|---|---|---|---|---|---|---|---|---|---|---|---|---|---|---|---|---|---|---|---|---|---|---|---|---|---|---|---|---|---|---|---|---|---|---|---|---|---|---|---|---|---|
| » density « | The display density has changed — the user might have specified a different display scale, or a different display might now be active. Added in API level 24. | ||||||||||||||||||||||||||||||||||||||||||||||||||||||||||||||||||||||||||||||||||||||||||||||||||
| » fontScale « | The font scaling factor has changed — the user has selected a new global font size. | ||||||||||||||||||||||||||||||||||||||||||||||||||||||||||||||||||||||||||||||||||||||||||||||||||
| » keyboard « | The keyboard type has changed — for example, the user has plugged in an external keyboard. | ||||||||||||||||||||||||||||||||||||||||||||||||||||||||||||||||||||||||||||||||||||||||||||||||||
| » keyboardHidden « | The keyboard accessibility has changed — for example, the user has revealed the hardware keyboard. | ||||||||||||||||||||||||||||||||||||||||||||||||||||||||||||||||||||||||||||||||||||||||||||||||||
| » layoutDirection « | The layout direction has changed — for example, changing from left-to-right (LTR) to right-to-left (RTL). Added in API level 17. | ||||||||||||||||||||||||||||||||||||||||||||||||||||||||||||||||||||||||||||||||||||||||||||||||||
| » locale « | The locale has changed — the user has selected a new language that text should be displayed in. | ||||||||||||||||||||||||||||||||||||||||||||||||||||||||||||||||||||||||||||||||||||||||||||||||||
| » mcc « | The IMSI mobile country code (MCC) has changed — a SIM has been detected and updated the MCC. | ||||||||||||||||||||||||||||||||||||||||||||||||||||||||||||||||||||||||||||||||||||||||||||||||||
| » mnc « | The IMSI mobile network code (MNC) has changed — a SIM has been detected and updated the MNC. | ||||||||||||||||||||||||||||||||||||||||||||||||||||||||||||||||||||||||||||||||||||||||||||||||||
| » navigation « | The navigation type (trackball/dpad) has changed. (This should never normally happen.) | ||||||||||||||||||||||||||||||||||||||||||||||||||||||||||||||||||||||||||||||||||||||||||||||||||
| » orientation « | The screen orientation has changed — the user has rotated the device. Note: If your application targets Android 3.2 (API level 13) or higher, then you should also declare the «screenSize» and «screenLayout» configurations, because they might also change when a device switches between portrait and landscape orientations. | ||||||||||||||||||||||||||||||||||||||||||||||||||||||||||||||||||||||||||||||||||||||||||||||||||
| » screenLayout « | The screen layout has changed — a different display might now be active. | ||||||||||||||||||||||||||||||||||||||||||||||||||||||||||||||||||||||||||||||||||||||||||||||||||
| » screenSize « | The current available screen size has changed. This represents a change in the currently available size, relative to the current aspect ratio, so will change when the user switches between landscape and portrait. Added in API level 13. | ||||||||||||||||||||||||||||||||||||||||||||||||||||||||||||||||||||||||||||||||||||||||||||||||||
| » smallestScreenSize « | The physical screen size has changed. This represents a change in size regardless of orientation, so will only change when the actual physical screen size has changed such as switching to an external display. A change to this configuration corresponds to a change in the smallestWidth configuration. Added in API level 13. | ||||||||||||||||||||||||||||||||||||||||||||||||||||||||||||||||||||||||||||||||||||||||||||||||||
| » touchscreen « | The touchscreen has changed. (This should never normally happen.) | ||||||||||||||||||||||||||||||||||||||||||||||||||||||||||||||||||||||||||||||||||||||||||||||||||
| » uiMode « | The user interface mode has changed — the user has placed the device into a desk or car dock, or the night mode has changed. For more information about the different UI modes, see UiModeManager . Added in API level 8. All of these configuration changes can impact the resource values seen by the application. Therefore, when onConfigurationChanged() is called, it will generally be necessary to again retrieve all resources (including view layouts, drawables, and so on) to correctly handle the change. Note: To handle all Multi-Window related configuration changes use both «screenLayout» and «smallestScreenSize» . Multi-Window is supported in Android 7.0 (API level 24) or higher. Whether or not the activity is direct-boot aware; that is, whether or not it can run before the user unlocks the device. Note: During Direct Boot, an activity in your application can only access the data that is stored in device protected storage. The default value is «false» . android:documentLaunchMode Specifies how a new instance of an activity should be added to a task each time it is launched. This attribute permits the user to have multiple documents from the same application appear in the overview screen. This attribute has four values which produce the following effects when the user opens a document with the application:
Note: For values other than » none » and » never » the activity must be defined with launchMode=»standard» . If this attribute is not specified, documentLaunchMode=»none» is used. android:enabled Whether or not the activity can be instantiated by the system — «true» if it can be, and » false » if not. The default value is » true «. android:excludeFromRecents Whether or not the task initiated by this activity should be excluded from the list of recently used applications, the overview screen. That is, when this activity is the root activity of a new task, this attribute determines whether the task should not appear in the list of recent apps. Set » true » if the task should be excluded from the list; set » false » if it should be included. The default value is » false «. android:exported This element sets whether the activity can be launched by components of other applications:
If an activity in your app includes intent filters, set this element to » true » to allow other apps to start it. For example, if the activity is the main activity of the app and includes the category » android.intent.category.LAUNCHER «. If this element is set to » false » and an app tries to start the activity, the system throws an ActivityNotFoundException . This attribute is not the only way to limit an activity’s exposure to other applications. Permissions can also be used to limit the external entities that can invoke the activity (see the permission attribute). android:finishOnTaskLaunch Whether or not an existing instance of the activity should be shut down (finished), except for the root activity, whenever the user again launches its task (chooses the task on the home screen) — » true » if it should be shut down, and » false » if not. The default value is » false «. If this attribute and allowTaskReparenting are both » true «, this attribute trumps the other. The affinity of the activity is ignored. The activity is not re-parented, but destroyed. This attribute is ignored if FLAG_ACTIVITY_RESET_TASK_IF_NEEDED isn’t set. android:hardwareAccelerated Whether or not hardware-accelerated rendering should be enabled for this Activity — » true » if it should be enabled, and » false » if not. The default value is » false «. Starting from Android 3.0, a hardware-accelerated OpenGL renderer is available to applications, to improve performance for many common 2D graphics operations. When the hardware-accelerated renderer is enabled, most operations in Canvas, Paint, Xfermode, ColorFilter, Shader, and Camera are accelerated. This results in smoother animations, smoother scrolling, and improved responsiveness overall, even for applications that do not explicitly make use the framework’s OpenGL libraries. Because of the increased resources required to enable hardware acceleration, your app will consume more RAM. Note that not all of the OpenGL 2D operations are accelerated. If you enable the hardware-accelerated renderer, test your application to ensure that it can make use of the renderer without errors. android:icon An icon representing the activity. The icon is displayed to users when a representation of the activity is required on-screen. For example, icons for activities that initiate tasks are displayed in the launcher window. The icon is often accompanied by a label (see the android:label attribute). This attribute must be set as a reference to a drawable resource containing the image definition. If it is not set, the icon specified for the application as a whole is used instead (see the element’s icon attribute). android:immersive Sets the immersive mode setting for the current activity. If the android:immersive attribute is set to true in the app’s manifest entry for this activity, the ActivityInfo.flags member always has its FLAG_IMMERSIVE bit set, even if the immersive mode is changed at runtime using the setImmersive() method. android:label A user-readable label for the activity. The label is displayed on-screen when the activity must be represented to the user. It’s often displayed along with the activity icon. If this attribute is not set, the label set for the application as a whole is used instead (see the element’s label attribute). The label should be set as a reference to a string resource, so that it can be localized like other strings in the user interface. However, as a convenience while you’re developing the application, it can also be set as a raw string. android:launchMode An instruction on how the activity should be launched. There are four modes that work in conjunction with activity flags ( FLAG_ACTIVITY_* constants) in Intent objects to determine what should happen when the activity is called upon to handle an intent. They are: » standard » The default mode is » standard «. As shown in the table below, the modes fall into two main groups, with » standard » and » singleTop » activities on one side, and » singleTask » and » singleInstance » activities on the other. An activity with the » standard » or » singleTop » launch mode can be instantiated multiple times. The instances can belong to any task and can be located anywhere in the activity stack. Typically, they’re launched into the task that called startActivity() (unless the Intent object contains a FLAG_ACTIVITY_NEW_TASK instruction, in which case a different task is chosen — see the taskAffinity attribute). In contrast, » singleTask » and » singleInstance » activities can only begin a task. They are always at the root of the activity stack. Moreover, the device can hold only one instance of the activity at a time — only one such task. The » standard » and » singleTop » modes differ from each other in just one respect: Every time there’s a new intent for a » standard » activity, a new instance of the class is created to respond to that intent. Each instance handles a single intent. Similarly, a new instance of a » singleTop » activity may also be created to handle a new intent. However, if the target task already has an existing instance of the activity at the top of its stack, that instance will receive the new intent (in an onNewIntent() call); a new instance is not created. In other circumstances — for example, if an existing instance of the » singleTop » activity is in the target task, but not at the top of the stack, or if it’s at the top of a stack, but not in the target task — a new instance would be created and pushed on the stack. Similarly, if you navigate up to an activity on the current stack, the behavior is determined by the parent activity’s launch mode. If the parent activity has launch mode singleTop (or the up intent contains FLAG_ACTIVITY_CLEAR_TOP ), the parent is brought to the top of the stack, and its state is preserved. The navigation intent is received by the parent activity’s onNewIntent() method. If the parent activity has launch mode standard (and the up intent does not contain FLAG_ACTIVITY_CLEAR_TOP ), the current activity and its parent are both popped off the stack, and a new instance of the parent activity is created to receive the navigation intent. The » singleTask » and » singleInstance » modes also differ from each other in only one respect: A » singleTask » activity allows other activities to be part of its task. It’s always at the root of its task, but other activities (necessarily » standard » and » singleTop » activities) can be launched into that task. A » singleInstance » activity, on the other hand, permits no other activities to be part of its task. It’s the only activity in the task. If it starts another activity, that activity is assigned to a different task — as if FLAG_ACTIVITY_NEW_TASK was in the intent.
As shown in the table above, standard is the default mode and is appropriate for most types of activities. SingleTop is also a common and useful launch mode for many types of activities. The other modes — singleTask and singleInstance — are not appropriate for most applications , since they result in an interaction model that is likely to be unfamiliar to users and is very different from most other applications. Regardless of the launch mode that you choose, make sure to test the usability of the activity during launch and when navigating back to it from other activities and tasks using the Back button. For more information on launch modes and their interaction with Intent flags, see the Tasks and Back Stack document. android:lockTaskMode Determines how the system presents this activity when the device is running in lock task mode. Android can run tasks in an immersive, kiosk-like fashion called lock task mode. When the system runs in lock task mode, device users typically can’t see notifications, access non-allowlisted apps, or return to the home screen (unless the Home app is allowlisted). Only apps that have been allowlisted by a device policy controller (DPC) can run when the system is in lock task mode. System and privileged apps, however, can run in lock task mode without being allowlisted. The value can be any one of the following R.attr.lockTaskMode string values:
|


