- Одно приложение обнаружит всё.
- Найдите свои устройства Apple.
- Все ваши устройства видны вам на карте.
- Поддерживаются
- Поддерживаются
- Найдите пропавшее устройство по звуку.
- Поддерживаются
- Поддерживаются
- Передайте сообщение тому, кто нашёл.
- Поддерживаются
- Поддерживаются
- Удалите информацию удалённо.
- Поддерживаются
- Поддерживаются
- Заблокируйте устройство. Автоматически.
- Поддерживаются
- Поддерживаются
- Найдите устройство, даже если оно офлайн.
- Потеряться может всё. AirTag поможет найти.
- Найдите своих друзей.
- Посмотрите кто где на карте.
- Узнайте, что они выехали. Узнайте, что они прибыли.
- Что ещё может найти приложение «Локатор»?
- Данные о местоположении надёжно защищены.
- Use Lost Mode in Find My iPhone on iCloud.com
- What happens when you use Lost Mode or lock a lost device?
- Turn on Lost Mode or lock a device
- Change your contact information on a lost device
- Turn off Lost Mode on an iPhone, iPad, iPod touch, or Apple Watch
- Recover the passcode and unlock your Mac
- iCloud User Guide
- What is iCloud?
- Use iCloud with your favorite apps
- Get more storage and features with iCloud+
- Use iCloud on the web
- Manage your iCloud storage
- Make more space available in iCloud
- Reduce the size of your iCloud Backup
- Choose which apps to back up on your iPhone, iPad, or iPod touch
- Delete backups and turn off iCloud Backup for your device
- iPhone, iPad, and iPod touch
- Windows PC
- Delete photos in iCloud Photos
- iPhone, iPad, and iPod touch
- iCloud.com
- If you don’t use iCloud Photos
- Delete folders or files in iCloud Drive
- iPhone, iPad, or iPod touch
- Windows
- iCloud.com
- Delete texts and attachments in Messages
- iPhone or iPad
- Delete messages and manage Mail
- iPhone, iPad, or iPod touch
- Mac or Windows PC
- iCloud.com
- Delete voice memos
- iPhone, iPad, or iPod touch
- Learn more about iCloud storage
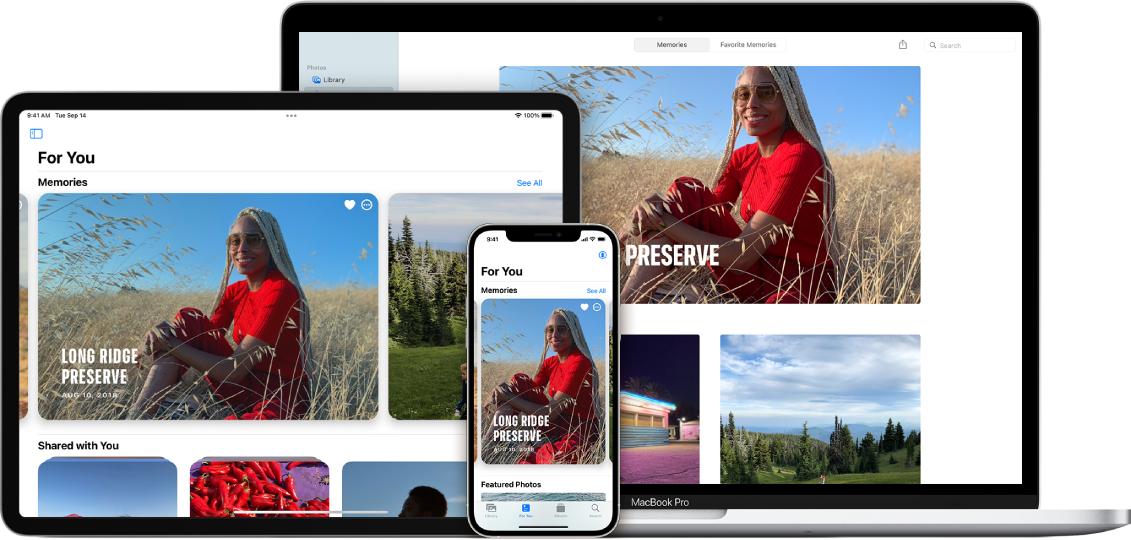
Одно приложение обнаружит всё.
В приложении «Локатор» легко найти на карте свои устройства Apple, свои вещи, к которым вы прикрепили AirTag, а также своих друзей и родных. Оно доступно на iPhone, iPad и Mac. С его помощью можно обнаружить пропавшие устройства, даже если они не подключены к интернету. При этом ваша конфиденциальность всегда остаётся под защитой.
Найдите свои
устройства Apple.
Вы носите свои устройства повсюду. Поэтому велика вероятность их где-то забыть. Но где бы вы их ни оставили — под подушкой на диване или на столе в офисе — ваша разлука будет недолгой. Вы можете быстро обнаружить свой iPhone, iPad, iPod touch, Apple Watch, Mac, AirPods или AirTag с помощью приложения «Локатор».
Все ваши устройства видны вам на карте.
Не помните, дома ваш iPad или на работе?
Посмотрите на карту: вы увидите все свои
устройства и сразу поймёте, где находится пропавшее. А некоторые устройства к тому же умеют отмечать своё местоположение на карте, когда заряд их аккумулятора подходит к концу, — это поможет их отыскать, даже если батарея полностью сядет.
Поддерживаются
- iPhone
- iPad
- iPod touch
- Apple Watch
- Mac
- AirPods
- AirTag
Поддерживаются
- iPhone
- iPad
- iPod touch
- Apple Watch
- Mac
- AirPods
- AirTag
Найдите пропавшее устройство по звуку.
Если устройство пропало из виду, но вы думаете, что оно где-то недалеко от вас или рядом с другими людьми, вы можете удалённо включить на нём звуковой сигнал, который позволит определить местоположение. А для наушников AirPods мы разработали особый звуковой сигнал, который хорошо распространяется по комнате и даже за её пределами.
Поддерживаются
- iPhone
- iPad
- iPod touch
- Apple Watch
- Mac
- AirPods
- AirTag
Поддерживаются
- iPhone
- iPad
- iPod touch
- Apple Watch
- Mac
- AirPods
- AirTag
Передайте сообщение тому, кто нашёл.
Если не получается найти своё устройство, в том числе AirTag, вы можете удалённо перевести его в режим пропажи. Этот режим активирует отслеживание геопозиции, отправляет вам уведомление при включении устройства и устанавливает ваш код-пароль для защиты ваших данных. А ещё можно указать свою контактную информацию. Нашедший увидит ваше сообщение на экране блокировки найденного устройства или сможет узнать ваш номер телефона, если прикоснётся своим смартфоном к вашему AirTag. *
Поддерживаются
- iPhone
- iPad
- iPod touch
- Apple Watch
- Mac
- AirTag
Поддерживаются
- iPhone
- iPad
- iPod touch
- Apple Watch
- Mac
- AirTag
Удалите информацию удалённо.
Боитесь, что устройство могло попасть в чужие руки? У вас есть возможность удалённо стереть на нём информацию: с устройства будут удалены все личные данные, и ваш iPhone, iPad, iPod touch, Mac или ваши Apple Watch вернутся к заводским настройкам. А если пропажа найдётся, вы сможете всё восстановить из резервной копии iCloud.
Поддерживаются
- iPhone
- iPad
- iPod touch
- Apple Watch
- Mac
Поддерживаются
- iPhone
- iPad
- iPod touch
- Apple Watch
- Mac
Заблокируйте устройство. Автоматически.
Функция «Блокировка активации» закроет посторонним доступ к вашему устройству
и помешает его перепродать. * Эта функция подключается автоматически, когда вы включаете возможности Локатора на своём устройстве. После этого никто не сможет стереть данные с вашего устройства или снова его активировать без ввода вашего Apple ID и пароля.
Поддерживаются
- iPhone
- iPad
- iPod touch
- Apple Watch
- Mac
Поддерживаются
- iPhone
- iPad
- iPod touch
- Apple Watch
- Mac
Найдите устройство,
даже если оно офлайн.
Если потерянное устройство не может подключиться к интернету, приложение «Локатор» всё равно способно отследить потерю — с помощью функции «Сеть Локатора». Для поиска задействуется сеть из сотен миллионов iPhone, iPad и Mac по всему миру. Устройства, находящиеся поблизости с вашим, безопасно передают данные о его местоположении в iCloud, и вы видите его в приложении «Локатор». Всё это происходит анонимно и защищается шифрованием, чтобы сохранить конфиденциаль ность всех сторон.
Потеряться может всё. AirTag поможет найти.
Не знаете, куда подевались ключи? Не помните, где забыли сумку? Если к ним прикреплён AirTag, долго искать не придётся. Функция «Сеть Локатора» может показать вам пропажу на карте. А если вещь где-то рядом с вами, вы можете удалённо активировать на AirTag звуковой сигнал, чтобы искать по звуку.
Найдите своих друзей.
Отправьте приглашение друзьям и членам семьи открыть доступ к геопозиции друг друга. И тогда станет ещё проще общаться, встречаться в людных местах и проверять, что близкие благополучно добрались до дома.
Посмотрите кто где на карте.
Если вы и ваши друзья делитесь геопозицией, то вам гораздо легче находить друг друга и оставаться на связи. При этом геопозицией можно поделиться на час, на целый день или без ограничений по времени — как вам удобнее.
Узнайте, что они выехали. Узнайте, что они прибыли.
Если хотите, вы можете получать уведомления о том, что ваш ребёнок добрался до школы или что другой член семьи вышел с работы. Это очень легко настроить. И каждой стороне предоставляется выбор — участвовать или не участвовать в таком отслеживании. Потому что у каждого должно быть право на конфиденциальность.
Что ещё может найти приложение «Локатор»?
В основе Локатора лежат технологии, которые теперь могут быть встроены в самые разные вещи. Например, в велосипеды или наушники. И всё, что совместимо, можно добавить в приложение, чтобы отслеживать там — вместе с вашими устройствами Apple.
Данные о местоположении надёжно защищены.
Как и во всех продуктах Apple, в приложении «Локатор» все ваши данные находятся под вашим контролем. Apple получает информацию о местонахождении вашего устройства, только если вы сами запросили его геолокацию, активировали на нём режим пропажи или включили функцию «Последняя геопозиция». Такие данные хранятся на серверах Apple только в зашифрованном виде и не более 24 часов. А когда для поиска используется функция «Сеть Локатора», данные всех участвующих в поиске сторон скрыты
от всех — даже от Apple.
Источник
Use Lost Mode in Find My iPhone on iCloud.com
Lost Mode lets you lock your iPhone, iPad, iPod touch, Mac, or Apple Watch so that others can’t access your personal information. You can turn on Lost Mode in Find My iPhone on iCloud.com.
Lost Mode requires a device that meets the minimum system requirements listed in the Apple Support article System requirements for iCloud.
To sign in to Find My iPhone, go to icloud.com/find.
What happens when you use Lost Mode or lock a lost device?
A confirmation email is sent to your Apple ID email address.
You can display a custom message on your device’s screen. For example, you may want to indicate that the device is lost or how to contact you.
Your device doesn’t display alerts or play a sound when you receive messages or notifications, or if any alarms go off. Your device can still receive phone calls and FaceTime calls.
Apple Pay is disabled for your device. Any credit or debit cards set up for Apple Pay, student ID cards, and Express Transit cards are suspended for your device. Apple Pay and student ID cards are suspended even if your device is offline. Express Transit cards are suspended the next time your device goes online. You can resume using suspended cards on your device after you unlock it and sign in with your Apple ID. See the Apple Support article Manage the cards that you use with Apple Pay.
For an iPhone, iPad, iPod touch, or Apple Watch, you see your device’s current location on the map, as well as any changes in its location. If Location Services is turned off on the device, it’s temporarily turned on to track your device’s location.
For a Mac, you can’t locate it or erase it if it’s not near a previously used Wi-Fi network, and you can’t change the passcode or unlock it remotely.
Turn on Lost Mode or lock a device
In Find My iPhone on iCloud.com, click All Devices, then select the device you want to put into Lost Mode or lock.
If you don’t see All Devices, it’s because you’ve already selected a device. Click the name of the current device in the center of the toolbar to access the Devices list, then select a new device.
Click Lost Mode or Lock.

Follow the onscreen instructions, keeping the following in mind:
Passcode: If your iPhone, iPad, iPod touch, or Apple Watch has a passcode, it’s required to unlock the device. Otherwise, you’re asked to create a passcode now. If you’re locking a Mac, you must create a numerical passcode, even if you already have a password set up on your Mac. This passcode is distinct from your password and is only used when you lock your Mac with Find My iPhone.
Family Sharing: If you’re trying to place a family member’s iPhone, iPad, or iPod touch in Lost Mode and the device doesn’t have a passcode set, you must enter that person’s Apple ID password on this computer. If you’re trying to lock a family member’s Mac, you must enter that person’s Apple ID password on this computer.
Contact information: If you’re asked to enter a phone number, enter a number where you can be reached. If you’re asked to enter a message, you may want to indicate that the device is lost or how to contact you. The number and message appear on the device’s Lock screen.
Note: If you forget the passcode, or if you set an EFI firmware password on your Mac before it was lost, then lock it and later find it, you may need to take it to an authorized repair center to unlock it.
Change your contact information on a lost device
After you mark your iPhone, iPad, iPod touch, or Apple Watch as lost, you can update your contact information.
In Find My iPhone on iCloud.com, click All Devices, then click the iPhone, iPad, iPod touch, or Apple Watch that’s in Lost Mode in the Devices list.
If you don’t see All Devices, it’s because you’ve already selected a device. Click the name of the current device in the center of the toolbar to access the Devices list, then select a new device.
Click Lost Mode, change the information, then click Done.
Turn off Lost Mode on an iPhone, iPad, iPod touch, or Apple Watch
In Find My iPhone on iCloud.com, click All Devices, then select the device that’s in Lost Mode.
Click Lost Mode, click Stop Lost Mode, then click Stop Lost Mode again.
You can also turn off Lost Mode by entering your passcode on the device.
Note: If you had any cards suspended when you put your device in Lost Mode (credit or debit cards for Apple Pay, or student ID cards or Express Transit cards), when you turn off Lost Mode and sign back in to iCloud, you can use them again.
Recover the passcode and unlock your Mac
In Find My iPhone on iCloud.com, click All Devices, then select the Mac that’s locked.
If you don’t see All Devices, it’s because you’ve already selected a device. Click the name of the current device in the center of the toolbar to access the Devices list, then select a new device.
Click Unlock, then follow the onscreen instructions to verify your identity with your Apple ID password.
Once you have your passcode, enter it on your Mac.
You can also use Find My on any device that’s signed in with the same Apple ID. See Use Find My to locate people, devices, and items.
If you can’t use Lost Mode because Find My iPhone isn’t set up on your lost device, see the Apple Support article If your iPhone, iPad, or iPod touch is lost or stolen.
Источник
iCloud User Guide
What is iCloud?
iCloud is the service from Apple that securely stores your personal information, keeps it up to date on all your devices, and makes it easy to share your photos, files, and more with friends and family.
Use iCloud with your favorite apps
See the same photos and videos everywhere. Keep your files up to date on all your devices. Store data from your favorite apps and see it anywhere iCloud is turned on.
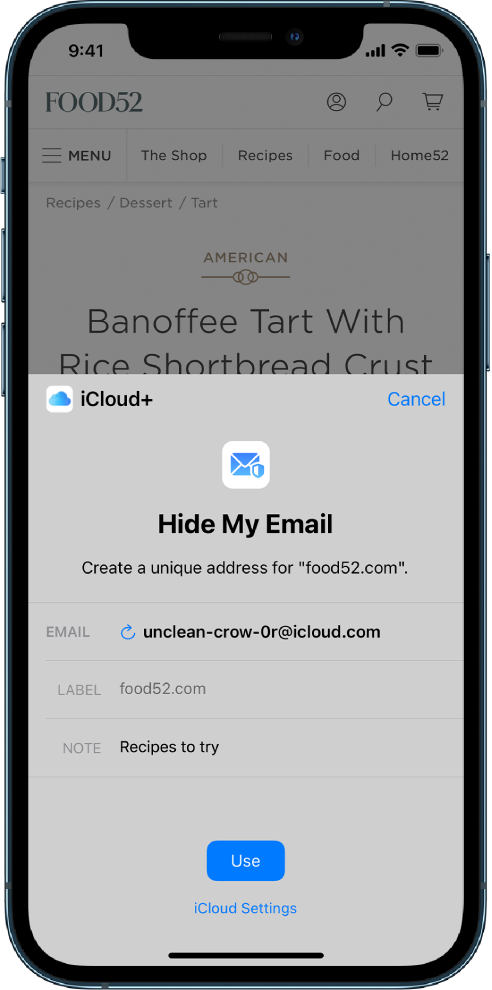
Get more storage and features with iCloud+
When you upgrade to iCloud+, you get more iCloud storage for your photos and files and access to features like iCloud Private Relay (beta) and Hide My Email.
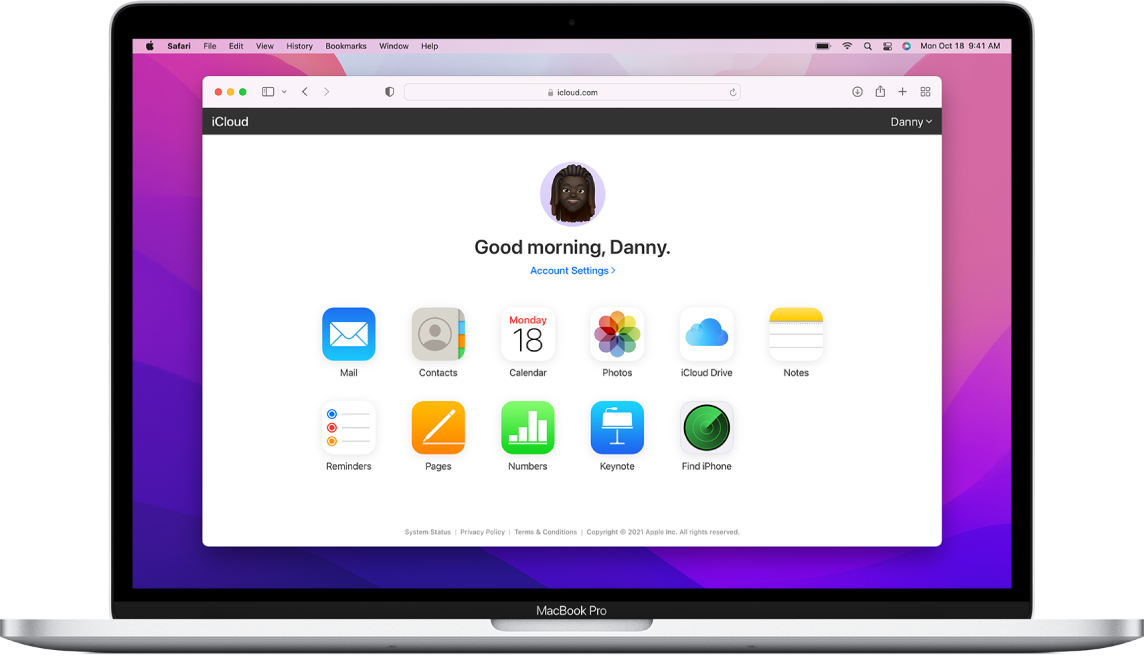
Use iCloud on the web
See your mail, photos, files, and more on iCloud.com. They’re safe, up to date, and available wherever you are.
To explore the iCloud User Guide, click Table of Contents at the top of the page, or enter a word or phrase in the search field.
If you need more help, visit the iCloud Support website.
Not all features are available in all countries or regions.
Источник
Manage your iCloud storage
Need more iCloud storage? You can easily make space or upgrade to iCloud+.
When you set up iCloud, you automatically get 5GB of storage. You can use that space for your iCloud backups, to keep your photos and videos stored in iCloud Photos, to keep your documents up to date in iCloud Drive, and more. You can always check how much iCloud storage you’re using in Settings on your device or on iCloud.com. If you’re running low, you can make more space or upgrade to iCloud+ any time.
Not sure about the difference between the storage capacity that comes with your device and iCloud storage? Learn more about device storage and iCloud storage.
Make more space available in iCloud
If you run out of iCloud storage, your device won’t back up to iCloud, new photos and videos won’t upload to iCloud Photos, and iCloud Drive, other iCloud apps, and messages won’t stay up to date across your devices. And you also won’t be able to send or receive emails with your iCloud email address.
You can free up storage in iCloud by deleting content that you’re not using:
Reduce the size of your iCloud Backup
When you back up your iPhone, iPad, or iPod touch to iCloud, the most important information on your device is backed up automatically. Learn more about what iCloud backs up.
Many iOS apps automatically back up to iCloud after you install them. You can decrease the size of your iCloud Backup and free up space in iCloud when you stop backing up apps that you don’t use or delete old iCloud backups.
Choose which apps to back up on your iPhone, iPad, or iPod touch
- Go to Settings > [your name] > iCloud.
- Tap Manage Storage > Backups.
- Tap the name of the device that you’re using.
- Turn off any apps that you don’t want to back up.
- Choose Turn Off & Delete.
When you confirm that you want to Turn Off & Delete an app, it turns off iCloud Backup for that app and removes all of its information from iCloud.
Some apps are always backed up and you can’t turn them off.
Delete backups and turn off iCloud Backup for your device
You can delete old iCloud backups for the device you’re currently using, or older devices you may not use anymore. iCloud backups are available for 180 days after you disable or stop using iCloud Backup. Backups that are currently being used to restore a device can’t be deleted.
iPhone, iPad, and iPod touch
- Go to Settings > [your name], then tap iCloud.
- Tap Manage Storage > Backups.
- Tap the name of the device whose backup you’d like to delete.
- Tap Delete Backup > Turn Off & Delete.
When you delete a backup, it also turns off iCloud Backup for your iPhone, iPad, or iPod touch. You can turn iCloud Backup back on in iCloud settings on your device.
- Go to Apple menu > System Preferences > Apple ID, then click iCloud.
- Click Manage and select Backups.
- Select one of the device backups, then click — to delete. If you want to turn off Backup and remove all backups for that device from iCloud, choose Delete when you’re asked to confirm.
When you delete a backup, it also turns off iCloud Backup for your device. You can turn iCloud Backup back on in iCloud settings on your device.
Windows PC
- Open iCloud for Windows.
- Click Storage.
- Select Backup from the items listed.
- Select one of the device backups, then click Delete. If you want to turn off Backup and remove all backups for that device from iCloud, choose Delete when you’re asked to confirm.
When you delete a backup, it also turns off iCloud Backup for your device. You can turn iCloud Backup back on in iCloud settings on your device.
Delete photos in iCloud Photos
iCloud Photos uses your iCloud storage to keep all of your photos and videos up to date across your devices. You can make more space in iCloud when you delete photos and videos that you no longer need from the Photos app on any of your devices.
Before you delete anything, make sure that you back up the photos and videos that you still want. When you use iCloud Photos and delete a photo or video on one device, it’s also deleted on all other devices where you’re signed in with the same Apple ID.
Use these steps to delete photos and videos from your iCloud Photos.
iPhone, iPad, and iPod touch
- Open the Photos app, then tap Photos at the bottom of your screen.
- Tap Select, and choose one or more photos or videos that you want to delete.
- Tap Delete , and then tap Delete Photo.
- Open the Photos app.
- Select the photos and videos that you want to delete.
- Press the delete key on your keyboard, control-click, or right-click and choose Delete (#) Photos. Then click Delete to confirm.
iCloud.com
- From your iPhone, iPad, or computer, sign in to iCloud.com.
- Tap the Photos app.
- Select the photos or videos that you want to delete.
- Tap Delete , then tap Delete.
To select multiple photos or videos, tap Select on iOS or iPadOS, or press and hold Command on a Mac or Control on a PC while you select the items. To select all, press and hold Command-A on macOS or Control-A on Windows, or tap Select All on iOS or iPadOS.
You can recover photos and videos that you delete from your Recently Deleted album for 30 days. If you want to remove content from Recently Deleted album faster, tap Select, then select the items you want to remove. Tap Delete > Delete. If you exceed your iCloud storage limit, your device immediately removes any photos and videos you delete and they won’t be available for recovery in your Recently Deleted album.
If you don’t use iCloud Photos
If you don’t use iCloud Photos, your Camera Roll is part of your iCloud Backup. To check how much storage it’s using in iCloud Backup, follow these steps.
- Go to Settings > [your name], then tap iCloud.
- Tap Manage Storage.
- Tap Backups.
- Tap the name of the device you’re using, then look at Photos.
To reduce the size of your Photos backup, save your photos and videos to your computer, then manually back up your iOS device. If you want to keep your photos and videos on your iOS device, you can turn off Photos in Backup or upgrade to iCloud+ for more storage. If there are any photos that you don’t want to keep, you can delete them.
- Open Photos.
- Select the item that you want to delete.
- Tap Delete and then tap Delete Photo.
Delete folders or files in iCloud Drive
You can manage and delete folders or files you store in iCloud Drive from your iPhone, iPad, iPod touch, Mac, or PC. If you’re a participant in someone else’s shared folder, it does not count towards your iCloud storage. Learn more about folder sharing in iCloud Drive.
With iOS 11 or later, files that you delete from iCloud Drive remain in Recently Deleted for 30 days before they’re removed from your device.
iPhone, iPad, or iPod touch
- Go to the Files app and tap Browse.
- Under Locations, tap iCloud Drive.
- Tap the More button , then tap Select.
- Choose the folders or files that you want to delete, then tap Delete .
- Go to Locations > Recently Deleted.
- Tap the More button , then tap Select.
- Choose the files that you want to delete.
- Tap Delete. Then tap Delete to confirm.
- Open the Finder and go to the iCloud Drive folder.
- Drag an item to the Trash, or move it to a different folder on your Mac.
- Open Trash, then right-click the files that you want to delete.
- Select Delete Immediately. Then click Delete to confirm.
Windows
On a PC with Windows 7 or later, you can manage your iCloud Drive files using Windows Explorer. Use these steps to add an iCloud Drive folder to Windows Explorer:
- Download and install iCloud for Windows.
- Sign in with your Apple ID.
- Turn on iCloud Drive.
- Go to the iCloud Drive folder.
- Select the folders or files that you want to delete.
- Click Delete.
iCloud.com
- From your iPad or computer, sign in to iCloud.com.
- Tap the iCloud Drive app.
- Select the files that you want to delete, then tap Delete .
- Open the iCloud Drive folder and tap Recently Deleted.
- Select the folders or files that you want to delete.
- Tap Delete.
Delete texts and attachments in Messages
When you use Messages in iCloud, all of your text messages and the attachments you send and receive use your iCloud storage. You can make more space available when you delete texts and attachments—like photos, videos, and files—that you don’t need anymore.
iPhone or iPad
To delete a message or attachment, follow these steps:
- In a message conversation, touch and hold the message bubble or attachment that you want to delete.
- Tap More.
- Tap Delete , then tap Delete Message. If you want to delete all messages in the thread tap Delete All, in the upper-left corner. Then tap Delete Conversation.
To delete multiple attachments from a contact or conversation, follow these steps:
- In a message conversation, tap the contact’s name at the top of the screen.
- Tap Info .
- In the Photos section, tap See All.
- Tap Select, tap the images you’d like to delete.
- Tap Delete, then tap Delete Attachment to confirm.
To delete an entire conversation, follow these steps:
- Swipe left over the conversation that you want to delete.
- Tap Delete.
- Tap Delete again to confirm.
To delete a message or attachment, follow these steps:
- Open a message conversation.
- Control-click the blank area of a message bubble that you want to delete.
- Choose Delete.
- Click Delete.
To delete multiple attachments from a contact or conversation, follow these steps:
- Open a message conversation.
- Click the Info button .
- Scroll to the Photos section.
- Click on an attachment then hold the Command key to select multiple attachments.
- Control-click or right-click, then choose Delete.
- Click Delete Attachment to confirm.
To delete an entire conversation, follow these steps:
- Control-click a conversation.
- Choose Delete Conversation.
- Click Delete.
Delete messages and manage Mail
You can free up iCloud space when you delete email messages from your iCloud email account. You can also move email messages from your iPhone, iPad, or iPod touch to your Mac or PC, where they no longer count against your iCloud storage.
Use the steps below to delete messages from your account. Remember that messages with large attachments take up more space than simple text emails.
iPhone, iPad, or iPod touch
If your iPhone, iPad, or iPod touch is set up to access iCloud email, you can delete messages from any mailbox, then empty the Trash to free up space:
- Swipe left across any message to delete it.
- Go to your Mailboxes and choose your Trash folder.
- To delete messages one at a time, swipe left on each message. To delete everything, tap Edit, tap Select All, and then tap Delete. Tap Delete All to confirm.
Mac or Windows PC
If you use iCloud Mail with a desktop email app, such as Mail on your Mac or Microsoft Outlook on your PC, use these steps:
- Mail on your Mac: Delete the messages that you no longer want, then choose Mailbox > Erase Deleted Items and select your iCloud email account from the menu. Then click Erase to confirm.
- Microsoft Outlook 2010 through Outlook 2016 (Windows): Delete the messages that you no longer want. Outlook will permanently delete your messages the next time you close and restart the app.
iCloud.com
- Sign in to iCloud.com.
- Select Mail and choose your Trash folder.
- To delete messages one at a time, select the message you want to delete, then select the Trash button . To delete multiple messages, select the messages you want to delete then select Delete.
Delete voice memos
With Voice Memos in iCloud, your voice recordings are stored in iCloud. You can easily delete them if you need more space.
iPhone, iPad, or iPod touch
- Tap Delete , then open Recently Deleted.
- Tap Edit.
- Tap Delete All, or select voice memos then tap Delete.
- Select the voice memos you want to delete.
- Click Delete .
- Open Recently Deleted, than click Delete.
- Click Delete Forever.
Learn more about iCloud storage
- Find out what’s in Others in your iCloud storage.
- If you have a web-only iCloud account, you can reduce how much of your 1 GB total of storage that you’re using by moving or deleting documents.
- For more information on availability of iCloud features, see the iCloud system requirements.
Information about products not manufactured by Apple, or independent websites not controlled or tested by Apple, is provided without recommendation or endorsement. Apple assumes no responsibility with regard to the selection, performance, or use of third-party websites or products. Apple makes no representations regarding third-party website accuracy or reliability. Contact the vendor for additional information.
Источник


