- Use the Finder to share files between your Mac and your iPhone, iPad, iPod touch
- Other ways to share
- What you need to use the Finder to share files
- See the iOS and iPadOS apps that can share files with your Mac
- Copy from your Mac to your device
- Copy from your device to your Mac
- Open shared files
- Back up shared files
- Delete shared files from your device
- If your iPhone, iPad, or iPod touch is lost or stolen
- Look for your device on a map
- Mark as Lost
- Report your missing device to local law enforcement
- File a Theft and Loss claim
- Remotely erase your device
- Contact your wireless carrier
- Remove your missing device from your account
- Locate backups of your iPhone, iPad, and iPod touch
- Find backups stored on your Mac or PC
- Search for the backup folder on your Mac
- Search for the backup folder on Windows 7, 8, or 10
- Delete or copy backups on your Mac or PC
- Copy backups to another location
- Delete backups
- Locate and manage backups stored in iCloud
- Set up Find My on your iPhone, iPad, iPod touch, or Mac
- How to turn on Find My for your iPhone, iPad, or iPod touch
- How to add your AirPods, Apple Watch, or Beats product to Find My
- One app to find it all.
- Find your Apple devices.
- See all your devices on a map.
- Compatible with
- Compatible with
- Play a sound to find your device.
- Compatible with
- Compatible with
- Display a message for someone who finds it.
- Compatible with
- Compatible with
- Erase it with ease.
- Compatible with
- Compatible with
- Lock it down. Automatically.
- Compatible with
- Compatible with
- You can even find devices that are offline.
- AirTag can help you find just about anything.
- Find your friends.
- See where everyone is on a map.
- Know when they leave. Know when they arrive.
- What else can Find My find?
- Everyone’s location data stays private.
Use the Finder to share files between your Mac and your iPhone, iPad, iPod touch
With macOS Catalina or later, you can use the Finder to share files between your iOS and iPadOS devices and your Mac.
Other ways to share
Learn about other ways you can share files between your Mac and your devices. These features work wirelessly.
iCloud Drive lets you securely access all of your documents from your iPhone, iPad, iPod touch, Mac, or PC. No matter which device you’re using, you’ll always have the most up-to-date documents when and where you need them.
With Handoff, you can start a document, email, or message on one device and pick up where you left off on another device. Handoff works with Apple apps such as Mail, Safari, Maps, Messages, Reminders, Calendar, Contacts, Pages, Numbers, and Keynote. It also works with some third-party apps.
AirDrop lets you instantly share your photos, videos, documents, and more with other Apple devices that are nearby.

What you need to use the Finder to share files
- macOS Catalina or later
- An iPhone, iPad, iPod touch with the latest version of iOS or iPadOS
- An iOS or iPadOS app that works with File Sharing
See the iOS and iPadOS apps that can share files with your Mac
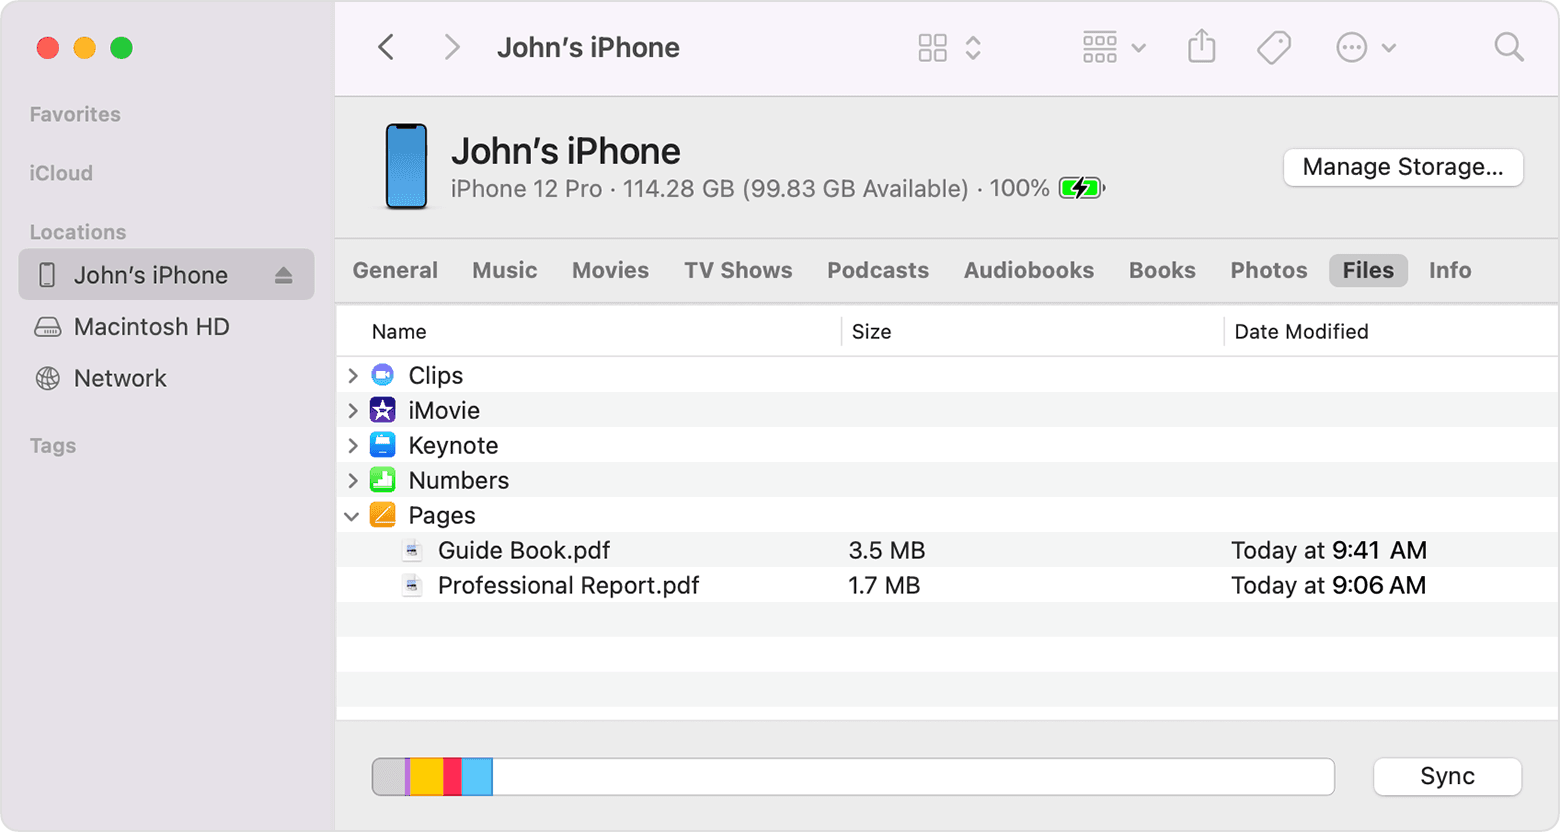
- Open a Finder window.
- Connect your iPhone, iPad, or iPod touch to your computer with a USB cable.
- Select your device in the Finder. Learn what to do if your computer doesn’t recognize your device.
- Click the Files tab to see a list of apps that can share files. If you don’t see a Files section, your device doesn’t have any apps that can share files.
- Click the triangle next to an app to see the files that you can share.

Copy from your Mac to your device
- Select the files that you want to copy. Select only files that work with the app. Check the app’s user guide to see which ones work.
- Drag the files to the app on your device. The Finder copies the files to your device.
Copy from your device to your Mac
- Select the files that you want to copy.
- Drag the files to a folder on your computer. The Finder copies the files to your computer.
Open shared files
On your iPhone, iPad, or iPod touch, use the app that you chose in the Files tab to open files that you shared from your computer.
Depending on the file type, some apps can’t open files in other apps or locations. You can see the list of files in the Files tab of the Finder when your device is connected to your computer.
Back up shared files
When iCloud or your computer backs up your device, it backs up your shared files as well.
If you delete an app with shared files from your iOS or iPadOS device, you also delete those shared files from your device and your iCloud or computer backup. To avoid losing shared files, copy the files to your computer before deleting the app from your device.
Delete shared files from your device
- Open a Finder window on your Mac.
- Connect your device to your computer using a USB cable.
- Select your device in the Finder. Learn what to do if your computer doesn’t recognize your device.
- Select the app from the list in the Files section.
- In the Documents list, select the file that you want to delete, then press the Delete key on your keyboard.
- When the Finder asks you to confirm, click Delete.
There might be other ways to delete files from an app. See the app’s user guide to find out more.
Источник
If your iPhone, iPad, or iPod touch is lost or stolen
If you lose your iPhone, iPad, or iPod touch or think it might be stolen, use Find My and protect your data.
Look for your device on a map
To find your device, sign in to iCloud.com/find. Or use the Find My app on another Apple device that you own.
If your iPhone, iPad, or iPod touch doesn’t appear in the list of devices, Find My was not turned on. But you can still protect your account if Find My was not turned on.
Mark as Lost
When you mark your device as lost, you remotely lock it with a passcode, keeping your information secure. This also disables Apple Pay on the missing device. And you can display a custom message with your contact information on the missing device.
Report your missing device to local law enforcement
Law enforcement might request the serial number of your device.
File a Theft and Loss claim
If your missing iPhone is covered by AppleCare+ with Theft and Loss, file a claim for an iPhone replacement.
Remotely erase your device
After you erase a device, you can’t track its location, so make sure that you no longer need to search for the device. If you have AppleCare+ with Theft and Loss, do not erase your iPhone until your claim has been approved.
Contact your wireless carrier
If the missing device is an iPhone or an iPad with cellular, report your missing device to your wireless carrier. Ask the carrier to disable your account to prevent calls, texts, and data use. And if your device is covered under your wireless carrier plan, file a claim.
Remove your missing device from your account
If you have AppleCare+ with Theft and Loss, do not remove your lost iPhone from your account until your claim has been approved.
Go to appleid.apple.com to remove the missing device from your list of trusted devices.
AppleCare+ with Theft and Loss is not available in all countries and regions.
Information about products not manufactured by Apple, or independent websites not controlled or tested by Apple, is provided without recommendation or endorsement. Apple assumes no responsibility with regard to the selection, performance, or use of third-party websites or products. Apple makes no representations regarding third-party website accuracy or reliability. Contact the vendor for additional information.
Источник
Locate backups of your iPhone, iPad, and iPod touch
Find a list of your iOS or iPadOS backups on your Mac, PC, and iOS or iPadOS device. Learn how to delete backups, copy them, and more.
Find backups stored on Mac or PC
Delete or copy backups stored on Mac or PC
Find and manage backups stored in iCloud
Find backups stored on your Mac or PC
To avoid ruining any of your backup files, here’s what you should know:
- The Finder and iTunes save backups to a Backup folder. The location of the Backup folder varies by operating system. Though you can copy the Backup folder, you should never move it to a different folder, external drive, or network drive.
- Don’t edit, relocate, rename, or extract content from your backup files, because these actions might ruin the files. For example, to restore from a relocated backup file, you need to move it back or the file won’t work. Backups serve as a safe copy of your entire device. So while you might be able to view or access a backup file’s contents, the contents usually aren’t stored in a format that you can read.
Search for the backup folder on your Mac
To find a list of your backups:
- Click the magnifier icon in the menu bar.
- Type or copy and paste this:
/Library/Application Support/MobileSync/Backup/
To find a specific backup:
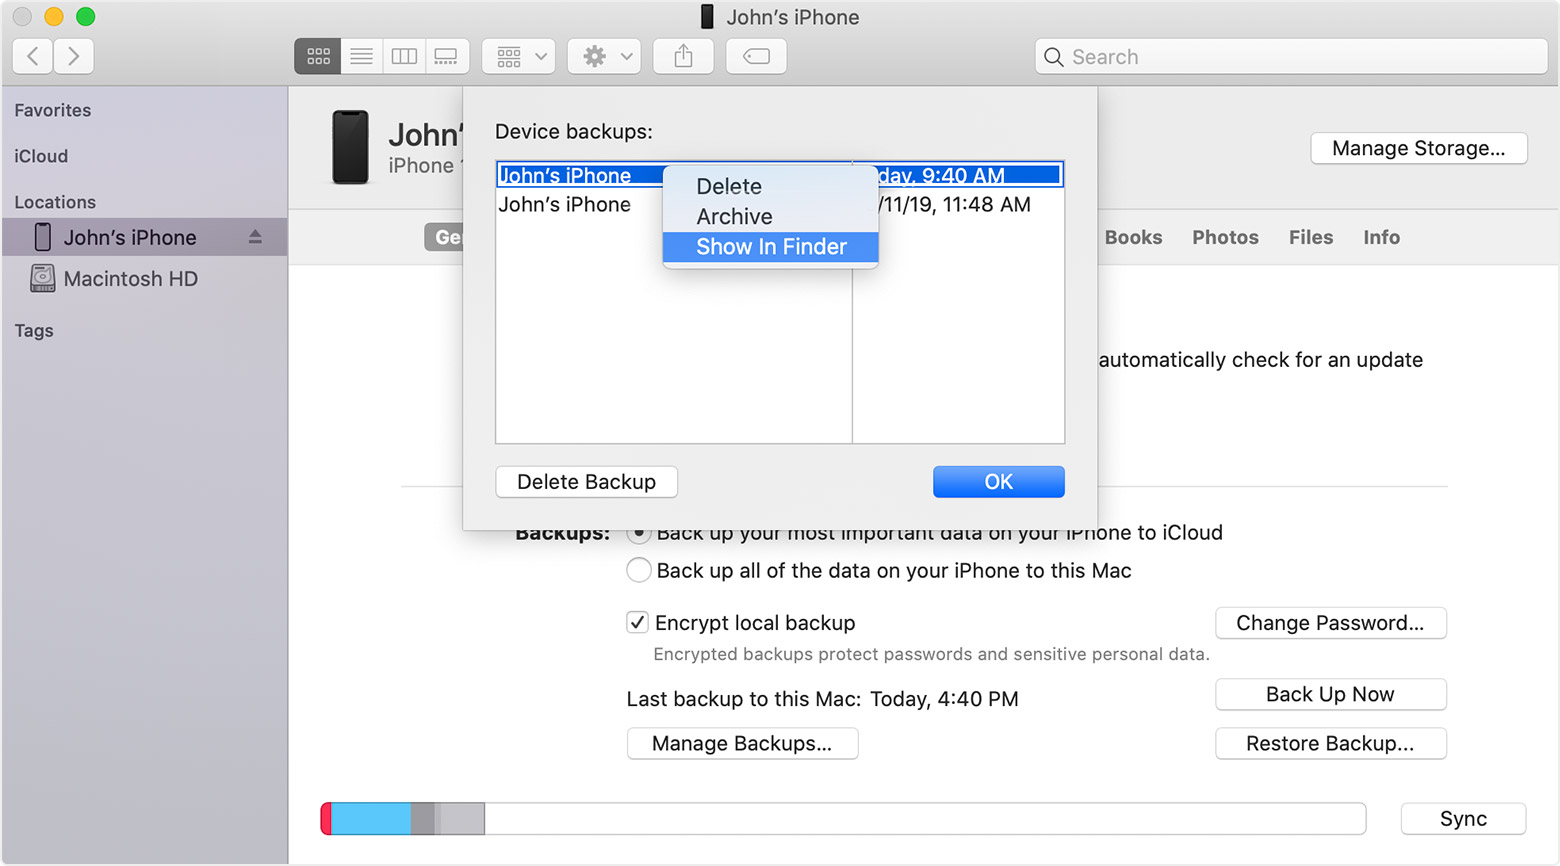
- On a Mac with macOS Catalina 10.15 or later, open the Finder. On a Mac with macOS Mojave 10.14 or earlier, or on a PC, open iTunes. Click your device.
- In the Finder, under the General tab, click Manage Backups to see a list of your backups. From here, you can right-click on the backup that you want, then choose Show in Finder, or you can select Delete or Archive. In iTunes, choose Preferences, then click Devices. From here, you can right-click on the backup that you want, then choose Show in Finder, or you can select Delete or Archive.
- Click OK when you’re finished.
Search for the backup folder on Windows 7, 8, or 10
- Find the Search bar:
- In Windows 7, click Start.
- In Windows 8, click the magnifying glass in the upper-right corner.
- In Windows 10, click the Search bar next to the Start button.
- In the Search bar, enter %appdata%. If you don’t see your backups, enter %USERPROFILE%.
- Press Return.
- Double-click these folders: «Apple» or «Apple Computer» > MobileSync > Backup.
Delete or copy backups on your Mac or PC
Don’t edit, relocate, rename, or extract content from your backup files, because these actions might ruin the files. Use the following sections to make copies of your backups or delete backups that you no longer need.
Copy backups to another location
If you need copies of your backups, you can find the Backup folder and copy the entire folder (not just part of it) to another place, like an external drive or network-storage location.
When you use Time Machine, it automatically copies your Backup folder when you back up the Home folder on your Mac.
Delete backups
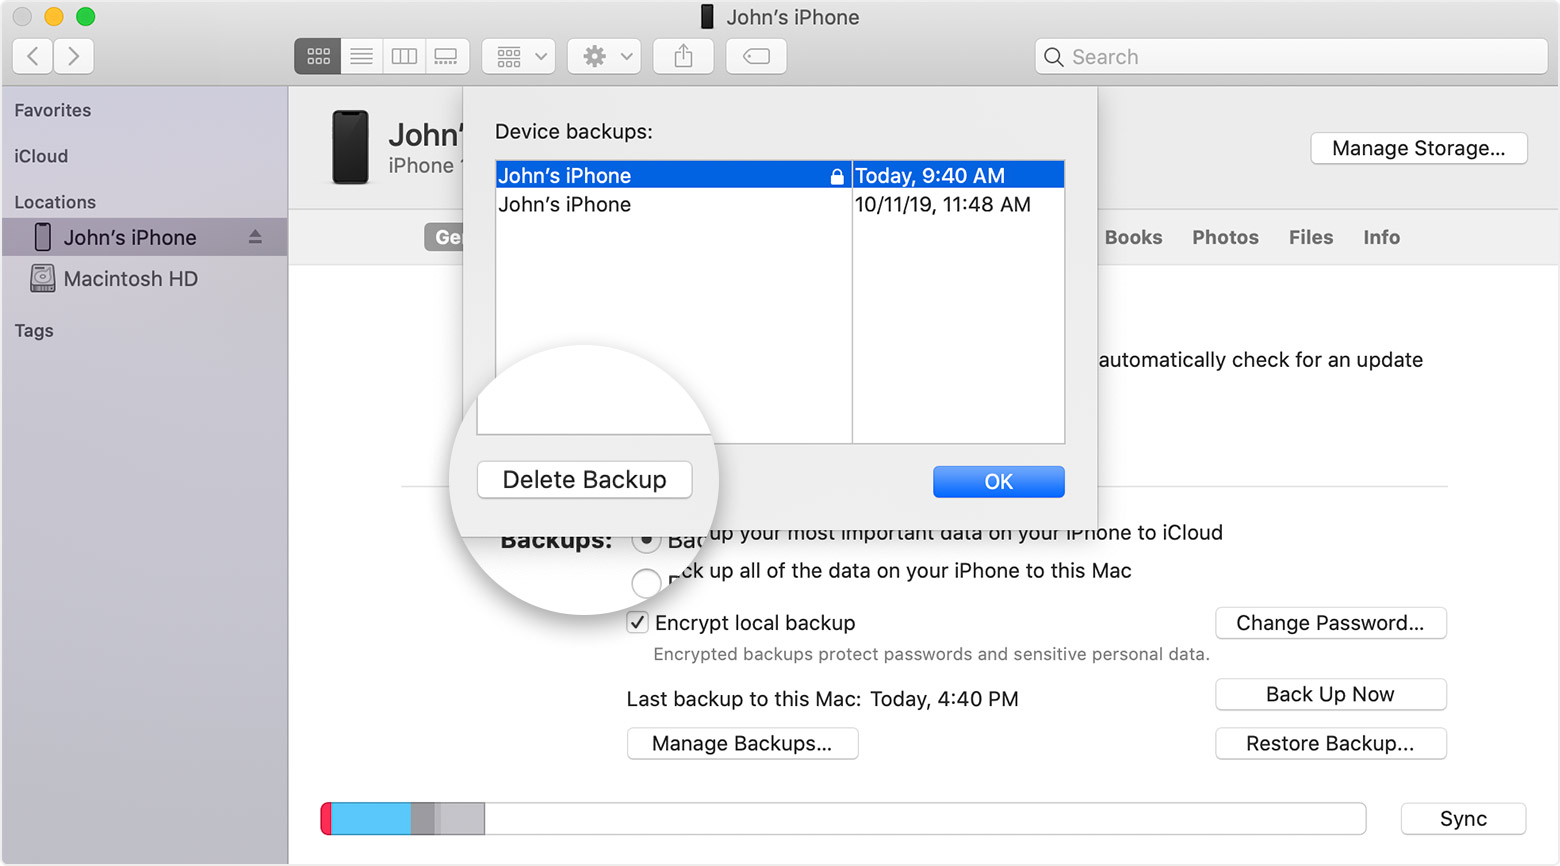
- On a Mac with macOS Catalina 10.15 or later, open the Finder. On a Mac with macOS Mojave 10.14 or earlier, or on a PC, open iTunes. Click your device.
- In the Finder, under the General tab, click Manage Backups to see a list of your backups. From here, you can right-click on the backup that you want, then select Delete or Archive. In iTunes, choose Preferences, then click Devices. From here, you can right-click on the backup that you want, then choose Delete or Archive. Click OK when you’re finished.
- Click Delete Backup, then confirm.
Locate and manage backups stored in iCloud
If you use iCloud Backup, you won’t find a list of your backups on iCloud.com. Here’s how to find your iCloud backups on your iOS or iPadOS device, Mac, or PC.
On your iPhone, iPad, or iPod touch:
- Using iOS 11 or later and iPadOS, go to Settings > [your name] > iCloud > Manage Storage > Backups.
- Using iOS 10.3, go to Settings > [your name] > iCloud. Tap the graph that shows your iCloud usage, then tap Manage Storage.
Tap a backup to see more details about it, choose which information to back up, or delete the backup.
You can choose which content to back up only from the Settings menu of the device that stores that content. For example, while you can view your iPad backup from your iPhone, you can choose which iPad content to back up only from the Settings menu of your iPad.
On a Mac with macOS Catalina 10.15 or later:
- Choose Apple () menu > System Preferences.
- Click Apple ID.
- Click iCloud.
- Click Manage.
- Select Backups.
On a Mac with macOS Mojave 10.14 or earlier:
- Choose Apple () menu > System Preferences.
- Click iCloud.
- Click Manage.
- Select Backups.
- Open iCloud for Windows
- Click Storage.
- Select Backup.
Источник
Set up Find My on your iPhone, iPad, iPod touch, or Mac
Make sure that you set up Find My so that if you ever lose a device or item, including your paired AirPods, Apple Watch, or a personal item with an AirTag attached, you can locate it.
How to turn on Find My for your iPhone, iPad, or iPod touch
- Open the Settings app.
- Tap your name, then tap Find My.
- If you want friends and family to know where you are, turn on Share My Location.
- Tap Find My [device], then turn on Find My [device].
- To see your device even when it’s offline, turn on Find My network.*
- To have the location of your device sent to Apple when the battery is low, turn on Send Last Location.
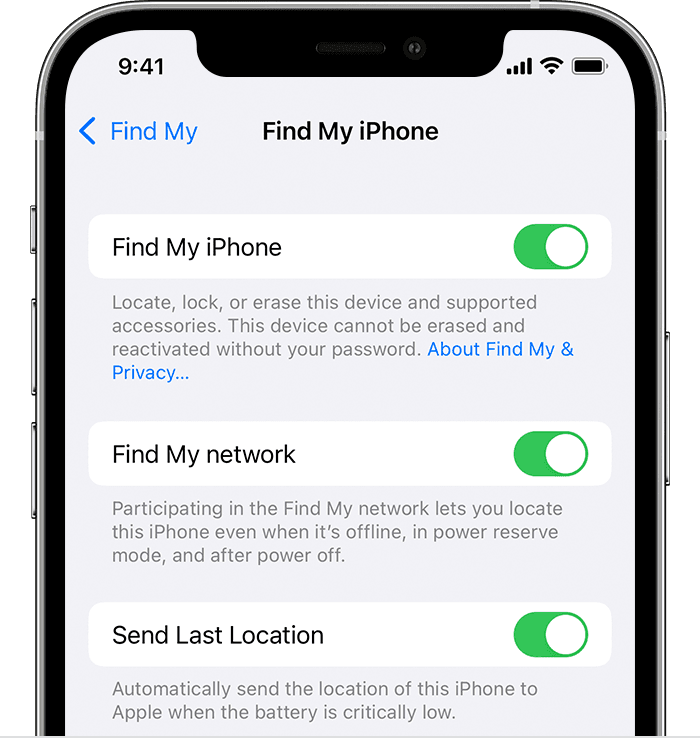
If you want to be able to find your lost device on a map, make sure that Location Services is turned on. To do this, go to Settings > Privacy > Location Services, and turn on Location Services.
* The Find My network is an encrypted, anonymous network of hundreds of millions of Apple devices that can help you locate your device.
How to add your AirPods, Apple Watch, or Beats product to Find My
If your AirPods, Apple Watch, or supported Beats product are paired with your iPhone, they’re automatically set up when you turn on Find My iPhone.
To make sure you can find your devices even if they’re powered off or disconnected, check that Find My network is turned on.
Источник
One app to find it all.
The Find My app makes it easy to keep track of your Apple devices. Locate items you’ve attached AirTag to. And keep up with friends and family. It works on iPhone, iPad, and Mac — even if your missing devices are offline. And your privacy is protected every step of the way.
Find your Apple devices.
You take your devices everywhere. Which means you might leave them anywhere. Whether they’re under a sofa pillow or in a conference room, chances are they won’t be lost for long. You can get help finding your iPhone, iPad, iPod touch, Apple Watch, Mac, AirPods, or AirTag right in the Find My app.
See all your devices on a map.
Is your iPad at home or back at the office? Use the map to get a full picture of where your devices are — and where a missing one might be. Some devices can also mark their location when the battery is critically low, to help you find them even if they run out of power.
Compatible with
- iPhone
- iPad
- iPod touch
- Apple Watch
- Mac
- AirPods
- AirTag
Compatible with
- iPhone
- iPad
- iPod touch
- Apple Watch
- Mac
- AirPods
- AirTag
Play a sound to
find your device.
When you can’t find something but think it’s nearby or around others who might hear it, you can play a sound to pinpoint its location. Your AirPods play a specifically designed sound that can project across a room — and even farther.
Compatible with
- iPhone
- iPad
- iPod touch
- Apple Watch
- Mac
- AirPods
- AirTag
Compatible with
- iPhone
- iPad
- iPod touch
- Apple Watch
- Mac
- AirPods
- AirTag
Display a message for someone who finds it.
If your device or AirTag goes missing, you can put it in Lost Mode. That starts tracking its location, sends you a notification when it pings the network, and sets your passcode to protect your data. You can also let people know how to reach you. They can simply view your message on your device’s Lock Screen, or tap your AirTag with their smartphone to get your contact number. 1
Compatible with
- iPhone
- iPad
- iPod touch
- Apple Watch
- Mac
- AirTag
Compatible with
- iPhone
- iPad
- iPod touch
- Apple Watch
- Mac
- AirTag
Erase it with ease.
Worried that your device has fallen into the wrong hands? You may want to erase it remotely to delete your personal data and reset your iPhone, iPad, iPod touch, Apple Watch, or Mac. If you retrieve it, you can restore your data from your iCloud backup.
Compatible with
- iPhone
- iPad
- iPod touch
- Apple Watch
- Mac
Compatible with
- iPhone
- iPad
- iPod touch
- Apple Watch
- Mac
Lock it down. Automatically.
Activation Lock is designed to prevent anyone else from using or selling your device. 1 When you enable Find My on your device, Activation Lock is turned on automatically. Your Apple ID and password will then be required in order to erase or reactivate your device.
Compatible with
- iPhone
- iPad
- iPod touch
- Apple Watch
- Mac
Compatible with
- iPhone
- iPad
- iPod touch
- Apple Watch
- Mac
You can even find devices that are offline.
If your missing device can’t connect to the internet, the Find My app can still help you track it down using the Find My network — hundreds of millions of iPhone, iPad, and Mac devices around the world. Nearby devices securely send the location of your missing device to iCloud, then you can see where it is in the Find My app. It’s all anonymous and encrypted to protect everyone’s privacy.
AirTag can help you find just about anything.
Misplaced your keys? Forgot your purse? If they have AirTag attached, they won’t be lost for long. The Find My network can help you track down items on a map. You can play a sound on your AirTag to find something hiding nearby — you can even get the distance and direction to your AirTag with Precision Finding. 2
Find your friends.
Invite friends and family members to share their locations. So you can keep in touch with one another, coordinate around an event, or know when a family member has arrived home safely.
See where everyone is on a map.
When you share your location with friends, it’s easier for you to find each other and stay connected. Share your location for an hour, a day, or indefinitely — it’s up to you.
Know when they leave. Know when they arrive.
If you like, you can get notifications when your child arrives at school or a family member leaves work. Notifications are easy to set up, and each person gets the choice to opt in. So everyone’s privacy is respected.
What else can Find My find?
Find My technology can now be built into all kinds of things — like bikes, headphones, and more. So anything that works with Find My can be added right next to all your Apple stuff in the Find My app.
Everyone’s location data stays private.
Just like every Apple product, Find My is designed to put you in control of your data. Location information is only sent to Apple when you actively locate your device, mark it as lost, or enable Send Last Location. Data is encrypted on Apple’s servers and kept for no more than 24 hours. And when the Find My network is used, everyone’s information is kept private — even from Apple.
Источник


