Полный список
В этом уроке мы:
— научимся обращаться из кода к View-элементам на экране и менять их свойства
Project name: P0081_ViewById
Build Target: Android 2.3.3
Application name: ViewById
Package name: ru.startandroid.develop.viewbyid
Create Activity: MainActivity
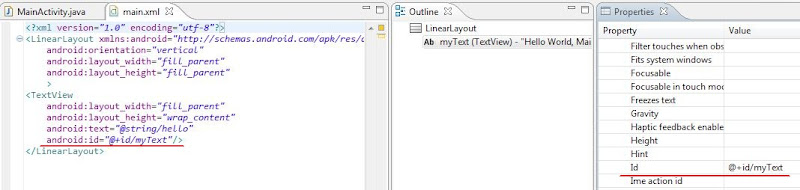
Чтобы обратиться к элементу экрана из кода, нам нужен его ID. Он прописывается либо в Properties, либо в layout-файлах, как вам удобнее. Для ID существует четкий формат — @+id/name, где + означает, что это новый ресурс и он должен добавиться в R.java класс, если он там еще не существует.
Давайте откроем main.xml, для TextView укажем и сохраним
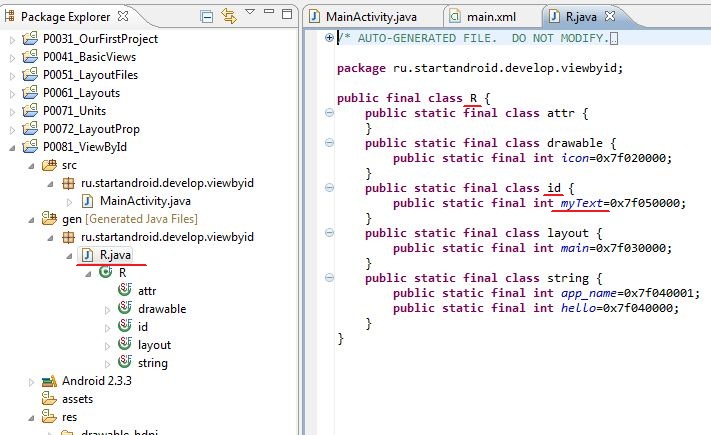
Теперь откроем R.java и видим, что для класса id появилась константа myText. Т.е. чтобы к ней обратиться, надо написать R.id.myText.
Она связана с элементом TextView и мы можем ее использовать, чтобы обратиться к элементу программно. Для этого нам понадобится метод findViewById. Он по ID возвращает View. Давайте напишем вызов этого метода. Напомню, что пока мы пишем наш код в методе onCreate. Это метод, который вызывается при создании Activity. Если вдруг непонятно, куда писать, можно подсмотреть в конец урока, там я выложил код.
Откроем MainActivity.java и после строки с вызовом метода setContentView напишем:
Если View подчеркнуто красным, то скорей всего этот класс не добавлен в секцию import. Нажмите CTRL+SHIFT+O для автоматического обновления импорта.
Теперь myTextView (типа View) – это наш TextView на экране. Но тип View – это предок для TextView (и остальных View-элементов). И он нам не подходит, если мы хотим проделывать операции соответствующие TextView. Поэтому нам необходимо преобразование View в TextView. Изменим наш код на следующий:
Теперь myTextView имеет тип TextView, а результат метода findViewById мы преобразуем из View в TextView. Теперь мы можем применять к myTextView методы класса TextView. Для примера возьмем метод setText. Сейчас отображаемый текст = Hello World, MainActivity!. Мы его программно поменяем на New text in TextView
Сохраняем, запускаем (CTRL+F11) и видим, что текст изменился

Добавим на экран кнопку (Button), текст оставим по умолчанию. Сохраняем — CTRL+SHIFT+S (если не сохранить, то в R.java не появится ID).
Обратите внимание, что у меня совпадает имя объекта и ID

Они друг другу не мешают и так делать даже логичнее. Это остается на ваше усмотрение. Так, кнопку мы нашли, теперь давайте изменим ее текст:
Запустим приложение. Текст на кнопке поменялся, на кнопку можно понажимать, но ничего происходить не будет. Т.к. мы нигде не указывали, что надо делать при нажатии. Этим займемся на следующем уроке. А пока давайте сделаем кнопку неактивной.
Мы поменяли параметр Enabled. Теперь на кнопку нельзя нажать. Сохраним, запустим и убедимся.
Добавим CheckBox, По умолчанию галочка не стоит. Давайте поставим ее программно, для этого используется метод setChecked, который меняет параметр Checked.
Запустив приложение видим, что код сработал.
Как видите – все несложно. Используем метод findViewById, чтобы по ID получить объект соответствующий какому-либо View-элементу (Button, TextView, CheckBox) и далее вызываем необходимые методы объектов (setText, setEnabled, setChecked).
В итоге должен получиться такой код:
На следующем уроке:
— научимся обрабатывать нажатие кнопки
Присоединяйтесь к нам в Telegram:
— в канале StartAndroid публикуются ссылки на новые статьи с сайта startandroid.ru и интересные материалы с хабра, medium.com и т.п.
— в чатах решаем возникающие вопросы и проблемы по различным темам: Android, Kotlin, RxJava, Dagger, Тестирование
— ну и если просто хочется поговорить с коллегами по разработке, то есть чат Флудильня
— новый чат Performance для обсуждения проблем производительности и для ваших пожеланий по содержанию курса по этой теме
Источник
findViewById in Kotlin

Or how and why we have two ways to avoid it
In Android, if you want to change the properties of views from your layout, like changing the text of a TextView or adding an onClickListener , you would have to first assign that view’s id to a variable by calling findViewById . For example, if you only had one TextView with an id of textView, you’d need to write the following Kotlin code:
As you can imagine, this gets pretty verbose for a large number of views. With Kotlin, we have two separate ways to avoid declaring variables and writing findViewById code:
- Kotlin Android Extensions (JetBrains’ approach)
- Data Binding (Google’s approach)

Now let’s look at how you use each of the new approaches:
1. Kotlin Android Extensions
To solve the issue of writing useless code, JetBrains has created the Kotlin Android Extensions which have a number of features, but exist primarily to avoid the need for findViewById code. Using them is straightforward, you simply need to import kotlinx.android.synthetic.main.activity_main.* and then you simply reference views by their id from the layout file, for example:
This is super useful, because it makes all of the code we wrote initially unnecessary. The way it works is basically it calls findViewById itself and it creates a cache of views it references any time you want to access that view again.
However, there are a number of issues with this, primarily that it’s Kotlin-only and that it still runs the expensive findViewById operations. For a more in-depth look at the downsides, have a look at this excellent article:
The Argument Over Kotlin Synthetics
It all started with a commit message
As a result, Google recommends not using them, and instead using:
2. Data Binding
To solve the same issue, as well as add some extra functionality (for example observing data changes), Google has created the Data Binding Library. Using this is a bit more involved than Kotlin Android Extensions, but in theory it allows for more complex manipulation of the data and, most importantly, it avoids findViewById calls entirely by creating an object that already contains references to all the views that have ids.
To use it, you first need to enable data binding in your app’s build.gradle
Then, you need to wrap each layout xml file with a tag.
Finally, need to create a variable to reference the object holding all the view ids:
After that, we can access all views using their ids like so:
Both approaches offer multiple benefits and expanded functionality so I encourage digging deeper into them if you’re curious, I just wanted to show you how each is used strictly in the context of avoiding writing boilerplate code. If you have any questions you’re welcome to ask them in the comments section below.
Thanks for reading this article. You can connect with me on LinkedIn.
I’m currently looking for a job in the Geneva area , Switzerland, so please contact me if you know someone in need of a Mobile Developer with Java/Kotlin (Android) and JavaScript (React Native Android/iOS) experience.
If you liked this article, please hit the clap icon 👏 to show your support.
Источник
How to access a view programmatically using findViewById – Kotlin Android
In this tutorial, we shall learn how to access a View programmatically using findViewById(int id) method in Kotlin Android with examples for EditText, Button, etc.
findViewById(int id) is very useful function to access or update properties of Views (Direct and Indirect Classes of android.view.View). Some of the regularly used Views are LinearLayout, TextView, Button, EditText, ImageView etc.
Access a View Programmatically using findViewById method

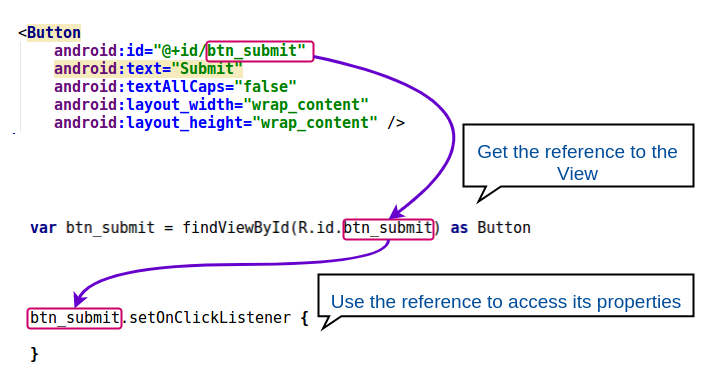
To find a view programmatically, the View (LinearLayout / TextView / Button / ImageView / EditText etc.) should have been set with an id in the layout xml file as shown below :
And in the Kotlin file, the View can be assigned to a variable using findViewById method as shown below :
Reference of Button view is loaded to the variable, btn_submit. The reference could be used to access or modify the properties of the view.
We shall look into an example Login Form Kotlin Android Project, where there are four views that we access programmatically, and assign an OnClickListener to Button.
Following is the login form activity layout xml file that has views with id s assigned.
activity_main.xml
And in the following Kotlin file, we shall access those views with ids et_user_name, et_password, btn_reset and btn_submit.
MainActivity.kt
Conclusion
In this Android Tutorial, we have learnt how to access a View programmatically using findViewById(int id) method in Kotlin Android with examples for EditText, Button, etc.
Источник


