- Dedicated one-app device with Android Management API
- Android app
- Android Management API
- Google Play
- Conclusion
- Set Up Device for Development
- Enable Debugging on the Device
- Android 9.0+
- Android 8.0 and Android 8.1
- Android 7.1 and lower
- Verify that USB debugging is enabled
- Android 9.0+
- Android 8.0 and Android 8.1
- Android 7.1 and lower
- Connect the device to the computer
- Alternate connection via Wifi
- Connecting over WiFi
- Troubleshooting
- Install USB Drivers
- Download the USB Drivers
- Installing the USB Driver
- Summary
Dedicated one-app device with Android Management API


In Ackee we, Android developers, are mostly dealing with Store-oriented apps, aimed at the broad public. Shared economy, food and grocery delivery, car management, education, job finding, advertising: apps in these areas are usually easily discoverable and aren’t limited to specific organizations, devices or accounts. But sometimes, our client’s requirement is to develop an internal app for their corporation with different access levels, limitations, remote configuration and strong emphasis on security. Ticketing, logistics, courier navigation are some of the use cases for closed to the public enterprise apps.
Meeting such requirements isn’t so much about the app development itself, but more about MDM (Mobile device management). There is a lot of different MDM (Mobile device management) solutions on the market and the choice will depend on particular case and on corporation infrastructure. But in this post, I will talk about Android Management API, simple and scalable solution from Google, which we chose for the ticketing app that we developed recently.
Our first requirement was to restrict our client devices to one app only — the ticketing app we’ve developed (to make it either locked to the device or to make it work in kiosk mode with minimum functionality). The second requirement is the ability to make changes in device configurations remotely without touching the device. And the last one is to provide automatic installation and updates of the app on all enterprise devices.
Android Management API allows all of this and here are the other reasons behind our choice:
- Made by Android (Google): smooth integration with Android SDK, no need for third-party software
- Simple but scalable: really easy to get it going with basic configuration, but new functions are easy to add in the future
- Support of almost all Android devices (6.0+)
- No need for custom backend solution (but may be integrated)
Now let’s take a look at what needs to be done to make our app run on dedicated device.
Android app
Android supports two modes for dedicated devices: more strict lock task mode (status bar and system buttons are hidden, the app completely blocks the screen) and app pinning mode (temporary pins the app to home screen, the user may leave the mode).
For our use case, we chose to completely lock the screen. The only thing the developer has to do to enable lock task mode is to either start it from code for specific activity, or set the lockTaskMode attribute to “if_whitelisted” or “always” in AndroidManifest.xml file.
Android Management API
This is where all the magic happens. To run Android Management API on your device, you need to do a couple of things first.
- Create an enterprise . An enterprise is a resource that represents an organization. All we need to create one is a valid Gmail account not associated with any enterprise. For example, if the account is a part of another organization, we won’t be able to do it. An enterprise consists of policies and devices.
- Create a policy . A policy is a set of rules that defines the behavior of groups of devices that are bound to your enterprise. The changes in policy that are made via Android Management API are applied immediately to linked devices without any manual manipulations.
- Enroll a device . The last part is to bind our device to created policy. The easier way to do it is to create an enrollment token linked to particular policy and your enterprise. To provision device, it should be reset to factory settings. Then, the created enrollment token may be scanned as a QR code from QR code mode. To enter QR code mode, we need to tap the same spot on the welcome screen six times if you have Android 7.0+ or to enter afw#setup into sign-in field. And voilà, our device is now an enterprise device bound to particular policy.
The easier way to complete all these steps is to go through interactive quickstart guide provided by Google. Otherwise we have to call all these REST API commands manually or via APIs Explorer. Another option for bigger projects is to link Android Management API to enterprise backend. It allows even finer customizations and integrations with organization processes. To call the API from server, the service account is needed.
The simple policy example may be seen below.
More use cases and example policies for dedicated devices may be found here. All parameters for policies are listed here.
Google Play
After the device enrollment we have it linked with our policy. But even if we have our application allowed in the policy ( cz.ackee.example in the example above), we still have to install it on our device somehow. Of course, we can do it manually or via third party distribution channels, but then, we have to do it for each device separately and handle each new update manually. It wasn’t an option for us. But on the other hand, we didn’t want our application to be freely accessible and visible in Play Store.
The solution is really simple. We may publish our app to Google Play as a private app limited to our organization only. Then, if the device is linked to our organization, the app will be accessible through managed Google Play.
To do it we have to upload the app to Google Play and then, in Store Presence -> Pricing & Distribution -> User programs -> Managed Google Play, check Turn on advanced managed Google Play features -> Privately target this app to a list of organizations and choose your organization. If the organization account and Play Store account is the same, the option will be presented, otherwise, we have to add the ID of organization.
We may even test it in Alpha/Beta channels. All we have to do is to add our organization in Manage testers -> Organizations.
Now, if we have our application installType set to FORCE_INSTALLED in our policy, the application will be installed and updated automatically.
Conclusion
It is really simple to make it work with easiest configuration. On the other hand, as you may see, policies allow to precisely control device configuration and even change its purpose remotely in handful of clicks (we may change locked one-app device into multi-app kiosk if we want to).
The API is well documented, but, unfortunately, there isn’t much examples and best practices on the matter yet. Moreover, Google has couple similar products (Google Play EMM API for example), and it’s not hard to become confused while choosing your solution and searching the web for information.
Источник
Set Up Device for Development
This article explains how to setup an Android device and connect it to a computer so that the device may be used to run and debug Xamarin.Android applications.
After testing on an Android emulator, you will want to see and test your apps running on an Android device. You will need to enable debugging and connect the device to the computer.
Each of these steps will be covered in more detail in the sections below.
Enable Debugging on the Device
A device must be enabled for debugging in order to test an Android application. Developer options on Android have been hidden by default since version 4.2, and enabling them can vary based on the Android version.
Android 9.0+
For Android 9.0 and higher, debugging is enabled by following these steps:
- Go to the Settings screen.
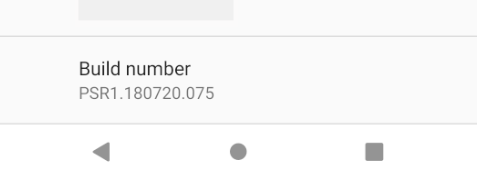
- Select About Phone .
- Tap Build Number 7 times until You are now a developer! is visible.
Android 8.0 and Android 8.1
- Go to the Settings screen.
- Select System.
- Select About Phone
- Tap Build Number 7 times until You are now a developer! is visible.
Android 7.1 and lower
- Go to the Settings screen.
- Select About Phone.
- Tap Build Number 7 times until You are now a developer! is visible.
Verify that USB debugging is enabled
After enabling developer mode on your device, you must ensure that USB debugging is enabled on the device. This also varies based on the Android version.
Android 9.0+
Navigate to Settings > System > Advanced > Developer Options and enable USB Debugging.
Android 8.0 and Android 8.1
Navigate to Settings > System > Developer Options and enable USB Debugging.
Android 7.1 and lower
Navigate to Settings > Developer Options and enable USB Debugging.
Once the Developer Options tab is available under Settings > System, open it to reveal developer settings:
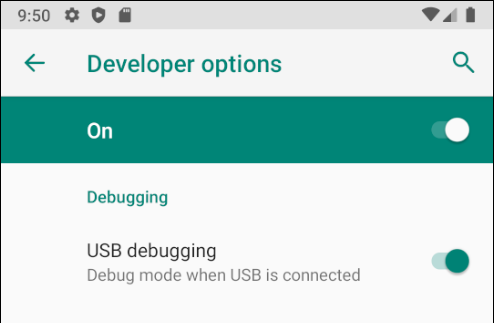
This is the place to enable developer options such as USB debugging and stay awake mode.
Connect the device to the computer
The final step is to connect the device to the computer. The easiest and most reliable way is to do so over USB.
You will receive a prompt to trust the computer on your device if you have not used it for debugging before. You can also check Always allow from this computer to prevent requiring this prompt each time you connect the device.

Alternate connection via Wifi
It is possible to connect an Android device to a computer without using a USB cable, over WiFi. This technique requires more effort but could be useful when the device is too far from the computer to remain constantly plugged-in via cable.
Connecting over WiFi
By default, the Android Debug Bridge (ADB) is configured to communicate with an Android device via USB. It is possible to reconfigure it to use TCP/IP instead of USB. To do this, both the device and the computer must be on the same WiFi network. To setup your environment to debug over WiFi complete the following steps from the command line:
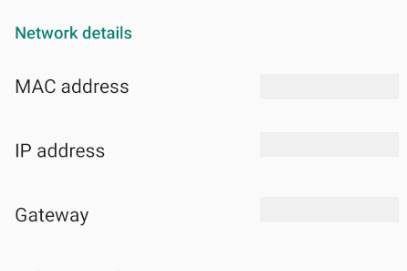
Determine the IP address of your Android device. One way to find out the IP address is to look under Settings > Network & internet > Wi-Fi, then tap on the WiFi network that the device is connected to, and then tap on Advanced. This will open a dropdown showing information about the network connection, similar to what is seen in the screenshot below:
On some versions of Android the IP address won’t be listed there but can be found instead under Settings > About phone > Status.
Connect your Android device to your computer via USB.
Next, restart ADB so that it using TCP on port 5555. From a command prompt, type the following command:
After this command is issued, your computer will not be able to listen to devices that are connected via USB.
Disconnect the USB cable connecting your device to your computer.
Configure ADB so that it will connect to your Android device on the port that was specified in step 1 above:
Once this command finishes the Android device is connected to the computer via WiFi.
When you’re finished debugging via WiFi, it’s possible to reset ADB back to USB mode with the following command:
It’s possible to request ADB to list the devices that are connected to the computer. Regardless of how the devices are connected, you can issue the following command at the command prompt to see what is connected:
Troubleshooting
In some cases you might find that your device cannot connect to the computer. In this case you may want to verify that USB drivers are installed.
Install USB Drivers
This step is not necessary for macOS; just connect the device to the Mac with a USB cable.
It may be necessary to install some extra drivers before a Windows computer will recognize an Android device connected by USB.
These are the steps to set up a Google Nexus device and are provided as a reference. Steps for your specific device may vary, but will follow a similar pattern. Search the internet for your device if you have trouble.
Run the android.bat application in the [Android SDK install path]\tools directory. By default, the Xamarin.Android installer will put the Android SDK in following location on a Windows computer:
Download the USB Drivers
Google Nexus devices (with the exception of the Galaxy Nexus) require the Google USB Driver. The driver for the Galaxy Nexus is distributed by Samsung. All other Android devices should use the USB driver from their respective manufacturer.
Install the Google USB Driver package by starting the Android SDK Manager, and expanding the Extras folder, as can be seen in the follow screenshot:
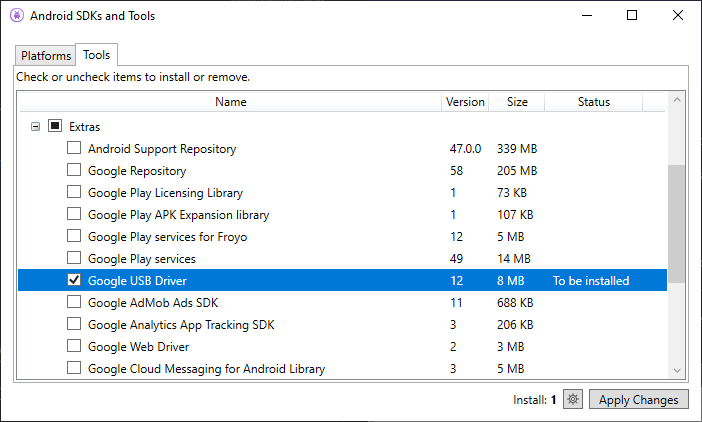
Check the Google USB Driver box, and click the Apply Changes button. The driver files are downloaded to the following location:
[Android SDK install path]\extras\google\usb\_driver
The default path for a Xamarin.Android installation is:
Installing the USB Driver
After the USB drivers are downloaded, it is necessary to install them. To install the drivers on Windows 7:
Connect your device to the computer with a USB cable.
Right-click on the Computer from your desktop or Windows Explorer, and select Manage .
Select Devices in the left pane.
Locate and expand Other Devices in the right pane.
Right-click the device name and select Update Driver Software . This will launch the Hardware Update Wizard.
Select Browse my computer for driver software and click Next .
Click Browse and locate the USB driver folder (the Google USB driver is located in [Android SDK install path]\extras\google\usb_driver).
Click Next to install the driver.
Summary
This article discussed how to configure an Android device for development by enabling debugging on the device. It also covered how to connect the device to a computer using either USB or WiFi.
Источник


