- How to Flash a ROM to Your Android Phone
- What’s a ROM?
- Apple AirPods 3
- Step One: Unlock Your Bootloader and Flash a Custom Recovery
- Step Two: Make a Backup of Your System, Apps, and Data
- How to Flash a Rom on Android
- Related Articles
- How to Flash Android Phone using PC Software
- Part 1. Reasons & Risks of Flashing Android Phone
- Part 2. Preparation Before Flashing Android Phone using PC Software
- Prerequisite 1: Installing USB Drivers
- Prerequisite 2: Unlocking the Bootloader
- Part 3. How to Flash Android Phone using PC Software
- Method 1: Flashing via iMyFone Fixppo (Easiest + Fastest)
- Method 2: Flashing via SP Flash Tool (MediaTek Devices) (Difficult)
- Method 3: Flashing via Odin (Samsung Devices) (Difficult)
How to Flash a ROM to Your Android Phone
Android is great, but sometimes, the version you get with your phone—whether its vanilla Android or something like Samsung’s TouchWiz—leaves a bit to be desired. Here’s how to install a new version of Android (or ROM) on your device for an even better Android experience.
What’s a ROM?
One of the best things about the openness of the Android platform is that if you’re unhappy with the stock OS, you can install one of many modified versions of Android (called ROMs) on your device. A new ROM can bring you the latest version of Android before your manufacturer does, or it can replace your manufacturer-modded version of Android with a clean, stock version. Or, it can take your existing version and just beef it up with awesome new features—it’s up to you.
If you’re familiar with Linux, it’s sort of similar to installing a different Linux distribution. Each version of the OS has a specific goal in mind, and as such differs quite a bit from the others. Which one you choose is dependent on your priorities and how you use the device. You’ll need to unlock your bootloader and flash a custom recovery ( more info on that here ), but once you get the hang of it, it’s not too difficult.
Everything You Need to Know About Rooting Your Android Phone
We love Android, but rooting your phone can give you the opportunity to do so much more than your…
Apple AirPods 3
A whole new look
There are a lot of different ROMs out there, and if you’re looking for a place to start, check out our list of the five most popular . You can also check out this amazing chart which compares a ton of ROMs feature-by-feature, which is a great way to find the right one for you. Even if you have a Nexus phone with pure stock Android, ROMs are a great way to add new features and conveniences to Android.
Five Best Android ROMs
Whether you’re looking to upgrade an Android device forsaken by its manufacturer or you just want…
Note: We originally wrote this guide in 2010, but things have changed quite a bit, so we figured it’s time to revisit the process. Many of you Android vets already know how to do this, but hopefully newcomers will find this guide valuable—and maybe even you veterans will learn a thing or two. Let’s begin!
Step One: Unlock Your Bootloader and Flash a Custom Recovery
First, let’s clear up some confusion: Contrary to popular belief, you do not actually need to root your phone to flash a ROM—you just need to unlock your bootloader and flash a custom recovery. However, this process usually goes hand-in-hand with rooting—and most custom ROMs come with root access—so what you think of as «rooting your phone» is probably what you’re going to have to do first.
Unfortunately, we can’t go through this step in detail here, because it’s different for every phone! So, I highly recommend checking out our everything root guide to learn a bit more about what’s involved, what all the different terms mean, and what to watch out for. Then, search around sites like XDA Developers for instructions on how to unlock the bootloader of your specific phone, which recovery you should use (usually TWRP or ClockworkMod ), and how to flash it.
I also recommend rooting your phone during step one, since it’ll make the backup process in step two easier—and save you some hassle along the way. A lot of methods and one-click apps will root your phone anyways, so it might be included in the process. Again, this can vary from phone to phone. (If the instructions require you to flash SuperSU.zip, you can refer to step three of this guide for info on how to do that—ironically, it’s just like flashing a ROM).
NOTE: Unlocking your bootloader will most likely wipe your phone, and without root access, you won’t be able to back up very much. So, save anything you want to keep on your computer—you will have to set up your phone from scratch just this once before continuing.
When you’re done, return here and continue to step two for the rest of the ROMming process.
Step Two: Make a Backup of Your System, Apps, and Data
Now that you’ve got a custom recovery on your phone, the first thing you should do—before you ever make a big change to your system—is back it up. First, we’ll make a Nandroid backup, which is basically a image of your current system. That way, if something goes wrong, you can restore your phone to exactly the way it was before you started tweaking. This will save you a lot of hassle if something goes wonky (which, let’s be honest, can happen often). To do this:
- Reboot your phone and enter recovery mode. This is a bit different on every phone, but usually involves some permutation of pressing the power and volume buttons at the same time.
- Head to the «Backup» or «Nandroid» section of your recovery mode. The default settings should be fine. If given the option, give your backup a name that helps you remember what it is (like «Pre-CyanogenMod Backup 01-17-14»). Confirm your backup and let it run.
- Wait for the backup to finish. This may take awhile.
I also recommend making a second type of backup: your apps and settings. If you just unlocked your bootloader and wiped your phone, you can skip this step, but any time you flash a ROM in the future, you’ll want to back up your apps first, since you may have to wipe your phone before you flash. With a backup, you can easily restore those apps and data after flashing, making the process a lot simpler. We recommend using Titanium Backup .
Источник
How to Flash a Rom on Android
To flash a Rom means to reinstall Android system of your Android phone. The step will be quite simple that you need to do it just like that with one click on Ghost. Some users may wonder: is it possible that I fail flashing my Android phone and there’s something wrong with it after I flash it? To be frank, to flash your Android phone does no harm to your phone. If you flash a system of a new version and there’s something wrong with your phone after it, you can flash it to other version according to the instruction below:
1. Enter Android System Recovery, then, choose the option: «Flash zip from sdcard«.

2. All the zip files in the SD card are all listed. Find the file named «update.zip«. We named it «update» so as to find the ROM file easier. Find the ROM you placed in the sdcard and click to confirm.

3. Choose the ROM you need flashed and you’ll see the following window. Click the «Home» button.

4. Don’t press any key, otherwise the process will abort.

5. When «Install from sdcard complete» appear in the bottom of the screen, the flash completes.

6. After finishing, you’d better reset your Android phone. You are required to enter the fifth option-Wipe, in the Recovery Menu.

7. After you choose «Wipe«, you will see the following interface. Click the 5 options below and there will be a pop-up window to give you tips. Press the «Home» button and begin to wipe.

8. Finally, choose the first option of the recovery menu «Reboot system now» to restart your Android phone. And the flash completes.

Note:
1. If your Android phone have a Home button, press «Home» and «Power on» simultaneously so as to enter the recovery mode. However, if the «Home» button of your Android phone is a touch one, press the «Volume» button and the «Power on» button at the same time instead.
2. Download the ROM package before flashing your Android phone and named it «update.zip» and then store it in the directory menu of the SD Card.
3. Before flashing your Android phone, backup your notes, text messages, and other important files in advance.
Related Articles
 Ivy Bruce
Ivy Bruce is the Founder and Editorial Director at Recovery-Android Studio. You can also find her on Google+ and Twitter.

How to Transfer Videos from Computer to iPhone
![]()
User Guide of Phone to Phone Transfer Software

How to Recover Deleted File from Motorola Atrix

How to Transfer Music from Computer to Nexus
Источник
How to Flash Android Phone using PC Software
home_icon Created with Sketch.
Home > Android Tips > How to Flash Android Phone using PC Software
![]()
August 1, 2019 (Updated: September 9, 2021)
One beauty of Android is that it allows endless possibilities in terms of customization. This is what makes it so popular; you could have two Android phones from the same company that both look the same from the outside but are opposite in terms of how the UI (User Interface) looks.
One way of changing how your phone feels is by flashing the device. It may sound technical and a daunting task however, in reality, it is quite simple to flash your device. What exactly does it mean to «flash» your device? Put simply, you will install a custom ROM on your device. Essentially, you will be changing your current version of Android to a modified version; this could be from your device’s manufacturer (Samsung, Google, LG, etc) or one made by the android community.
Part 1. Reasons & Risks of Flashing Android Phone
Before you jump straight into flashing your device, you should be aware of the reasons as to why someone would like to flash their device but also the risks that come with flashing your phone.
- Bloatware: One main reason to flash your device is to remove any bloatware that comes with the device. As you are installing a custom ROM, you will be able to remove the bloatware.
- Customization: A new ROM may allow you to customize your device to the most precise detail you want. It will also give your phone a different feel.
- Performance: Normally, you would not be able to change how your CPU and GPU behave. However, a custom ROM may allow you to overclock your CPU and GPU to optimize the performance of these components for activities such as gaming. Battery life can also be increased as background activity can be reduced when the device is not being used.
- Updates: Most Android devices will stop receiving updates after a few years of release but if you install a community made custom ROM, you will be receiving updates more often and for longer.
All of this does come with some risks that you should carefully consider before flashing your device.
- Malfunctions: Some device features, such as some preinstalled applications may not be compatible with the custom ROM so they will not be able to function.
- Warranty: Flashing your phone will almost always void your warranty. The manufacturer will not repair an issue with the device even if it is not related to the installation of a custom ROM.
- Compatibility: Especially for less popular devices, not all custom ROMs may be compatible with your device.
Note: You WILL lose all data on your device when flashing the device. Make sure you create a backup of all the data on your device separately.

If you want to know how to flash the android phone with a computer, this article will show you how to flash your android device using iMyFone Fixppo, SP Flash Tool, and Odin. The Fixppo software is the easiest and fastest method for any user to repair a dead device and flashing firmware onto it. It automatically downloads the firmware, which means you are not at risk of downloading malicious software. It also completes the difficult steps required when using software such as Odin (see further below) so that you can repair your device as soon as possible.
Part 2. Preparation Before Flashing Android Phone using PC Software
Check the requirements below before you start to flash your phone.
- The device you want to flash
- PC
- USB Cable for your device
- Unlocked Bootloader
- Flashing software
- Android USB Drivers
- Custom ROM downloaded
If you use iMyFone Fixppo for Android, then no need to install Android USB drivers and download ROM.
Before following any of these methods, make sure your bootloader is unlocked and you have Android USB drivers installed for your device. Make sure that your device’s battery is above 50% before doing this.
Prerequisite 1: Installing USB Drivers
Samsung devices:
- Download the Samsung USB drivers from the Samsung developer’s website.
- Extract the zip file by right-clicking it (on windows), choosing «extract all» and then clicking extract.
- Open the extracted folder and run the «.exe» file.
- Click next, choose your language and click install. Wait for the installation to complete and click finish.
В MTK Devices:
- Download the Android CDC driver file from online and extract it (right-click, choose to extract all and extract).
- Opendevice manager by searching for it in Windows or by searching for «device manager» in Control Panel.
- In the device manager, click on your Computer’s name, click on the action button and «Add legacy hardware».
- Click on the «Next» button, choose the «Install the hardware that I manually select from a list (Advanced)» and click next.
- Choose the «have disk» option, click on «browse», locate the extracted driver folder and click on the «Android Gadget CDC Driver» file.
- Click on «OK«, «next«, wait for the driver to install and click «finish«.

If you get a Windows security box, click on «Install this driver software anyway».
Prerequisite 2: Unlocking the Bootloader
Samsung devices come with an unlocked bootloader, so you do not need to follow these steps. Here is a general guide.
- Download and install Android SDK tools.
- Download the drivers for your device (these can be found from your manufacturer’s website).
- Enable developer’s options and then enable USB Debugging in the developer’s options menu on your device.
- Get the unlock key for your device from your manufacturer’s website.
- Use command prompt to unlock the bootloader via fastboot commands.
Searching Google for your device’s bootloader unlocking method will give you a more in-depth method that you can follow.

Part 3. How to Flash Android Phone using PC Software
We will introduce 3 PC software here. A complete guide will be offered for each method. You can check the chart below to know the differences between them and choose a method you like.
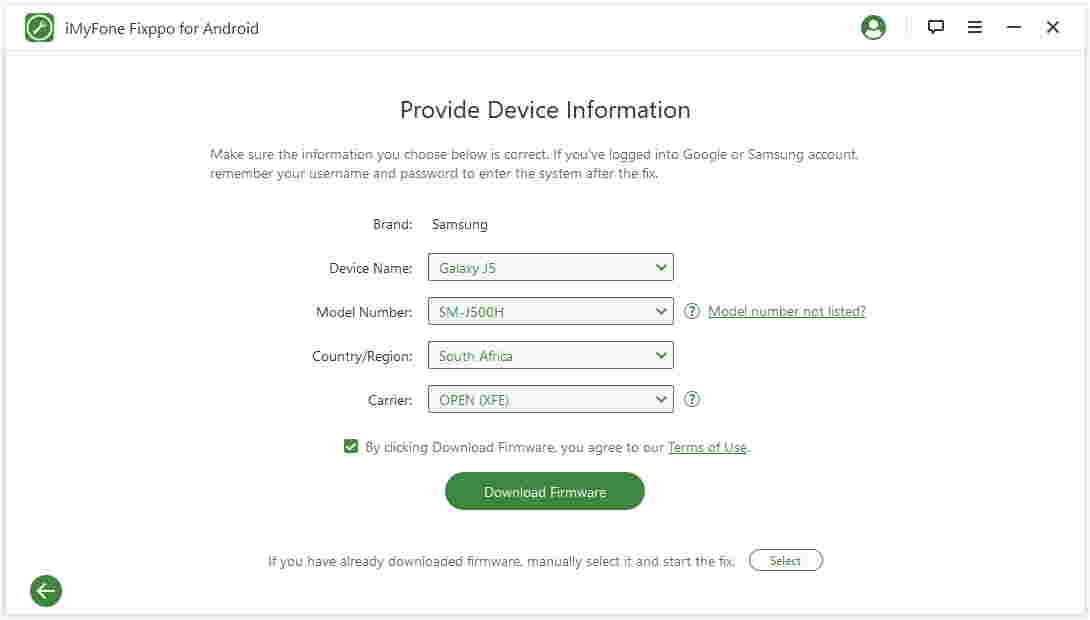
Method 1: Flashing via iMyFone Fixppo (Easiest + Fastest)
This is the easiest and fastest method for flashing Android firmware onto your device. iMyFone Fixppo for Android will work with android phones that are completely dead and requires no expert knowledge in Android. It is an Android system repair tool, but also an android flash tool.
- Download Fixppo for Android on your Windows PC.
- Launch Fixppo and click start on the software to continue.
- Fill in the details regarding your Android device on the software and click «Download Firmware». This will download and extract the firmware for your phone automatically without you having to do anything else.
- Confirm the information once the firmware has been downloaded and press start.
- Put your device is in Download mode (follow on-screen instructions).
- Connect your device to your PC to begin the flashing process.
- The process will start. The Fixppo software will automatically flash your phone and complete the whole process. Leave your phone until it reboots, as this happens when problems have been repaired on your device.
- Disconnect your device from the PC and use it as normal.
That is all you need to do using Fixppo. This is the easiest and best method for repairing your android device (phone or tablet) and to repair it so that you can continue to use it as previously.
Besides, iMyFone Fixppo for Android has been trusted by many individuals and websites. Thousands of people have already tried Fixppo for Android and can solve various complex Android system issues.
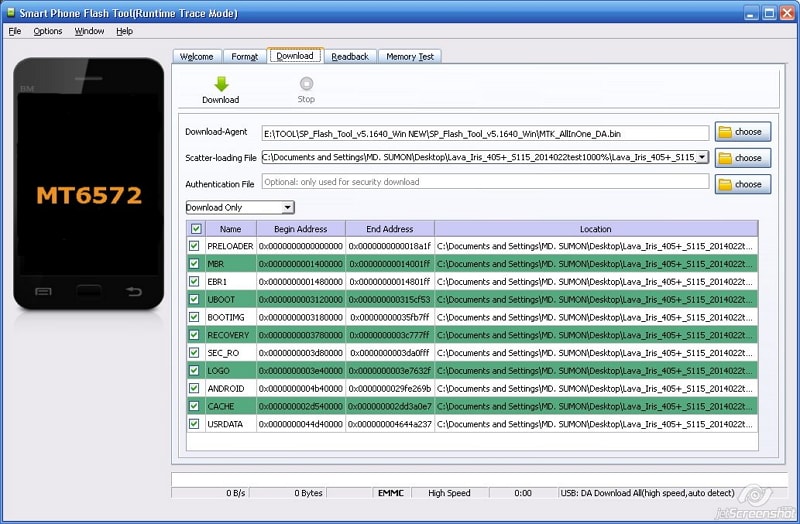
Method 2: Flashing via SP Flash Tool (MediaTek Devices) (Difficult)
- Power off your android device completely and remove the battery if it is removable.
- Download the ROM you want to flash your phone with (make sure the ROM is compatible) and extract the files.
ROM files from websites such as XDA developers are usually reliable.
- Download the SmartPhone(SP) Flash Tool on your computer.
- Extract the zip file by right-clicking on the .zip file and choose «extract all».
- Open the folder that has been extracted, find «flash_tool.exe» in the folder and run the file.
- When the tool has been executed, click on the «Download» tab if it hasn’t already been selected.
- When you are in the download tab, click on the «Choose» button on the line which says «Scatter-loading File».
- Locate your extracted ROM, go into the «Firmware» folder and select the «.txt» file that contains the word «Scatter».
- Once the file has been processed, click on the «Download» button.
- Connect your phone (make sure the power is turned off and the battery is removed if possible) and a volume key to make sure your phone has been recognized by the PC.
- Once completed, exit the SP flash tool and disconnect your phone.
Your phone has now been flashed to your desired ROM. Reboot your phone and you can now use your device normally.
Method 3: Flashing via Odin (Samsung Devices) (Difficult)
- Download the ROM you would like to install and extract it on your PC.
You can download the ROM from a range of websites, such as Sammobile. Make sure the ROM is compatible with your device.
Note: Do not downgrade your version of Android. Always upgrade the version as it will cause issues with your device.
- Download, extract and install Samsung USB Drivers on your PC.
- Download and extract the latest version of Odin on your PC.
- Put your phone in Download mode
- For devices with a physical home button: Power off your device. Hold down the volume down and home button keys simultaneously. When you get a screen with a warning, press the volume up key to put your device in download mode.
- If your device does not have a physical home button: Power off your device. I will be using the S8 as an example. Press and hold the Bixby and volume up buttons. Then press the power button until the power turns off. Release the buttons once a blue screen appears. Press the volume up key to boot into download mode.
- If these methods do not work on your device, a quick search online will confirm how to boot into download mode.
Search: Phone model + download mode
- Connect your phone to the PC via a USB cable.
- Launch the Odin software (it will be in the folder that you have extracted). You will see your device under the «ID: COM» label if connected.
- Once Odin is launched, click on the «AP» button. Browse into your extracted ROM folder through the Odin popup browser and click on the file located inside the ROM folder.
- Wait for the file to be added to Odin.
- Click on the Start button at the bottom of Odin and wait for the ROM to be flashed.
- Your phone will reboot and finalize the installation of the software.
- When your phone has completed the installation, disconnect your phone.

In short, using the Fixppo software is the quickest and easiest way for you to flash firmware onto your device. The other methods require you to download the firmware in advance and require more skill when flashing. This can lead to more errors and you potentially risk bricking your device.
Источник


