- Adding Flipper to Android apps with Gradle
- Dependencies
- Application Setup
- Diagnostics
- Android Snapshots
- Enabling plugins
- Having trouble?
- React Native Support
- Device type: React Native
- Native plugins for React Native
- Writing JavaScript plugins for React Native + Flipper
- Community React Native plugins for Flipper
- Set up your React Native App
- Using the latest Flipper SDK
- Manual Setup
- Troubleshooting Issues
- Mac Desktop app
- Flipper won’t launch on Mac
- Flipper shows weird render artifacts
- iOS Simulator missing from devices dropdown
- iOS physical device not showing up
- App on physical iOS device stuck in ‘connecting. ‘ state
- No plugins showing up for your device
- Connection Issues
- Android
- Known Incompatibilities
- File an Issue
- Android
- Exception from call site #4 bootstrap method
- Duplicate class com.facebook.jni.*
- React Native
- Q: I don’t see the ‘React Native’ device
- Q: I see my device / emulator, but I can’t see the app
- Q: I see my app, but I don’t see the external plugins I’ve installed
- Q: On iOS it seems that the Flipper dependencies are compiled when making a release build
- Q: The React DevTools don’t seem to connect
- Q: Cannot inspect an element in the React DevTools: «Could not inspect element with id . «
- Q: How to select a specific element in the React DevTools?
- Q: The Hermes Debugger does not connect
- iOS Build errors in React Native
- YogaKit.modulemap not found
- Swift errors
- Opting out from Flipper (iOS)
- Disable Flipper on CI builds (iOS)
Adding Flipper to Android apps with Gradle
To set up Flipper for Android, you need to add the neccessary dependencies to your app, initialize the Flipper client and enable the plugins you want to use. Optionally, you can hook up the diagnostics Activity to help you troubleshoot connection issues.
Dependencies
Flipper is distributed via Maven Central. Add the dependencies to your build.gradle file. You should also explicitly depend on soloader instead of relying on transitive dependency resolution which is getting deprecated with Gradle 5.
We provide a «no-op» implementation of some oft-used Flipper interfaces you can use to make it easier to strip Flipper from your release builds.
Please note that our flipper-noop package provides a limited subset of the APIs provided by the flipper package and does not provide any plugin stubs. It is recommended that you keep all Flipper instantiation code in a separate build variant to ensure it doesn’t accidentally make it into your production builds. Check out the sample app to see how to organise your Flipper initialization into debug and release variants.
Alternatively, have a look at the third-party flipper-android-no-op repository, which provides empty implementations for several Flipper plugins.
Application Setup
Now you can initialize Flipper in your Application’s onCreate method, which involves initializing SoLoader (for loading the C++ part of Flipper) and starting a FlipperClient .
Diagnostics
It’s recommended that you add the following activity to the manifest, which can help diagnose integration issues and other problems:
Android Snapshots
Feeling adventurous? We publish Android snapshot releases directly off of main .
You can get the latest version by adding the Maven Snapshot repository to your sources and pointing to the most recent -SNAPSHOT version.
Enabling plugins
Finally, you need to add plugins to your Flipper client. Above, we have only added the Layout Inspector plugin to get you started. See Network Plugin and Layout Inspector Plugin for information on how to add them, and also enable Litho or ComponentKit support. You can check the sample apps in the GitHub repo for examples of integrating other plugins.
Having trouble?
See the troubleshooting page for help with known problems.
Источник
React Native Support
The React Native and Developer tooling teams at Facebook work in close collaboration to make sure Flipper offers top-notch value out of the box for React Native development. Integration between React Native and Flipper is enabled out of the box in React Native version 0.62 and higher.
Flipper: The Extensible DevTool Platform for React Native
Device type: React Native
In Flipper there is a dedicated device type, “React Native”, that connects to a locally running Metro instance to interact with your React Native app. This device will be detected as soon as you fire up a Metro instance by running yarn run ios or yarn run android in your project.
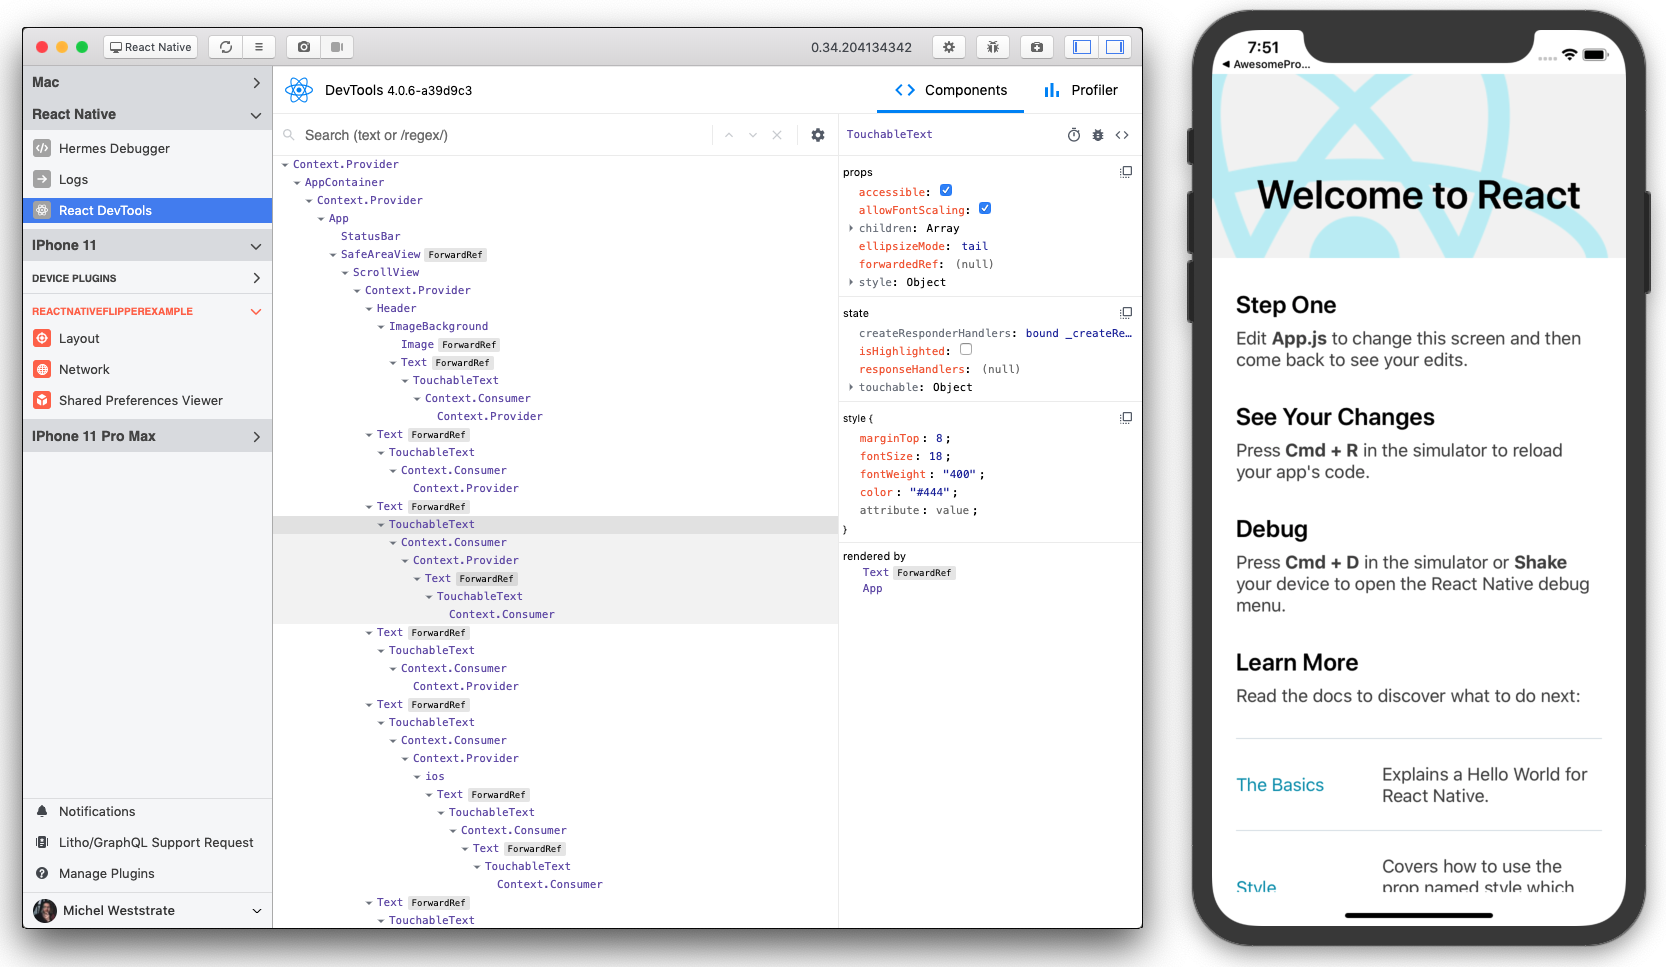
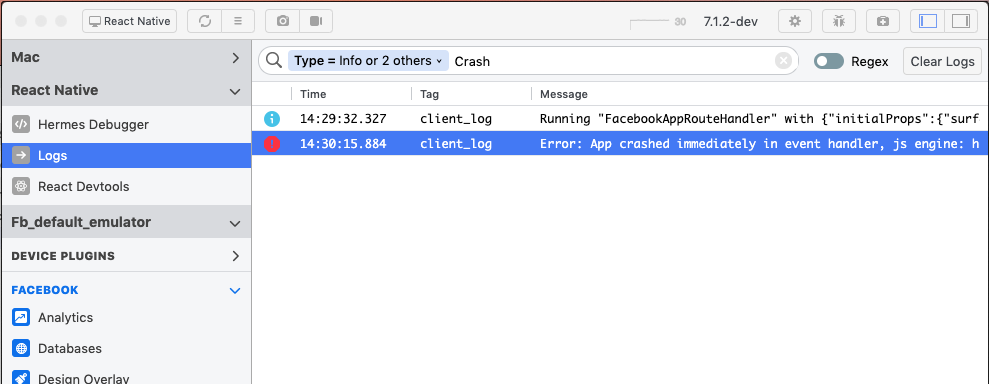
If Metro is connected, two new buttons will appear in Flipper’s main toolbar: “Reload” and “Open Dev Menu”. Both do exactly what their name suggests, without needing the agility of a pianist to get to the right keyboard combo inside your emulator. The “React Native” device will feature two plugins out of the box: “Logs” and “React DevTools”.
The React DevTools allows you to inspect the component tree and tune the props and state of your React components.
The Logs plugins will allow you to search, filter and even put watch expressions on your logging output. This offers a much richer way to interact with your logs compared to the terminal output of Metro.
Native plugins for React Native
Beyond the React Native specific Flipper plugins described above, with Flipper you will also inherit the plugin eco-system that exists for native Android and iOS apps. This means that you will be able to use plugins that are aimed at native apps for your React Native app as well. Example plugins include:
- Device logs
- Device crash reporter
- Inspecting network requests
- Inspecting app local databases
- Inspecting device preferences
- Inspecting cached images
- Inspecting native layout elements
Writing JavaScript plugins for React Native + Flipper
One of the greatest values of Flipper is its extensibility. Many teams across Facebook already have written their own one-off plugins that help with analysing very specific use cases. Writing plugins for Flipper doesn’t require any native code, as the Flipper SDK is exposed directly to JavaScript through the react-native-flipper package.
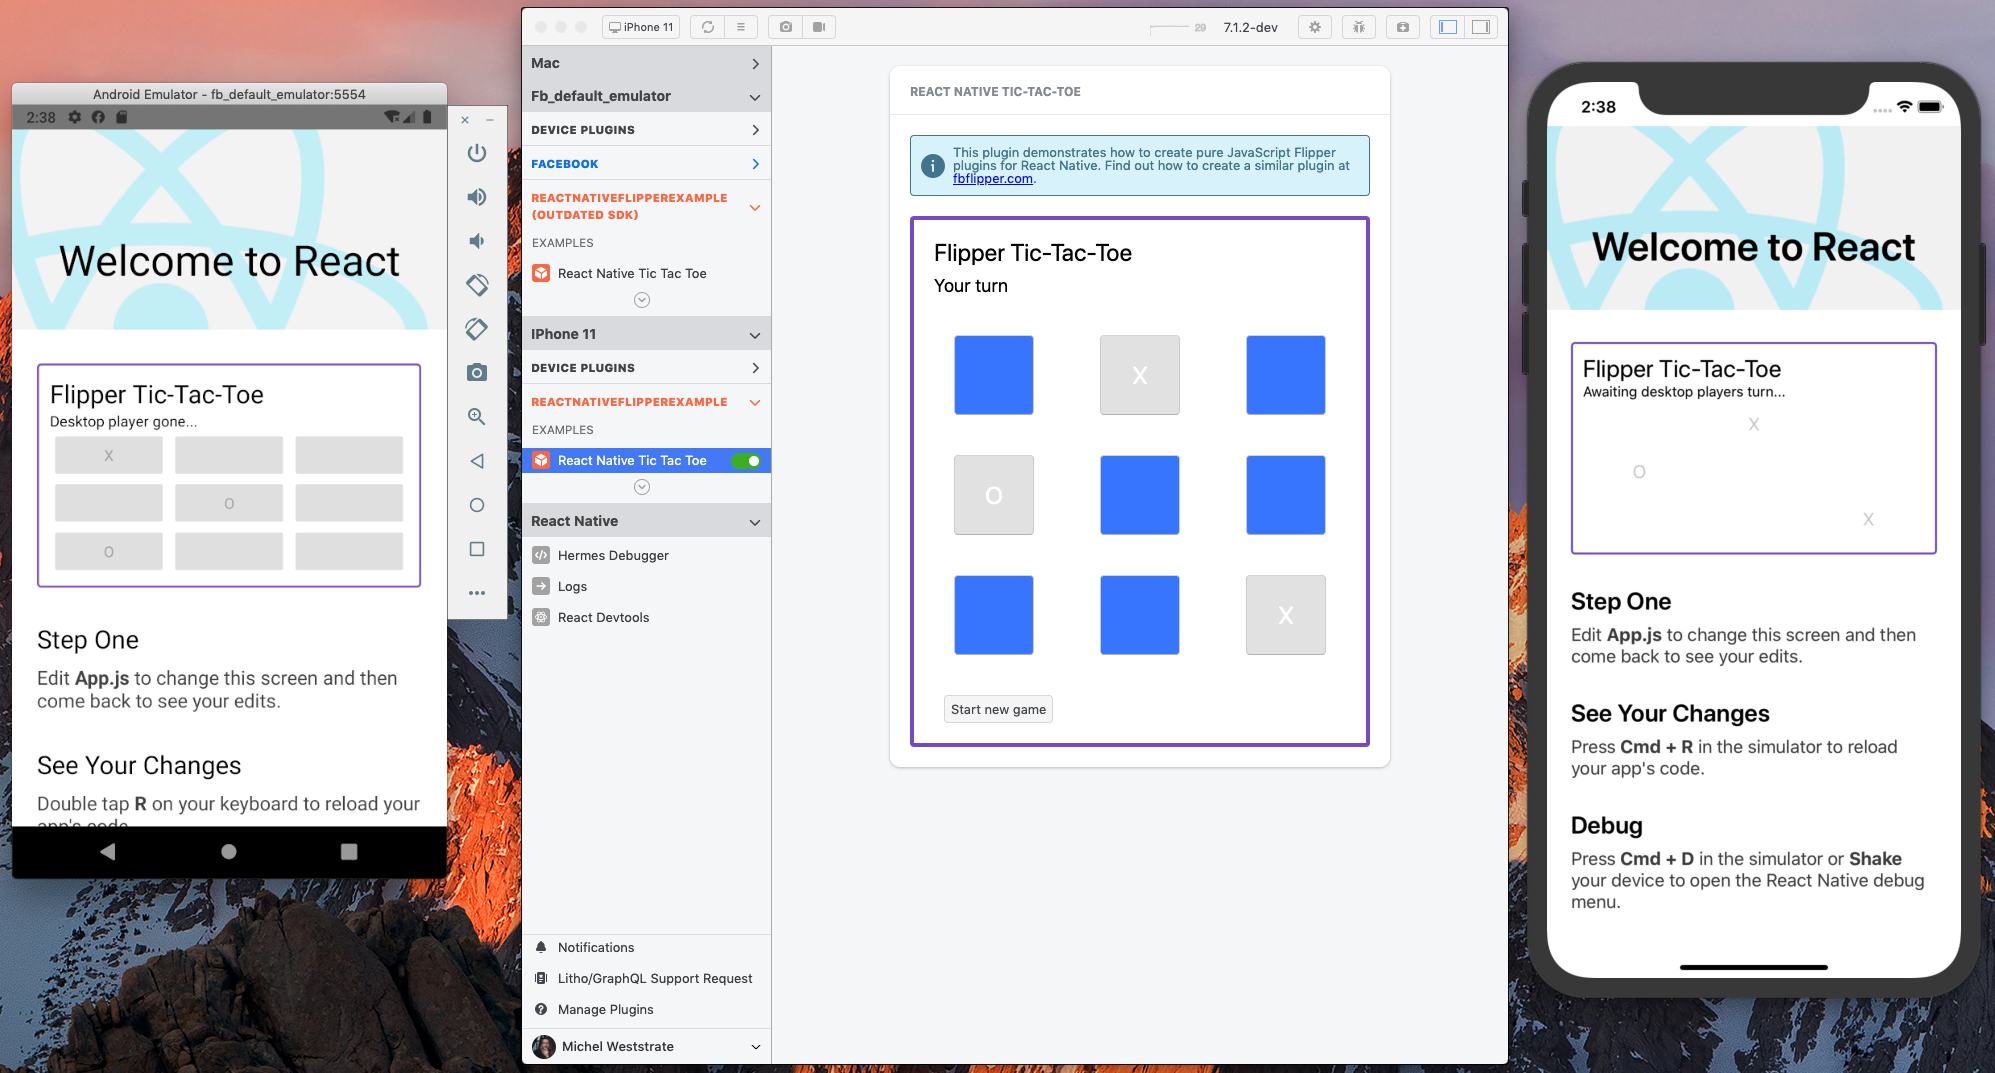
Example Flipper plugin: playing a game of Tic Tac Toe using Flipper and some emulators
If you would love to build a specific (or generic) extension for Flipper check out the following pointers! Plugins for Flipper can be distributed through NPM so sharing them is trivial.
Community React Native plugins for Flipper
The React Native community has also started to build plugins for Flipper.
Got your own Flipper plugin for React Native you want to plug here? Please sent us a Pull Request!
Источник
Set up your React Native App
Starting with React Native 0.62, after generating your project with react-native init , the Flipper integration is ready out of the box for debug builds:
- For Android, start the Flipper Desktop application, and start your project using yarn android . Your application will appear in Flipper.
- For iOS, run pod install once in the ios directory of your project. After that, run yarn ios and start Flipper. Your application will show up in Flipper.
By default, the following plugins will be available:
- Layout Inspector
- Network
- Databases
- Images
- Shared Preferences
- Crash Reporter
- React DevTools
- Metro Logs
Additional plugins can be installed through the plugin manager.
To create your own plugins and integrate with Flipper using JavaScript, check out our writing plugins for React Native tutorial!
Using the latest Flipper SDK
By default React Native might ship with an outdated Flipper SDK. To make sure you are using the latest version, determine the latest released version of Flipper by running npm info flipper .
- Bump the FLIPPER_VERSION variable in android/gradle.properties , for example: FLIPPER_VERSION=0.123.0 .
- Run ./gradlew clean in the android directory.
- Call use_flipper with a specific version in ios/Podfile , for example: use_flipper!( < 'Flipper' =>‘0.123.0’ >) .
- Run pod install in the ios directory.
Manual Setup
If you are not using a default React Native template or cannot use the upgrade tool, you can find instructions for how to integate Flipper into your projects in these guides:
Источник
Troubleshooting Issues
We hope that Flipper works well out of the box, but the software is a work in progress and problems will occur. Below are some known issues and steps you can take to try to resolve them.
Mac Desktop app
Flipper won’t launch on Mac
- If the window is appearing, try opening the Chrome DevTools within Flipper. To do so, from the View menu select Toggle Developer Tools or press CMD+Option+I and check if there are any errors on the console.
- Launch Flipper from the command line using /Applications/Flipper.app/Contents/MacOS/Flipper . This should give you some logs, that might be helpful when debugging.
- Delete
/.flipper and try relaunching Flipper.
Flipper shows weird render artifacts
This is a long standing MacOS + Electron issue outside our control. In general restarting your computer fixes the problem. For a quick, temporarily work around start Flipper with hardware acceleration disabled. Please note that this will consume a lot of CPU: FLIPPER_DISABLE_GPU=1 open -a Flipper .
iOS Simulator missing from devices dropdown
- Check that xcode-select -p shows the same XCode version that you’re using. If not, see xcode-select for how to select the correct version.
iOS physical device not showing up
Make sure idb is installed and configured in the Flipper settings.
App on physical iOS device stuck in ‘connecting. ‘ state
Make sure you are building and installing the application from source.
No plugins showing up for your device
- Check your device isn’t on the list of known incompatibilities.
- Make sure your version of Flipper is up to date.
- Make sure the mobile SDK you are using is relatively recent (
/.flipper .
Connection Issues
The Flipper SDK includes an in-app connection diagnostics screen to help you diagnose problems.
Android
This will only work if you added FlipperDiagnosticActivity to your AndroidManifest.xml . See getting started for help.
You’ll need to manually add this ViewController to your app to see the in-app diagnostics.
Known Incompatibilities
The following devices are known to be incompatible or face issues with Flipper:
- Some Samsung devices (Tracking Issue).
- Genymotion emulators on Android 8+ are reported to have issues.
File an Issue
Still not working? File an issue on GitHub with the chrome DevTools logs and the output from the diagnostics screen, if relevant.
Android
Exception from call site #4 bootstrap method
Build error after including the Flipper dependency:
This can happen because we include OkHttp3 as dependency which makes use of Java 8 features. There are two ways of dealing with this:
Enable Java 8 support
Add this to your Gradle config:
Exclude the OkHttp3 dependency
Alternatively, if you don’t plan on making use of OkHttp, you can exclude the dependency from the build entirely:
Duplicate class com.facebook.jni.*
This can occur when mixing different versions of FBJNI, a library we use to interact with native C++ code.
Speficially, this can happen when the versions 0.0.x and 0.1.x are mixed. Version 0.1.0 of FBJNI switched to using Google Prefab for distributing native artifacts, which made the split into combined, «java-only» and «header» packages redundant and only requires a single dependency in your projects.
When including both «fbjni-java-only:0.0.1» and «fbjni:0.1.0» in one project, you will now duplicate class errors during the build process. You must ensure that only one of the two versions is used in your entire dependency tree. Start by looking at ./gradlew :myapp:dependencies to see where the different version requirements come from. Then exclude the FBJNI dependency from one of them, e.g.
React Native
Make sure the project is using the latest Flipper SDK.
When using Flipper with React Native, two devices should show up:
- The ‘React Native’ device. This is the «device» that talks to the Metro server and shows plugins that connect to or through Metro, such as the React DevTools, the Hermes Debugger and Metro logs.
- The device on which your app is running (like SM760FS , Pixel 3 , android_emulator , iPhone 11 ). This is the device that Flipper connects to ADB / IDB. We primarily support emulators and USB connected devices.
Q: I don’t see the ‘React Native’ device
- Make sure that the Metro server is running.
- Make sure you are on React Native 0.62 or higher.
- Verify that the @react-native-community/cli version is 0.47.0 or higher (using yarn why @react-native-community/cli ).
Q: I see my device / emulator, but I can’t see the app
- Make sure you are running a debug build. Flipper only supports debug builds.
- If you are upgraded from RN cd android && ./gradlew clean , cd iOS && pod install —repo-update
- For iOS, make sure it works on a simulator first
- (Unconfirmed) check the deployment info target in the XCode project settings. Target should be iOS 9.0 .
Q: I see my app, but I don’t see the external plugins I’ve installed
- Make sure you’ve installed the desktop part of the plugin (usually through «Manage plugins» in Flipper). If no plugins show up under «Manage plugins» > «Status», make sure you’ve selected your running device in the Flipper toolbar (and not «React Native»).
- Make sure you’ve installed the app part of the plugin. Typically the installation instructions of the plugin itself need to be followed here.
- Make sure you’ve installed the latest version of react-native-flipper in your app, and run pod install in the iOS dir afterwards.
- Make sure you’ve restarted both Flipper and your app.
Q: On iOS it seems that the Flipper dependencies are compiled when making a release build
That is correct, the dependencies won’t be actually included in the release (when using react-native-flipper > 0.45), but sadly we can’t exclude those dependencies from the build process.
Q: The React DevTools don’t seem to connect
- Make sure there are no other instances of the React DevTools are running (For example a stand-alone version). Restart Flipper if needed after closing other tools.
- Make sure you have only one device running to connect to. If there are multiple devices, close them and try again (restart Flipper if needed).
- Make sure there is only one RN app running on the device
Q: Cannot inspect an element in the React DevTools: «Could not inspect element with id . «
The «Could not inspect element with id XXX» error will appear when selecting a specific element in the React DevTools, when the version of the DevTools shipped in Flipper is incompatible with the react-devtools-core package used by the React Native application.
Flipper supports using a globally installed react-devtools (after using npm install -g react-devtools@x.x.x ) instead of the embedded one. This should help with any compatibility issues.
Another way to fix this is to set the resolutions field in the package.json of the app to force a specific version and then run yarn install , for example:
Q: How to select a specific element in the React DevTools?
- Trigger the debug menu on your RN app (you can use the button in the Flipper toolbar for that)
- Use Show Inspector . Flipper will now follow the selection on your device.
Q: The Hermes Debugger does not connect
- Make sure the Hermes engine is enabled
- Make sure only one device with React Native is running
- Make sure there is only one RN app running on the device
- Make sure the React Native app is not in debug mode already (trigger dev menu, and make sure that Remote JS Debugging is not enabled).
iOS Build errors in React Native
First, make sure your cocoapods is up to date ( sudo gem install cocoapods ), and that you are using the latest FlipperKit.
For inexplainable build errors, clone and verify if our reference project builds and runs locally. If it does, we recommend to compare the package.json and ios/Podfile files with yours. If that doesn’t yield anything, compare the ios/Podfile.lock as well to verify any transitive pod dependencies need updating.
YogaKit.modulemap not found
- Make sure you are opening the .xcodeworkspace dir when building from XCode, not the project file. Pods based projects should always be opened this way.
- Make sure you did run cd ios && pod install .
- Restarting your machine seems to magically fix the issue for quite some people. This might especially be needed after doing an XCode upgrade.
- Make sure that the simulators are spawned by your current Xcode version. Force quite all simulators, run sudo xcode-select —switch /Applications/Xcode.app (update path were necessary), and start simulators & Flipper again.
- Make sure the iOS build target version aligns with the podfile and target iOS 11. Example
- Verify XCode has enough permissions.
- More solutions might be found in this thread.
Swift errors
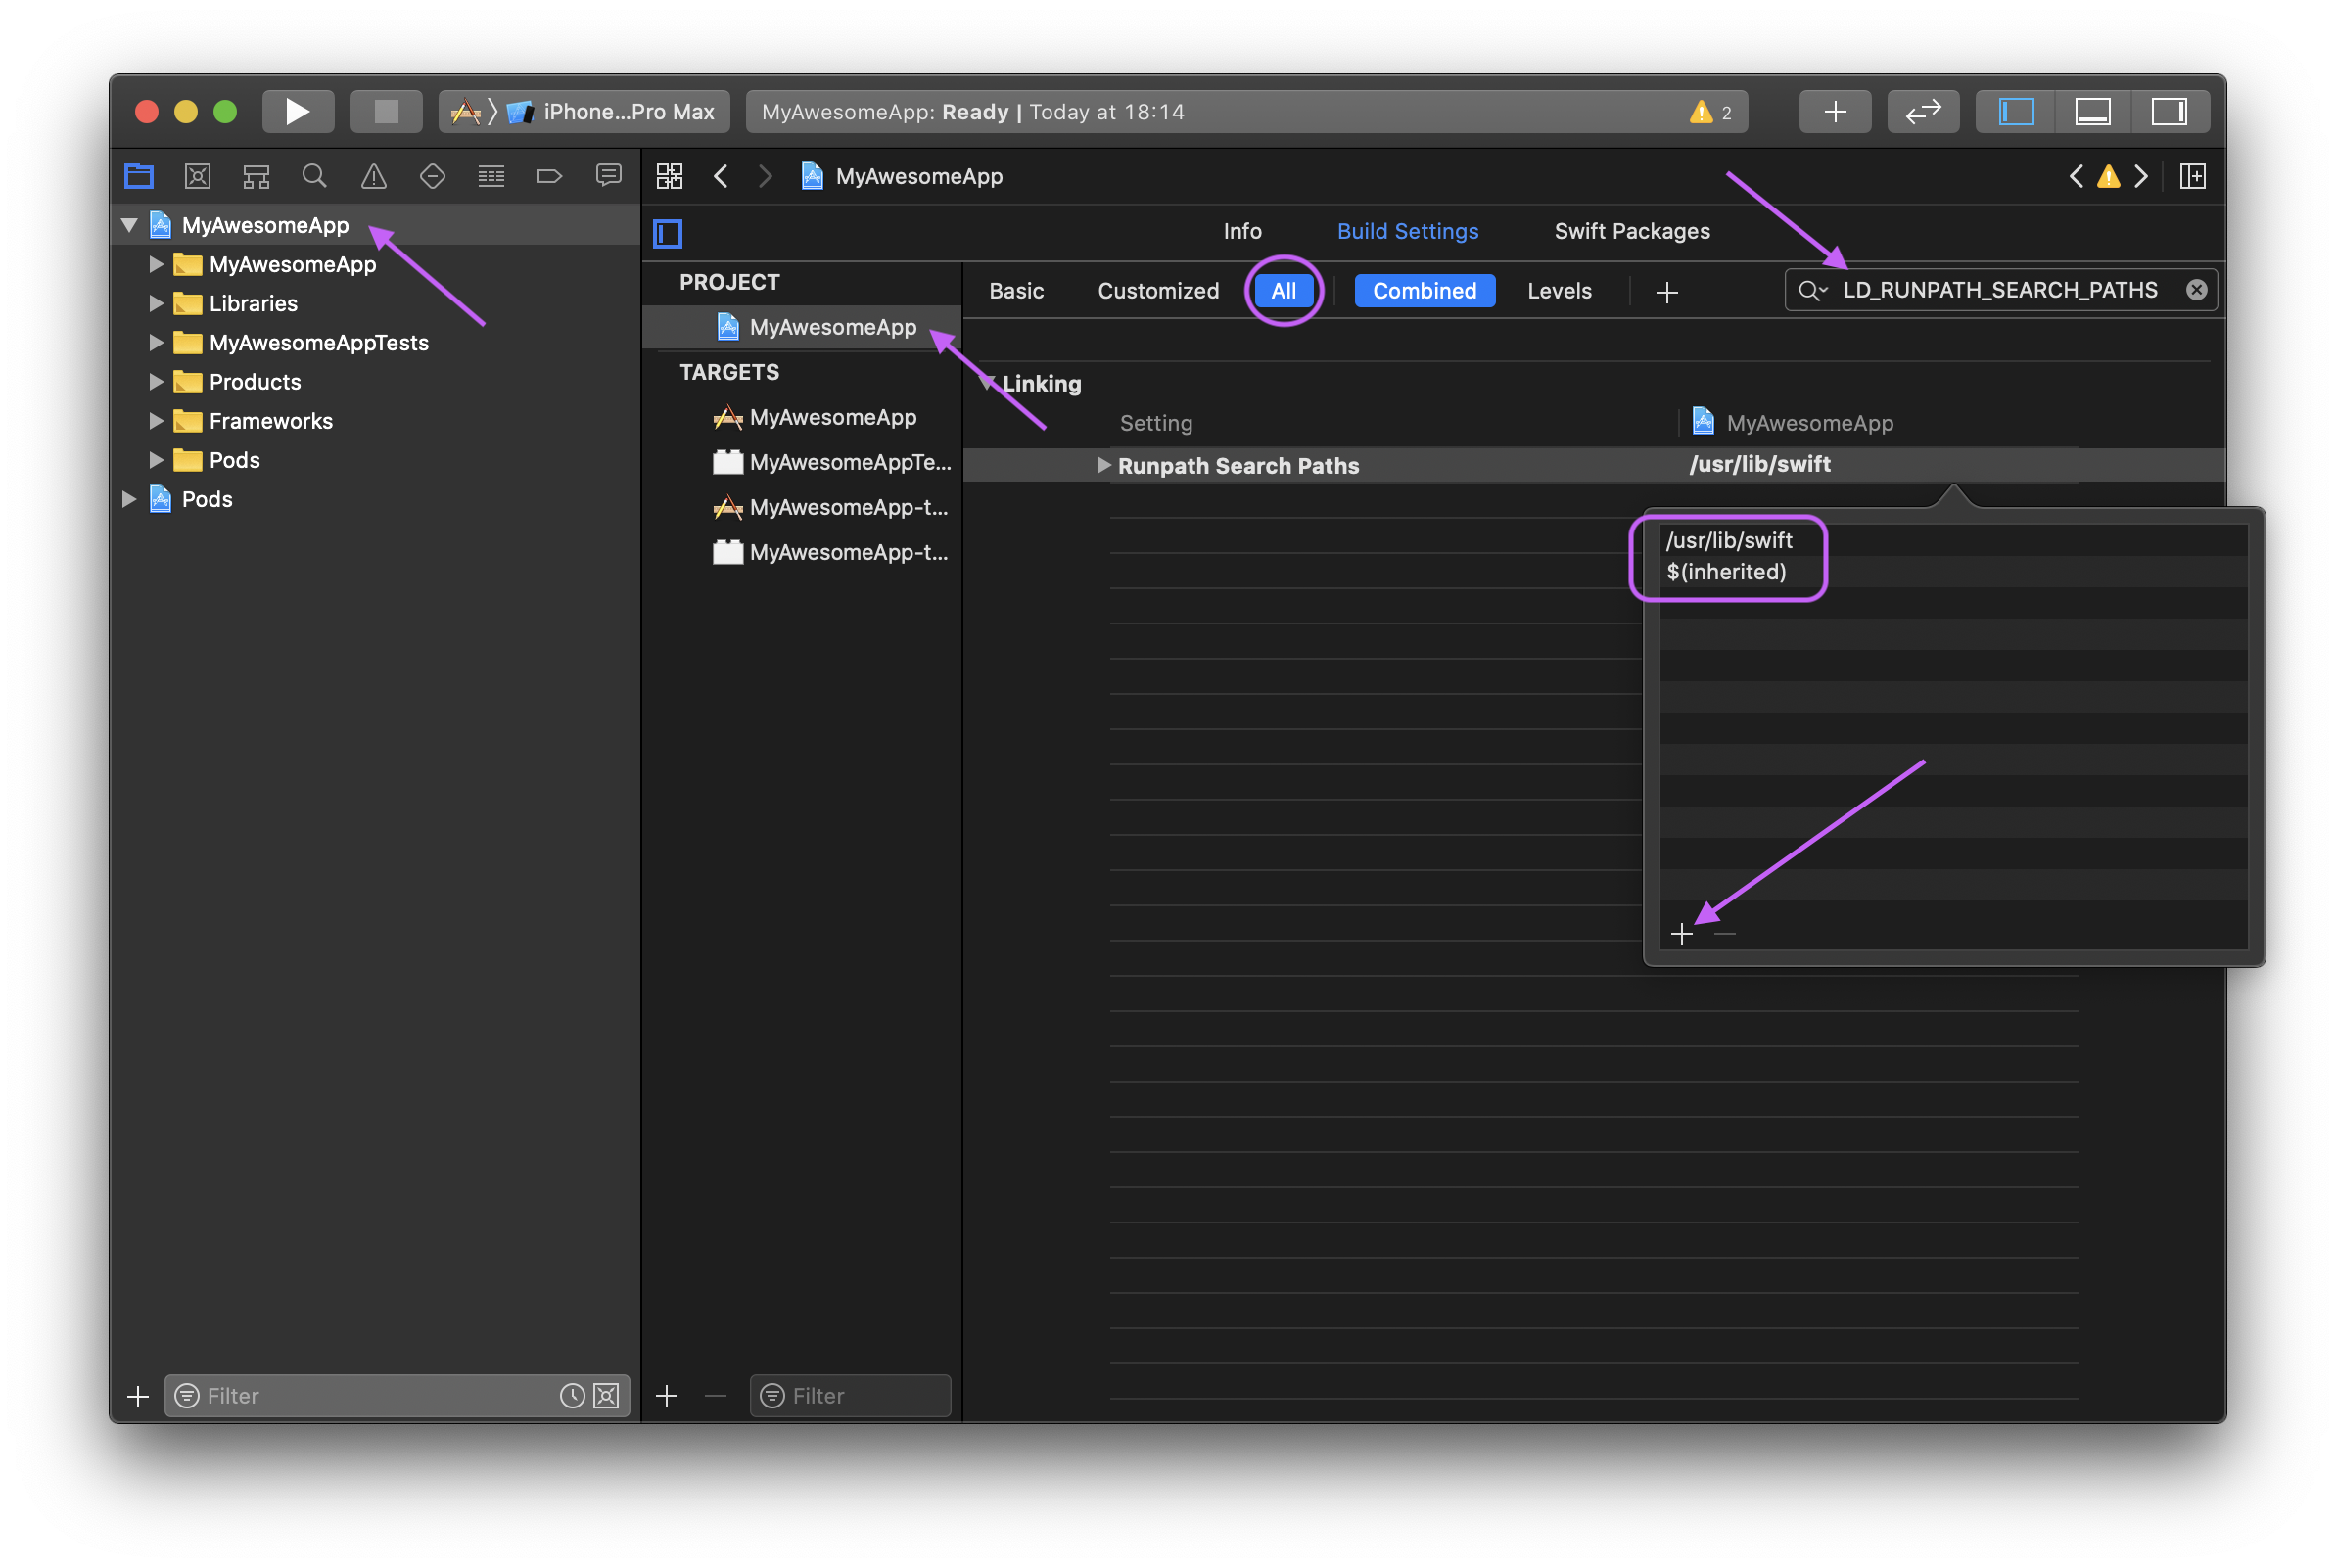
If you experience errors such as Undefined symbol: associated type descriptor for FloatLiteralType or Undefined symbol: __swift_FORCE_LOAD_$_swiftCompatibility50 after going through the Getting Started tutorial you must do as follows:
Open your project in Xcode;
Click in your project’s name on the left side;
Make sure that you choose your project under PROJECT on the screen that has been opened;
Go to the tab Build Settings ;
Search for LD_RUNPATH_SEARCH_PATHS (make sure that All is selected);
Double-click Runpath Search Paths and, in the dialog that opens, click on the plus button at the bottom-left corner and paste /usr/lib/swift $(inherited) there;
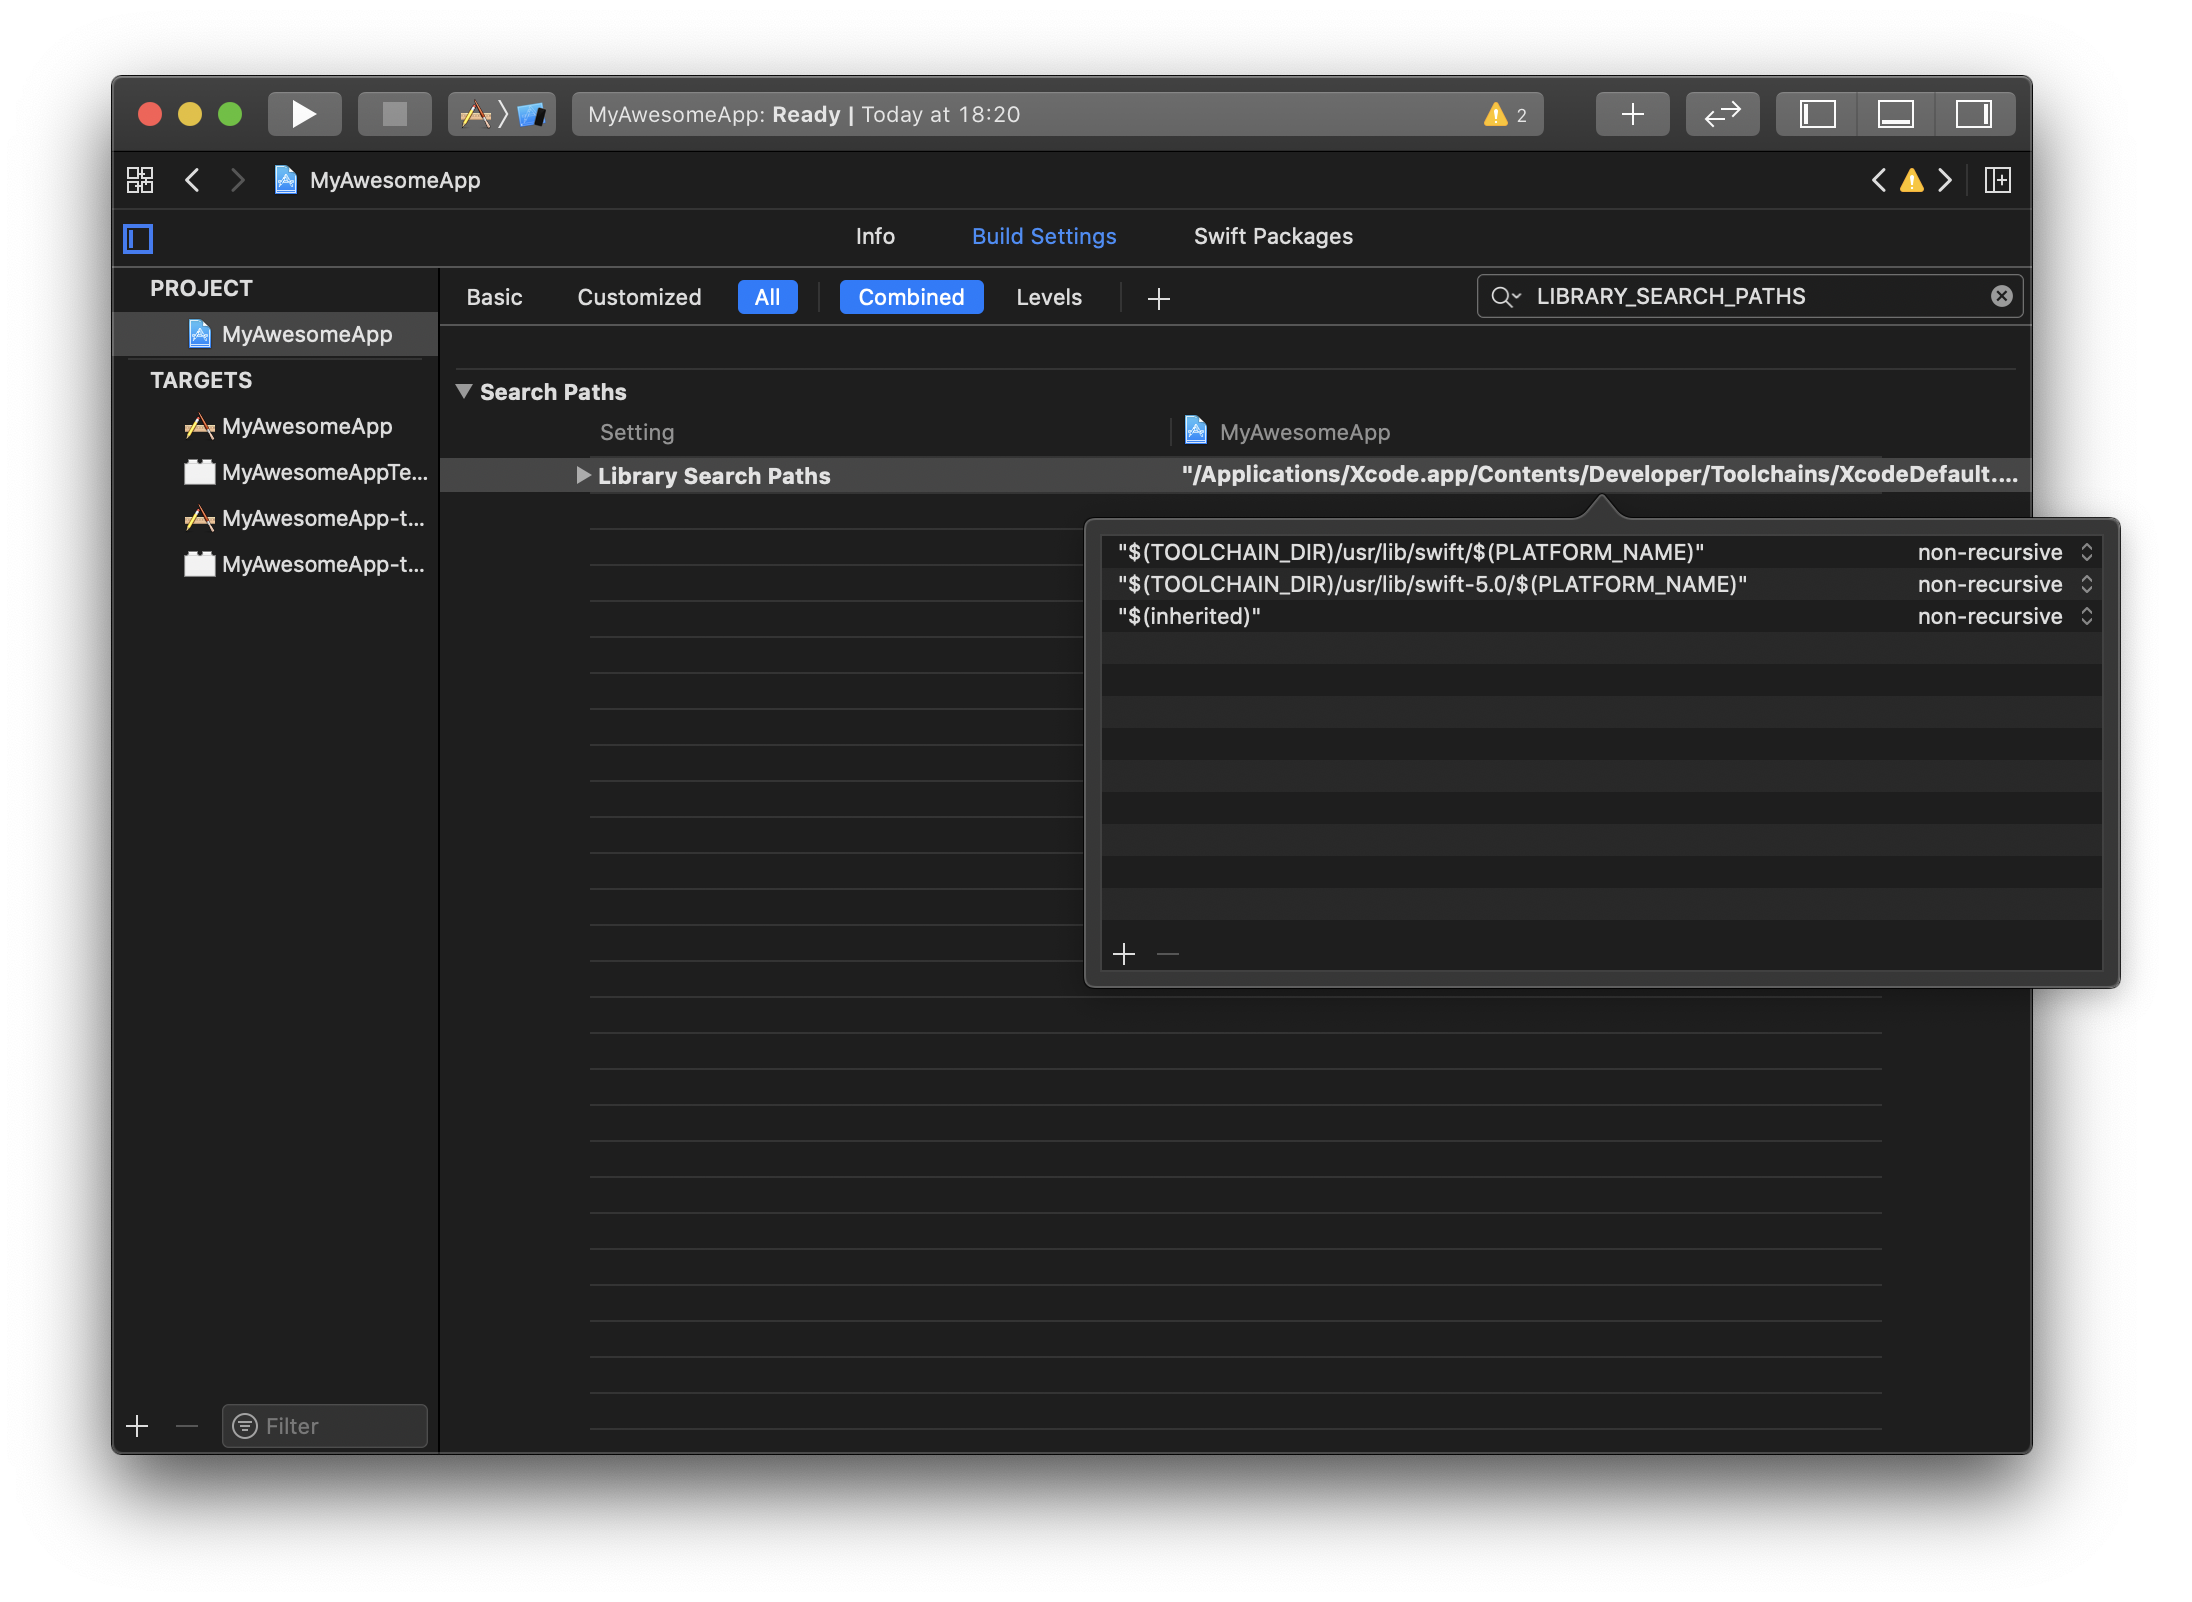
Now search for LIBRARY_SEARCH_PATHS ;
Double-click Library Search Paths and, in the dialog that opens, add the following items:
Note: all of them should be added as non-recursive (the default).
In the end it should look like this:
Now you can run your build normally.
Opting out from Flipper (iOS)
Comment out the relevant lines in ios/Podfile and run cd ios && pod install again:
Disable Flipper on CI builds (iOS)
To speed up CI builds, Flipper can be disabled on CI environments by making the Flipper SDK inclusion conditional (this works on most CI providers, feel free to customize the environment variable):
Источник
