- Flutter Cupertino App
- Flutter with iOS style
- Pengenalan
- Cupertino Widgets
- CupertinoApp
- CupertinoPageScaffold
- CupertinoButton
- CupertinoActionSheet
- CupertinoActivityIndicator
- CupertinoAlertDialog
- CupertinoDatePicker
- CupertinoSlider
- Kesimpulan
- Building a Cupertino app with Flutter
- 1. Introduction
- What you’ll learn in this codelab
- What would you like to learn from this codelab?
- 2. Set up your Flutter environment
- 3. Create the initial Cupertino app
- lib/main.dart
- lib/styles.dart
- lib/app.dart
- lib/app.dart
- pubspec.yaml
- 4. Create structure for a 3-tab app
- lib/app.dart
- lib/product_list_tab.dart
- lib/search_tab.dart
- lib/shopping_cart_tab.dart
- lib/app.dart
- 5. Add state management
- lib/model/product.dart
- lib/model/products_repository.dart
- lib/model/app_state_model.dart
- lib/main.dart
- 6. List products for sale
- lib/product_row_item.dart
- lib/product_list_tab.dart
- 7. Add product search
- lib/search_tab.dart
- lib/search_bar.dart
- 8. Add customer info
- lib/shopping_cart_tab.dart
- 9. Add date picker
- lib/shopping_cart_tab.dart
- 10. Add selected items for purchase
- lib/shopping_cart_tab.dart
- 11. Next steps
- Congratulations!
- Other next steps
- Learn more
Flutter Cupertino App
Flutter with iOS style

Pengenalan
Flutter merupakan cross platform single code base yang bisa berjalan di platform mobile (Android/iOS), web, dan desktop. Fokus kita di artikel ini ialah di iOS. Di mobile development terdapat perbedaan antara Android dan iOS. Dan salah satu hal yang paling menonjol jika kita pernah memakai kedua OS ini adalah style-nya. Perbedaan yang terdapat pada kedua OS ini membuat kita mau tidak mau harus bisa membuat style yang sama sesuai dengan OS-nya yaitu Android atau iOS. Yah, walaupun sebenarnya dari Flutter itu sendiri kita bisa menjalankan style Android di device iOS dan juga sebaliknya. Namun, jika dipandang dari sisi pengguna sepertinya jika kita menyajikan style Android di device iOS maupun style iOS di device Android rasanya agak-agak aneh bagi saya jika ditempatkan sebagai pengguna. Jadi, mau tidak mau kita sebagai Flutter Developer harus bisa memahami hal tersebut.
Cupertino Widgets
Syukurnya di Flutter mereka paham akan hal tersebut dan mereka akhirnya membuat widget khusus dengan style iOS dan mereka menamakannya dengan Cupertino. Berdasarkan dari website-nya terdapat beberapa widget dengan style iOS yaitu sebagai berikut.
- CupertinoApp
- CupertinoPageScaffold
- CupertinoButton
- CupertinoActionSheet
- CupertinoActivityIndicator
- CupertinoAlertDialog
- CupertinoDatePicker
- CupertinoDialog
- CupertinoDialogAction
- CupertinoFullscreenDialogTransition
- CupertinoPageScaffold
- CupertinoPageTransition
- CupertinoPicker
- CupertinoPopupSurface
- CupertinoScrollbar
- CupertinoSegmentedControl
- CupertinoSlider
- CupertinoSwitch
- CupertinoNavigationBar
- CupertinoTabBar
- CupertinoTabScaffold
- CupertinoTabView
- CupertinoTextField
- CupertinoTimePicker
Berdasarkan artikel ini dipublish sudah ada sekitar 24 widget untuk style iOS yang saya ketahui. Jadi, ada kemungkinan di masa yang akan datang widget untuk style iOS akan bertambah ya. Dan berikut beberapa contoh pemakaiannya untuk setiap widget cupertino.
CupertinoApp
Secara default ketika kita pertama kali buat projek di Flutter maka, defaultnya adalah akan menggunakan material.dart yang mana didalam package tersebut terdapat beberapa widget dengan style Android atau Material Design. Kalau di Material Design kita pakai kode seperti berikut.
Maka, di Cupertino kita bisa pakai seperti berikut.
CupertinoPageScaffold
CupertinoPageScaffold merupakan widget style iOS dari Scaffold. Jika kita pakai Scaffold maka kodenya seperti berikut.
Maka, di CupertinoPageScaffold kita membuatnya seperti berikut.
Selain itu, bisa juga kita lihat bahwa jika di Scaffold kita pakai AppBar maka, di CupertinoPageScaffold kita bisa pakai CupertinoNavigationBar . Dan berikut outputnya.

CupertinoButton
Kalau di Material Design kita bisa pakai RaisedButton
Maka, di Cupertino kita bisa pakai CupertinoButton

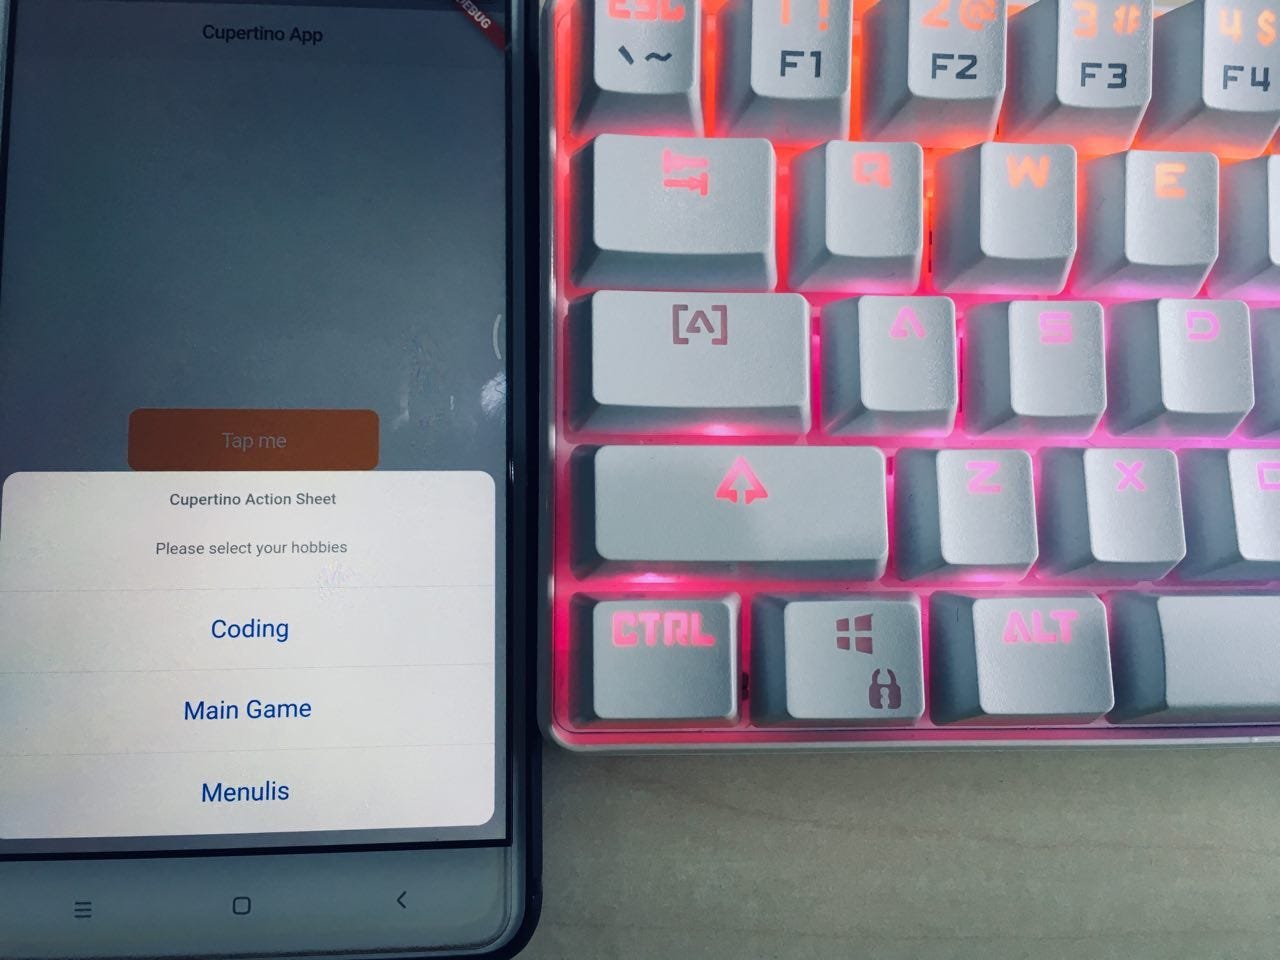
CupertinoActionSheet
Kalau di Material Design kita bisa pakai BottomSheet
Maka, di Cupertino kita bisa pakai CupertinoActionSheet

CupertinoActivityIndicator
Kalau di Material Design kita bisa pakai CircularProgressIndicator
Maka, di Cupertino kita bisa pakai CupertinoActivityIndicator

CupertinoAlertDialog
Kalau di Material Design kita bisa pakai AlertDialog
Maka, di Cupertino kita bisa pakai CupertinoAlertDialog

CupertinoDatePicker
Kalau di Material Design kita menggunakan DatePicker
Lalu, di Cupertino kita bisa menggunakan CupertinoDatePicker

CupertinoSlider
Jika di Material Design kita bisa menggunakan Slider
Lalu untuk Cupertino kita bisa menggunakan CupertinoSlider

Kesimpulan
Dari beberapa contoh penggunaan Cupertino yang sudah saya contohkan pada artikel ini saya harap kita semua bisa paham bahwa walaupun Flutter bersifat cross platform yang mana style-nya bisa berjalan tanpa perhatikan platformnya seperti style Android diletakkan di iOS dan sebaliknya saya harap kita jika sebagai pengguna yang sudah terbiasa dengan style-nya iOS kemudian tiba-tiba menggunakan sebuah aplikasi terbaru di iOS dengan style Android saya rasa pengguna akan merasakan kehilangan feel-nya si iOS itu sendiri. Jadi, dengan adanya Cupertino ini kita sebagai developer flutter bisa menyesuaikan style-nya sesuai dengan platform-nya masing-masing ya.
Источник
Building a Cupertino app with Flutter
1. Introduction
Welcome to the Flutter Cupertino codelab!
In this codelab, you’ll create a Cupertino (iOS-style) app using Flutter. The Flutter SDK ships with two styled widget libraries (in addition to the basic widget library):
- Material widgets implements the Material design language for iOS, Android, web, and desktop.
- Cupertino widgets implements the current iOS design language based on Apple’s Human Interface Guidelines.
Why write a Cupertino app? The Material design language was created for any platform, not just Android. When you write a Material app in Flutter, it has the Material look and feel on all devices, even iOS. If you want your app to look like a standard iOS-styled app, then you would use the Cupertino library.
You can technically run a Cupertino app on either Android or iOS, but (due to licensing issues) Cupertino won’t have the correct fonts on Android. For this reason, use an iOS-specific device when writing a Cupertino app.
You’ll implement a Cupertino style shopping app containing three tabs: one for the product list, one for a product search, and one for the shopping cart.


What you’ll learn in this codelab
- How to build a Flutter app with an iOS style look and feel.
- How to create multiple tabs and navigate between them.
- How to use the provider package to manage state between screens.
What would you like to learn from this codelab?
I’m new to the topic, and I want a good overview.
I know something about this topic, but I want a refresher.
I’m looking for example code to use in my project.
I’m looking for an explanation of something specific.
2. Set up your Flutter environment
You need two pieces of software to complete this lab: the Flutter SDK and an editor. You can use your preferred editor, such as Android Studio or IntelliJ with the Flutter and Dart plugins installed, or Visual Studio Code with the Dart Code and Flutter extensions.
You can run this codelab using one of the following devices:
- A physical iOS device connected to your computer.
- The iOS simulator.
You’ll also need:
- A Mac configured with Xcode.
3. Create the initial Cupertino app
Create the initial app using a CupertinoPageScaffold .
 Create a Flutter project called cupertino_store as follows.
Replace the contents of lib/main.dart . Delete all of the code from lib/main.dart , which creates a Material-themed button counting app. Replace with the following code, which initializes a Cupertino app.
lib/main.dart
 Observations
- Import the Cupertino package. This makes all the Cupertino widgets and constants available to your app.
Create lib/styles.dart . Add a file to the lib directory called styles.dart . The Styles class defines the text and color styling to customize the app. Here is a sample of the file, but you can get the full content on GitHub: lib/styles.dart .
lib/styles.dart
Observations
- We can centralize style definitions in a way that is similar to how web developers centralize their style markup in CSS files by grouping all of our definitions in a single file. This gives us the easiest way to reuse and redefine styles across the whole app.
Create lib/app.dart and add the CupertinoStoreApp class. Add the following CupertinoStoreApp class to lib/app.dart .
lib/app.dart
Observations
- Import the services library. This makes the platform services, like the clipboard and setting the device orientation, available to your app.
- Instantiates CupertinoApp , which provides theming, navigation, text direction, and other defaults required to create an app that an iOS user expects.
- Instantiates a CupertinoStoreHomePage as the homepage.
- The app is designed to only work vertically, so the device orientation is limited to portrait.
Add the CupertinoStoreHomePage class. Add the following CupertinoStoreHomePage class to lib/app.dart to create the layout for the homepage.
lib/app.dart
Observations
- The Cupertino package provides two types of page scaffolds. CupertinoPageScaffold supports single pages and accepts a Cupertino-style navigation bar, background color, and holds the widget tree for the page. You’ll learn about the second type of scaffold in the next step.
- This page has a title, and the widget tree contains a single empty container.
Update the Flutter package dependencies. Add Flutter package dependencies by running the following commands at the top level of your project.
The intl package will be used in the last step for formatting.
The provider package will be used for state management.
Finally, the shrine_images package will be used for image assets. To access the images, add the following lines to the flutter section of your pubspec.yaml file.
pubspec.yaml
Observations
- This pulls in several packages, including shrine_images, containing products for populating the store.
- The provider package provides a simple way to manage state across screens.
- The intl package provides internationalization and localization facilities.
- The cupertino_icons package contains icon assets for the Cupertino widgets.
Run the app. You should see the following white screen containing the Cupertino navbar and a title:

Problems?
If your app is not running correctly, look for typos. If needed, use the code at the following links to get back on track.
4. Create structure for a 3-tab app
The final app features 3 tabs:
- Product list
- Product search
- Shopping cart
In this step, you’ll update the home page with three tabs using a CupertinoTabScaffold . You’ll also add a data source that provides the list of items for sale, with photos and prices.
In the previous step, you created a CupertinoStoreHomePage class using a CupertinoPageScaffold . Use this scaffold for pages that have no tabs. The final app has three tabs, so swap out the CupertinoPageScaffold for a CupertinoTabScaffold .
Cupertino tab has a separate scaffold because on iOS, the bottom tab is commonly persistent above nested routes rather than inside pages.
Update lib/app.dart . Replace the CupertinoStoreHomePage class with the following, which sets up a 3-tab scaffold:
lib/app.dart
Observations
- CupertinoTabBar requires at least two items, or you will see errors at run-time.
- The tabBuilder: is responsible for making sure the specified tab is built. In this case, it calls a class constructor to set up each respective tab, wrapping all three in CupertinoTabView and CupertinoPageScaffold .
Add stub classes for the content of the new tabs. Create a lib/product_list_tab.dart file for the first tab that compiles cleanly, but only displays a white screen. Use the following content:
lib/product_list_tab.dart
Observations
- The product list tab is a stateless widget.
- The Consumer , from the provider package, assists with state management. More about the model later.
- There are 2 variants of the navigation bar on iOS. The common short static type seen since iOS 1, and the tall scrollable large title type introduced in iOS 11. This page implements the latter inside a CustomScrollView with a CupertinoSliverNavigationBar widget.
Add a search page stub. Create a lib/search_tab.dart file that compiles cleanly, but only displays a white screen. Use the following content:
lib/search_tab.dart
Observations
- The search tab is a stateful widget because, as the user performs searches, the list of results changes.
Add a shopping cart page stub. Create a lib/shopping_cart_tab.dart file that compiles cleanly, but only displays a white screen. Use the following content:
lib/shopping_cart_tab.dart
Observations
- The shopping cart tab is a stateful widget because it maintains the list of purchases and the customer’s info.
- This page also uses a CustomScrollView .
Update lib/app.dart. Update the import statements in lib/app.dart to pull in the new tab widgets:
lib/app.dart
In the second part of this step, continued on the next page, you’ll add code for managing and sharing state across the tabs.
5. Add state management
The app has some common data that needs to be shared across multiple screens, so you need a simple way to flow the data to each of the objects that need it. The provider package provides an easy way to do that. In provider , you define the data model and then use ChangeNotifierProvider to provide your data model down the tree.
Create the data model classes. Create a model directory under lib . Add a lib/model/product.dart file that defines the product data coming from the data source:
lib/model/product.dart
Observations
- Each instance of the Product class describes a product for sale.
The ProductsRepository class contains the full list of products for sale, along with their price, title text, and a category. Our app won’t do anything with the isFeatured property. The class also includes a loadProducts() method that returns either all products, or all products in a given category.
Create the products repository. Create a lib/model/products_repository.dart file. This file contains all products for sale. Each product belongs to a category. Here is a sample of the file, but you can get the entire contents on GitHub: products_repository.dart .
lib/model/products_repository.dart
Observations
- In this case we are making a mock product database for ease of development, but this should be served to the app as an API. An easy way to do this that deals with the partially disconnected reality of mobile phones is Cloud Firestore.
You are now ready to define the model. Create a lib/model/app_state_model.dart file. In the AppStateModel class, provide methods for accessing data from the model. For example, add a method for accessing the shopping cart total, another for a list of selected products to purchase, another for the shipping cost, and so on.
Create the model class. Here is the list of method signatures provided by this class. Get the full content on GitHub: lib/model/app_state_model.dart .
lib/model/app_state_model.dart
Observations
- Our AppStateModel shows a way of centralizing the state of the application, and making the state available throughout the whole application. In later steps we will use this state to drive our Search and Shopping Cart functionality.
Update lib/main.dart . In the main() method, initialize the model. Add the lines marked with NEW.
lib/main.dart
Observations
- We are wiring the AppStateModel at the top of the widget tree to make it available throughout the entire app.
- We are using ChangeNotifierProvider from the provider package, which monitors AppStateModel for change notifications.
Run the app. You should see the following white screen containing the Cupertino navbar, a title, and a drawer with 3 labeled icons representing the three tabs. You can switch between the tabs, but all three pages are currently blank.

Problems?
If your app is not running correctly, look for typos. If needed, use the code at the following links to get back on track.
6. List products for sale
In this step, display the products for sale in the product list tab.
Add lib/product_row_item.dart to display the products. Create the lib/product_row_item.dart file , with the following content:
lib/product_row_item.dart
Observations
- CupertinoSliverNavigationBar is how we get iOS 11 style expanding titles in the navigation bar. This is important to make an iOS user feel at home in the app.
- There is a lot of complexity in this file, as we emulate the highly refined look and feel of iOS applications. Flutter’s strength is that we can make these changes in an editor and see them change in near real time thanks to Stateful Hot Reload.
In lib/product_list_tab.dart , import the product_row_item.dart file.
lib/product_list_tab.dart
In the build() method for ProductListTab , get the product list and the number of products. Add the new lines indicated below:
Also in the build() method, add a new sliver to the sliver widgets list to hold the product list. Add the new lines indicated below:
Observations
- The notch is accounted for by the first sliver (the CupertinoSliverNavigationBar ).
- The new sliver and the first sliver are siblings (not parent-child), so the first sliver has no way to communicate that it has already consumed the notch. Therefore the second sliver sets SliverSafeArea ‘s top property to false so that it ignores the notch.
- The SliverSafeArea ‘s left and right properties still default to true in case the phone is rotated, and it still accounts for the bottom so that the sliver can scroll past the bottom home bar to avoid obstruction when it’s scrolled to the end.
- This logic is not specifically required here due to the app being restricted to portrait only, but including it means this code is safe to re-use in apps that handle horizontal presentation.
Run the app. In the product tab, you should see a list of products with images, prices, and a button with a plus sign that adds the product to the shopping cart. The button will be implemented later, in the step where you’ll build out the shopping cart.
Problems?
If your app is not running correctly, look for typos. If needed, use the code at the following links to get back on track.
7. Add product search
In this step, you’ll build out the search tab and add the ability to search through the products.
Update the imports in lib/search_tab.dart .
Add imports for the classes that the search tab will use:
lib/search_tab.dart
Update the build() method in _SearchTabState .
Initialize the model and replace the CustomScrollView with individual components for searching and listing.
Observations
- We are re-creating an iOS style search experience, but we have a lot of latitude to customise the user experience.
Add supporting variables, functions, and methods to the _SearchTabState class.
These include initState() , dispose() , _onTextChanged() , and _buildSearchBox() , as shown below:
Observations
- _SearchTabState is where we keep state specific to searching. In this implementation we store what the search terms are, and we hook into the AppStateModel to fulfill the search capability. In the case where we implement an API back end, here is a good place to do network access for Search.
Add a SearchBar class.
Create a new file, lib/search_bar.dart . The SearchBar class handles the actual search in the product list. Seed the file with the following content:
lib/search_bar.dart
Observations
- Search interfaces on iOS are interesting in that there is reasonably wide variation in implementations. Flutter gives you the ability to tune the layout and color of the implementation quickly and easily.
Run the app. Select the search tab and enter «shirt» into the text field. You should see a list of 5 products that contain «shirt» in the name.
Problems?
If your app is not running correctly, look for typos. If needed, use the code at the following links to get back on track.
8. Add customer info
In the next three steps, you’ll build out the shopping cart tab. In this first step, you’ll add fields for capturing customer info.
Update the lib/shopping_cart_tab.dart file.
Add private methods for building the name, email, and location fields. Then add a _buildSliverChildBuildDelegate() method that builds out parts of the user interface.
lib/shopping_cart_tab.dart
Observations
- A key way that Flutter differs from more traditional User Interface design environments is that you have the full power of a proper programming language to introduce abstractions. You can add functions to group functionality, or turn it into a stand alone Widget if you want easy re-use. As the programmer, the choice in how to lay out functionality is yours to make.
Update the build() method in the _ShoppingCartTabState class.
Add a SliverSafeArea that calls the _buildSliverChildBuilderDelegate method:
Observations
- With all of the user interface defined in builder functions, the build method can be quite small.
Run the app. Select the shopping cart tab. You should see three text fields for gathering customer information:

Problems?
If your app is not running correctly, look for typos. If needed, use the code at the following link to get back on track.
9. Add date picker
In this step, add a CupertinoDatePicker to the shopping cart so the user can select a preferred shipping date.
Add imports and a const to lib/shopping_cart_tab.dart .
Add the new lines, as shown:
lib/shopping_cart_tab.dart
Add a _buildDateAndTimePicker() function to the _ShoppingCartTab widget.
Add the function, as follows:
Observations
- Adding a CupertinoDatePicker is quick to do, and gives iOS users an intuitive way to enter dates and times.
Add a call to build the date and time UI, to the _buildSliverChildBuilderDelegate function. Add the new code, as shown:
Run the app. Select the shopping cart tab. You should see an iOS style date picker below the text fields for gathering the customer info:

Problems?
If your app is not running correctly, look for typos. If needed, use the code at the following link to get back on track.
10. Add selected items for purchase
In this step, add the selected items to the shopping cart to complete the app.
Import the product package in shopping_cart_tab.dart .
lib/shopping_cart_tab.dart
Add a currency format to the _ShoppingCartTabState class.
Add the line marked NEW:
Add a product index to the _buildSliverChildBuilderDelegate function.
Add the line marked NEW:
In the same function, display the items to purchase.
Add the code to the default: section of the switch statement, as follows:
At the bottom of the file, add a new ShoppingCartItem class:
Run the app. From the products tab, select a few items to purchase using the plus-sign button to the right of each item. Select the shopping cart tab. You should see the items listed in the shopping cart below the date picker:

Problems?
If your app is not running correctly, look for typos. If needed, use the code at the following link to get back on track.
11. Next steps
Congratulations!
You have completed the codelab and have built a Flutter app with the Cupertino look and feel! You’ve also used the provider package to manage app state across screens. When you have time, you might want to learn more about managing state in our state management documentation.
Other next steps
This codelab has built a front end for a shopping experience, but the next step in making it real is to create a back-end that handles user accounts, products, shopping carts and the like. There are multiple ways of accomplishing this goal:
- Host the product and shopping carts in Cloud Firestore, and use the Flutter plugin for Firebase Authentication for user authentication.
- Use Dart’s gRPC support to talk to a cloud hosted API server, for example with Cloud Endpoints for gRPC.
- If you have an API server that exports an API via JSON REST, see Andrew Brogdon’s Medium post for a range of options for working with JSON REST APIs.
Learn more
You can find more info at the following links:
Except as otherwise noted, the content of this page is licensed under the Creative Commons Attribution 4.0 License, and code samples are licensed under the Apache 2.0 License. For details, see the Google Developers Site Policies. Java is a registered trademark of Oracle and/or its affiliates.
Источник


