- Visual Studio Code
- Installation and setup
- Updating the extension
- Creating projects
- Creating a new project
- Opening a project from existing source code
- Editing code and viewing issues
- Running and debugging
- Selecting a target device
- Run app without breakpoints
- Run app with breakpoints
- Run app in debug, profile, or release mode
- Fast edit and refresh development cycle
- Advanced debugging
- Debugging visual layout issues
- Debugging external libraries
- Editing tips for Flutter code
- Assists & quick fixes
- Snippets
- Keyboard shortcuts
- Hot reload vs. hot restart
- Troubleshooting
- Known issues and feedback
- Visual Studio Code vs Android Studio – Functionality, Search and Source Control
- Functionality
- Visual Studio Code
- Android Studio
- Searching in the project
- Visual Studio Code
- Android Studio
- Source Control
- Visual Studio Code
- Android Studio
- Can’t I add plugins to Visual Studio Code for better functionality?
- Android Studio has some weird key bindings that you should know about:
- So what should I use?
Visual Studio Code
Installation and setup
Follow the Set up an editor instructions to install the Dart and Flutter extensions (also called plugins).
Updating the extension
Updates to the extensions are shipped on a regular basis. By default, VS Code automatically updates extensions when updates are available.
To install updates manually:
- Click the Extensions button in the Side Bar.
- If the Flutter extension is shown with an available update, click the update button and then the reload button.
- Restart VS Code.
Creating projects
There are a couple ways to create a new project.
Creating a new project
To create a new Flutter project from the Flutter starter app template:
- Open the Command Palette ( Ctrl + Shift + P ( Cmd + Shift + P on macOS)).
- Select the Flutter: New Project command and press Enter .
- Select Application and press Enter .
- Select a Project location.
- Enter your desired Project name.
Opening a project from existing source code
To open an existing Flutter project:
- Click File > Open from the main IDE window.
- Browse to the directory holding your existing Flutter source code files.
- Click Open.
Editing code and viewing issues
The Flutter extension performs code analysis that enables the following:
- Syntax highlighting
- Code completions based on rich type analysis
- Navigating to type declarations (Go to Definition or F12 ), and finding type usages (Find All References or Shift + F12 )
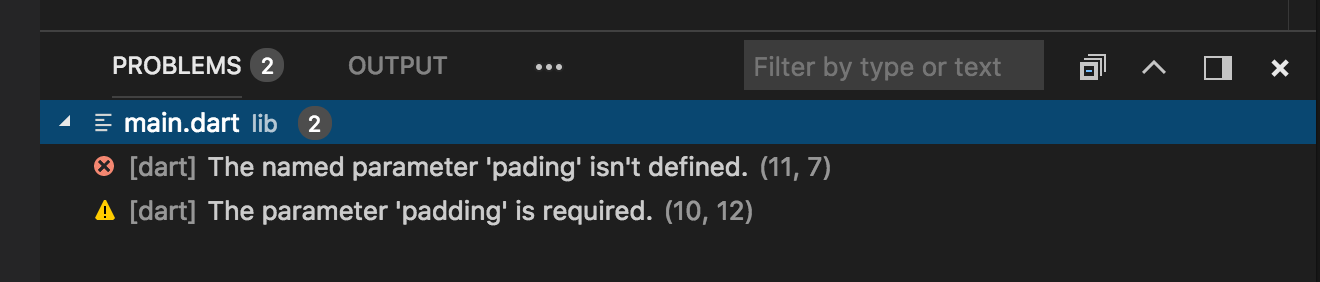
- Viewing all current source code problems (View > Problems or Ctrl + Shift + M ( Cmd + Shift + M on macOS)) Any analysis issues are shown in the Problems pane:

Running and debugging
Note: You can debug your app in a couple of ways.
- Using DevTools, a suite of debugging and profiling tools that run in a browser. DevTools replaces the previous browser-based profiling tool, Observatory, and includes functionality previously only available to Android Studio and IntelliJ, such as the Flutter inspector.
- Using VS Code’s built-in debugging features, such as setting breakpoints.
The instructions below describe features available in VS Code. For information on using launching DevTools, see Running DevTools from VS Code in the DevTools docs.
Start debugging by clicking Run > Start Debugging from the main IDE window, or press F5 .
Selecting a target device
When a Flutter project is open in VS Code, you should see a set of Flutter specific entries in the status bar, including a Flutter SDK version and a device name (or the message No Devices): 
Note:
- If you do not see a Flutter version number or device info, your project might not have been detected as a Flutter project. Ensure that the folder that contains your pubspec.yaml is inside a VS Code Workspace Folder.
- If the status bar reads No Devices, Flutter has not been able to discover any connected iOS or Android devices or simulators. You need to connect a device, or start a simulator or emulator, to proceed.
The Flutter extension automatically selects the last device connected. However, if you have multiple devices/simulators connected, click device in the status bar to see a pick-list at the top of the screen. Select the device you want to use for running or debugging.
Are you developing for macOS or iOS remotely using Visual Studio Code Remote? If so, you might need to manually unlock the keychain. For more information, see this question on StackExchange.
Run app without breakpoints
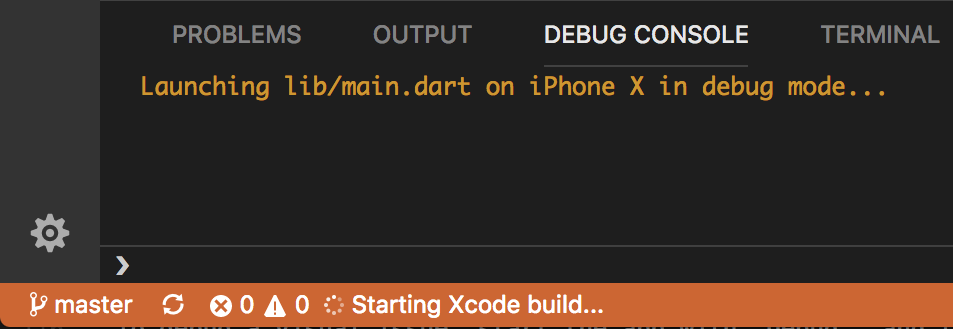
- Click Run > Start Without Debugging in the main IDE window, or press Ctrl + F5 . The status bar turns orange to show you are in a debug session.
Run app with breakpoints
- If desired, set breakpoints in your source code.
Click Run > Start Debugging in the main IDE window, or press F5 .
- The left Debug Sidebar shows stack frames and variables.
- The bottom Debug Console pane shows detailed logging output.
- Debugging is based on a default launch configuration. To customize, click the cog at the top of the Debug Sidebar to create a launch.json file. You can then modify the values.
Run app in debug, profile, or release mode
Flutter offers many different build modes to run your app in. You can read more about them in Flutter’s build modes.
Open the launch.json file in VS Code.
If you do not have a launch.json file, go to the Run view in VS Code and click create a launch.json file.
In the configurations section, change the flutterMode property to the build mode you want to target.
- For example, if you want to run in debug mode, your launch.json might look like this:
Fast edit and refresh development cycle
Flutter offers a best-in-class developer cycle enabling you to see the effect of your changes almost instantly with the Stateful Hot Reload feature. See Using hot reload for details.
Advanced debugging
You might find the following advanced debugging tips useful:
Debugging visual layout issues
During a debug session, several additional debugging commands are added to the Command Palette and to the Flutter inspector. When space is limited, the icon is used as the visual version of the label.
Toggle Baseline Painting Causes each RenderBox to paint a line at each of its baselines. Toggle Repaint Rainbow Shows rotating colors on layers when repainting. Toggle Slow Animations Slows down animations to enable visual inspection. Toggle Debug Mode Banner Hides the debug mode banner even when running a debug build.
Debugging external libraries
By default, debugging an external library is disabled in the Flutter extension. To enable:
- Select Settings > Extensions > Dart Configuration.
- Check the Debug External Libraries option.
Editing tips for Flutter code
If you have additional tips we should share, let us know!
Assists & quick fixes
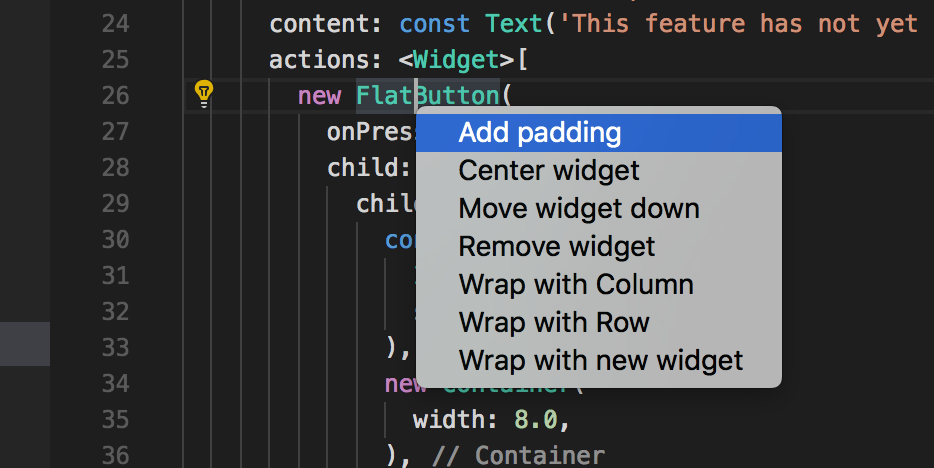
Assists are code changes related to a certain code identifier. A number of these are available when the cursor is placed on a Flutter widget identifier, as indicated by the yellow lightbulb icon. The assist can be invoked by clicking the lightbulb, or by using the keyboard shortcut Ctrl + . ( Cmd + . on Mac), as illustrated here:
Quick fixes are similar, only they are shown with a piece of code has an error and they can assist in correcting it.
Wrap with new widget assist This can be used when you have a widget that you want to wrap in a surrounding widget, for example if you want to wrap a widget in a Row or Column . Wrap widget list with new widget assist Similar to the assist above, but for wrapping an existing list of widgets rather than an individual widget. Convert child to children assist Changes a child argument to a children argument, and wraps the argument value in a list. Convert StatelessWidget to StatefulWidget assist Changes the implementation of a StatelessWidget to that of a StatefulWidget , by creating the State class and moving the code there.
Snippets
Snippets can be used to speed up entering typical code structures. They are invoked by typing their prefix, and then selecting from the code completion window: 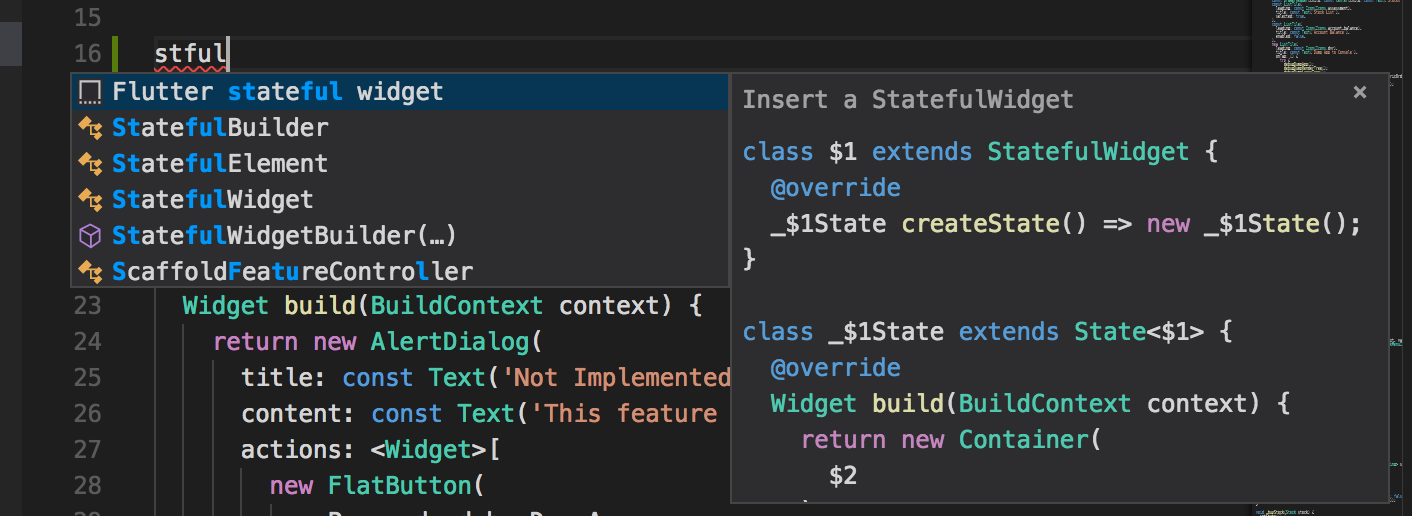
The Flutter extension includes the following snippets:
- Prefix stless : Create a new subclass of StatelessWidget .
- Prefix stful : Create a new subclass of StatefulWidget and its associated State subclass.
- Prefix stanim : Create a new subclass of StatefulWidget , and its associated State subclass including a field initialized with an AnimationController .
You can also define custom snippets by executing Configure User Snippets from the Command Palette.
Keyboard shortcuts
Keyboard mappings can be changed by executing the Open Keyboard Shortcuts command from the Command Palette.
Hot reload vs. hot restart
Hot reload works by injecting updated source code files into the running Dart VM (Virtual Machine). This includes not only adding new classes, but also adding methods and fields to existing classes, and changing existing functions. A few types of code changes cannot be hot reloaded though:
- Global variable initializers
- Static field initializers
- The main() method of the app
For these changes, fully restart your application without having to end your debugging session. To perform a hot restart, run the Flutter: Hot Restart command from the Command Palette, or press Ctrl + Shift + F5 ( Cmd + Shift + F5 on macOS).
Troubleshooting
Known issues and feedback
All known bugs are tracked in the issue tracker: Dart and Flutter extensions GitHub issue tracker.
We welcome feedback, both on bugs/issues and feature requests. Prior to filing new issues:
- Do a quick search in the issue trackers to see if the issue is already tracked.
- Make sure you are up to date with the most recent version of the plugin.
When filing new issues, include flutter doctor output.
Except as otherwise noted, this work is licensed under a Creative Commons Attribution 4.0 International License, and code samples are licensed under the BSD License.
Источник
Visual Studio Code vs Android Studio – Functionality, Search and Source Control
When it comes to the tools we use to develop our Flutter apps, there are two main contenders. It usually boils down to either Visual Studio Code or Android Studio. In this article, Lewis Cianci compares these two tools in three key areas.
Years ago, there weren’t many choices when it came to Integrated Development Environments (IDE). In the early days, there were languages like Visual Basic 6 which had to be written in Visual Studio and that was it.
Nowadays, we have choices to make, not only related to what languages and frameworks we use to make our apps, but also the tooling that we use to accomplish this task. This topic is somewhat surprisingly hotly contested, with people avidly defending “their” IDE and plugins over another IDE.
Comparing two different IDEs is a fairly big topic, so in this article, we’ll look at the differences between Visual Studio Code and Android Studio by focusing on three key aspects that I notice the most when comparing IDEs:
- вљ™ Functionality: How easy is it is to get around my code? Can I tear tabs off and work on my code with more than one window open at a time?
- рџ”ЋSearch: Is it straightforward to find where a certain widget has been used in my app? If I forget the implementation of something, can I easily search and find if it has been used somewhere else?
- 👩‍💻 Source control: Does the source control solution make it easy to see changes and differences?
Functionality
Visual Studio Code
Visual Studio Code is an editor that favors simplicity over having an endless assortment of bells and whistles. Most of the functionality is exposed by typing in the thing you need into the top search bar.
 Visual Studio Code
Everything you would expect to be there is there: debugging, breakpoints, etc.
However, something that I have been doing for years in every IDE that I have used is to tearing off the tabs from the top. This is invaluable, as at various times I can effectively work on two parts of my app at the same time.
Visual Studio Code can’t do this and it doesn’t seem like it’s getting this functionality any time soon. You can split your tabs so that one window is split down the middle or you can try to reopen the same project in another instance of Visual Studio Code. But you can’t just tear the tabs off.
The practical effect of this is that if you are working between your services and your UI layer, you have to switch back and forth between both files until you eventually solve the issue.
Android Studio
Android Studio is more of a “kitchen sink” approach to an IDE. Google licensed IntelliJ IDEA and used it to make Android Studio. Software developers have been using it to make apps for Android for a very long time.
In terms of tearing the tabs off: Well, you just do it. You just pick one up, drag it off, and you’re done. You can put these onto alternate screens – whatever you want. Any comparable solution to doing this in Visual Studio Code (that’s as easy as just grabbing the tab and moving it to where you want it) doesn’t seem to exist, at least not at the time of writing.
For me personally, this is enough to make me want to use Android Studio by itself, but let’s press on.
Searching in the project
Visual Studio Code
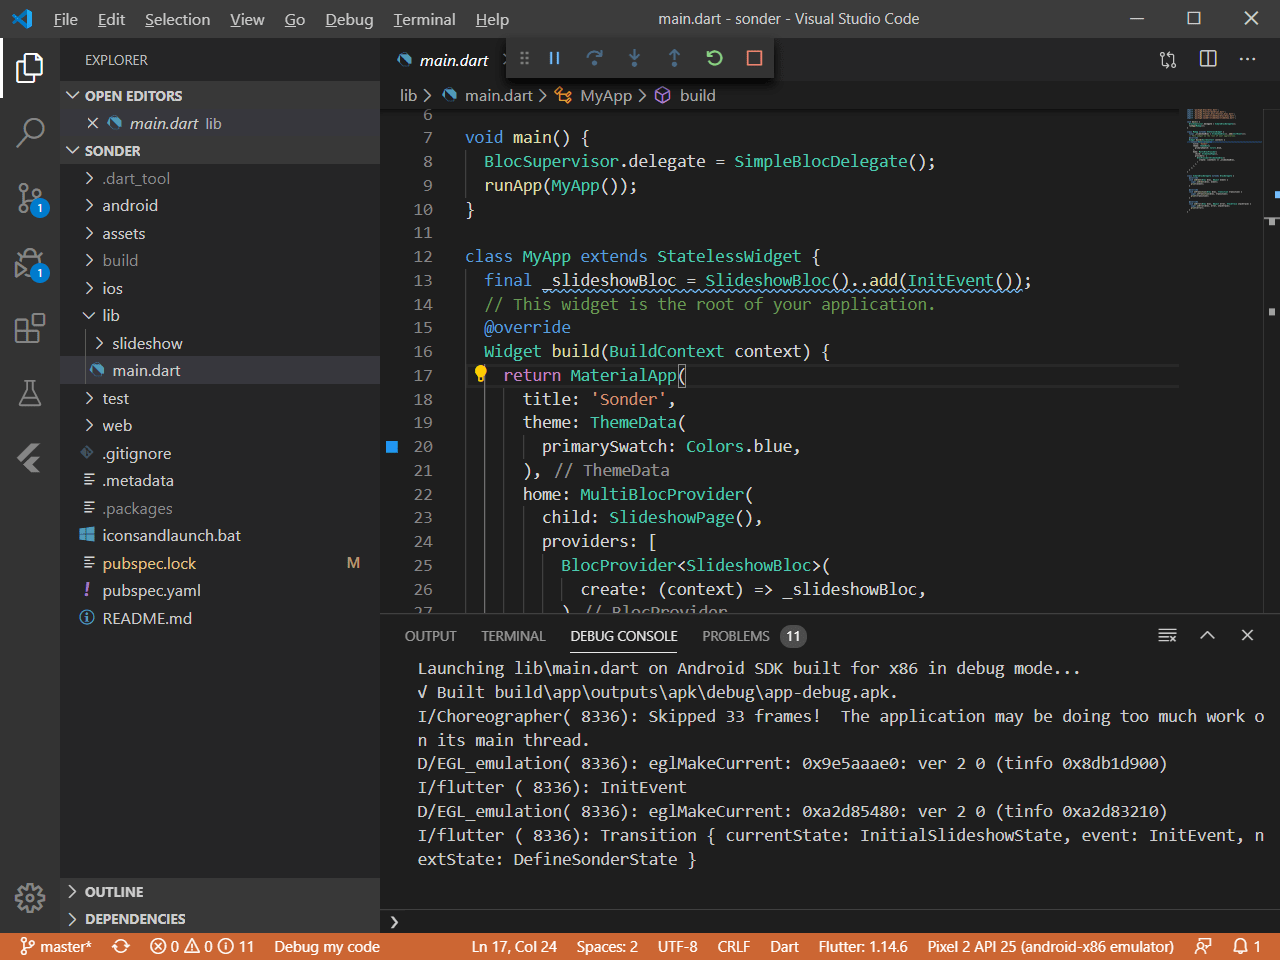
Visual Studio Code has the ability to “search anywhere” in the project when the user presses CTRL+SHIFT+F . 
As we can see, I’ve searched for Sonder, and on the left-hand side of this window we have all the results. You can move backwards and forwards through them with F4 and SHIFT+F4 . It’s certainly functional.
The only gripe I have with this search feature is that you tend to lose a lot of context when searching. We’re restricted to looking at each and every result of our search here, either by clicking on a specific result or using hotkeys to move through them. Afterwards, we can get back to where we were by clicking on the appropriate tab up at the top or hitting ALT+LEFT ARROW until we get back to where we were. Sometimes when I do that, I forget where I was up to and what I was doing initially.
Android Studio
Again, CTRL+SHIFT+F . But this time, we get a dedicated search dialog. It looks like this:
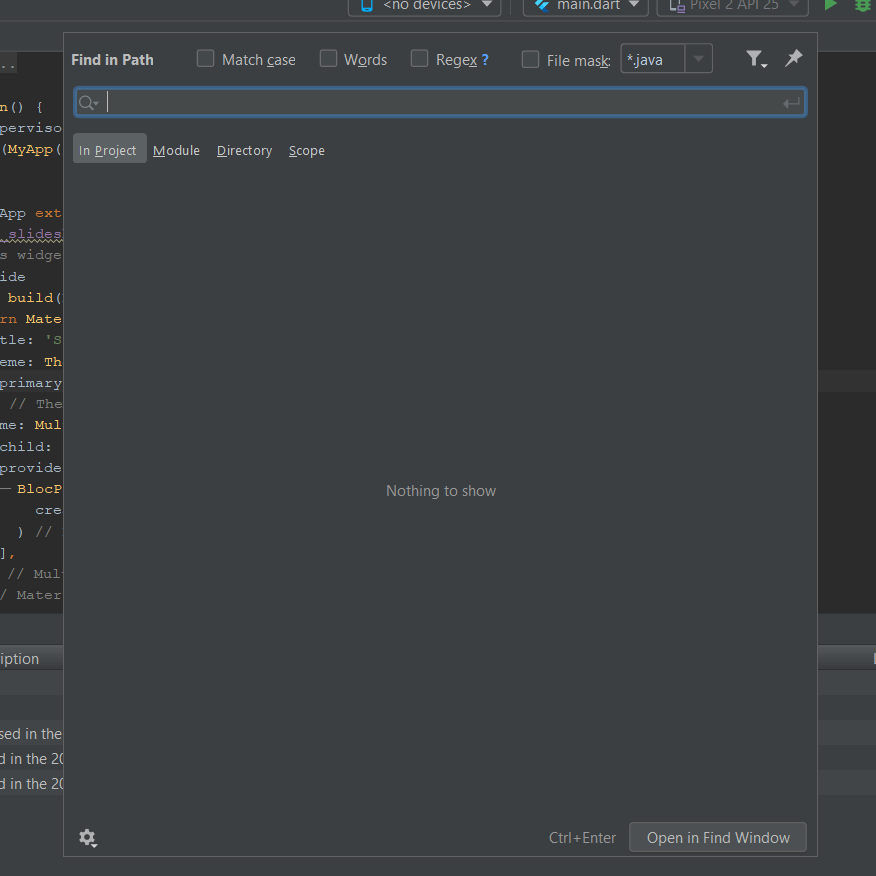 Search dialog
If we search for something, like Sonder, we get the results in this dialog:
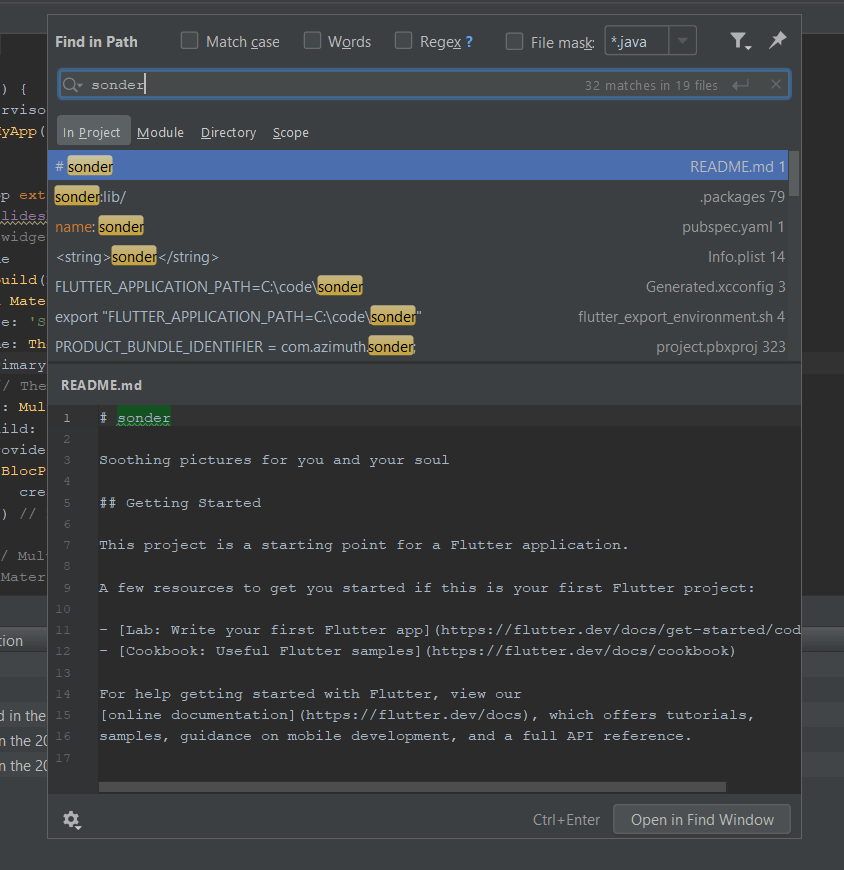 Search results
Pressing the up or down cursors here will show us results from that particular file, as well as the 8–9 lines on either side of that search result. 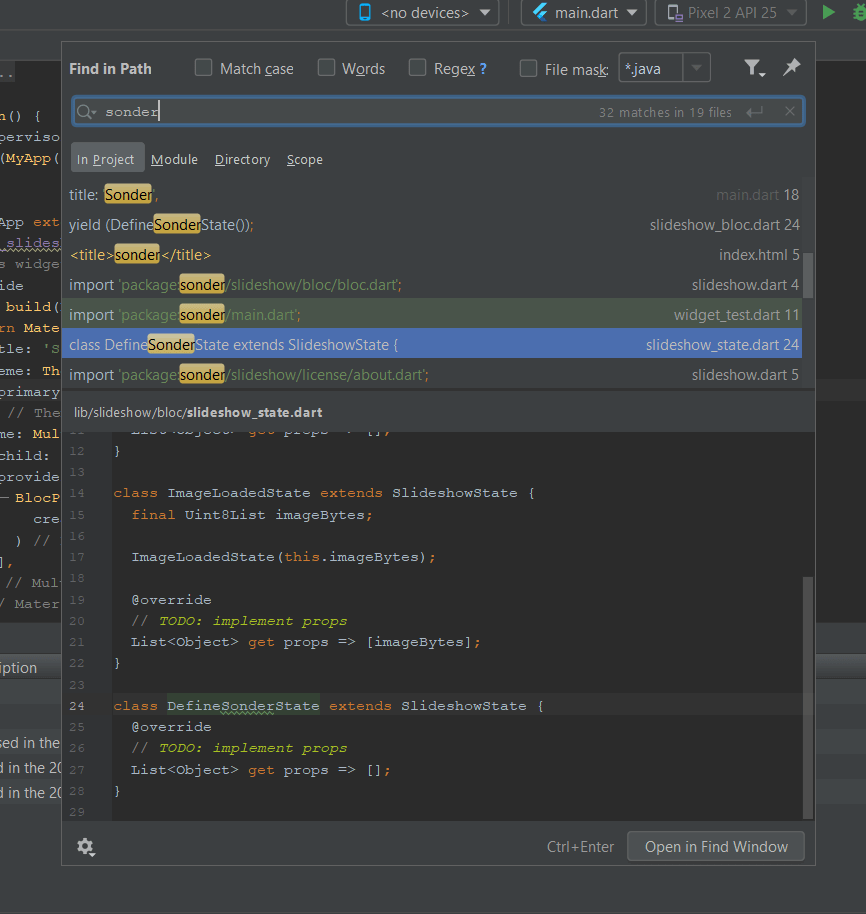
SSometimes, I’m searching for an implementation of a certain widget or function, and then I just quickly hit CTRL+SHIFT+F to bring up this dialog. Doing so, I can quickly move through the list by using the up and down arrows, and when I have found what I’m looking for, I can just hit escape to go back to the file I was working on initially. In terms of productivity, I find this is more powerful and faster.
Source Control
For more advanced source control operations I normally stick to using a dedicated tool like Fork, because it’s a lot easier to understand what is happening.
Still, you may find yourself in a situation where you have to use the tools of the IDE you are using, and that’s where the quality of the integrated source control solution does count.
Visual Studio Code
Visual Studio Code has an extremely wide array of source control utilities made available to it through extensions. But we’ll take a look at the built-in functionality that’s available.
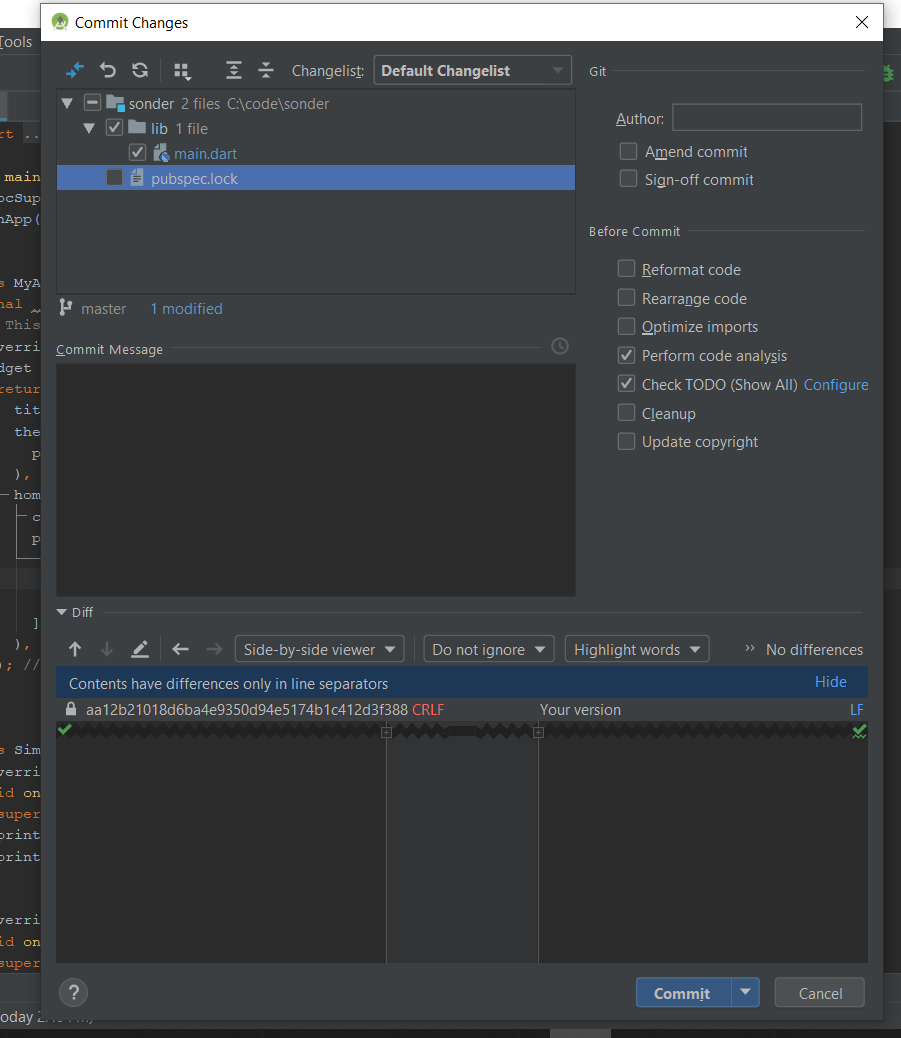
When writing this article, I noticed that I had changes to my pubspec.lock file, despite not recalling making any changes. The change window in Visual Studio Code looked like this:
 Something has changed…. but what?
Visual Studio Code knew that something had changed but couldn’t specifically call out what was different. If nothing has changed, then committing or resetting should logically have no impact, right? But it’s weird (and probably concerning) that Git is tracking a changed file but yet Visual Studio Code can’t show us what is different.
Now, if we actually change a file, then we can see the change in the source control area of Visual Studio Code. 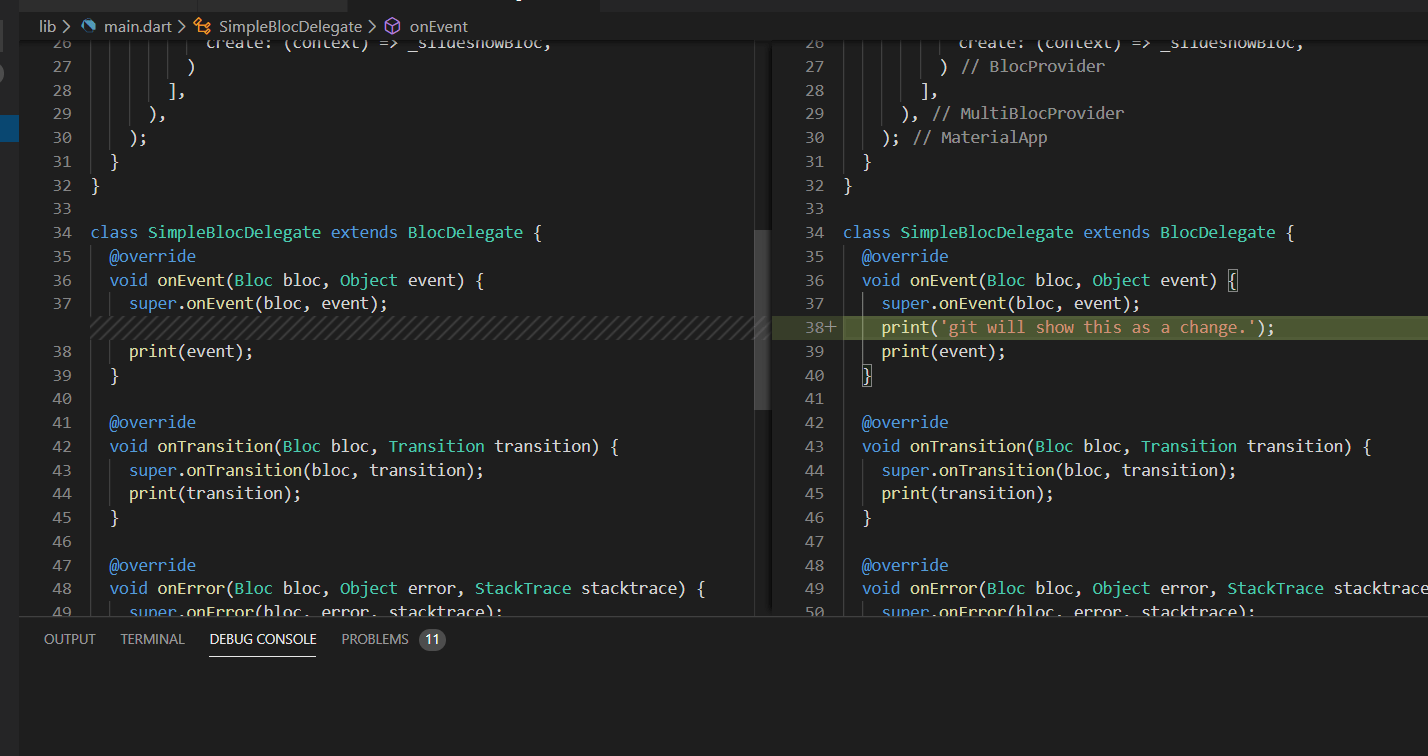
This is functional. Deletions are shown in much the same way.
Android Studio
Remember that pubspec.lock file for which Visual Studio Code couldn’t tell us what the changes were? In Android Studio, it looks like this:
 So, there are still no actual changes shown, which is accurate. But up at the top of the “Diff” section, we see this text:
“Contents have differences only in line separators”
And then, on the left, we can see that the file used to have CRLF line endings but now has LF line endings. This is because of a change I made with my Git client for how it handles line endings, which happened after my initial checkout. That’s pretty cool – we can now decide on whether that’s something we want to commit or not.
Checking actual file changes shows up like this as well: 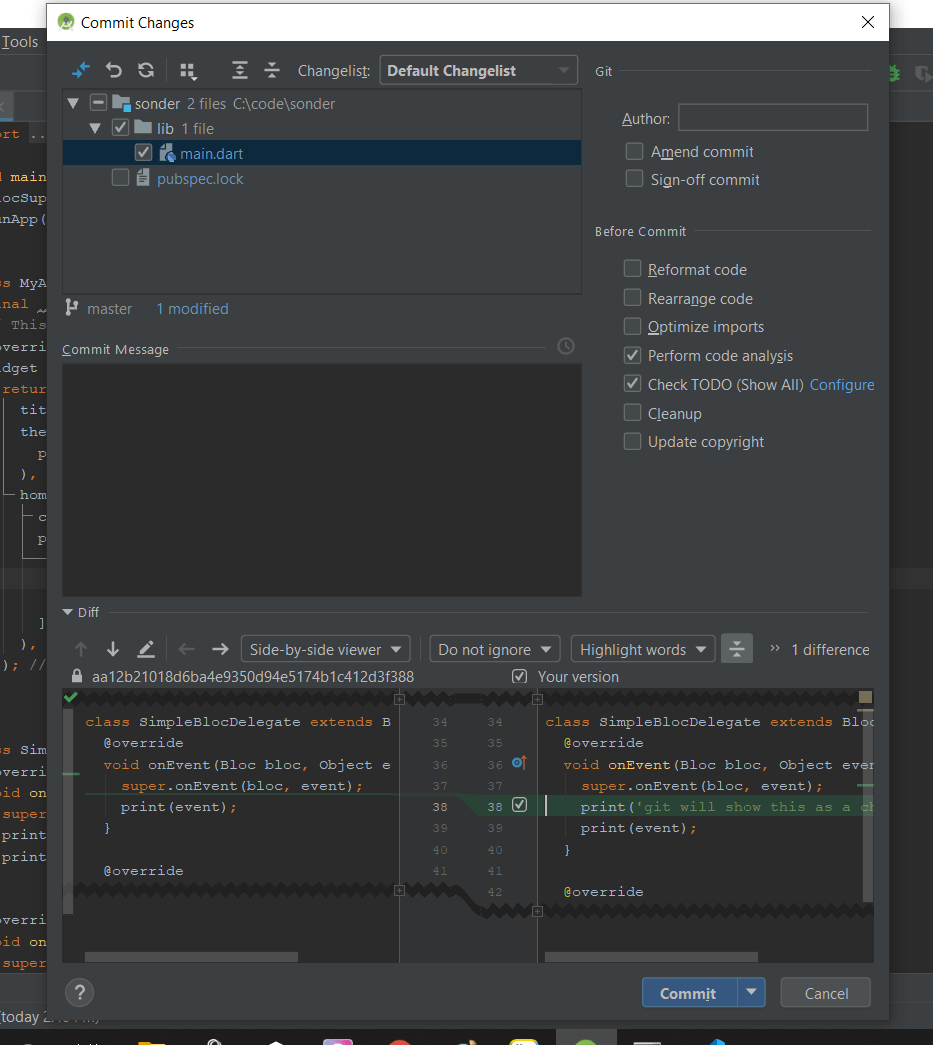
Changes to the file and the comparisons between the version that is already in the repository and our local version are very clear. We can see the green highlighting showing us precise changes that are happening to the file. We can also untick or tick, on a line-by-line basis, what we want to commit before doing so.
In fact, Android Studio has quite a bit of flexibility when it comes to using Git as your source control system. These are the options from the Git menu: 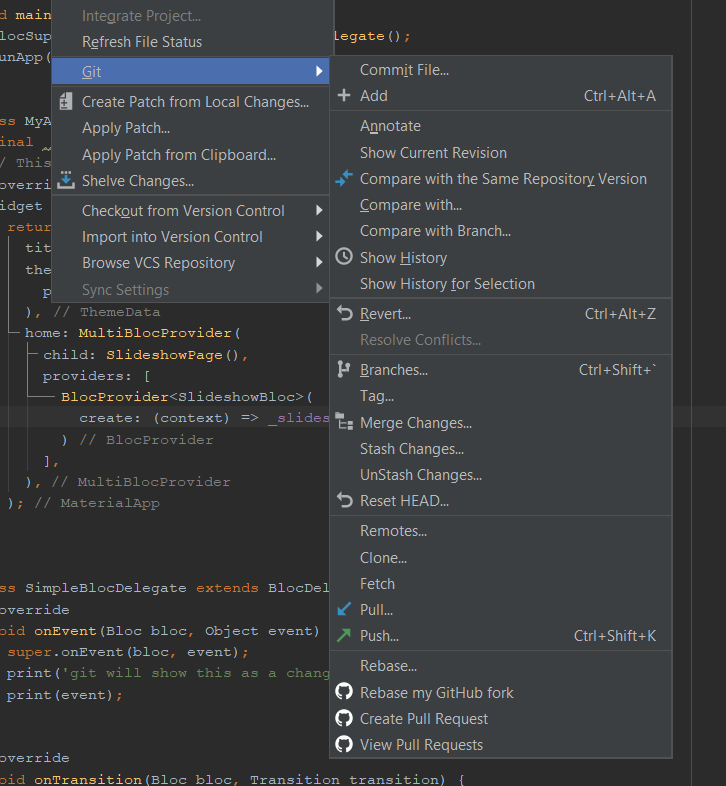
Can’t I add plugins to Visual Studio Code for better functionality?
You absolutely can, but I find that adding too many plugins to Visual Studio Code can bog it down considerably and make it slow to use. By the time you install all the stuff you need to do things like enhance the source control, you may be better off just choosing a more fully-featured IDE from the get-go.
Android Studio has some weird key bindings that you should know about:
The one that got me is CTRL+Y . In Visual Studio Code, this will redo something you have undone. In Android Studio, it will delete the current line. The default key binding for redo is CTRL+SHIFT+Z . This one got me a few timesрџ….

So what should I use?
There are a variety of functionality differences between these two tools. Visual Studio Code is lighter than Android Studio, so if you are genuinely limited by your hardware, you may be better off on Visual Studio Code. Also, some plugins and enhancements are only available for one or the other, so that will impact your decision as well. I personally prefer Android Studio, but you should use both and make your own decision.
In the early days I went between both tools before finally settling on Android Studio. There’s no reason why you can’t do the sameрџЉ.
And of course, you should use what works best for you. For every article recommending Android Studio, I’m sure there’s an article recommending Visual Studio Code. As always, if you have any questions be sure to let us know in the Codemagic Slack channel.
Thanks for reading!
Lewis Cianci is a software developer in Brisbane, Australia. His first computer had a tape drive. He’s been developing software for at least ten years, and has used quite a few mobile development frameworks (like Ionic and Xamarin Forms) in his time. After converting to Flutter, though, he’s never going back. You can reach him at his blog, read about other non-fluttery things at Medium, or maybe catch a glimpse of him at your nearest and most fanciest coffee shop with him and his dear wife.
Источник


