- Use the Files app on your iPhone, iPad, or iPod touch
- Find your files
- Save a copy of your file locally
- Move iCloud Drive files
- Look for files on your Mac or PC
- Organize your files
- Create new folders
- Add a tag
- Rename a tag
- Delete files
- Share folders and files with your friends or colleagues
- Use third-party apps in Files
- Add third-party apps
- Move third-party cloud files
- Do more with Files on iPadOS
- Connect to a file server
- Switch to Column View
- If you need help
- Move apps and create folders on your iPhone, iPad, or iPod touch
- How to organize your apps
- How to put apps in a folder
- How to move an app to a different page
- Use Tags and Smart Folders in Notes on your iPhone, iPad, and iPod touch
- Add a tag to a note
- View your notes with tags
- Remove tags from your notes
- Create a Smart Folder
- Convert a folder to a Smart Folder
Use the Files app on your iPhone, iPad, or iPod touch
View and manage your files from any iPhone, iPad, or iPod touch. The Files app makes it simple to find what you’re looking for, no matter what device you’re currently using.
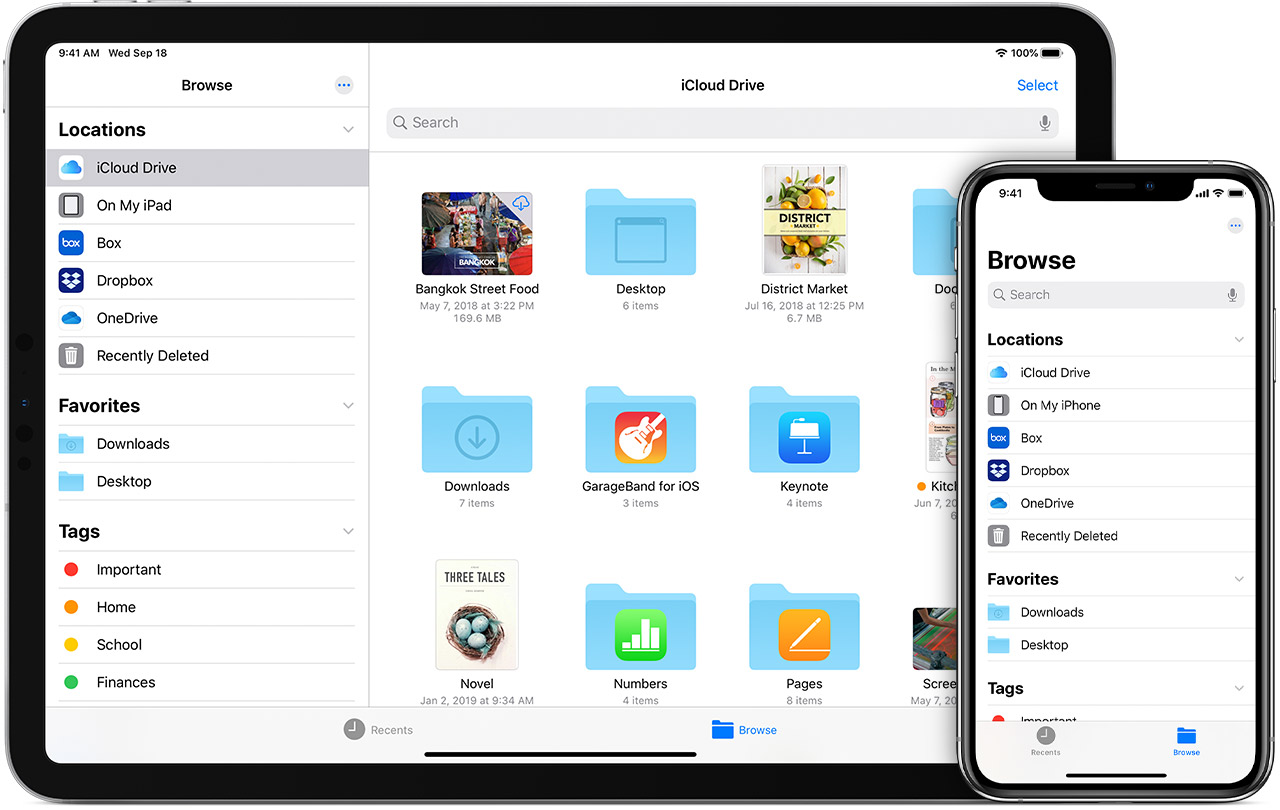
Find your files
The Files app includes files on the device you’re using, as well as those in other cloud services and apps, and iCloud Drive. You can also work with zip files.* To access your files, just open the Files app and choose the location of the file you’re looking for.
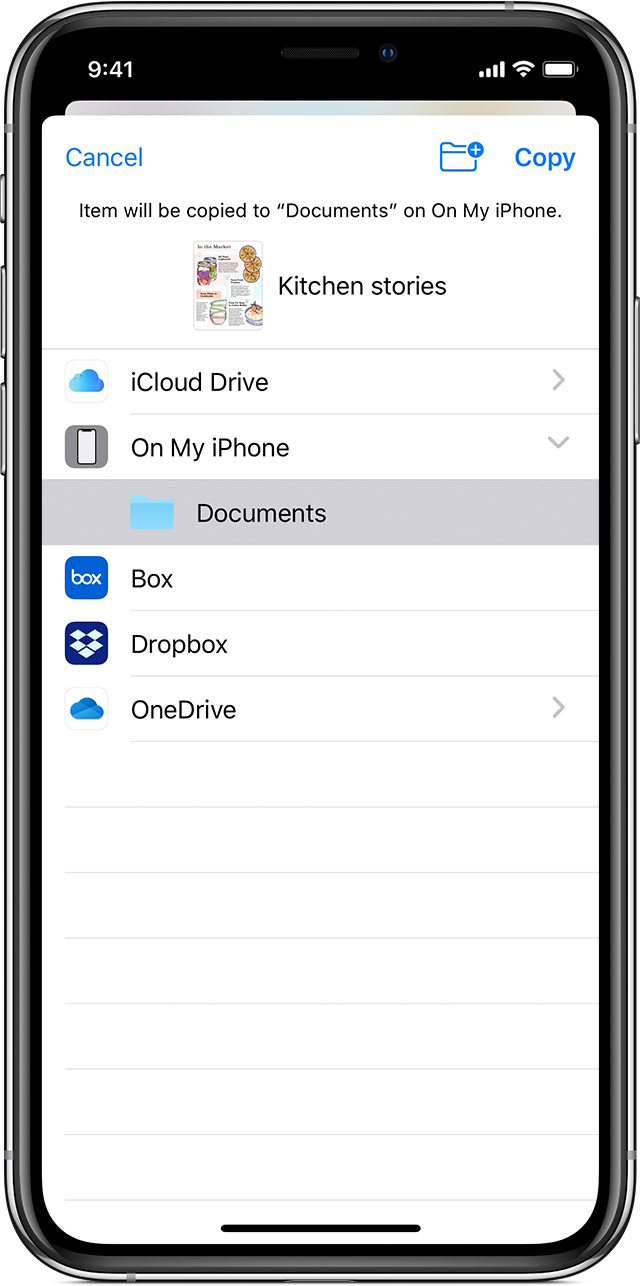
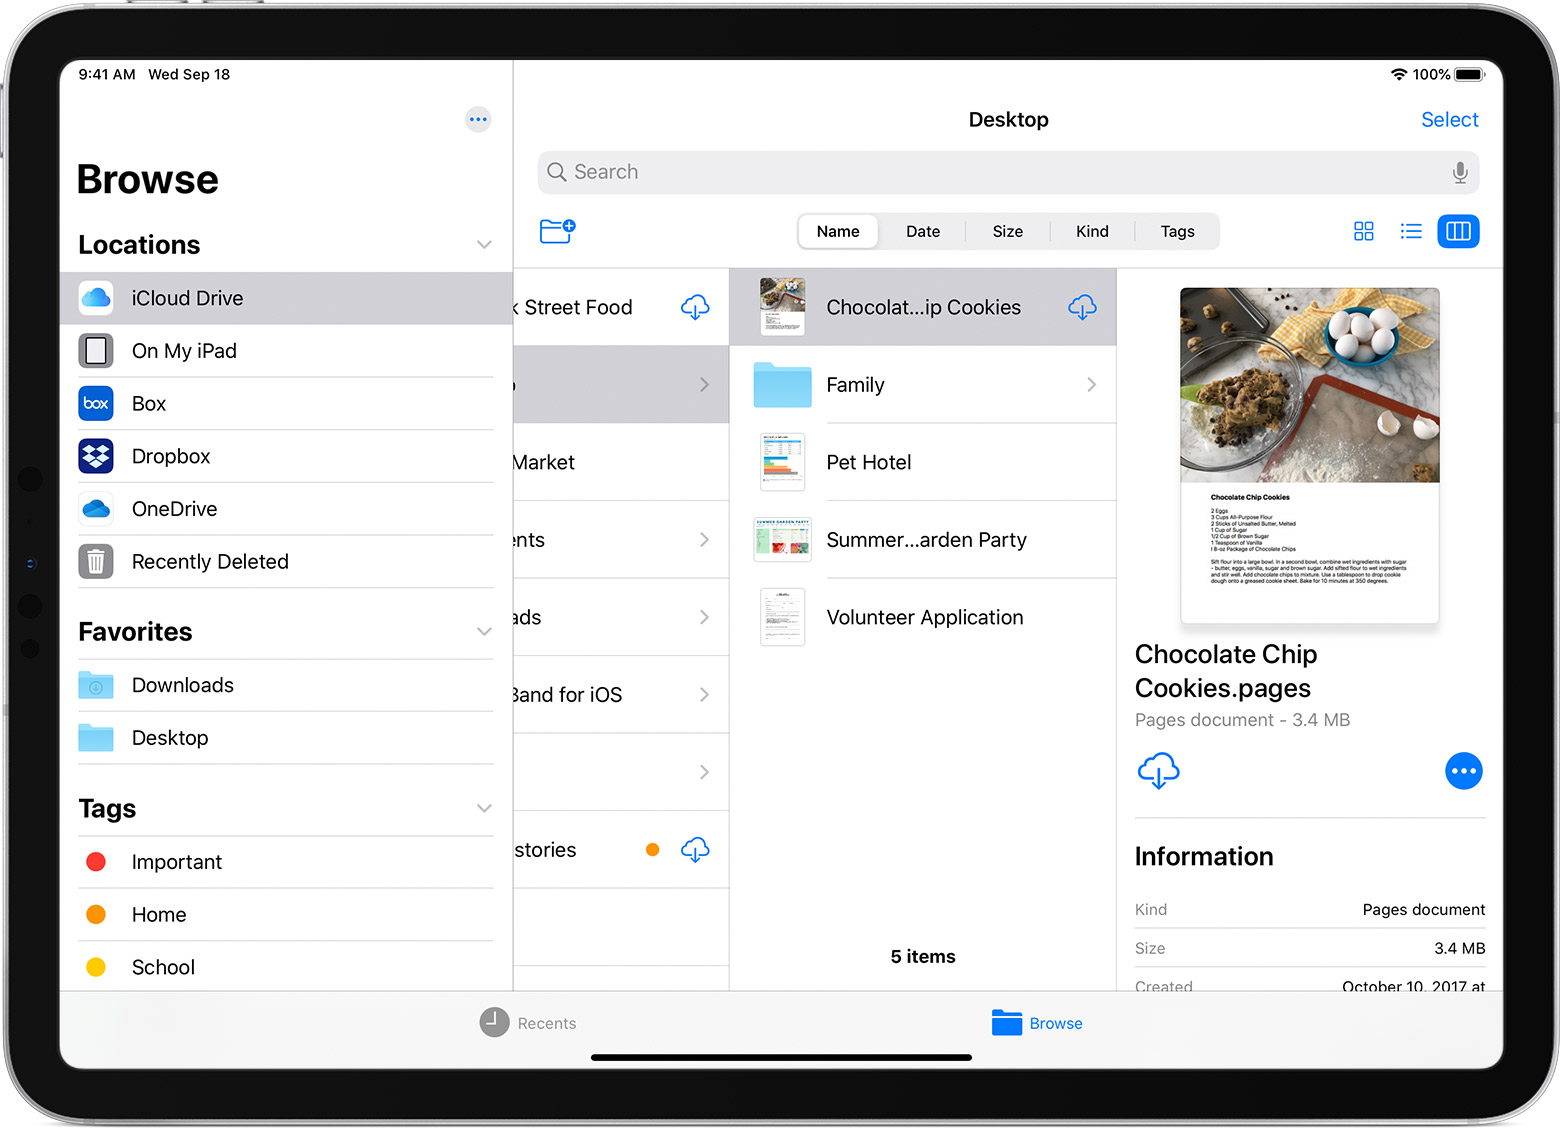
Save a copy of your file locally
You can find locally stored files in On My [device], under Locations. On your iPad, simply drag files into the On My iPad folder to store them directly on your device. If you want to save a file locally on your iPhone or iPod touch, follow these steps.
- Go to the file that you want to store on your device.
- Tap Select > the file name > Organize .
- Under On My [Device], choose a folder or tap New Folder to create a new one.
- Tap Copy.
You can also long press on a file, choose Move, and select which folder you want to copy it to.
On iOS 12 or earlier, tap the file and choose Move. Then, under On My [device], choose Numbers, Keynote, or Pages, and tap Copy.
![]()
Move iCloud Drive files
- Go to the file that you want to move.
- Tap Select, then choose the file.
- Tap Organize .
- Under On My [Device], choose a folder or tap New Folder to create a new one.
- Tap Move.
You can also long press on a file, choose Move, and select which folder you want to copy it to.
Look for files on your Mac or PC
- On your Mac, choose Go > iCloud Drive from the menu bar, or click iCloud Drive in the sidebar of a Finder window.
- On iCloud.com, go to the iCloud Drive app.
- On your PC with iCloud for Windows, open File Explorer, then click iCloud Drive.
* Password protected zip folders or directories are not supported in the Files app.

Organize your files
It’s easy to organize all of the files stored in iCloud Drive — including Pages, Numbers, and Keynote documents. When you make changes on one device, your edits are automatically updated on every device using iCloud Drive.
You can make your own folders. Or rename the files and folders you already have when you press firmly on them.
Create new folders
- Go to Locations.
- Tap iCloud Drive, On My [device], or the name of a third-party cloud service where you want to keep your new folder.
- Swipe down on the screen.
- Tap More .
- Select New Folder.
- Enter the name of your new folder. Then tap Done.
On iOS 12 or earlier, tap New Folder . If you don’t see New Folder or it’s gray, then the third-party cloud service doesn’t support new folders.
View your files by name, date, size, or the tags that you add. With colorful and custom labels, you can assign tags to your files any way that you like. That means you’ll quickly find just the project or document you need.
Add a tag
- Tap Select.
- Tap the file that you want to tag.
- Tap Share > Add Tags .
- Choose the tag that you want to add.
Rename a tag
- Go to Locations.
- Tap More > Edit.
- Tap the name of an existing tag.
- Enter the name of your new tag.
- Tap Done.
![]()
Delete files
Select the files that you don’t want anymore and tap Delete . If you delete files from the iCloud Drive folder on one device, they delete on your other devices too. iCloud Drive removes the files from every device that you’re signed in to with the same Apple ID.
When you delete a file from iCloud Drive or On My [device], it goes into your Recently Deleted folder. If you change your mind or accidentally delete a file, you have 30 days to get it back. Go to Locations > Recently Deleted. Select the file that you want to keep and tap Recover. After 30 days, your files are removed from Recently Deleted.
You can also sign into iCloud.com from your Mac or PC, then go to iCloud Drive and check Recently Deleted.
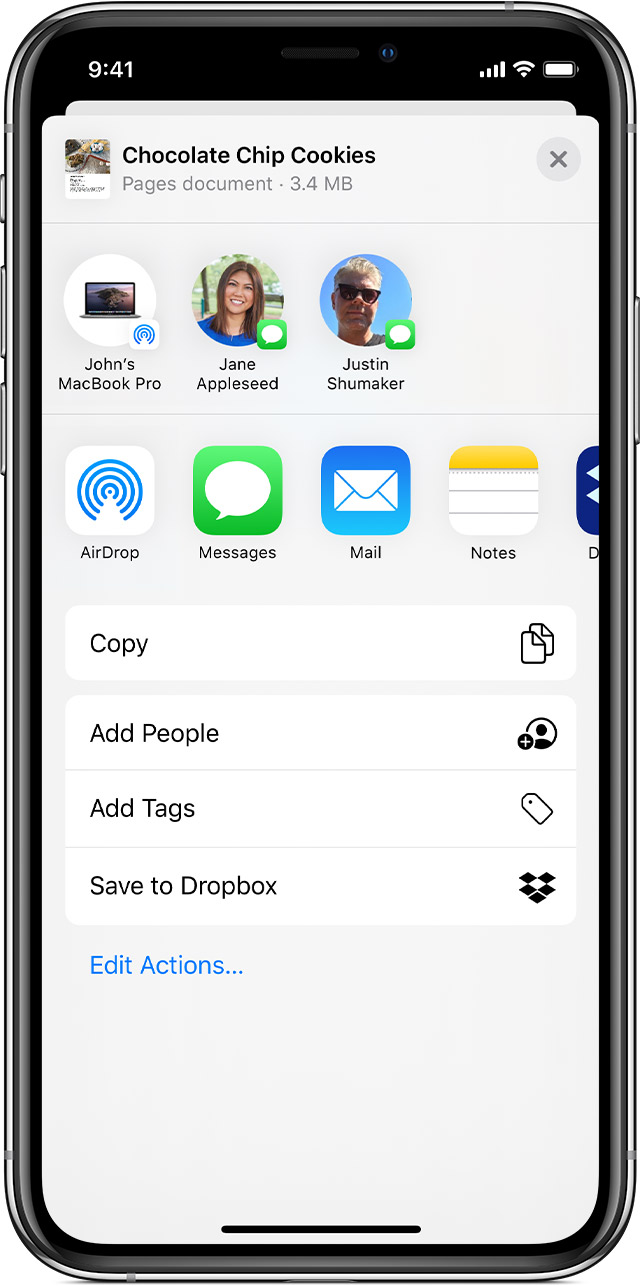
Share folders and files with your friends or colleagues
Want to share with a friend or colleague? You can share any folder or file stored in iCloud Drive directly from the Files app. In iCloud Drive, tap Select, choose the file or folder that you want to share, tap Share , and select Add People. You can share a folder or file through AirDrop, Messages, Mail, and more. Learn more about how folder sharing and file sharing work in iCloud Drive.
Or maybe you want to collaborate on a project in real time. The Files app lets you do that too with your Pages, Numbers, and Keynote documents. Select the file and tap Share or > Add People . You can invite them to collaborate through Messages, Mail, or copy and paste a link. Your participants are color-coded. And you can see when they’re online, actively working on your shared document.
Use third-party apps in Files
The Files app lets you add your third-party cloud services — like Box, Dropbox, OneDrive, Adobe Creative Cloud, Google Drive, and more — so that you can access all of your files on all of your devices. The files you keep in iCloud Drive automatically appear in the Files app, but you need to set up your other cloud services to access them in the Files app too.
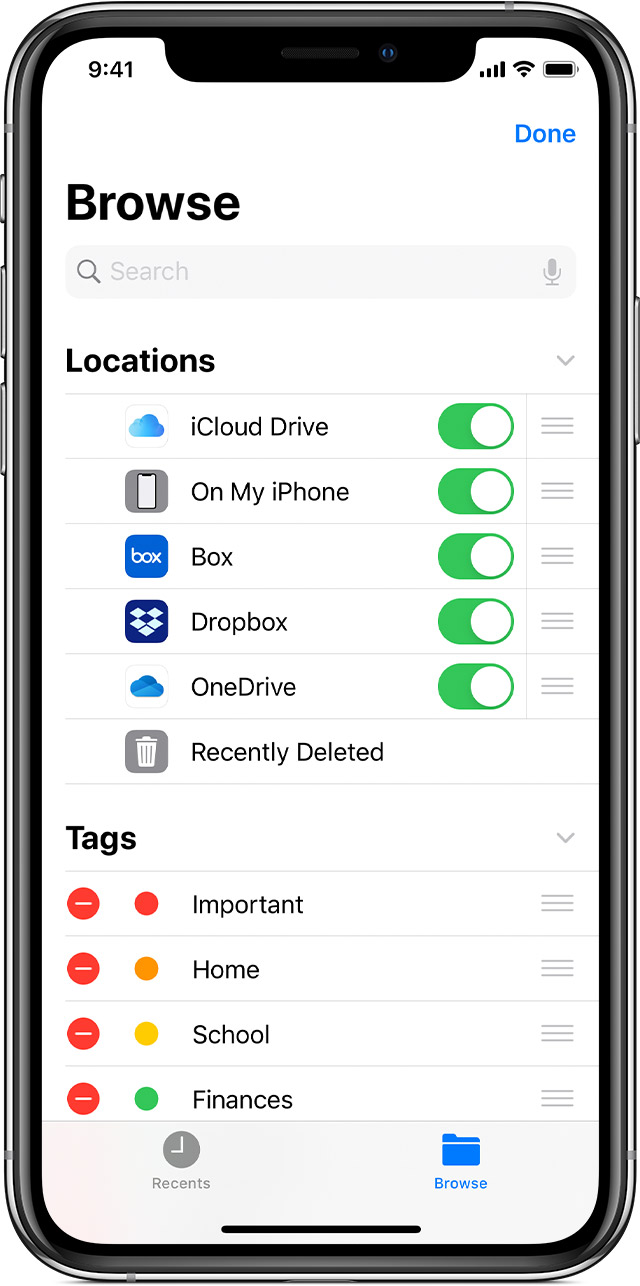
Add third-party apps
- Download and set up the third-party cloud app.
- Open the Files app.
- Tap the Browse tab.
- Tap More > Edit.
- Turn on the third-party apps that you want to use in the Files app.
- Tap Done.
If you don’t see one of your third-party cloud services in the Files app, check with your cloud provider.
On iOS 12 or earlier, open the Files app then tap Locations > Edit to add third-party apps.
![]()
Move third-party cloud files
- Open the file that you want to move.
- Tap Share > Copy.
- Open the folder where you want to move your file.
- Firmly press the screen.
- Tap Paste.
Do more with Files on iPadOS
If you’re on iPadOS, you can access files on a USB flash drive, SD card, or hard drive through the Files app on iPadOS. Just connect the storage device, and then you can select it under Locations. You can also connect to unencrypted storage on a file server, if that storage is using the APFS, Mac OS Extended, MS-DOS (FAT), or ExFAT format. You also have the option to view your files in Column View, which is helpful if you have files nested in multiple folders. Column View lets you see previews of files and offers access to tools like markup and rotate without even opening a file.
Connect to a file server
- Open the Browse tab.
- Tap More .
- Select Connect to Server.
- Enter the SMB address.
- Tap Connect.
- The server name appears under Shared in the Browse menu.
Switch to Column View
- In landscape mode, open the Browse tab.
- Select a folder.
- Swipe down on the right side of the screen.
- Select Column View in the upper right.
- Tap a folder to expand its contents.
- Tap a file to see a preview.
To leave Column View, tap Grid View or List View , or use your iPad in portrait mode.
If you need help
- Update your iPhone, iPad, or iPod touch to the latest iOS, or iPadOS.
- Set up iCloud on all of your devices and turn on iCloud Drive.
- Make sure that you’re signed in to iCloud with the same Apple ID on all of your devices.
- If you want to upload, download, or share files using cellular data, open Settings, select Cellular, scroll down to iCloud Drive and any third-party cloud services you use, and turn it on for each service.
If you don’t want to access your iCloud Drive files in the Files app, you can choose to download and add only third-party cloud services instead.
![]()
Information about products not manufactured by Apple, or independent websites not controlled or tested by Apple, is provided without recommendation or endorsement. Apple assumes no responsibility with regard to the selection, performance, or use of third-party websites or products. Apple makes no representations regarding third-party website accuracy or reliability. Contact the vendor for additional information.
Источник
Move apps and create folders on your iPhone, iPad, or iPod touch
You can organize the apps on your Home Screen, put them in folders, and move them to other pages, or screens. You can also reorder your pages.
How to organize your apps
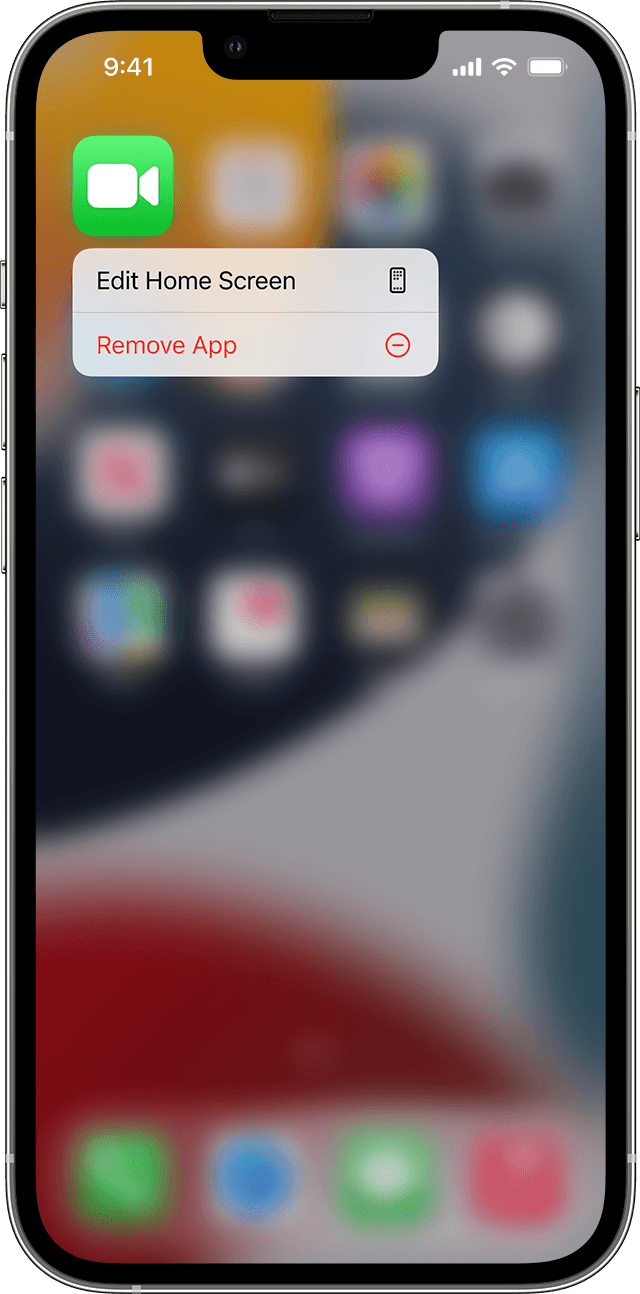
- Touch and hold any app on the screen, then tap Edit Home Screen .
- Drag the app to another spot, like the Dock at the bottom of the screen.
- On iPhone X and later, tap Done to save. On iPhone 8 and earlier, press the Home button.
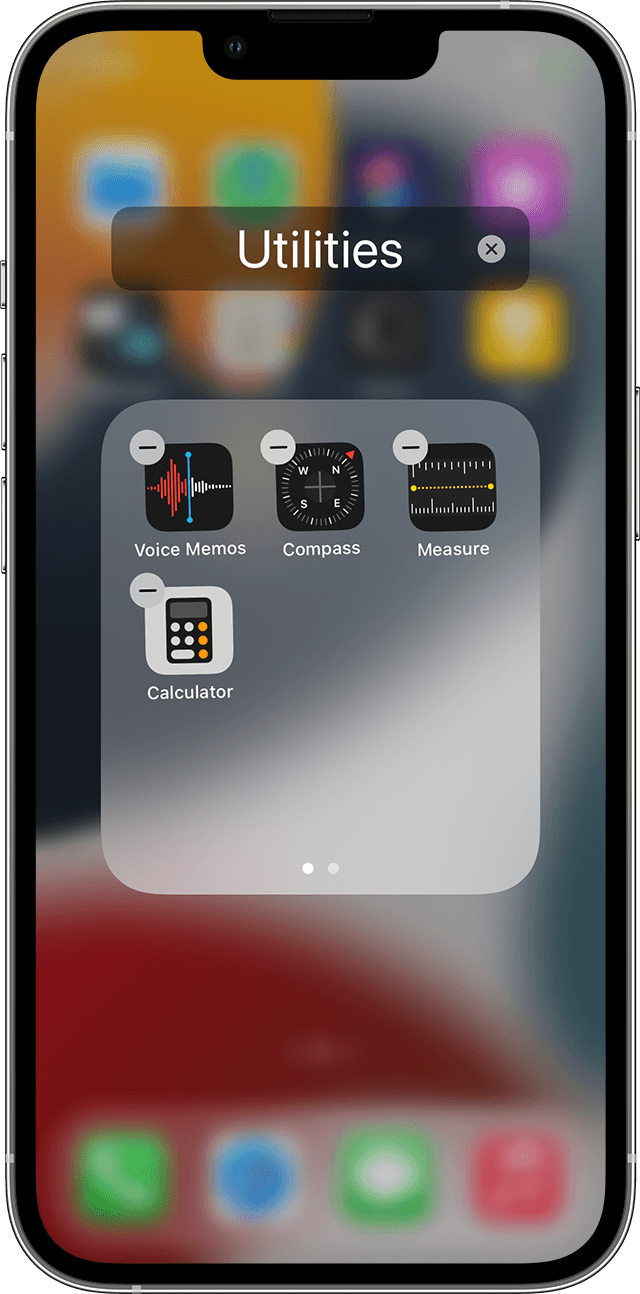
How to put apps in a folder
If you have a lot of apps, you can put your related apps in folders. Here’s how:
- To make a folder, drag an app onto another app.
- To rename the folder, tap the name field or the Close button , then enter the new name.
- Drag apps into the folder. Folders can have more than one page.
How to move an app to a different page
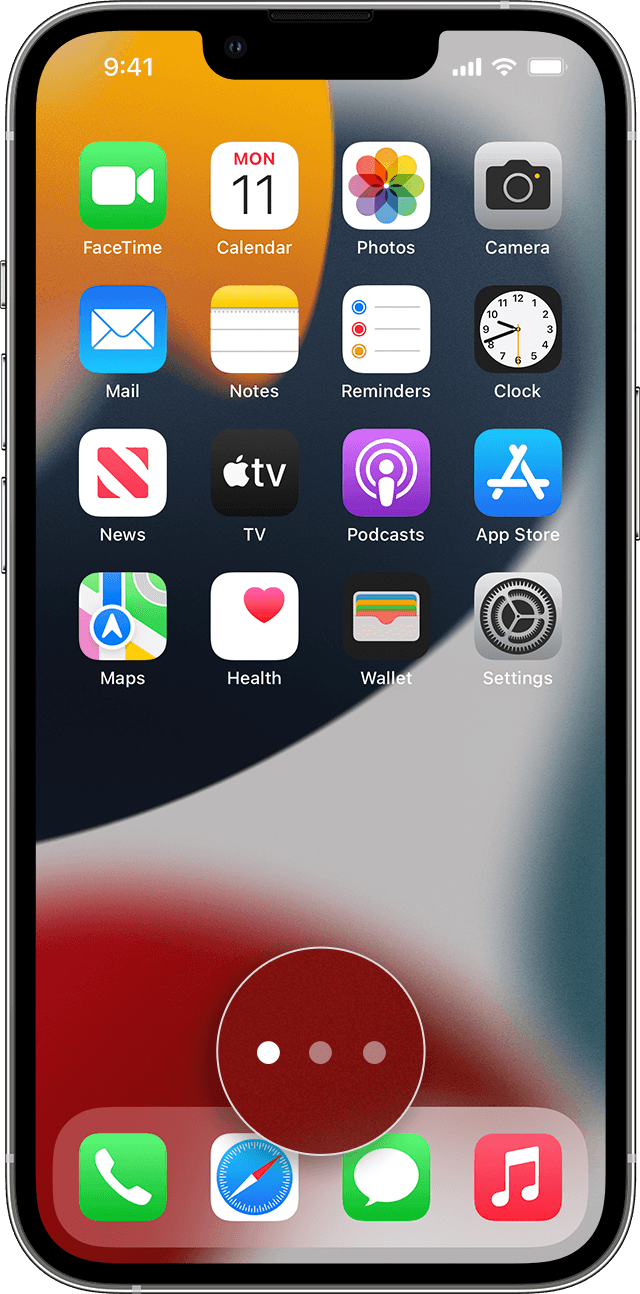
You start with one page of apps. To make a new page, touch and hold an app until the apps jiggle, then drag an app to the right edge of the screen. You might need to wait a second for the new page to appear. To delete a page, consolidate all of your apps to another Home Screen. When there are no apps present the page will delete.
When you have more than one page, a bright dot in a row of dots above the Dock shows you which page you’re on. You can move an app to a different page and create new pages:

If there are dots to the left or right of the bright dot, you can drag an app to the right side of the screen to move the app to the next page in that direction. Or swipe left to see the apps on that page.

If there are no dots to the right of the bright dot, dragging an app to that side of the screen makes a new page.
Источник
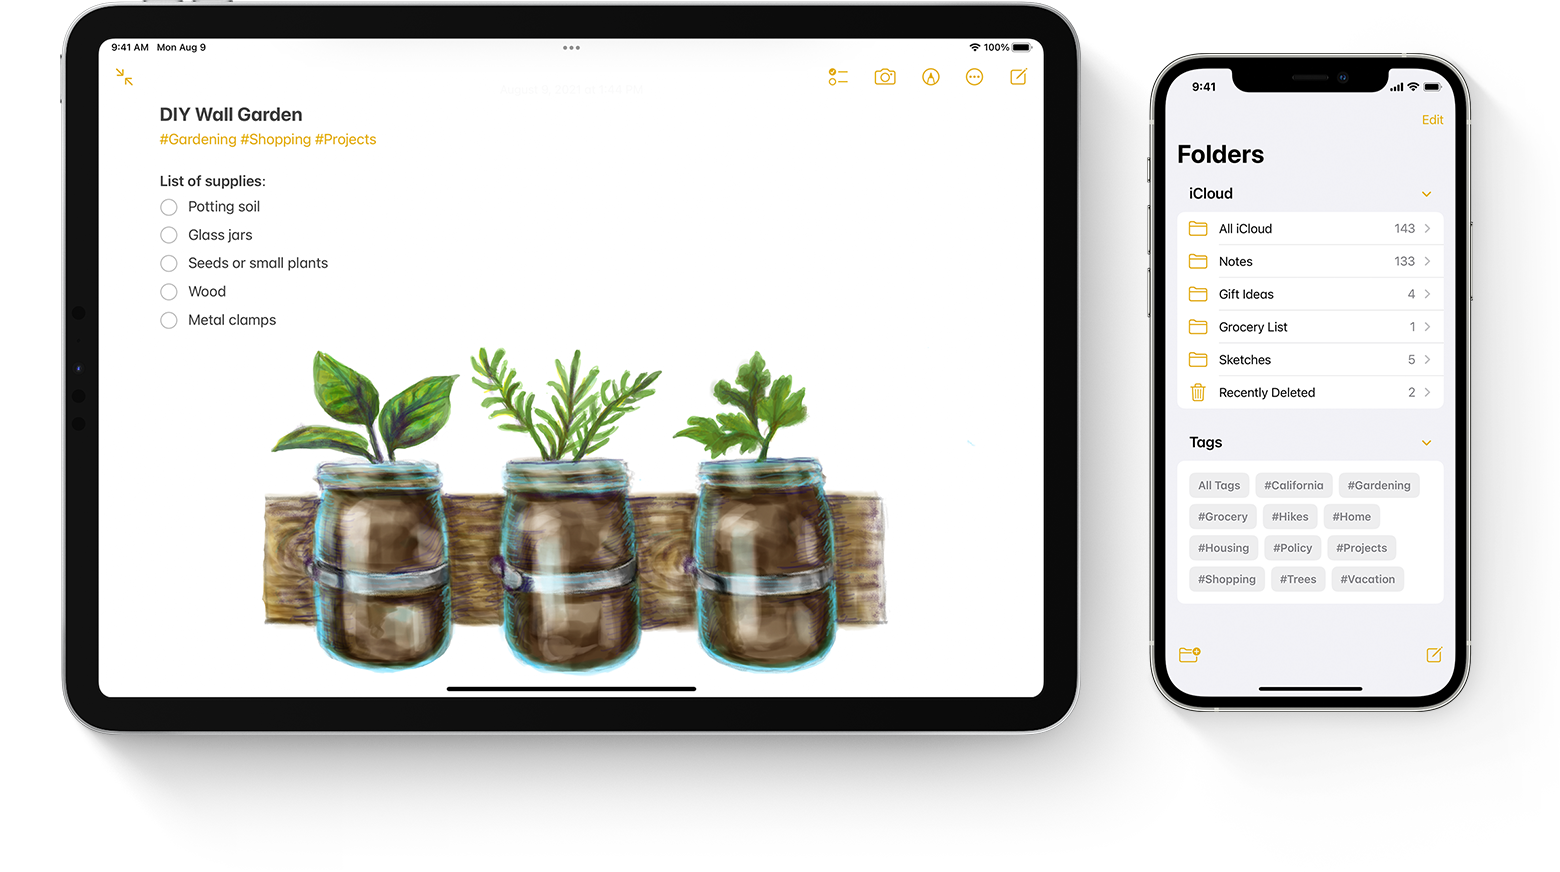
Use Tags and Smart Folders in Notes on your iPhone, iPad, and iPod touch
With iOS 15 and iPadOS 15, you can use tags to quickly categorize your notes so you can easily find them later. Just add one or more tags — like #work or #shopping — anywhere in any note. You can also use tags together with existing folders to search and filter your notes across multiple folders.
Add a tag to a note
With iOS 15 and iPadOS 15, you can add a tag anywhere in a note, including the title. To add a tag to a note, type # followed by the tag name or choose a tag from the suggestions menu above the keyboard. You can also add tags in your drawings with an Apple Pencil, just sketch # and the tag name within a note.
Tag names need to be one continuous word, but you can use hyphens and underscores to make tag names longer — for example, #gardening-supplies. You can add multiple tags to a note, and any tag you create is automatically added to the Tags browser under your list of Folders.
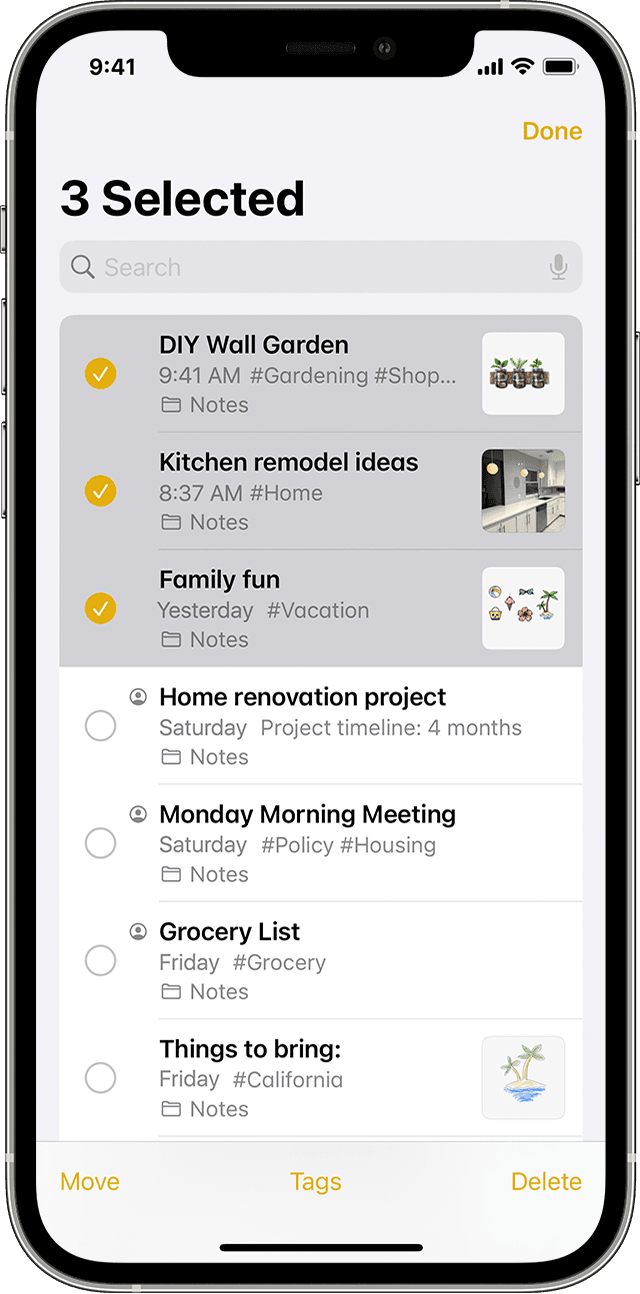
To add a tag to multiple notes:
- Go to the folder with the list of notes.
- Tap the More button , then tap Select Notes.
- Select the notes, then tap Tags at the bottom of the screen.
- Select the tags you want to add to the notes, then tap Done.
If you create a tag on a device with iOS 15 or iPadOS 15, it’ll show up in Notes on your other Apple devices if they’re using at least the latest version of iOS 14, iPadOS 14, or macOS Big Sur. If your other devices are using an older software version, the note with the tag will be hidden.
When you share a tagged note with someone who’s using at least the latest version of iOS 14, iPadOS 14, or macOS Big Sur, they’ll see the tagged word but it won’t appear as an actual tag until they add it as a tag. If you try to share a tagged note with someone who’s using an older software version, they won’t see the note at all.
You can’t lock a note that has a tag and you can’t add a tag to a locked note.
View your notes with tags
When you create a tag, you can find it in the note itself and in the Tags browser, which is below your list of Folders.
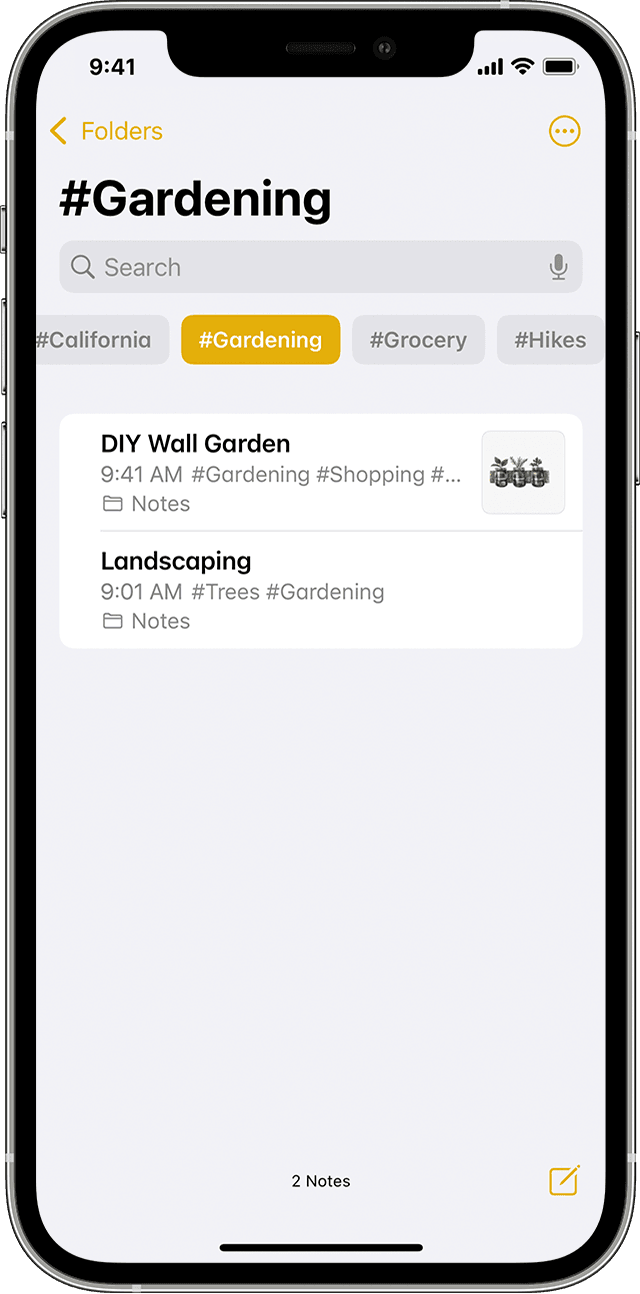
To see a list of notes with a specific tag or multiple tags:
- Go to the Tags browser.
- Tap a tag or All Tags. If you tap one tag, you’ll see a list of notes with that specific tag. If you tap All Tags, you’ll see a list of all your notes that have tags.
If you want to filter your notes even more, for example to find notes that have two specific tags:
- Go to the Tags browser.
- Tap a tag, then select another tag. All of your notes with those two tags should appear.
Remove tags from your notes
To remove a tag from the Tags browser, remove it from all of the notes that include it. To remove a tag:
- Go to all the notes that have the tags and remove the tags.
- Tap Done.
The Tags browser will only show tags that are being used within your notes. If you remove a tag from a note, it’ll be removed from the Tags browser.
Create a Smart Folder
Folders are a great way to organize your notes into categories like work or personal projects. Smart Folders act like filters to gather your tagged notes. When using Smart Folders, your notes also remain in the original folder you created them in. You can use Smart Folders as an easy way to find notes that you want to reference regularly — like journal entries, recipes, or work documents.
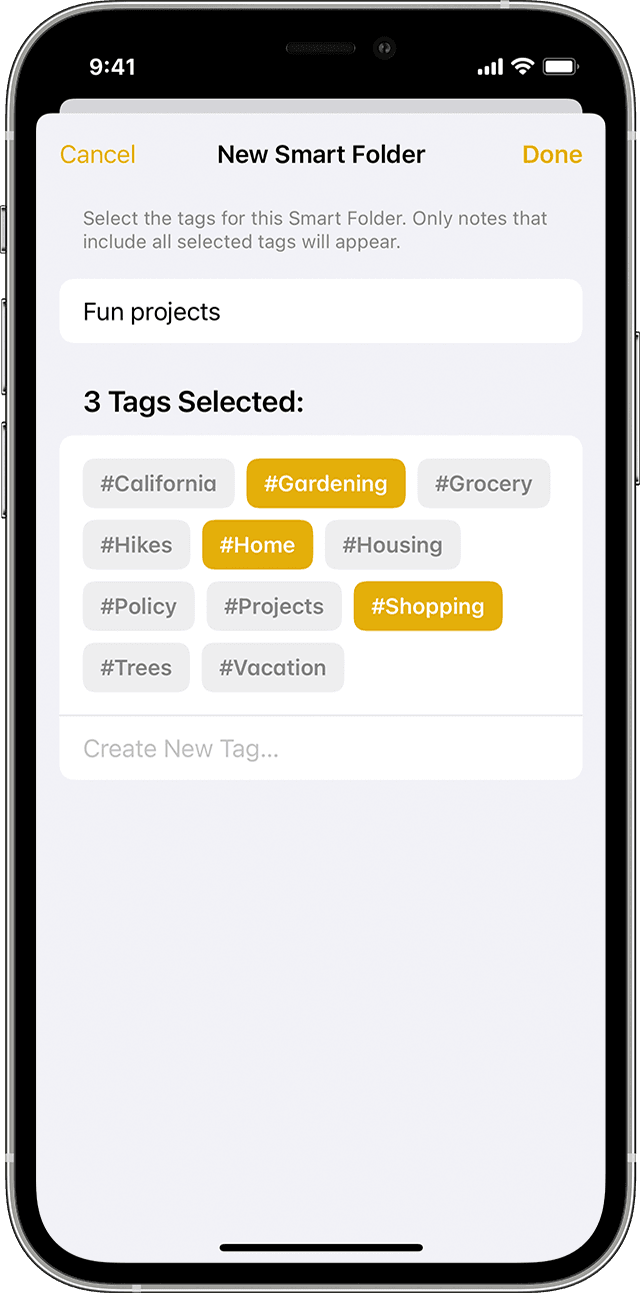
To create a Smart Folder:
- Tap the New Folder button .
- Choose an account, such as On My iPhone or iCloud.
- Tap New Smart Folder, enter a name, then select the tags or create some new tags.
You can also create a Smart Folder from the Tags browser. Just tap the tag, then tap the More button , tap Create Smart Folder, add a name, and tap Save.
Convert a folder to a Smart Folder
To convert an existing folder to a Smart Folder:
- When viewing the folder you want to convert, tap the More button .
- Scroll down and tap Convert to Smart Folder.
When you convert a folder, its notes are moved to the Notes folder and tagged with the name of the Smart Folder. Keep in mind, you can’t convert shared folders, a folder with a subfolder, or a folder that contains locked notes.
When you convert a folder to a Smart Folder, it can’t be undone. If you no longer want the Smart Folder, you need to delete it.
Источник


