- Android User Interface Design: Basic Font Sizes
- How Users Can Configure Font Settings
- Using Dynamic Font Sizes
- Using Fixed Pixel Sizes
- Using Standard System Font Sizes
- Conclusion
- 400+ Android & Flutter Code
- Saturday, January 3, 2015
- How to change TextView font size in android
- Fonts in XML
- Creating a font family
- Using fonts in XML layouts
- Adding fonts to a TextView
- Adding fonts to style
- Using fonts programmatically
- Kotlin
- Using the support library
- Kotlin
- Русские Блоги
- Адаптивный размер официального шрифта TextView в Android
Android User Interface Design: Basic Font Sizes
Android device screens come in all shapes and sizes. Android developers often include text in their applications that needs to be readable, regardless of what device the application is running on. By using some simple methods, developers can write one application whose text will display reasonably well for all sorts of devices, including supporting the user’s own text size preferences, with little extra work.
In this quick tutorial, we will discuss some of the steps that developers can take to make the text in their applications clear and readable, as well as flexible enough to work on a variety of screen types and across multiple user display settings.
How Users Can Configure Font Settings
Some users have great eyesight and others literally nearly blind. The Android operating system recognizes this fact and provides accessibility features to allow the device text font size to be scaled based on the user’s preference.
To change the font settings on the device, launch the Settings application, then choose Display, Font Size. The user font preference can be set to make text one of four font size settings (Small, Normal, Large, and Huge), as shown in Figure 1.


Using Dynamic Font Sizes
When you want your text to be flexible, based on the user preferences, defne text font sizes using SP (scalable point) units. The Android platform allows dimensional values to be defined in a variety of ways. When it comes to text sizes, you will want to use density-independent units like DP (device-independent pixels) and SP. The SP unit is perfect for text sizes, as it is sensitive to the user’s display settings.
Here’s an example of a TextView that defines its size in terms of SP units:
When it comes to title or heading text, and not text in a free flowing text box, you may not want the user to be able to control the size of the text. In this case, you’d use the DP unit, as it scales in pixels with the density of the device, but not with user settings.
Using Fixed Pixel Sizes
When you don’t want your text to scale no matter what, use absolute pixel sizes with the px unit. There may be some situations when you do not want your text to scale or change size. While this is discouraged, as it may make font sizes unreadable on some devices, here’s how you can do it if you have a good reason for doing so. Simply use one of the absolute units, such as the PX (pixels).
Here’s an example of a TextView that defines its size in terms of PX units. The text displayed by this control will not scale based on the user’s preferences or other factors.
Using Standard System Font Sizes
The Android platform defines a set of relative font size styles that you can use in your applications: Small, Medium, and Large. These font sizes are built upon the SP unit type, so they will scale with user preferences.
The following XML defines three TextView controls, one that will be displayed using the Small font, one in the Medium font, and the third in the Large font size.
Now let’s pull everything together and show you what all these different TextView controls would look like on an Ice Cream Sandwich-style device. In the first figure, the user has a Normal font preference, and in the second figure, the user has a Huge font preference. Note how the TextView controls display under these conditions.


Conclusion
Android devices come in all shapes and sizes and Android users have different needs in terms of application accessibility, such as the need for larger font sizes. Because of the screen limitations, applications that use text need to take some steps to keep typography readable and flexible for different screens. To start, make certain that your application uses scale-independent pixel units (SP), but understand that this font size can change pretty drastically based upon user preferences.
Источник
400+ Android & Flutter Code
Example code for android + flutter app developers.
Saturday, January 3, 2015
How to change TextView font size in android
TextView widget display text on android application. we can set or change TextView font size statically by declarative syntax in xml layout file or programmatically at run time in java file. even we can use an xml file source to define font size.
the following example code demonstrate us how can we define TextView font size in xml layout file and how can we uses dimens.xml to reference font size. in this example we did not changes any coding in java file, so here we only include the layout xml file and dimens.xml file.


Dimension
we defined dimension value in xml layout file as example 50sp, 20pt, 30dp. dimension is specified with a number followed by a unit of measure. android supported the following units of measure, those are dp, sp, pt, px, mm, in.
dp means Density-independent-Pixels. this is an abstract unit that is based on the physical density of the screen.
sp means Scale-independent-Pixels. SP as like dp but it is also scaled by the user’s font size preference. Sp is recommended unit for measure.
pt means Points — 1/72 of an inch based on the physical size of screen. px describe Pixels which corresponds to actual pixels on the screen. mm is Millimeters which is based on the physical size of the screen. in describe inches which also based on the physical size of the screen.
Источник
Fonts in XML
Android 8.0 (API level 26) introduces a new feature, Fonts in XML, which lets you use fonts as resources. You can add the font file in the res/font/ folder to bundle fonts as resources. These fonts are compiled in your R file and are automatically available in Android Studio. You can access the font resources with the help of a new resource type, font . For example, to access a font resource, use @font/myfont , or R.font.myfont .
To use the Fonts in XML feature on devices running Android 4.1 (API level 16) and higher, use the Support Library 26. For more information on using the support library, refer to the Using the support library section.
To add fonts as resources, perform the following steps in the Android Studio:
- Right-click the res folder and go to New > Android resource directory.
The New Resource Directory window appears.
In the Resource type list, select font, and then click OK.
Note: The name of the resource directory must be font.

Figure 1. Adding the font resource directory
Add your font files in the font folder.
The folder structure below generates R.font.dancing_script , R.font.lobster , and R.font.typo_graphica .

Figure 2. Adding the font files in the resource directory
Double-click a font file to preview the file’s fonts in the editor. 
Figure 3. Previewing the font file
Creating a font family
A font family is a set of font files along with its style and weight details. In Android, you can create a new font family as an XML resource and access it as a single unit, instead of referencing each style and weight as separate resources. By doing this, the system can select the correct font based on the text style you are trying to use.
To create a font family, perform the following steps in the Android Studio:
- Right-click the font folder and go to New > Font resource file. The New Resource File window appears.
- Enter the file name, and then click OK. The new font resource XML opens in the editor.
- Enclose each font file, style, and weight attribute in the element. The following XML illustrates adding font-related attributes in the font resource XML:
Using fonts in XML layouts
Use your fonts, either a single font file or a font from a font family, in a TextView object or in styles. To add fonts to the TextView or in styles, use the fontFamily attribute.
Note: When you use a font family, the TextView switches on its own, as needed, to use the font files from that family.
Adding fonts to a TextView
To set a font for the TextView , do one of the following:
- In the layout XML file, set the fontFamily attribute to the font file you want to access.
- Open the Properties window to set the font for the TextView .
- Select a view to open the Properties window.
Note: The Properties window is available only when the design editor is open. Select the Design tab at the bottom of the window.

Figure 4. Selecting the font from the Properties window
The Android Studio layout preview, shown in the rightmost pane of Figure 5, allows you to preview the font set in the TextView .
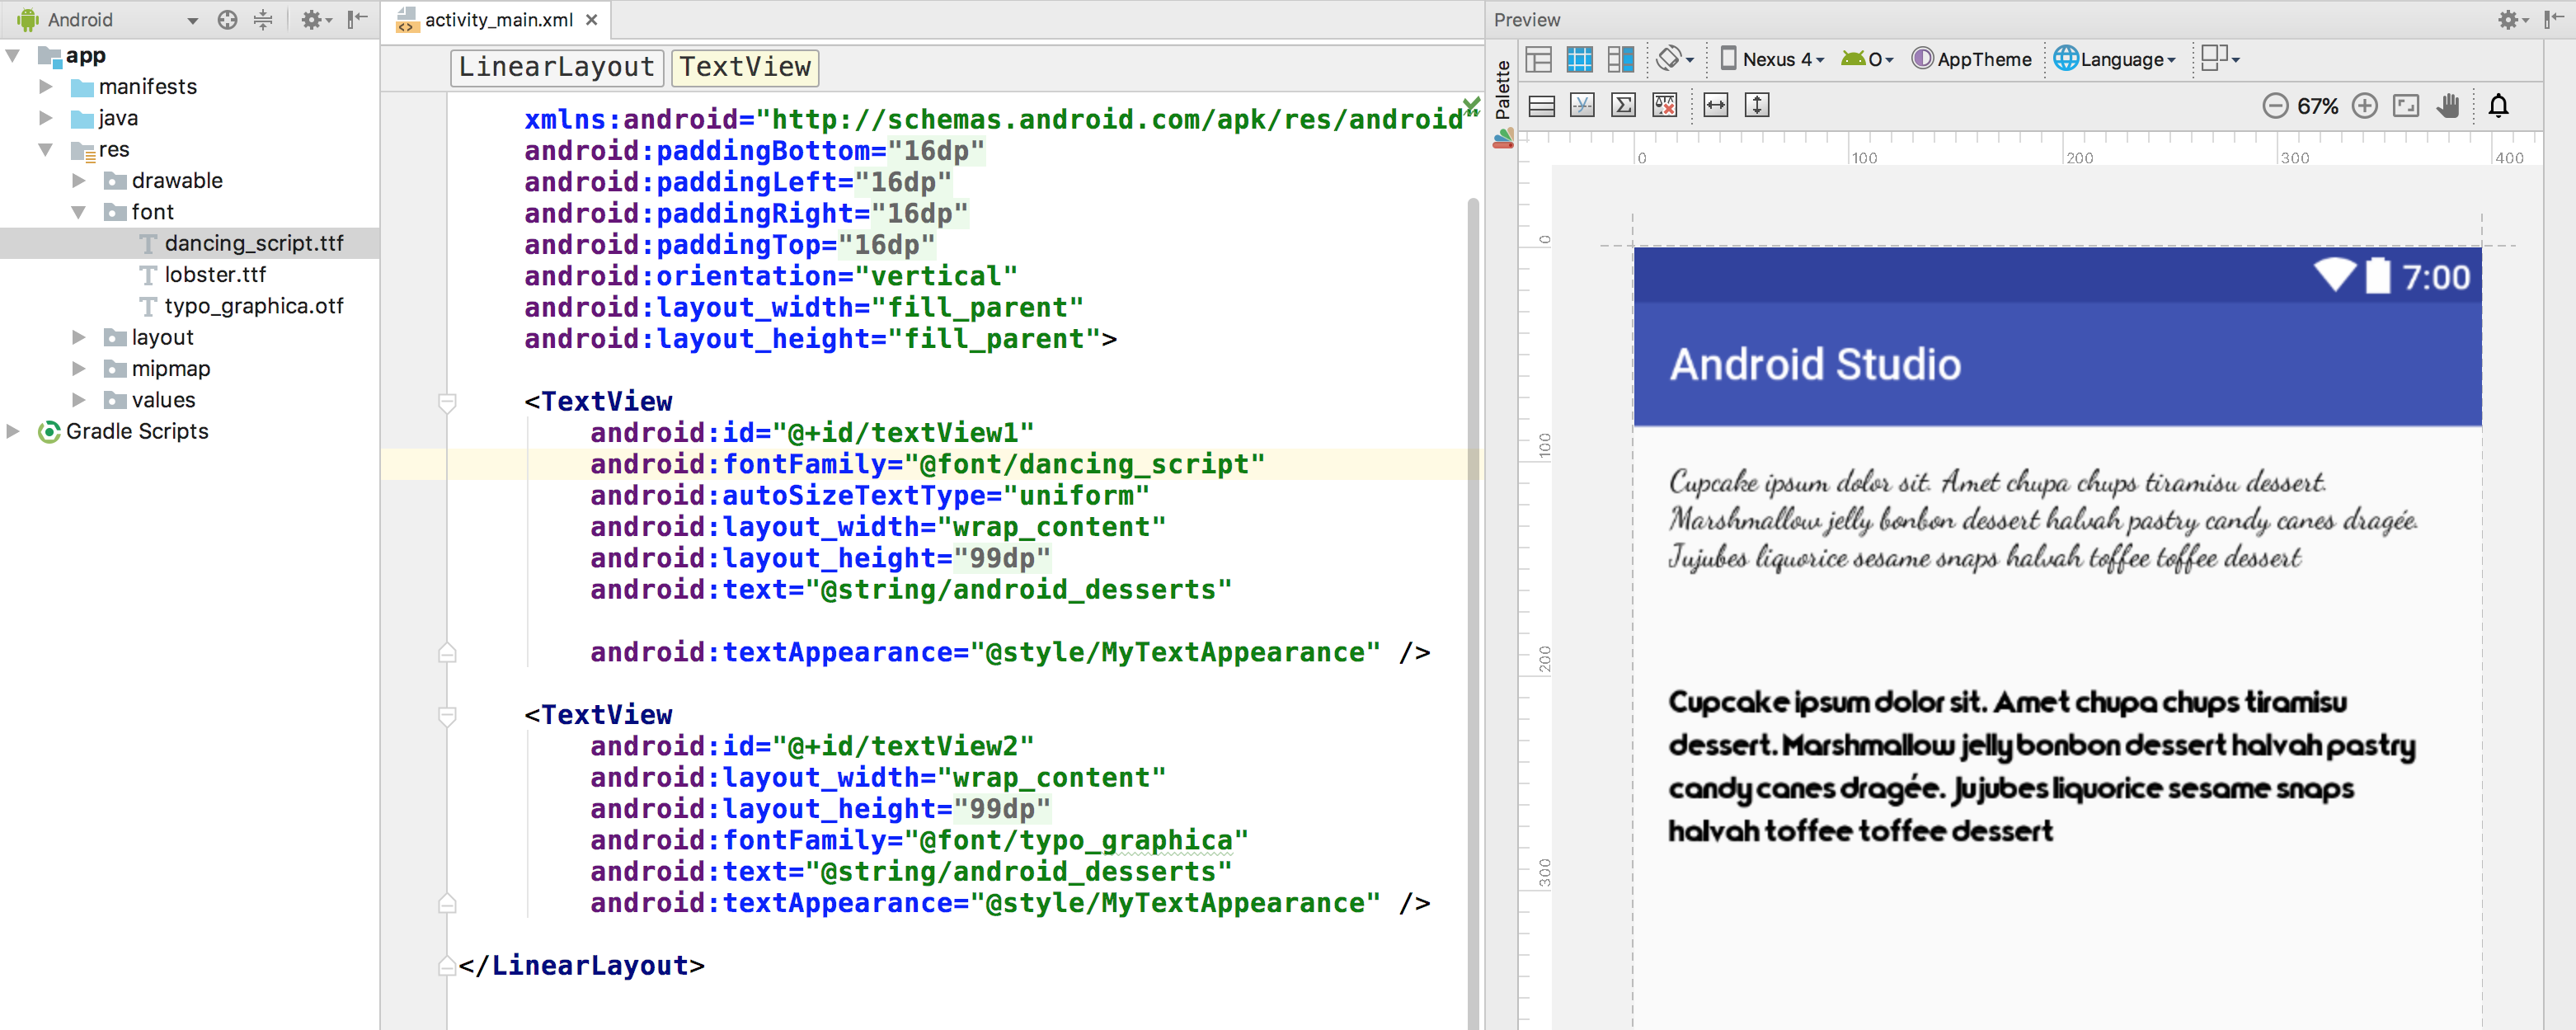
Figure 5. Previewing fonts in layout preview
Adding fonts to style
Open the styles.xml , and set the fontFamily attribute to the font file you want to access.
Using fonts programmatically
To retrieve fonts programmatically, call the getFont(int) method and provide the resource identifier of the font you want to retrieve. This method returns a Typeface object. Although the system picks the best style for you from the fonts information, you can use the setTypeface(android.graphics.Typeface, int) method to set the typeface with specific styles.
Note: The TextView already does this for you.
Kotlin
Using the support library
The Support Library 26.0 provides support to the Fonts in XML feature on devices running Android 4.1 (API level 16) and higher.
Note: When you declare font families in XML layout through the support library, use the app namespace to ensure your fonts load.
To retrieve fonts programmatically, call the ResourceCompat.getFont(Context, int) method and provide an instance of Context and the resource identifier.
Kotlin
Content and code samples on this page are subject to the licenses described in the Content License. Java is a registered trademark of Oracle and/or its affiliates.
Источник
Русские Блоги
Адаптивный размер официального шрифта TextView в Android
Обнаружена проблема: когда текст, отображаемый элементом управления, слишком длинный, он может стать неполным на устройстве с маленьким экраном, особенно кнопка, которая не позволяет пропускать текст.
Для такого ленивого человека, как я, конечно, посмотрите, сможет ли кто-нибудь наступить на плечи своих предшественников. Google посмотрел, и я нашел более одного
Взгляните на реализацию
Основной код этих двух примерно одинаков.
Основная идея состоит в том, чтобы переписать TextView, чтобы изменить размер шрифта в соответствии с настройкой при вызове методов onTextChanged и onSizeChanged.
Проблема решается быстро, и она использовалась непосредственно в предыдущих проектах.
Недавно у меня появилось это требование, и я обнаружил, что официальный представитель поддерживает этот TextView с адаптивным размером. Автоматическое изменение размеров TextView
Android 8.0 (API level 26) allows you to instruct a TextView to let the text size expand or contract automatically to fill its layout based on the TextView’s characteristics and boundaries. This setting makes it easier to optimize the text size on different screens with dynamic content.
The Support Library 26.0 provides full support to the autosizing TextView feature on devices running Android versions prior to Android 8.0 (API level 26). The library provides support to Android 4.0 (API level 14) and higher. The android.support.v4.widget package contains the TextViewCompatclass to access features in a backward-compatible fashion.
Эта функция добавлена в TextView Android O. Команда Android считает, что эта функция также должна поддерживаться в предыдущих версиях, поэтому эта функция также реализована в библиотеке поддержки для использования в предыдущих версиях системы.
Установите размер шрифта для автоматической настройки
Есть три способа установить информацию о размере шрифта:
- По умолчанию
- Гранулярность
- Предустановленные размеры
Вызовите функцию setAutoSizeTextTypeWithDefaults (@AutoSizeTextType int autoSizeTextType) в коде и укажите параметр как AUTO_SIZE_TEXT_TYPE_UNIFORM, чтобы установить значение по умолчанию. Если вы не хотите включать автоматическую настройку размера шрифта, вы можете установить для параметра значение AUTO_SIZE_TEXT_TYPE_NONE.
Используйте параметр autoSizeTextType в xml
android:layout_width=»wrap_content»
android:layout_height=»wrap_content»
android:autoSizeTextType=»uniform»
/>
Если вы используете библиотеку поддержки, вы можете использовать атрибуты, определенные в пространстве имен приложения.
Используйте функцию setAutoSizeTextTypeUniformWithConfiguration (int autoSizeMinTextSize, int autoSizeMaxTextSize, int autoSizeStepGranularity, int unit), чтобы указать значение размера шрифта. unit — тип размера, определенный TypedValue.
Используйте значение autoSizeTextType в xml, чтобы быть однородным или отсутствовать. Значение по умолчанию — none. Значения autoSizeMinTextSize, autoSizeMaxTextSize и autoSizeStepGranularity являются значениями измерений.
android:layout_width=»wrap_content»
android:layout_height=»wrap_content»
android:autoSizeTextType=»uniform»
android:autoSizeMinTextSize=»12sp»
android:autoSizeMaxTextSize=»112sp»
android:autoSizeStepGranularity=»1sp»
/>
Использовать в библиотеке поддержки
значение по умолчанию
Вызовите функцию setAutoSizeTextTypeUniformWithPresetSizes (int [] presetSizes, int unit) TextView в коде, чтобы установить коллекцию предустановленных размеров шрифта.
Использовать атрибут ресурсов для установки в xml
android:layout_width=»wrap_content»
android:layout_height=»wrap_content»
android:autoSizeTextType=»uniform»
android:autoSizePresetSizes=»@array/autosize_text_sizes»
/>
Использовать в библиотеке поддержки
Это пример, который я использовал в списке, и он работает на устройстве 5.0.
Я использую гранулированный режим
Используемый метод вызова кода поддержки.
Первая функция — это включение функции автоматического изменения размера, а вторая функция — это настройка параметров детального режима: определение максимальной и минимальной настройки шрифта и длины шага каждой настройки шрифта. При настройке размера шрифта система настроит размер шрифта в соответствии с максимальным, минимальным и размером шага и выберет оптимальный размер шрифта.
- Параметр 1: TextView должен быть установлен
- Параметр 2: минимальный размер шрифта для автоматического масштабирования.
- Параметр 3: Максимальный размер шрифта для автоматического масштабирования
- Параметр 4: единица измерения, используемая для параметра 2 и параметра 3. Здесь из-за размера шрифта она обозначена как SP.
Пока очень простой код или конфигурация xml могут реализовать адаптацию размера шрифта TextView, официальное использование также очень скользкое.
был опубликован вАвтоматически изменять размер TextView
Источник


