- TextClock
- Android TextClock with Examples
- Create Android TextClock in XML Layout File
- Android TextClock Control Attributes
- Android TextClock Control Example
- activity_main.xml
- MainActivity.java
- Output of Android TextClock Example
- Как отображать время в 24-часовом формате с помощью TextClock?
- Android Analog, Digital And Text Clock Example
- 1. android.widget.AnalogClock
- 1.1 The AnalogClock Class Important Properties.
- 1.2 AnalogClock Disadvantage.
- 1.3 AnalogClock Example.
- 2. android.widget.DigitalClock
- 2.1 DigitalClock Disadvantage.
- 2.2 DigitalClock Example.
- 3. android.widget.TextClock
- 3.1 TextClock Class Benefits.
- 3.2 Main TextClock Atttibute.
- 3.3 Main TextClock Method.
- 3.4 TextClock Example.
- 4. Full Example
TextClock
TextClock — компонент, который появился в Android 4.2. Находился в разделе Date & Time в старых версиях студии, сейчас отсутствует на панели инструментов. Наследуется от TextView.
Компонент TextClock предназначен для вывода текущей даты и времени в текстовой строке. Причём, элемент сам отслеживает системное время и автоматически меняет показания. Служит отличной заменой для громоздких элементов типа AnalogClock или DigitalClock.
Интерес представляют два атрибута android:format12Hour и android:format24Hour, которые задают шаблон для вывода даты/времени. Так как пользователь может в настройках установить 12- или 24-часовой формат, то можно задать шаблоны для разных форматов. При переключении из одного формата в другой вид TextClock автоматически выведет дату/время в заданном шаблоне.
Разместим на экране два элемента TextClock для экспериментов.
Запустим проект и посмотрим на время. Затем в настройках поменяем формат вывода времени и вернёмся в своё приложение. Убедимся, что теперь выводятся данные при помощи другого шаблона. Текущий формат системного времени можно увидеть в верхней правой части экрана.
В первом случае у первого элемента при 24-формате выводится дата и время по шаблону EEEE, MMMM dd, yyyy h:mmaa. Так как в эмуляторе была выбрана американская локаль, то текст выводится на английском. При переключении в 12-часовой формат наш элемент уже использует шаблон hh:mm. Со вторым элементом вы разберётесь самостоятельно.
Источник
Android TextClock with Examples
In android, TextClock is a UI control that is used to show the current date or time as a formatted string.
The TextClock provides a date/time in two formats, one is to show the date/time in 24 Hours format and another one is to show the date / time in 12-hour format.
By using the is24HourModeEnabled() method, we can easily know whether the system using TextClock in 24 Hours format or 12 Hours format.
Following is the pictorial representation of using a TextClock in android applications.
Now we will see how to define and use TextClock control in android applications.
Create Android TextClock in XML Layout File
In android, we can create TextClock in XML layout file using
element with different attributes like as shown below.
TextClock
android :id= «@+id/textClock»
android :layout_width= «wrap_content»
android :layout_height= «wrap_content»
android :format12Hour= «hh:mm:ss a»/>
If you observe above code snippet, we used android :format12Hour attribute to set the 12 Hours time format based on our requirements.
Android TextClock Control Attributes
The following are some of the commonly used attributes related to TextClock control in android applications.
| Attribute | Description |
|---|---|
| android:id | It is used to uniquely identify the control |
| android:format12Hour | It is used to specify the formatting pattern to show the time in 12-hour mode. |
| android:format24Hour | It is used to specify the formatting pattern to show the time in 24 hours mode. |
| android:gravity | It is used to specify how to align the text like left, right, center, top, etc. |
| android:textColor | It is used to change the color of the text. |
| android:textSize | It is used to specify the size of the text. |
| android:textStyle | It is used to change the style (bold, italic, bolditalic) of text. |
| android:background | It is used to set the background color for textclock control. |
| android:padding | It is used to set the padding from left, right, top and bottom. |
Android TextClock Control Example
Following is the example of defining two TextClock controls, one Button control and one TextView control in RelativeLayout to get the time from TextClock on Button click.
Create a new android application using android studio and give names as TextClockExample. In case if you are not aware of creating an app in android studio check this article Android Hello World App.
Now open an activity_main.xml file from \res\layout path and write the code like as shown below
activity_main.xml
xml version= «1.0» encoding= «utf-8» ?>
RelativeLayout xmlns: android = «http://schemas.android.com/apk/res/android»
android :layout_width= «match_parent» android :layout_height= «match_parent» >
TextClock
android :id= «@+id/textClock1»
android :layout_width= «wrap_content»
android :layout_height= «wrap_content»
android :layout_marginTop= «100dp»
android :layout_marginLeft= «70dp»
android :format12Hour= «hh:mm:ss a»
android :textColor= «#F1511B»
android :textSize= «45dp»
android :textStyle= «bold»/>
TextClock
android :id= «@+id/textClock2»
android :layout_width= «wrap_content»
android :layout_height= «wrap_content»
android :layout_marginTop= «30dp»
android :layout_marginLeft= «100dp»
android :layout_below= «@+id/textClock1»
android :textColor= «#80CC28»
android :textSize= «45dp»
android :textStyle= «bold»/>
Button
android :id= «@+id/btnGet»
android :layout_width= «wrap_content»
android :layout_height= «wrap_content»
android :layout_alignLeft= «@+id/textClock2»
android :layout_below= «@+id/textClock2»
android :layout_marginTop= «30dp»
android :layout_marginLeft= «40dp»
android :text= «Get Time»/>
TextView
android :id= «@+id/textview1»
android :layout_width= «wrap_content»
android :layout_height= «wrap_content»
android :layout_alignLeft= «@+id/btnGet»
android :layout_below= «@+id/btnGet»
android :layout_marginTop= «20dp»
android :layout_marginLeft= «-30dp»
android :textSize= «20dp»
android :textStyle= «bold»/>
RelativeLayout >
If you observe above code we created a two TextClock controls, one Button and one TextView control in XML Layout file.
The android TextClock has been introduced in API Level 17 so if we use TextClock in our app then it requires a minimum API Level 17. In case if your app SDK version is less than 17 then TextClock will throw an error like “View Required API Level 17”.
To fix this error we need to update the SDK version of our app for that just double click on build.gradle(Module: app) file in application Gradle Scripts section like as shown below.
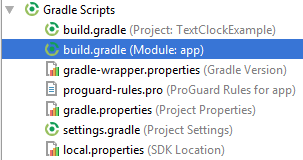
Once you open build.gradle(Module: app) file update minSDKVersion to 17 or more and click Sync Now like as shown below.
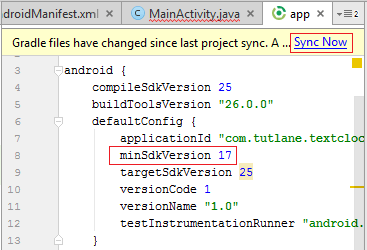
Once you update the SDK version then “View Required API Level 17” problem will get solved automatically.
Now we need to load the XML layout resource from our activity onCreate() callback method, for that open main activity file MainActivity.java from \java\com.tutlane.textclockexample path and write the code like as shown below.
MainActivity.java
package com.tutlane.textclockexample;
import android.support.v7.app.AppCompatActivity;
import android.os.Bundle;
import android.view.View;
import android.widget.Button;
import android.widget.TextClock;
import android.widget.TextView;
public class MainActivity extends AppCompatActivity <
private TextClock tClock ;
private TextView tView ;
private Button btn ;
@Override
protected void onCreate(Bundle savedInstanceState) <
super .onCreate(savedInstanceState);
setContentView(R.layout. activity_main );
tClock = (TextClock) findViewById(R.id. textClock1 );
tView = (TextView) findViewById(R.id. textview1 );
btn = (Button)findViewById(R.id. btnGet );
btn .setOnClickListener( new View.OnClickListener() <
@Override
public void onClick(View v) <
tView .setText( «Time: » + tClock .getText());
>
>);
>
>
If you observe above code we are calling our layout using setContentView method in the form of R.layout.layout_file_name in our activity file. Here our xml file name is activity_main.xml so we used file name activity_main and we are trying to get the time from TextClock control on button click.
Generally, during the launch of our activity, the onCreate() callback method will be called by the android framework to get the required layout for an activity.
Output of Android TextClock Example
When we run above example using android virtual device (AVD) we will get a result like as shown below.
If you observe above result, we are able to get the time from TextClock control when we click on Button in the android application.
This is how we can use TextClock control in android applications to show the time based on our requirements.
Источник
Как отображать время в 24-часовом формате с помощью TextClock?
У меня возникли проблемы с попыткой отобрать время для отображения в 24-часовом формате. У меня есть отображение времени в другом часовом поясе, но я не могу его отобразить в 24-часовом формате.
Также можно отображать дату с помощью TextClock?
Если ваша система находится в 12-часовом режиме, вам не нужно писать подкласс, чтобы получить то, что вы хотите. JavaDocs говорят:
- В 12-часовом режиме:
- Используйте значение, возвращенное getFormat12Hour (), когда не null
- В противном случае используйте значение, возвращаемое getFormat24Hour (), когда значение не равно нулю
- В противном случае используйте значение по умолчанию, соответствующее языку пользователя, например HH: mm
Поэтому я ожидал бы, что последняя строка в этом случае сделает getFormat12Hour() возвращать null и, таким образом, использовать ваш собственный getFormat24Hour() :
(Кстати, как отмечали другие, принудительные форматы следует использовать с осторожностью.Если ваши пользователи хотели 24-часовые часы, они бы указали это в своих системных предпочтениях. И приложения, которые форсируют форматированные, форматированные форматы даты на их Пользователи, такие как MM/dd/yyyy , приглашают рейтинги одной звезды (за исключением, в данном случае, из США и филиппинских пользователей), поэтому хорошо, что вы используете MMM ! Вам все равно будет лучше использовать getBestDateTimePattern () , Хотя, как мне кажется, потребуется подклассификация TextClock.)
Вместо заданного формата времени в xml я предлагаю использовать с java-файлом, т.е.
Показывает ли это время в 12- или 24-часовом формате, зависит от настроек системы. Возможно, ваше устройство Android или эмулятор настроено на 12-часовой формат. Вот почему ваш android:format24Hour игнорируется. Если вы хотите показать 24-часовой формат, перезаписав системные настройки (которые я бы не рекомендовал), добавьте в качестве другого атрибута android:format12Hour=»MMM dd, yyyy k:mm» .
Тем не менее, всегда рекомендуется указывать время и дату в соответствии с настройками системы. Если в вашем приложении есть некоторые другие ограничения (например, макет), для которых требуется отдельная обработка 12- или 24-часового режима, вы можете динамически проверить настройку кода, вызвав в is12HourModeEnabled() или is24HourModeEnabled() .
К вашему второму вопросу, говорят документы
TextClock может отображать текущую дату и / или время как форматированную строку.
И это то, на что он способен – отобразить время и дату. Если вы имеете в виду «другую дату, чем текущую», вам придется придерживаться простого TextView и форматировать дату String вручную.
Я только что проверил его и когда на вашем устройстве установлено:
- 12-часовой формат (US, GB) – TextClock – 12 часов
- 24-часовой формат (Европа) – TextClock – 24 часа
Как упоминалось выше, лучше, когда вы дадите выбор пользователю, и вы не заставите его использовать ex. Ваш любимый формат.
Да. Вам просто нужно использовать «android: format12Hour» и / или «android: format24Hour».
MMM означает 3 символа в течение месяца
Dd означает 2 символа в течение дня
Yyyy означает 4 символа в течение года
Источник
Android Analog, Digital And Text Clock Example
Android provides three clock widgets that you can use to implement a clock. They are android.widget.AnalogClock , android.widget.DigitalClock and android.widget.TextClock . The AnalogClock and DigitalClock class have been deprecated since Android SDK version 1.7, but they can still be used. TextClock class is recommended.
1. android.widget.AnalogClock
android.widget.AnalogClock class extends android.view.View class. So if you want to customize an analog clock, you can create a sub-class and overwrite it’s onDraw() method. And implement the customization code in that method.
1.1 The AnalogClock Class Important Properties.
- android:dial: A drawable resource id which is an analog clock dial image.
- android:hand_hour: A drawable resource id which is an analog clock hour hand image.
- android:hand_minute: A drawable resource id which is an analog clock minute hand image.
1.2 AnalogClock Disadvantage.
- Can not set analog clock second-hand image.
- Can not set time directly, you can create a sub-class to implement a time modify function yourself.
- Can not get time from AnalogClock class directly, use java.util.Calendar to get current time instead.
1.3 AnalogClock Example.
- Below is the analog clock example image.
- Copy your clock_dial.jpg , clock_hour_hand.png and clock_minute_hand.png into your android project app/res/drawable folder. Please note, the hour hand and minute hand image’s background should be transparent.
- Copy below AnalogClock XML code in your layout xml file.
- Use the above layout XML in your Activity code.
2. android.widget.DigitalClock
android.widget.DigitalClock is a subclass of android.wedget.TextView . It can only show the digital hour and minute value. You can change time value font size, color, style, etc use TextView’s properties.
2.1 DigitalClock Disadvantage.
- Can not modify time directly, you can create a sub-class to implement a set time function yourself.
- Can only get text value from DigitalClock to get Hour and Minute time value.
2.2 DigitalClock Example.
- Below is the digital clock example image.
- Just copy the below XML code into your layout file, then you can see a digital clock in your activity.
3. android.widget.TextClock
android.widget.TextClock is introduced since android SDK 1.7. It is recommended. Use the TextClock class has the below benefits.
3.1 TextClock Class Benefits.
- Can show, set, and get both date and time.
- Support date-time format customization.
3.2 Main TextClock Atttibute.
- format12Hour: Set 12-hour system time format.
- format24Hour: Set 24-hour system time format.
- timeZone: Set time zone.
- drawableStart: Clock head image id.
- drawableEnd: Clock tail image id.
3.3 Main TextClock Method.
- is24HourModeEnabled(): Check whether the system is currently using a 24-hour system. This is decided by OS, can not change in code.
3.4 TextClock Example.
- Below is the text clock example image.
- Use the below XML code in your layout file to implement the above TextClock example.
- Please Note: When you use the TextClock XML tag, you may encounter an error message like “view requires API level 17 (Current min is 15)” like below. This is because your project SDK version is 15 and TextClock requires version 17. Follow the below steps to resolve this issue.
- In the Android Studio left project tree view panel.
- Select Project in the drop-down list.
- Click app/build.gradle file.
- Change minSdkVersion from 15 to 17 in the right panel.
4. Full Example
Источник


