- How to Format Android Phone Step By Step
- Part 1: Why Do You Need Format Android Phone?
- Part 2: How to Prepare Before You Format Android Phone Completely?
- Part 3: How to Format Android Phone (Samsung/Huawei/LG included)?
- 3.1 Normal Way to Format Android Phone (Factory Reset)
- 3.2 Reformat Android Phone by Entering into Recovery Mode
- Video Guide: How to Enter Android Recovery Mode
- 3.3 Format Android Phone from PC Software without Screen Password
- Conclusion
- How to Format an Android Phone
- Part 1: Back Up Android Data Before Formatting Process
- Part 2: Format Functioning Android with Factory Reset
- Part 3: Format Non-functioning Android in Recovery Mode
- Related Articles
- 3 Ways to Format Your Android Phone or Tablet
- When should I format an Android phone?
- Part 1. Format Android Device with Factory Reset
- Part 2. You Can Also Format Android in Recovery Mode
- Android formatting also format the MicroSD?
- Part 3: Securely Format Android Device with Data Erasing Software
- Step 1 Download and Android Data Eraser and Install it on Computer
- Step 2 Turn on USB Debugging and Connect Android Device to Computer
- Step 3 Scan All Content and Start Wiping Android
- Step 4 Factory Reset Android (Important)
How to Format Android Phone Step By Step
by Sophie Green Updated on 2021-07-22 / Update for Android Tips
Feel totally frustrated when your Android phone starts to run slower than before? Some of you might go through such thing. Because a large amount of files, pictures, videos and documents occupy limited storage. How to reformat my phone, you probably ask, we here provide you some steps to format android phone. No nothing more important thing matters to you when you decide to tidy up Android phone as time flies. After putting your phone on a diet, a speedy phone will come as a surprise.
Part 1: Why Do You Need Format Android Phone?
“I want to format handphone Samsung.” There is no denying that many of you want to but a little bit hesitate to format Android phone. First, let’s ditch into what does format Android Phone mean. Formatting a phone means erasing all data remained but not involving operating system. Gallery, pictures, messages, songs, videos are cleared after formatting. You can hold a new phone again from the software side. What an easy way to simply your phone to some extent.

Obviously, the moment you set up your mind to format Android phone, you’re going to lose some data. Why do you still do that? Because you need to resell old phone and this is a good way to get others rid of snooping information. Also, your phone performs so badly and wipe out some data is never an impulsive choice.
Part 2: How to Prepare Before You Format Android Phone Completely?
Please have a data backup before you begin a full format android phone. What if some problems happen when you fail to format phone? This preparation work does your favour when losing data. So how to back up data on your Android Phone? Here we take an example to guide you.
Step1: Tap Settings > System > Backup
Step2: Click Google Account in the middle of screen
Step3: Switch on “Back up to Google Drive”
Part 3: How to Format Android Phone (Samsung/Huawei/LG included)?
Now you may wonder what is the best way to format Android . This is the most concerned thing after you fully prepared. Whether you need Android contacts file format or Samsung phone picture format, here are very detailed instructions to assist you rookie or tech-savy. From the simplest way to professional way, just following feasible ways to begin.
3.1 Normal Way to Format Android Phone (Factory Reset)
When your Android phone works fine, just put it factory reset. Factory reset means you’re going to reset phone to its original state exactly when you bought then. Do as steps showing below:
Step1: Find settings on the screen
Step2: Tap System (close to the bottom of settings interface)
Step3: Choose Reset > Factory Data Reset
Step4: Click Reset and enter PIN(used to unlock phone)
Step5: Click Erase Everything and wait for a while
3.2 Reformat Android Phone by Entering into Recovery Mode
If your phone happens to be abnormally working, such as boot failure, black screen, stuck on Samsung logo and so on, please try Android recovery mode. Here are some very useful ways to help you solve this kind of tough problem.
Option1: Press button combination to enter recovery mode
Normally speaking, you can do it manually. Hold on volume up, home, and power button together until Android logo appears. Then press volume down to choose “wipe data/factory reset”, finally press power button to make a yes. Just wait for a successful result.
Option2: One click to free enter recovery mode with ReiBoot for Android
Sometimes, it is a little bit hard to use button combination. Different Android devices have different combinations. Try software to help enter recovery mode by one click. Tenorshare ReiBoot for Android, is exactly what you need. Quick to enter recovery mode without time consumption. Almost over 600+Android phones are supported. However, when you stuck in recovery mode, how to fix? Consider ReiBoot for Android, and it helps you exit recovery mode one click.

Step 1 After you download this software, please directly connect Android phone to computer via USB cable. Then click «Repair Android System»
Step 2 The software will list the way of launching USB debugging button when your phone’s brand is recognized. Just do it as prompts tell you to enable USB debugging on device
Step 3 After you successfully turn on USB debug, select «One-click to Enter Recovery Mode» to get start.
Step 4 Wait until it’s done, only seconds to enter recovery mode without any interference.
Video Guide: How to Enter Android Recovery Mode
3.3 Format Android Phone from PC Software without Screen Password
What if your phone comes with screen locked? How to format locked android phone? Tenorshare 4uKey for Android Screen Unlocker to easily remove any kind of password within minutes including Android Password, PIN, pattern, fingerprint lock. Good helper if you unlucky to forget screen password. What if you’re having a Samsung? This software can also removes your FRP Lock quickly.


Step 1 Download 4ukey for Android and select Remove Screen Lock
After you successfully download software, please select what kind of password you want to unlock.
Step 2 Start to Remove Passwords
Choose Remove Screen Lock and wait for minutes. It takes time to detect system and enable phone bricked.
You’re prompt to make sure you really want to remove because this procedure will wipe out all data.
Step 3 Process Is Done
Just no more than several minutes and you can witness screen lock is successfully removed.
Conclusion
When you don’t want others to snoop private messages and documents for reselling Android phone, or just poor performance of phone, or accidentally disable phone, please consider to format Android phone. Surely, normal way without software does your favour. However, you’re having an abnormally working phone, Tenorshare ReiBoot for Android enables you to free enter/exit recovery mode and repair system. But, if you forget screen passwords, what can be done to format phone? There is always a solution. You can still use software for formatting android phones, Tenorshare 4uKey — Android Screen Unlocker unlocks your phone without password just within minutes.
Updated on 2021-07-22 / Update for Android Tips
Источник
How to Format an Android Phone
Formatting Android device is sometimes a powerful solution to deal with some issues. So you may ask: When we need to format Android phone?
1. You want to pass your Android to your friends or sell it in the market. Thus, you need to delete your personal data off your device.
2. You are frustrated when it takes 10 minutes to run an app, or some consistent bugs you find difficult to remove. Then you want to format Android phone for the solution.
3. You may sometime forget the password to unlock screen. So you may want to format your Android when locked.
…
Now I will show you the guide to reset Android phone. If you can use your device normally, you can choose the method in part 2. Otherwise, please go through the guide in part 3. But please note that before formatting an Android phone like Samsung Galaxy S8/S7, you should back up the Android data in advance.
Part 1: Back Up Android Data Before Formatting Process
The below two methods to format Android phone would erase all your important data. So before the process, backing up the Android files is a must! You are recommended to use Android Backup Restore program to make a backup copy on your computer. Please download the program firstly.

Step 1 Plug Device into Computer
After you install the program, please launch it and go the «Data Backup & Restore» pane on the interface. Then plug the device you want to format into computer via the USB cable.
Step 2 Select the Data You Want to Back Up
There are two options: Backup and Restore on the interface. Please choose «Backup» and select certain contents from your Android.

Step 3 Start to Back Up Data
Please click on the “Backup” button once you complete to choose the data types. Wait for a moment and you would be notified if it finishes backing up your data. And it also offers you an option to preview the results.

Part 2: Format Functioning Android with Factory Reset
The first way to format an Android device is to perform a factory reset. Actually, it is pretty simple to reset your Android. Now, I will take a Samsung Galaxy as an example to show you how to reset Android phone.
Device Model Information:
Device Name: Samsung Galaxy S7 edge
Model Number: SM-G9350
Android Version: 6.0.1
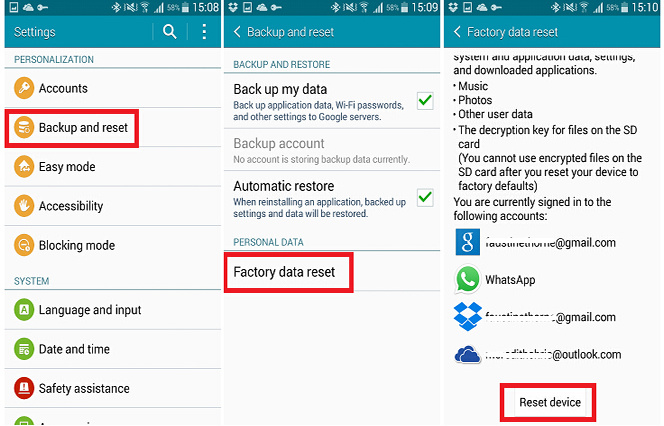
Step 1 Go to «Settings» app on your Android device.
Step 2 Tap «Backup and reset» option and then scroll down to the button of the screen and choose «Factory data reset» from the options. And now, please tap on the «RESET DEVICE» button to reset your Android to factory defaults.

Part 3: Format Non-functioning Android in Recovery Mode
Another way to format your device is to perform the process in Recovery mode. The reasons to choose this method can be:
1. When you turning on your Android, it is stuck into a certain interface and can not get out of it.
2. You may want to remove Screen lock when you forget the password.
In a word, to format Android in Recovery mode would be the cases that you can’t successfully enter the system and perform a factory reset in a normal way. Now, let’s check how to do with the Samsung Galaxy S7 edge model for your example.
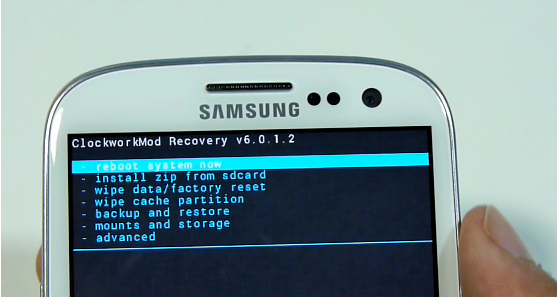
Step 1 Power Off your Galaxy S7 edge
Step 2 Press and hold the Power key, Volume up and Home button at the same time. Release all three buttons when you see the logo and then you will get into the Recovery Mode interface.
Step 3 Scroll down to select wipe data/factory reset option with the Volume down button and use Power key to confirm it.

Important note:
1. All the data on your Android would be wiped out after the process.
2. The above guide is only an example to enter Recovery mode in Samsung. Actually, different phone models to boot into Recovery mode may be not the same. You can also search it on the internet for your own device.
Tips: After you format your Android, you can restore the backup copy to your device in one click without data loss. Please simply connect the target device into computer and then choose the backup copy you want to restore, and you can get back your important data easily. And it is completely free to back up data with the Android Backup Restore program, but you need to pay for it when you need to restore files to Android. As it is so effective and simple to use, $19.95 for lifetime license is not big a deal!

Format an Android phone is very easy and totally at your control. The most important thing you should do is to back up the precious data from your device to computer before getting it back to factory setting. Hope this instruction is helpful to you.
Related Articles
 Ivy Bruce
Ivy Bruce is the Founder and Editorial Director at Recovery-Android Studio. You can also find her on Google+ and Twitter.

How to Transfer Videos from Computer to iPhone
![]()
User Guide of Phone to Phone Transfer Software

How to Recover Deleted File from Motorola Atrix

How to Transfer Music from Computer to Nexus
Источник
3 Ways to Format Your Android Phone or Tablet
CaseВ A: In many cases, this procedure is done when we sell on the second hand or even give our device to a friend or family member so you can use, and do not want others to access our privacy information.
Case B: You may feel the performance of a Android device is slowing because of junk files that occupy the memory system, you Android phone often doesn’t work correct, poorly functioning.
No matter the reason, you should always format and reset the device. It’s necessary to let you understand that Android formatting means just deleting the user data i.e images, videos, songs, contact numbers, etc which you have saved in the phone memory. It will not touch the operating system. Formatting a Android brings the total loss of user information, not the system itself. Equivalent to formatting a PC, the system would remain intact, but completely clean customizations.
When should I format an Android phone?
As discussed earlier, there are several reasons to format your mobile Android…
1). When you go to sell your second-hand device or give your phone to someone else to use it.
2). When you return your device for service and do not want to reveal personal data
3). When you lose the stability of the system and want to start customizing from scratch.
4). Formatting a cell phone is required when it is infected by virus.
Note : IВ wouldВ stronglyВ suggestВ that you’d better back up android data to computer in advance before formatting an Android phone like Samsung Galaxy, HTC, LG, Sony, Nexus,etc.
Part 1. Format Android Device with Factory Reset
As I said before, a factory reset will erase all of your phone’s data and restore it to the original settings, all of your data will gone forever and can’t be recovered. So, don’t forget to make a backup of your ipmortant data. This guide will walk you through formatting your device.
Open the menu and select Settings, then in the section, choose Personal Backup and restore. Once inside we choose Factory data reset. Tap «Reset device» to delete all data on your phone and restore original factory settings. By default, all your phone’s internal storage will be erased. After a few minutes you will have a whole new phone!
Part 2. You Can Also Format Android in Recovery Mode
Another method to formatting a android is a little more complicated because it requires you to enter recovery mode. Just follow the steps below.
1) Turn off your Android phone, press and hold the VOLUME UP button for some seconds
2) If you do OK you will get into recovery mode menu.
3) You can navigate the menu with the volume buttons and locate the factory reset mode, then confirm it.
Android formatting also format the MicroSD?
In the event that your phone has MicroSD, not all devices accept, as the range of Nexus One or HTC, the answer is no, the SD card can be formatted independently if desired, factory reset doesn’t clear the internal SD. If you need, you can try this steps: Go to Settings ->Storage -> Format SD card.
It will not replace the custom ROM if you perform factory reset on your phone, but it will reset the device to the way it was right after you installed the ROM on your device. I’ve formatted my Android tablet with the part 1 method.
Part 3: Securely Format Android Device with Data Erasing Software
The data that was deleted by factory reset can be recoverabled by professional Android data recovery software. So it is not a safe way to keep your privacy under protection. If you really cared about the information on Android device, then you should use Android data erasing tool to permanently wipe everything on Android phone or tablet.
In the following example, We are taking Androidphonesoft Android Eraser as a demo. We already tested the program on various devcies, including Samsung Galaxy S6, LG G5, Xperia Z3 and HTC One M8. It works well on all the devices. We also purchased commercial data recovery software and tried to get content after erasing. However, nothing was scanned.
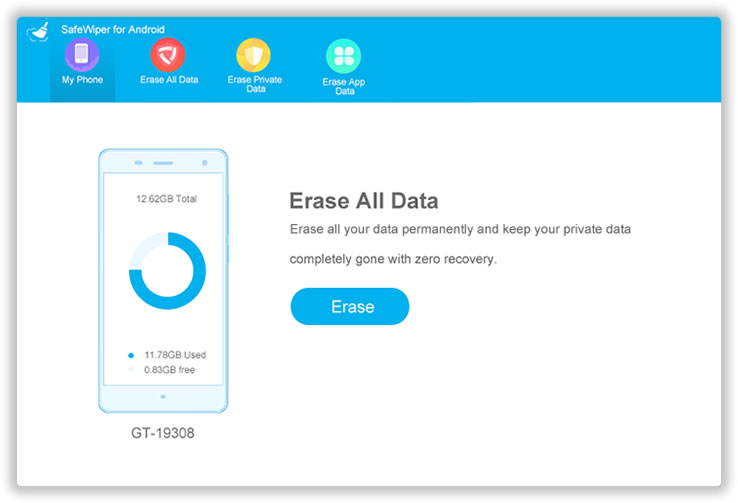
Step 1 Download and Android Data Eraser and Install it on Computer
The first step is to download Android Data Eraser and follow the instructions to successfully install it on a computer. After that, open the program and you will get 3 erasing options. In here, we need to choose ‘Erase All Data’ from the main window.
Step 2 Turn on USB Debugging and Connect Android Device to Computer
Please check whether USB debugging function is enabled on the phone. If not, you need to follow the steps in below picture to turn it on. Then connect the device to computer with USB cable. A few seconds later, you will find out the phone was detected by the program.
Note: If the program couldn’t detect the phone, please download and install the latest USB driver for the device.

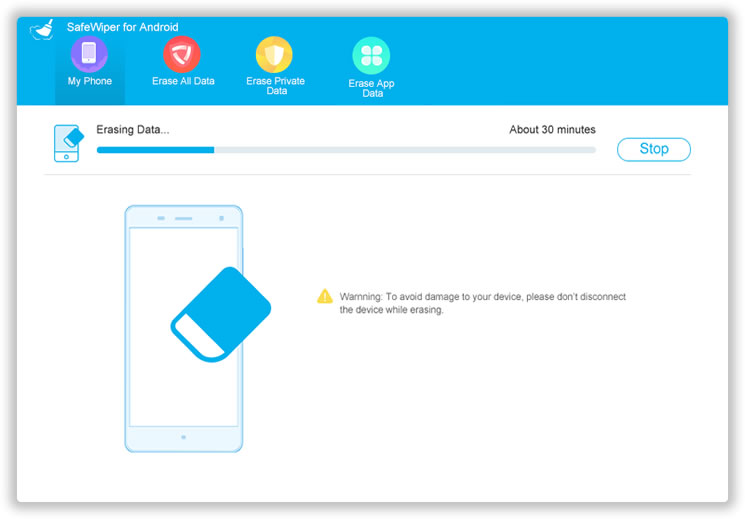
Step 3 Scan All Content and Start Wiping Android
Now click ‘Erase’ button to let the program fully scan all the content and settings on the device. This will take 7-10 minutes. After that, type ‘Erase’ in the input box to confimr the erasing operation. A few minutes later, all the personal data on the device will be removed cleanly.
Step 4 Factory Reset Android (Important)
To make the formatting more secure, it is highly recommended to factory reset the device again after erasing. After doing this, there is no way to get anything from the phone.
This article demostrates 3 methods to delete data from Android phone or tablet. You can take any of them as you like. Each one has its own pros and cons. Please carefully read them before action. My personal favorite is Method 3 because it is more safe to protect sensitive data being seen by others.
Источник


