- How to Format Android Phone Entirely
- Method 1. To Format Android phone by Factory Reset
- Here is a guidance for your reference.
- Method 2. To Format Android phone by dr.fone – Android Erase.
- To make it a short story, here is a list of the main features of the dr.fone – Data Eraser:
- Now let me show you how simple it is to format Android phones entirely with this tool.
- Tips for better protection for your Android phone.
- A Complete Guide to Format Your Android Phone
- Part 1: Backup data before formatting Android phone
- Dr.Fone — Phone Backup (Android)
- How to Format an Android Phone
- Part 1: Back Up Android Data Before Formatting Process
- Part 2: Format Functioning Android with Factory Reset
- Part 3: Format Non-functioning Android in Recovery Mode
- Related Articles
How to Format Android Phone Entirely

Provided that you want to sell your old Android phone, remember to wipe & format all the personal data from your Android phone. And you may need to remove all the important files from your old Android phone before you put them on the shelf. The most convenient way to format all the files from an Android phone is to format it, namely to factory it or reset it. It is of great significance to know the detailed way to format a phone, and thus I would like to introduce two nice methods to you.
PS: here, you will learn more about the complete Quick Format Vs. Full Format comparison.
Method 1. To Format Android phone by Factory Reset
The Factory reset is a simple tool for formatting a mobile phone. It enables the users to reset their phones through a few simple operations. The main principle of this tool is to delete the files available on the phones so that people can get their phones as new phones from the factory. But before factoring, you need to encrypt your phone first.
Here is a guidance for your reference.
Step 1. To encrypt your Android phone, you need to go to the “Settings” app on the screen and find the “Security” option from the menu. Click on the “Security” option to open it. Choose the “Encrypt device” item and turn on the switch of it.
Step 2. The whole process of encrypting will last for a long time, so please make sure that your phone has been well charged. If possible, just make it fully charged before Step 1. Once the process finishes, go to the “Security” option again to see it successfully encrypted.
Step 3. Now you can start to factory your mobile phone. Just go to the “Settings” app again. And then, choose the “General” option and select the “Backup and reset” item.

Step 4. On the new screen, you can see many items for your choice. Simply find and click on the “Factory data reset” items. And then, you will get a confirmation message. Read it and click on the “Reset device” button in the lower middle.

Step 5. Now you can rest assured because the resetting process will finish in a few minutes, and you will find your phone become a formatted one.

Method 2. To Format Android phone by dr.fone – Android Erase.
Well, as you can see, it is not so simple to format an Android phone with built-in apps. So it is advisable to give it a nicer helper, like the dr.fone – Data Eraser (Android). The dr.fone, developed by the famous Wondershare company, is a professional tool to delete data from mobile phones and tablets. Just like its name, the dr.fone – Android Erase can permanently delete personal data safely and efficiently, and the data deleted will be unrecoverable. What’s more, it is compatible with both Android devices and iOS devices, so that you can simply manage these two kinds of devices with the same method.
To make it a short story, here is a list of the main features of the dr.fone – Data Eraser:
- 1. Delete unwanted data for you including the contacts, messages, photos, audios, videos, and apps.
- 2. Format the Android devices (dr.fone – Android Data Eraser) and iOS devices (dr.fone – iOS Data Eraser).
- 3. Optimize the performance of your devices.
- 4. A time-saving tool compared to its counterparts.
- 5. Support for both the Windows computer and the Mac computer.
Now let me show you how simple it is to format Android phones entirely with this tool.
Step 1. Download and install the dr.fone on your computer. And then connect your Android phone to your computer with a USB cable. And for the users who connect their phones to the computer for the first time, you enable the USB debugging on your phone.

Step 2. On the primary window, click the “Data Eraser” option and you need to click the “Erase All Data” button. And then the dr.fone will ask you to input the word “delete” in order to know you really want to format your phone. And then click on the “Erase Now” button to start the erasing process.


Step 3. Then the dr.fone will start to delete all the data on your phone, including the contacts, messages, photos, audios, videos, and apps.

Step 4. The whole process will finish in a short time. And after that, you need to click on the “Erase All Content” or “Factory Data Reset” on your mobile phone to erase the settings.

Tips for better protection for your Android phone.
- 1. Transfer the media files to your computer for long-time storage. The media files like the photos, audios, and videos may contain unforgettable memories of your life. So it is a pity to delete them directly. By transferring them to your computer, you can easily get access to them when you want.
- 2. In case that you may want the personal data on your old Android phone someday, you’ d better create a backup file for all the content. There are many ways to create a backup file. You can either back up the data on your computer or create one backup with a certain cloud application.
- 3. If there are some files with reactivation lock on your mobile phone, you need to unlock them before transferring or backup. Simply go to Settings > Security, and then disable the relevant option.
- 4. The media files and the backup files on your computer may need password protection so that people cannot see them without the correct password. After you set a password, you should take a mind note of the password. Or you can undo the password protection if you think there is no need to have that.
Track locations, messages, calls, and apps. Do it remotely and 100% discreetly.
Источник
A Complete Guide to Format Your Android Phone

James Davis
Nov 15, 2021 • Filed to: Fix Android Mobile Problems • Proven solutions
An Android phone is all fun due to the vast freedom we enjoy in it, unlike iOS. However, sometimes, users feel that they might want to sell their old device as they may be buying a new one, or probably exchanging a better one. Now before giving away your phone, it is a must that you remove all the accounts, passwords, and user data. The reason is that in today’s world of digital communication, our smartphones have become the secret keepers of our personal and professional life. Whether it be personal photos, videos, contacts, financial information, or business emails and files, you cannot risk losing any information to an outsider at any cost. Now performing a factory reset on the phone might be a good idea but not a foolproof one as information saved in your phone can still be traced if the buyer is technically sound.
Here comes formatting your phone, in the sense that deleting your accounts, passwords completely from the phone, so that no one can access any information that was stored even in the backup files. Now before you think of formatting your phone, the first and foremost thing to do would be backing up the data.
Let us get to know more about it in the next section.
Part 1: Backup data before formatting Android phone
Option 1: Using Google Account
PHOTOS & VIDEOS: Open the google photos app and at the bottom, tap Photos. All the photos that aren’t saved will have an icon of a struck out cloud.
Now to turn on backup and sync or off, open the google photos app and on the top left corner, you’ll find a menu, click it. Select Settings>Backup & Sync. And at the top, switch it on or off.
FILES: Upload the necessary files to Google Drive. Open the Google Drive App and tap on the “+” symbol to add and tap Upload. Choose from the list of files you need to create a backup for.
MUSIC: Download and install the Music Manager App. Open the application from the menu (PC). After signing in to your Google account select the location of where you keep your music files and follow the instruction on the screen.
BACKUP DATA WITH ANDROID BACKUP SERVICE: In the settings menu of your device tap on the вЂPersonal’ option and tap вЂBackup & Reset’. Click on вЂBackup My Data’ and switch it on.
To restore your backed up data, open your settings menu, and tap on Personal>Backup & Reset> Automatic Restore.
Option 2: Backup using the Dr.Fone — Phone Data:
Alternatively, there is another option available from Dr.Fone — Phone Data (Android) to give users a very easy experience to back up and restore Android data with one click.
After installing the software on your PC, you only need to connect your smartphone with Data Cable and the app automatically detects all your data. Then you would only have to select the data you want to take backup and click on “Back up”. This one-click process gives you a total backup option just in few minutes.
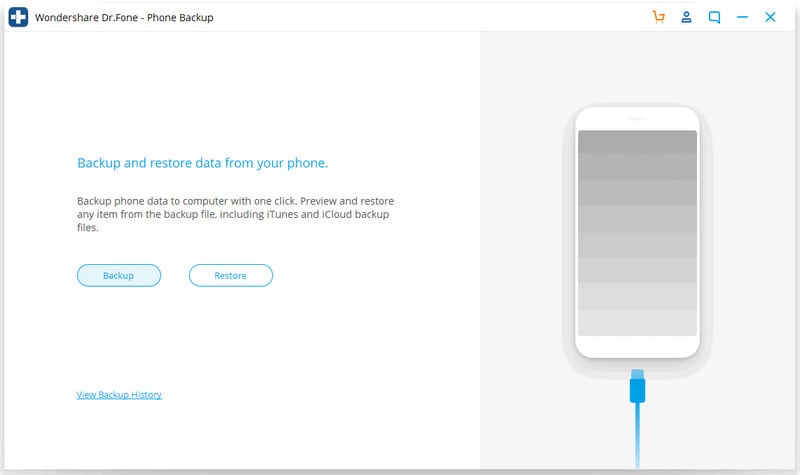
If you want to restore the data, just connect your device when the Toolkit is running and you can see an option to “Restore” from your Backup data. You can even select some of the files you require from the total backup.
![]()
Dr.Fone — Phone Backup (Android)
Flexibly Backup and Restore Android Data
- Selectively backup Android data to the computer with one click.
- Preview and restore a backup to any Android device.
- Supports 8000+ Android devices.
- There is no data lost during backup, export, or restore.
Источник
How to Format an Android Phone
Formatting Android device is sometimes a powerful solution to deal with some issues. So you may ask: When we need to format Android phone?
1. You want to pass your Android to your friends or sell it in the market. Thus, you need to delete your personal data off your device.
2. You are frustrated when it takes 10 minutes to run an app, or some consistent bugs you find difficult to remove. Then you want to format Android phone for the solution.
3. You may sometime forget the password to unlock screen. So you may want to format your Android when locked.
…
Now I will show you the guide to reset Android phone. If you can use your device normally, you can choose the method in part 2. Otherwise, please go through the guide in part 3. But please note that before formatting an Android phone like Samsung Galaxy S8/S7, you should back up the Android data in advance.
Part 1: Back Up Android Data Before Formatting Process
The below two methods to format Android phone would erase all your important data. So before the process, backing up the Android files is a must! You are recommended to use Android Backup Restore program to make a backup copy on your computer. Please download the program firstly.

Step 1 Plug Device into Computer
After you install the program, please launch it and go the «Data Backup & Restore» pane on the interface. Then plug the device you want to format into computer via the USB cable.
Step 2 Select the Data You Want to Back Up
There are two options: Backup and Restore on the interface. Please choose «Backup» and select certain contents from your Android.

Step 3 Start to Back Up Data
Please click on the “Backup” button once you complete to choose the data types. Wait for a moment and you would be notified if it finishes backing up your data. And it also offers you an option to preview the results.

Part 2: Format Functioning Android with Factory Reset
The first way to format an Android device is to perform a factory reset. Actually, it is pretty simple to reset your Android. Now, I will take a Samsung Galaxy as an example to show you how to reset Android phone.
Device Model Information:
Device Name: Samsung Galaxy S7 edge
Model Number: SM-G9350
Android Version: 6.0.1
Step 1 Go to «Settings» app on your Android device.
Step 2 Tap «Backup and reset» option and then scroll down to the button of the screen and choose «Factory data reset» from the options. And now, please tap on the «RESET DEVICE» button to reset your Android to factory defaults.

Part 3: Format Non-functioning Android in Recovery Mode
Another way to format your device is to perform the process in Recovery mode. The reasons to choose this method can be:
1. When you turning on your Android, it is stuck into a certain interface and can not get out of it.
2. You may want to remove Screen lock when you forget the password.
In a word, to format Android in Recovery mode would be the cases that you can’t successfully enter the system and perform a factory reset in a normal way. Now, let’s check how to do with the Samsung Galaxy S7 edge model for your example.
Step 1 Power Off your Galaxy S7 edge
Step 2 Press and hold the Power key, Volume up and Home button at the same time. Release all three buttons when you see the logo and then you will get into the Recovery Mode interface.
Step 3 Scroll down to select wipe data/factory reset option with the Volume down button and use Power key to confirm it.

Important note:
1. All the data on your Android would be wiped out after the process.
2. The above guide is only an example to enter Recovery mode in Samsung. Actually, different phone models to boot into Recovery mode may be not the same. You can also search it on the internet for your own device.
Tips: After you format your Android, you can restore the backup copy to your device in one click without data loss. Please simply connect the target device into computer and then choose the backup copy you want to restore, and you can get back your important data easily. And it is completely free to back up data with the Android Backup Restore program, but you need to pay for it when you need to restore files to Android. As it is so effective and simple to use, $19.95 for lifetime license is not big a deal!

Format an Android phone is very easy and totally at your control. The most important thing you should do is to back up the precious data from your device to computer before getting it back to factory setting. Hope this instruction is helpful to you.
Related Articles
 Ivy Bruce
Ivy Bruce is the Founder and Editorial Director at Recovery-Android Studio. You can also find her on Google+ and Twitter.

How to Transfer Videos from Computer to iPhone
![]()
User Guide of Phone to Phone Transfer Software

How to Recover Deleted File from Motorola Atrix

How to Transfer Music from Computer to Nexus
Источник


