- Unity Tutorial – Full Body FPS Controller – Part 1 : Base Character Controller
- 1 – Tutorial introduction
- 2 – Setting up our Unity scene
- 3 – Moving our controller
- 3.1 – Input management
- Why protected and not private ?
- Unity How to Make Mobile Touch Controls
- Step 1: Create All The Necessary Scripts
- Step 2: Set Up Mobile Controls
- Step 3: Implement Mobile Controls
- Создание простого персонажа (First Person Controller) и земли (Terrain) в Unity
- Создание земли (Terrain)
- Создание персонажа (First Person Controller)
Unity Tutorial – Full Body FPS Controller – Part 1 : Base Character Controller
This is the first part of a tutorial where I explain how to make a Full Body FPS Controller in Unity. In this part we will set up our scene, our character and make it move with some animations.
This part will be the base of the controller and will be the same for both FinalIK and Unity’s IK version.
This tutorial is made with Unity 2019.1.9f1
1 – Tutorial introduction
In first person game there are mainly two different approaches for your character controller.
The one that we use the most is using a floating pair of arms. It’s the easiest method. Some games, even add fake legs sometimes to make you think that you aren’t just a pair of arms. It’s the method that games like Counter Strike, Insurgency, Call of Duty use.
The other one, the one we are interested in, is the Full body approach. It may seem the most straightforward approach as you can simplify it by saying that you take a full character model and put a camera between his eyes. But the fact that you have a full character model make it harder in many ways. You can encounter issues such as head stabilization, animations must look good and coherent in first person view and third person view and so on.This method is found mainly on tactical shooter games such as Arma or Ground Branch.
So if this method is harder and almost nobody uses it, why would we bother trying to do it? Well, it does look better in my opinion and it’s way more immersive. But hey, if it looks better, that’s the only thing that matters right? As someone who spent around 6-9 months trying to make it work I can’t say no 🙂
2 – Setting up our Unity scene
Before anything else we need a little testing scene, nothing too fancy, a player and a ground should be enough for now.
For the ground anything with a collider will do and for the player I will use the free SWAT character from mixamo but you can use any character.
Once you have chosen your character and added it to the scene we’re going to add a Capsule Collider and a RigidBody to it. It should look like that:
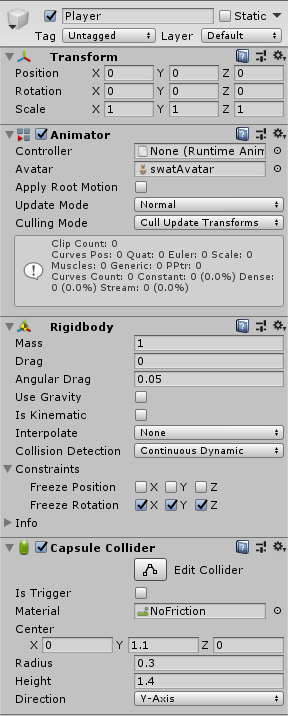
Here you might notice a few things. First, we aren’t using Unity gravity because we will add it manually later.
Then on the capsule collider I added a physic material with no friction so that the character will not stick to walls. Here how the material looks:
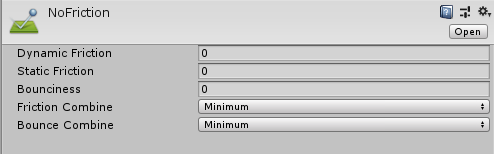
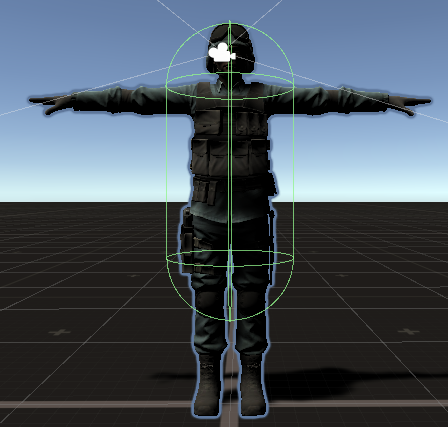
Also on the collider you can see that I moved the center up on the Y axis, and changed the radius and height to match my character. This is because we want to solve the ground collision ourselves in order to handle slopes and stairs.
Your character should look like this :
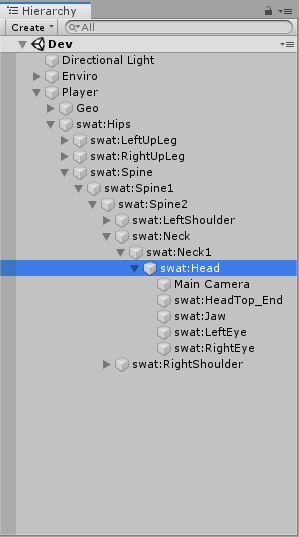
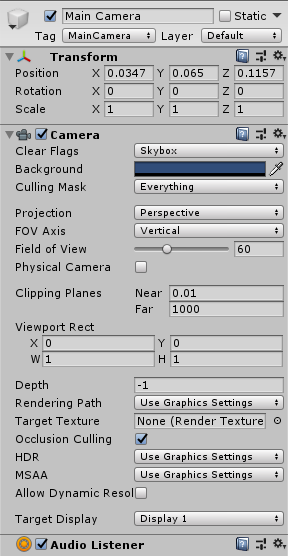
Next thing the camera. We need to put it as a child of the head bone of our character. And we move it in front of the right eye.
Note: this part might differ if you are using FinalIK or Unity’s IK. We will see why in another tutorial.
We also set the near clipping plane of the camera to the minimum (0.01). We need to do that because if not the arms and the weapon of our character could clip through the camera.
You should have something like that :
Last thing before scripting, we need to put at least an idle animation and some walking animation to our character.
I will again take the animations from mixamo . But you can use any animation you like as long as it works for your character.
Note: Unity’s IK only supports humanoid rigs, FinalIK supports both humanoid and generic. You should choose your animations and character accordingly.
First, create an animator controller and put it on the player animator . Then inside this animator we will add two parameters : Forward ( float ) and Sideway ( float ). We will update them with the keyboard input.
We now need to create a new blend tree with the type 2D Freeform Cartesian. It should look like that:
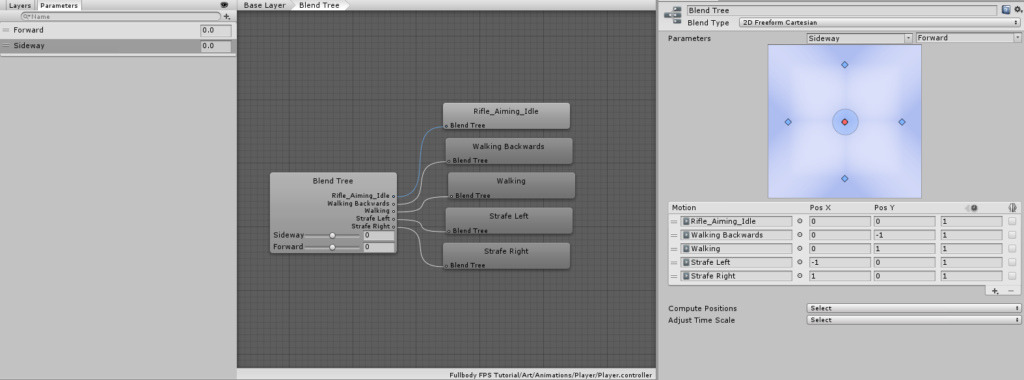
And with that done, we can go to the interesting part: the scripts !
3 – Moving our controller
3.1 – Input management
In order to move our character we need to catch those inputs. So we’re going to create an InputManager script. And we will make it in a way that if we want we could add controller support easily. For that we will do the script in a slightly different way that you may be used to. We will be using protected variables to store our input data and public properties to expose the values. We will also need to create a protected method HandleInput where we will put the code for catching the inputs.
Why protected and not private ?
Let’s start by catching our movement input. For that we create two strings that will hold our Forward Axis name and our Horizontal Axis name. As said earlier, we store input values inside protected floats and make public properties to get them.
Источник
Unity How to Make Mobile Touch Controls
Controls are one of the most important parts of a video game, and no surprise, it’s what allows players to interact with the game world.
Game controls are signals that are sent through hardware interaction (mouse/keyboard, controller, touchscreen, etc.) which are then processed by the game code, applying certain actions.
PCs and Gaming Consoles have physical buttons that can be pressed, however, modern mobile devices have only a few physical buttons, the rest of the interaction is done through touch gestures, which means game buttons need to be displayed on the screen. That’s why when creating a mobile game, it’s important to find a balance between having all the buttons on the screen while keeping it user-friendly and clutter-free.
In this tutorial, I will be showing how to create fully-featured (Joysticks & Buttons) mobile controls in Unity using UI Canvas.
Step 1: Create All The Necessary Scripts
This tutorial features 2 scripts, SC_ClickTracker.cs and SC_MobileControls.cs. The first script will listen to the click events and the second script will read the values generated from the events.
SC_ClickTracker.cs
SC_MobileControls.cs
Step 2: Set Up Mobile Controls
- Create new Canvas (GameObject -> UI -> Canvas)
- Change ‘UI Scale Mode’ in Canvas Scaler to ‘Scale With Screen Size’ and change Reference Resolution to the one you’re working with (in my case it’s 1000 x 600)
- Attach SC_MobileControls script to Canvas Object
- Right-click on Canvas Object -> UI -> Image
- Rename the newly created Image to «JoystickLeft»
- Change «JoystickLeft» Sprite to an empty circle (don’t forget to change Texture Type to ‘Sprite (2D and UI)’ after importing it to Unity)

- Set»JoystickLeft» Rect Transform values same as on the screenshot below:

- In the Image component, set the Color alpha to 0.5 to make the sprite slightly transparent:

- Duplicate «JoystickLeft» Object and rename it to «JoystickLeftButton»
- Move «JoystickLeftButton» inside «JoystickLeft» Object
- Change the «JoystickLeftButton» Sprite to a filled circle:

- Set «JoystickLeftButton» Rect Transform values same as on the screenshot below:


- Add Button component to «JoystickLeftButton»
- In the Button component change Transition to ‘None’
- Attach SC_ClickTracker script to «JoystickLeftButton»
- In SC_ClickTracker set Button Name to any unique name (in my case I set it to ‘JoystickLeft’) and enable the ‘Is Joystick’ checkbox.

The Joystick button is ready. You can have any number of Joysticks (In my case I will have 2, one on the left to control the movement and one on the right to control the rotation).
- Duplicate «JoystickLeft» and rename it to «JoystickRight»
- Expand «JoystickRight» and rename «JoystickLeftButton» to «JoystickRightButton»
- Set «JoystickRight» Rect Transform values same as on the screenshot below:

- Select «JoystickRightButton» Object and in SC_ClickTracker change Button Name to ‘JoystickRight’
The second Joystick is ready.
Now let’s create a regular button:
- Right-click on Canvas Object -> UI -> Button
- Rename Button Object to «SprintButton»
- Change the «SprintButton» Sprite to a Circle with a bevel effect:

- Set «SprintButton» Rect Transform values same as on the screenshot below:

- Change «SprintButton» Image color alpha to 0.5
- Attach SC_ClickTracker script to «SprintButton» Object
- In SC_ClickTracker change the Button Name to ‘Sprinting’
- Select Text Object inside «SprintButton» and change its text to ‘Sprint’, also change Font Size to ‘Bold’

The button is ready.
We are going to create another button called «Jump»:
- Duplicate the «SprintButton» Object and rename it to «JumpButton»
- Change «JumpButton» Pos Y value to 250
- In SC_ClickTracker change the Button Name to ‘Jumping’
- Change Text inside «JumpButton» to ‘Jump’
And the last button is «Action»:
- Duplicate the «JumpButton» Object and rename it to «ActionButton»
- Change «ActionButton» Pos X value to -185
- In SC_ClickTracker change Button Name to ‘Action’
- Change Text inside «ActionButton» to ‘Action’
Step 3: Implement Mobile Controls
If you followed the steps above, you can now use these functions to implement the mobile controls in your script:
As an example, I will be implementing mobile controls with an FPS Controller from this tutorial. Go follow that tutorial first, it’s fairly simple.
If you followed that tutorial you would now have «FPSPlayer» Object along with Canvas with mobile controls.
We will be preserving Desktop controls while also implementing the mobile controls, making it cross-platform:
- Open SC_FPSController script, scroll until line 28, and remove this part (removing that part will prevent the cursor from being locked and will allow clicking on mobile controls in Editor.):
- Scroll til line 39 and replace:
- With:
- Scroll down till line 45 and replace:
- With:
- Scroll down till line 68 and replace:
- With:
Since the look movement will interfere with the joystick testing in Editor, we’re using #if platform-specific compilation to separate mobile logic from the rest of the platforms.
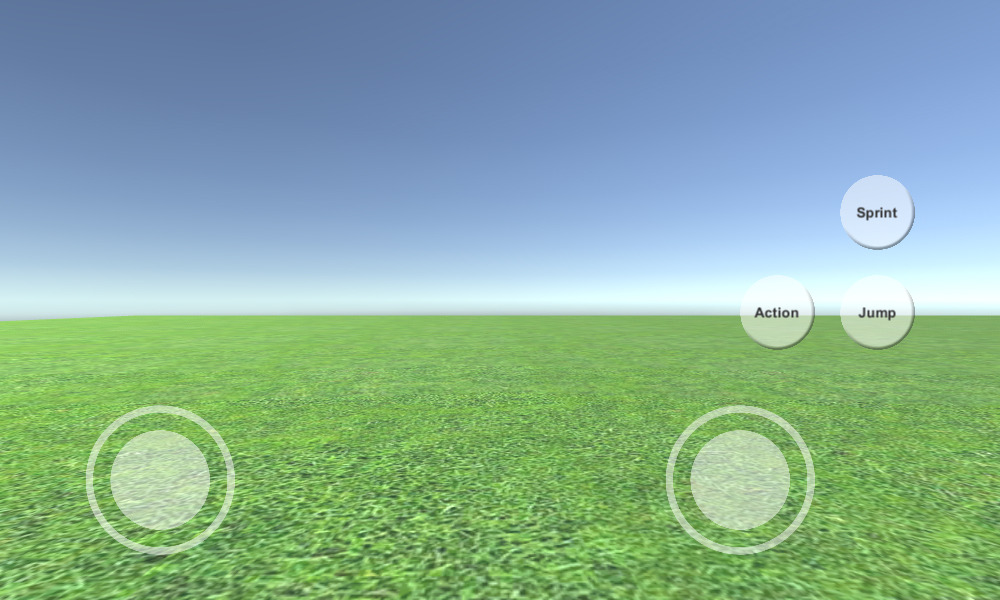
The Mobile FPS Controller is now ready, let’s test it:

As you can see, all Joysticks and Buttons are functional (except the «Action» button, which wasn’t implemented due to not having a suitable feature for it).
Источник
Создание простого персонажа (First Person Controller) и земли (Terrain) в Unity

Чтобы создать свой виртуальный мир, нужен какой-то начальный персонаж, который сможет по крайней мере двигаться.
Я решил не заморачиваться с кодом. Так как я новичок, путевого ничего все равно не напишу. Следовательно, первое время буду использовать готовые ассеты. Устанавливать их можно из официального Asset Store Unity. Не сложнее, чем моды для игр.
Но сперва я решил создать какую-то землю, чтобы персонаж смог ходить.
Создание земли (Terrain)
Создать землю в Unity очень легко.
- Добавляем на сцену Terrain (GameObject → 3D Objects → Terrain).
- Выбираем ее в окне иерархии слева, а справа в Inspector открываем раздел Terrain.
- Здесь выбираем режим Paint Terrain (кисточка), ниже в поле выбираем Raise or Lower Terrain и начинаем рисовать себе горы и овраги доступными кистями. Настраиваем размер и просто водим кисточкой по террейну.
- Находим в интернете любую бесшовную текстуру травы. Здесь же, в инспекторе выбираем режим Paint Texture, создаем слой и запихиваем туда эту текстуру.

И вот у нас уже есть какие-то зеленые горы… Сойдет для начала.
Создание персонажа (First Person Controller)
- Идем в Asset Store, находим готовый ассет Mini First Person Controller.
- Нажимаем кнопку ADD TO MY ASSETS, соглашаемся с лицензией.
- Далее нажимаем OPEN IN UNITY.

- В самом Unity у нас открывается Package Manager с этим ассетом. Нажимаем Download, ждем загрузки, затем Import, потом еще раз.
- Находим в корневой папке проекта новую папку First Person Controller. Заходим внутрь.
- Находим там болванку с названием First person controller full и просто перетаскиваем на Terrain. Немного приподнимаем над землей, чтобы не застрял.


Запускаем игру, бегаем, наслаждаемся своим шедевром. В этом ассете уже присутствуют звуки шагов, возможность прыгать, приседать, ускоряться. Все настройки найдете в инспекторе.
Ну а я возвращаюсь к своим экспериментам 😉…
Источник


