Fragments in android github

Android library for managing multiple stacks of fragments (e.g., Bottom Navigation , Navigation Drawer). This library does NOT include the UI for bottom tab bar layout. For that, I recommend either BottomBar (which is the library shown in the demo) or AHBottomNavigation. This library helps maintain order after pushing onto and popping from multiple stacks(tabs). It also helps with switching between desired tabs and clearing the stacks.
Did I help you out, save you some time, make your life easier? Oh, cool. Want to say thanks, buy me a coffee or a beer? HEY THANKS! I appreciate it.
Fragments are maintained in a stack per Android’s guideline https://developer.android.com/guide/navigation/navigation-principles#navigation_state_is_represented_as_a_stack_of_destinations . A lot of questions get asked about how to maintain only one instance of a fragment, or to pull out a fragment in the middle of the stack. That is outside Android navigation guidelines, and also this library. You may want to rethink your UX.
With Material Design Bottom Navigation pattern, and other tabbed navigation, managing multiple stacks of fragments can be a real headache. The example file shows best practice for navigating deep within a tab stack.
How do I implement it?
Initialize using a builder and one of two methods
Create a list of fragments and pass them in
Allow for dynamically creating the base class by implementing the NavListener in your class and overriding the getRootFragment method
Send in the supportFragment Manager, a list of base fragments, the container that you’ll be using to display fragments. After that, you have four main functions that you can use In your activity, you’ll also want to override your onSaveInstanceState like so
Tab switching is indexed to try to prevent you from sending in wrong indices. It also will throw an error if you try to switch to a tab you haven’t defined a base fragment for.
Push a fragment
You can only push onto the currently selected index
You can only pop from the currently selected index. This can throw an UnsupportedOperationException if trying to pop the root fragment
Pop multiple fragments
You can pop multiple fragments at once, with the same rules as above applying. If the pop depth is deeper than possible, it will stop when it gets to the root fragment
Replacing a fragment
You can only replace onto the currently selected index
You can also clear the stack to bring you back to the base fragment
You can also navigate your DialogFragments using
All of the above transactions can also be done with defined transaction options. The FragNavTransactionOptions have a builder that can be used.
Get informed of fragment transactions
Have your activity implement FragNavController.TransactionListener and you will have methods that inform you of tab switches or fragment transactions
A sample application is in the repo if you need to see how it works.
Can be set using the transactionOptions
Restoring Fragment State
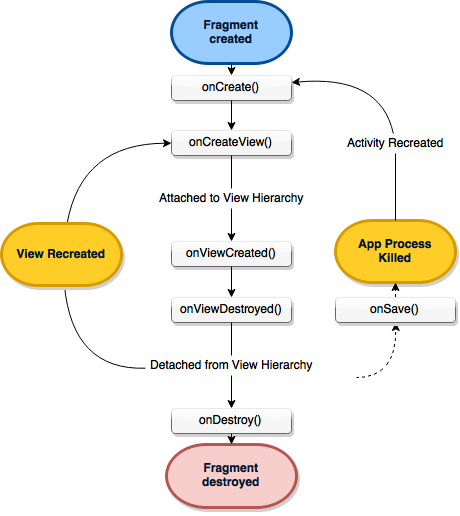
Fragments transitions in this library use attach()/detch() (http://daniel-codes.blogspot.com/2012/06/fragment-transactions-reference.html). This is a delibrate choice in order to maintain the fragment’s lifecycle, as well as being optimal for memory. This means that fragments will go through their proper lifecycle https://developer.android.com/guide/components/fragments.html#Lifecycle . This lifecycle includes going through OnCreateView which means that if you want to maintain view states, that is outside the scope of this library, and is up to the indiviudal fragment. There are plenty of resources out there that will help you design your fragments in such a way that their view state can be restored https://inthecheesefactory.com/blog/fragment-state-saving-best-practices/en and there are libraries that can help restore other states https://github.com/frankiesardo/icepick
Special Use Cases
History & Back navigation between tabs
The reason behind this feature is that many of the «big» apps out there has a fairly similar approach for handling back navigation. When the user starts to tap the back button the current tab’s fragments are being thrown away (FragNav default configuration does this too). The more interesting part comes when the user reaches the «root» fragment of the current tab. At this point there are several approaches that we can choose:
- Nothing happens on further back button taps — This is the default
- FragNav tracks «Tab History» and send a tab switch signal and we navigate back in history to the previous tab.
To use the history keeping mode you’ll have to add extra parameters to the builder:
Here first we have to choose between two flavors (see below for details), then we’ll have to provide a callback that handles the tab switch trigger (This is required so that our UI element that also contain the state of the selected tab can update itself — aka switching the tabs always triggered by the application never by FragNav).
| UNLIMITED_TAB_HISTORY | UNIQUE_TAB_HISTORY |
|---|---|
 |  |
Show & Hide modes for fragment «replacement»
While having a good architecture and caching most of the data that is presented on a page makes attaching / detaching the fragments when switching pretty seamless there may be some cases where even a small glitch or slowdown can be bothering for the user. Let’s assume a virtualized list with couple of hundred items, even if the attach is pretty fast and the data is available rebuilding all the cell items for the list is not immediate and user might see some loading / white screen. To optimize the experience we introduced 3 different possibility:
Using attach and detach for both opening new fragments on the current stack and switching between tabs — This is the default — DETACH
Using attach and detach for opening new fragments on the current stack and using show and hide for switching between tabs — DETACH_ON_NAVIGATE_HIDE_ON_SWITCH
Having this setting we have a good balance between memory consumption and user experience. (we have at most as many fragment UI in the memory as the number of our tabs)
Using Fragment show and hide for both opening new fragments on the current stack and switching between tabs — HIDE
This gives the best performance keeping all fragments in the memory so we won’t have to wait for the rebuilding of them. However with many tabs and deep navigation stacks this can lead easily to memory consumption issues.
WARNING — Keep in mind that using show and hide does not trigger the usual lifecycle events of the fragments so app developer has to manually take care of handling state which is usually done in the Fragment onPause/Stop and onResume/Start methods.
There is also a possibility to automatically add and inflate all the root fragments right after creation (This makes sense only using HIDE and DETACH_ON_NAVIGATE_HIDE_ON_SWITCH modes). To have this you should set «eager» mode to true on the builder (Default is false).
Apps Using FragNav
Feel free to send me a pull request with your app and I’ll link you here:
| Logo | Name | Play Store |
|---|---|---|
| Rockbot DJ | ||
| Rockbot Remote | ||
 | Skyscanner | |
 | Fonic / Fonic Mobile | |
 | Just Expenses |
If you have any problems, feel free to create an issue or pull request.
The sample app in the repository uses BottomBar library.
Источник
Fragments in android github
Working with Android Fragments [Video]
This is the code repository for Working with Android Fragments [Video], published by Packt. It contains all the supporting project files necessary to work through the video course from start to finish.
About the Video Course
Welcome to this exciting course where you will learn to master Android Fragments and Layouts. You’ll have fun learning all about fragments and android layouts by building a polished app — HeroMe. First, you’ll learn about the basics of Android Fragments. Then you’ll dive deeper into custom drawables and changing views programmatically. By the end of this courses, you’ll be able to start building more functional apps.
What You Will Learn
- Use textures to make cool 3D models
- Display and animate 3D models in the camera view of the real world
- Use World Tracking to track your position at all times
- Launch projectiles in the real world
- Place 3D objects on horizontal surfaces
- Drive a car on horizontal surfaces
- Build an inter-dimensional portal
- Detect collisions between two 3D nodes
Instructions and Navigation
To fully benefit from the coverage included in this course, you will need:
If you have basic programming experience with Java and want to build more functional apps by mastering Fragments and Android Layouts, this course is for you.
This course has the following software requirements:
Need basic programming skills.
Источник
Fragments in android github
![]()
A fragment-like abstraction for Android that is easier to use and understand
The purpose of this library is to build a better foundation for working with the controller layer in Android-style MVC. If you have ever worked with Fragments, you know that they feel more complicated than they need to be AND sometimes have unexpected behavior. This is especially true when you try to nest them. SimpleFragment provides an api that is very similar to native fragments but is more powerful and easier to understand.
or if you are using AppCompat
- Survive orientation changes
- First-class nesting
- Immediately added to the view when they are created
- Don’t have to worry about commitAllowingStateLoss()
- Fails fast if you attempt to add the same fragment twice
- Many of the same features as native fragments: view paging, inflation from layouts, startActivityForResult() , back stack, dialogs
The most important thing to understand is how the lifecycle differs from native fragments. It is, in fact, very similar to setting setRetainInstance(true) in that it survives configuration changes. This makes things like api calls much easer to handle. However, you do have to be careful to only keep references any view or activity state between onViewCreated() and onViewDestroyed() .
Here an example of a SimpleFragment that gets a string from a network call and populates a TextView .
There are many ways to easily handle the view lifecycle part of this equation, like Butter Knife, a custom view or view holder, or more recently, data binding.
In order to use SimpleFragments in an Activity you should subclass SimpleFragmentActivity or SimpleFragmentAppCompatActivity . You can then either add the SimpleFragment in the layout
or dynamically in code
Note that when dynamicaly creating fragments, that they will be saved and restored by the SimpleFragementManager so you should not add it again when restoring state (Use findOrAdd() to simplify this check). Luckily, you will get an immedatly exception if you accidently do this instead of having an extra fragment silently added.
You can pass extras to you SimpleFragment in a similar way to the way you do it in activities. Simply add them to the SimpleFragmentIntent
and then access the intent in the fragment to obtain it’s value.
Both SimpleFragmentActivity and SimpleFragment provide a SimpleFragmentManager . Unlike native fragments, you don’t have to worry about werid inconsitencies in nested fragements like startActivityForResult() or the back stack not working.
You can push a new SimpleFragment on the back stack by using push() instead of add() . The back button will pop the fragment off, or you can do it in code with pop() . This will work correctly in nested fragments, where the back button will alwasy pop the last one globbaly added, and the pop() method will be scoped to the current fragment.
You can subclass SimpleFragmentPagerAdapter to use fragments in a ViewPager .
The default implementation will properly handle adding and removing pages dynamcialy when you call notifyDataSetChange() . No more having to worry about overriding getItemPosition() .
Note that fragments will still be completly destroyed when they are far off screen. You can always use ViewPager.setOffscreenPageLimit() to modify this limit.
There is a SimpleDialogFragment subclass you can use for dialogs.
A good way to propigate events from the dialog (or any fragment) back up to it’s parent is with SimpleFragment.getParent() which will return either the parent fragment or Activity depending on where it is nested. You can cast this to an interface to communicate back up to it.
Start Activity For Result
Not much to say here, just use startActivityForResult() on the SimpleFragment instead of the activity and the result will be sent back down to your fragment. Works with nesting too!
Источник
Fragments in android github
This app is designed to demonstrate and reinforce the use of fragments in apps.
Part 1 — Project Data
Start with the provided project. The main activity has sample code on how to use the api tools provided.
I didn’t have much time for this code so I just used something that I already had and converted it to work in kotlin for this project. A few of the classes are poorly put together for kotlin and most of them don’t use the new tools provided that we’ll be teaching you. Don’t use it as a reference.
Part 2 — List Fragment
We’ll now create a fragment to list our data.
- In your project tab on the left, right click the package name and go to new -> fragment -> Fragment(list)
- There will be a popup window. In that window, replace the value for «Object Kind» with the name of your data object ( CongresspersonOverview ). Note the names of the files it will be creating. Click finish.
- You’ll see that this will now generate a number of classes and files. In your project tab there is now a new package called dummy delete that package and the files it contains.
- First, open the New fragment file. You’ll see some red error messages.
- In the generated fragment class, you’ll see a constructor for the generated list adapter class. You’ll need to change the DummyItem to your data class. Once that is done follow the constructor to the RecyclerViewAdapter class
- Adjust this class and the corresponding layout to work with your data object.
- You’ll see a call to onListFragmentInteraction along with another error. You’ll need to change the signature of that method (found in the new fragment class) to accept your data object
Part 3 — Attach List Fragment to MainActivity
- In your MainActivity layout replace the TextView with a fragment view add a name attribute and set the value as the full package name for your fragment
- In the kotlin file. Implement the OnListFragmentInteractionListener from your ListFragment and implement the method. This is where you’ll build and attach your second fragment. You can use the passed in data object to pass along to the details page
Part 4 — Add a second fragment for tablets
- Create a new activity_main layout for displays with the smallest screen width of 600

- Copy your old layout to this one. Add a FrameLayout for your details fragment, be sure to include an id and size it how you want both fragments to appear
- Create another new fragment, but this time select Fragment (Blank) DetailsFragment
- In the new layout, add fields to display your data
- In the MainActivity’s OnListFragmentInteractionListener Create a new instance of your detail fragment.
You’ll also need to implement that fragment’s OnListFragmentInteractionListener interface and method
- Create a new Bundle object and put the id property for the selected congressperson into it (the one passed in the current method’s signature)
- Call setArguments on your fragment and pass it your bundle.
- Start a fragment transaction with getSupportFragmentManager().beginTransaction() then use the builder pattern to call replace and pass it your Frame layout id, and the fragment object, then call commit()
- In the detail fragment, call getArguments to get the bundle object and then getString to get the passed id
- Use the provided api method to get that member’s details CongressDao.getMemberDetails(it)
- Use that object to populate your view
Part 5 — Add a second activity for phones
This is a bit different from what we did in class, but teaches you some useful tools and skills
- Create a new activity like the main activity with a FrameLayout view and in the new activity’s onCreate method add the detail fragment programatically like you did in steps 5-8 in part 4
- Now we need to determine if the device is big enough for two panels
- Create a new attr.xml file. Add a new bool field called is_tablet set the value to false
- Create another attr.xml file, but this time, create it with the same requirement you set in Step 4.1. Add the same bool field but set its value to true
- In your main activity’s OnListFragmentInteractionListener , call getResources().getBoolean(R.bool.is_tablet) to get that value. If it is true, add your fragment as in part 4. If not, create an intent and use it to start the second activity, passing your data object as well.
Change the detail activity to be a popup diaplog instead of a separate activity or screen.
Источник


