- FrameLayout
- Поочередная смена картинки
- Основы верстки для нативных андроид приложений
- FrameLayout
- LinearLayout
- RelativeLayout
- TableLayout
- Alternate Layouts
- Стили
- Android FrameLayout Tutorial With Example In Android Studio
- XML Attributes Of FramLayout
- 1. android:id
- 2. android:foreground
- 3. android:visibility
- 4. android:measureAllChildren
- Methods of FrameLayout
- 1. generateLayoutParams(AttributeSet attrs)
- 2. getAccessibilityClassName()
- 3. getMeasureAllChildren()
- 4. setForegroundGravity(int foregroundGravity)
- 5. setMeasureAllChildren(boolean measureAll)
- 6. shouldDelayChildPressedState()
- 7. generateDefaultLayoutParams()
- 8. generateLayoutParams(ViewGroup. LayoutParams lp)
- 9. onLayout(boolean changed, int left, int top, int right, int bottom)
- 10. onMeasure(int widthMeasureSpec, int heightMeasureSpec)
- Examples of FrameLayout
- Example 2
FrameLayout
FrameLayout является самым простым типом разметки. Обычно это пустое пространство на экране, которое можно заполнить только дочерними объектами View или ViewGroup. Все дочерние элементы FrameLayout прикрепляются к верхнему левому углу экрана.
В разметке FrameLayout нельзя определить различное местоположение для дочернего объекта. Последующие дочерние объекты View будут просто рисоваться поверх предыдущих компонентов, частично или полностью затеняя их, если находящийся сверху объект непрозрачен, поэтому единственный дочерний элемент для FrameLayout обычно растянут до размеров родительского контейнера и имеет атрибуты:
Также можно использовать свойства Gravity для управления порядком размещения.
FrameLayout можно использовать для интересного эффекта, когда верхняя часть (TextView) остаётся неизменной, а основной контент прокручивается.
Поочередная смена картинки
Создадим разметку, когда на экран динамически выводится только одно изображение.
Теперь код для активности, где при нажатии на изображении, оно будет заменяться на другое.
В разметке мы указали, что один из компонентов ImageView должен быть невидимым. Если бы мы этого не сделали, то увидели, что компоненты просто накладываются друг на друга в стопку. И если элементы разных размеров, то можно увидеть, как одно изображение частично перекрывает другое.
Имейте в виду, что размер компоновки FrameLayout определяется наибольшим элементом в контейнере. Поэтому более маленькое изображение может растянуться.
Если часть элементов сверху стопки являются невидимыми, то могут наблюдаться проблемы с выводом на экран. В этих случаях рекомендуется вызывать метод setMeasureAllChildren() с аргументом true (аналог метода — атрибут android:measureAllChildren=»true»).
Источник
Основы верстки для нативных андроид приложений
( пользоваться не рекомендуется, deprecated )
AbsoluteLayout — означает что каждый элемент верстки будет иметь абсолютную позицию относительно верхнего левого угла экрана задаваемую с помощью координат x и y. Т.е. верхнийлевый угол экрана при AbsoluteLayout имеет координаты x = 0, y = 0.
Позиция указывается в атрибутах элемента android:layout_x и android:layout_y.
Пример кода:

FrameLayout
FrameLayout — тип верстки внутри которого может отображаться только один элемент в строке. Т.е. если внутри FrameLayout вы поместите несколько элементов, то следующий будет отображаться поверх предыдущего.
Пример кода:
LinearLayout
LinearLayout — тип верстки при котором область верстки делится на строки и в каждую строку помещается один элемент. Разбиение может быть вертикальное или горизонтальное, тип разбиения указывается в атрибуте LinearLayout android:orientation. Внутри верстки возможно комбинировать вертикальную и горизонтальную разбивки, а кроме того, возможна комбинация нескольких разных типов верстки например использование LinearLayout внутри FrameLayout.
Пример вертикальной разбивки LinearLayout:
Пример горизонтальной разбивки LinearLayout:
Комбинация нескольких LinearLayout:
RelativeLayout
RelativeLayout — тип верстки при котором позиционирование элементов происходит относительно друг друга и относительно главного контейнера.
За то, каким образом будут позиционироваться элементы отвечают следующие атрибуты:
Атрибуты позиционирования относительно контейнера
- android:layout_alignParentBottom – Низ элемента находится внизу контейнера
- android:layout_alignParentLeft – Левая часть элемента прилегает к левой части контейнера
- android:layout_alignParentRight – Правая часть элемента прилегает к правой части контейнера
- android:layout_alignParentTop – Элемент находится в верхней части контейнера
- android:layout_centerHorizontal – Элемент позиционируется по центру относительно горизонтального размера контейнера
- android:layout_centerInParent – Элемент позиционируется по центру относительно горизонтального и вертикального размеров размера контейнера
- android:layout_centerVertical – Элемент позиционируется по центру относительно вертикального размера контейнера
Атрибуты позиционирования относительно других элементов.
В качестве значений этих атрибутов ставятся id элемента относительно которого будет производится позиционирование.
android:layout_above – Распологает элемент над указанным
android:layout_below – Распологает элемент под указанным
android:layout_toLeftOf – Распологает элемент слева от указанного
android:layout_toRightOf – Распологает элемент справа от указанного
Выравнивание относительно других элементов.
android:layout_alignBaseline – Выравнивает baseline элемента с baseline указаннго элемента
android:layout_alignBottom – Выравнивает низ элемента по низу указанного элемента
android:layout_alignLeft – Выравнивает левый край элемента с левым краем указанного элемента
android:layout_alignRight – Выравнивает правый край элемента с правым краем указанного элемента
android:layout_alignTop – Выравнивает верхнюю часть элемента в соответствие с верхней частью указанного элемента
TableLayout
TableLayout — табличная верстка.
Организует элементы в строки и столбцы таблицы.
Для организации строк служит таг
Alternate Layouts
Alternate Layouts — альтернативная верстка. Позволяет использовать различную верстку для различных ориентаций экрана.
XML для альтернативной верстки помещается в папки проекта:
res/layout-land – альтернативная верстка для landscape UI
res/layout-port –альтернативная верстка для portrait UI
res/lauout-square – альтернативная верстка для square UI
и перед тем как получить макет из res/lauout система проверяет наличие файлов в этих папках.
И в завершении немного о стилях.
Стили
Во первых стили элемента могут быть описаны в атрибутах самого элемента.
Например:
Кроме того стили можно вынести в отдельный xml файл и сохранить его в папке res/values/
Напимер:
Если мы вынесем стили в отдельный файл, то для описания стилей элемента будем использовать атрибут style.
Источник
Android FrameLayout Tutorial With Example In Android Studio

Android FrameLayout Tutorial With Example is today’s chapter.
FrameLayout is the easiest layout to hold the child view. It is generally used to block the certain area of the screen.
Usually, framelayout have single child view to reduce the complexity of making the screen responsive across all the screen sizes.
If framelayout contains multiple child views then they might overlap each other in different screen sizes and responsiveness of the layout becomes just a dream!
For example, when you want to have a fragment along with button, you should put the fragment in the framelayout,
while you should keep the button in the activity’s layout XML file.
You can, however, add multiple children to a FrameLayout,
For that you need to control their position within the FrameLayout by assigning gravity to each child, using the android:layout_gravity attribute.
FrameLayout add it’s child in the stack format.
Meaning is that it will add the most recently added child on the top.
XML Attributes Of FramLayout
Following are the important and useful attributes of the FrameLayout.
1. android:id
This attribute will give the unique identity to the framelayout.
When you want to access the framelayout from the JAVA class, this id will give you the reference via findViewById() method.
Value of this attribute should be unique across the whole android app to reduce the complexity.
Below is the code example to use id
2. android:foreground
This attribute allows us to draw to certain view on the whole framelayout.
The value of this property can be a color, a drawable file or a simple image.
Possible color values are “#rgb”, “#argb”, “#rrggbb”, or “#aarrggbb” according to various RGB values.
Now make a new project in android studio.
Do not touch the MainActivity.java class. Keep it as it is.
Add the below source code in activity_main.xml file.
Above file will generate the following output
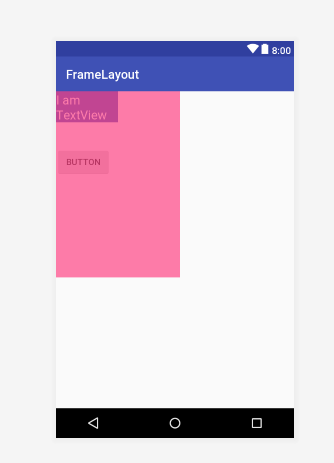
Framelayout is the main layout in the above file.
Now foreground attribute have a value of transparent pink color with 173 opacity.
Because pink color is transparent, we can see the TextView and Button through it, Otherwise solid color will cover them both completely.
So you can imagine that foreground value will cover the whole framelayout.
3. android:visibility
We can apply this attribute to any child of the framelayout.
Possible values for visibility are visible, invisible and gone.
- Visible means that the view is present and we can also see it.
- Invisible means that the view is present and we can not see it.
- Gone means that view is not present and so we can not see it.
Code example can be like below
Remove all the code from your activity_main.xml file and add the below code
Output will be like the following image
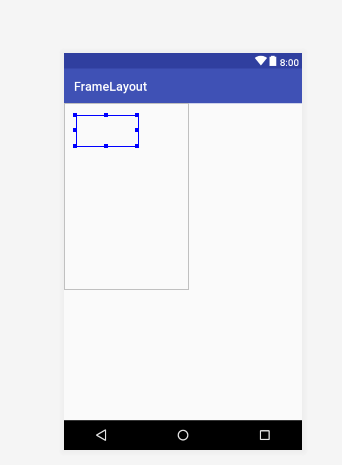
You can see that Textview is present (blue border rectangle) but we can not see it.
Similarly, you can change the value as Visible and Gone and see the output.
4. android:measureAllChildren
This property defines whether to measure the all the children including those who are with “Gone” visibility state or to measure only those who have “visible” or “invisible” state.
This property can have “True” or “False” value.
If true then it will include the child with gone visibility otherwise not.
Let us understand this example,
In your activity_main.xml file, add the below code
In the MainActivity.java file, add the below code
When you run the above code, we will have the toast with values “width=100 and height=50” (Which are the width and height of the TextView.)
Width and Height are in the dp format.
Visibility of Textview is gone but because measureAllchildren is true, compiler will take the textview into consideration.
Methods of FrameLayout
To control the framelayout from JAVA class, android gives us the following in-built methods to use.
1. generateLayoutParams(AttributeSet attrs)
It Returns a new set of layout parameters based on the supplied attributes set.
2. getAccessibilityClassName()
Return the class name of this object to be used for accessibility purposes.
3. getMeasureAllChildren()
Determines whether all children, or just those in the VISIBLE or INVISIBLE state, are considered when measuring.
It will return boolean value. (True or False)
If it returns false then compiler will consider only VISIBLE or INVISIBLE state of children of framelayout.
For true, it will consider VISIBLE, INVISIBLE and GONE state of children of framelayout.
4. setForegroundGravity(int foregroundGravity)
Describes how the foreground is positioned.
5. setMeasureAllChildren(boolean measureAll)
Sets whether to consider all children, or just those in the VISIBLE or INVISIBLE state, when measuring.
6. shouldDelayChildPressedState()
Return true if the pressed state should be delayed for children or descendants of this ViewGroup.
7. generateDefaultLayoutParams()
Returns a set of layout parameters with a width of ViewGroup.LayoutParams.MATCH_PARENT, and a height of ViewGroup.LayoutParams.MATCH_PARENT.
8. generateLayoutParams(ViewGroup. LayoutParams lp)
Returns a safe set of layout parameters based on the supplied layout params.
9. onLayout(boolean changed, int left, int top, int right, int bottom)
Called from layout when this view should assign a size and position to each of its children.
10. onMeasure(int widthMeasureSpec, int heightMeasureSpec)
Measure the view and its content to determine the measured width and the measured height. This method is invoked by measure(int, int) and should be overridden by sub classes to provide accurate and efficient measurement of their contents.
NOTE: When overriding this method, you must call setMeasuredDimension(int, int) to store the measured width and height of this view. Failure to do so will trigger an IllegalStateException, thrown by measure(int, int). Calling the superclass’ onMeasure(int, int) is a valid use.
Examples of FrameLayout
Make a new project in android studio if do not have already.
Code for MainActivity.java should look like the below
In your activity_main.xml file, write down the following lines
Above code will produce the below output
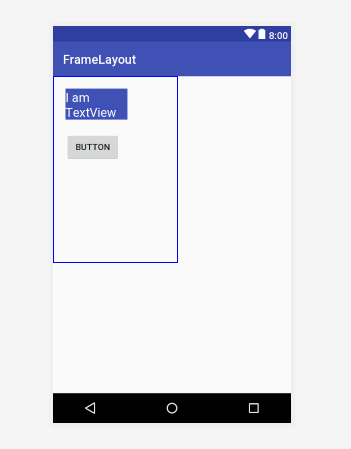
Big rectangle with blue borders is the area covered by the FrameLayout.
In this framelayout, I have added a textview and a button.
Naturally, children of framelayout covers each other but in the above code I have used proper layout_margin properties to avoid this overlapping.
Now if you set the layout_margitTop of button as “0” you will have the following preview.

In the above image, you can clearly see that Button is overlapping the TextView.
That is why, it is recommended to use only single view inside the framelayout.
Example 2
Again, do not change anything in the MainActivity.java file.
Code for activity_main.xml is like the below
Following is the view of the above source code
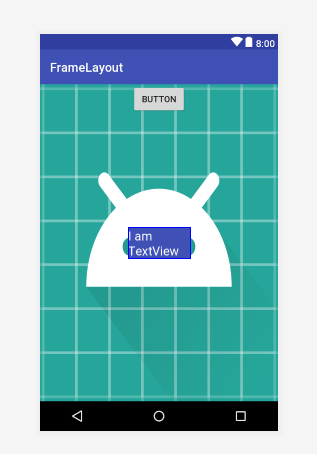
I have given full width and height to the framelayout. So it will cover the whole screen.
Both children, textview and button are overlapping the android logo image.
Now first child of framelayout is the Imageview with full height and width.
So you can see in above image that Image of android logo has the full screen size.
Second child is button, with layout_gravity as a “center_horizontal“.
Thus, button is at the center horizontally.
TextView has the layout_gravity as a “center“, so it is at the center of the whole screen (horizontally and vertically)
Thus, it was all the necessary information about FrameLayout.
Источник


