- How to: Use Your Android as a Flash Drive
- Step 1 – Downloading Drivedroid & Setting Up
- Step 2 – Downloading your Bootable .iso
- Step 3 – Finishing the Process
- Android USB Tool
- Android customization — how to connect a USB flash drive to your Android device
- Before we get started
- Apps that can read USB flash drives
- ES File Explorer
- Nexus Photo Viewer and Nexus Media Importer
- What’s next
- Next week
How to: Use Your Android as a Flash Drive
Have you ever been desperately in need of a flash drive but haven’t had one around? The simple solution, besides going out and buying one, may be to set up your Android as a flash drive. It may sound wacky, but it’s completely possible to set your Android device up and use it as a boot device. All it takes is a single application called Drivedroid.
This app works in almost all cases, but there are rare instances where some devices or kernels aren’t supported. Luckily it doesn’t take too long to set up so it’s worth giving it a try.
In this guide we’ll explain how you can use your Android as a flash drive with the Drivedroid tool and install an operating system onto a PC with a bootable .iso file. It should be noted that this guide requires root access.
Step 1 – Downloading Drivedroid & Setting Up
Firstly, you’ll need to download Drivedroid from the Google Play Store. There is a paid version of this application but the free version provides all of the functionality you will need to use your Android as a flash drive.
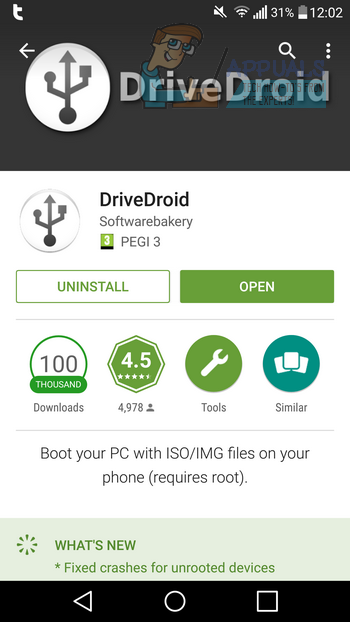
When you open the application for the first time, it will ask if you’d like to go through the initial setup process. We would recommend choosing the setup – do not skip it. At this point the application will ask for root access. Please keep in mind that you will need your device to be rooted to use Drivedroid.
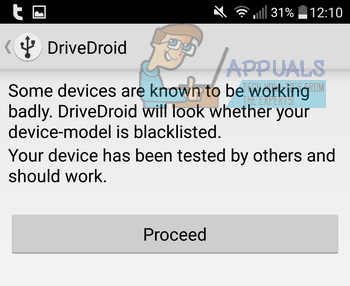
The first stage of the Drivedroid setup process will test whether your smartphone is capable of using the application or not. In the majority of cases, your smartphone will be supported, but if it is not supported, you will not be able to continue with this guide.
Next, the application will ask you to plug your smartphone into your PC via USB. Once you have plugged your smartphone in, tap the ‘I plugged in the USB cable’ button.
Next the app will ask you to choose a USB system. The application can predict what system works best for your particular device. Tap proceed, and then tap the option that has been listed at the top. In this example, the ‘Standard Android kernel’ option has appeared at the top – it may be different for your device!

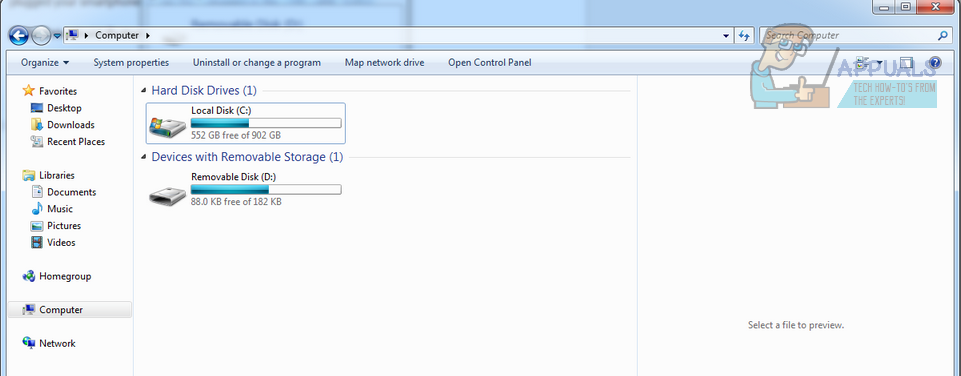
Your PC should now recognize the smartphone as a USB drive. Here is an example of what we have seen on our Windows 7 PC.
Next, tap the ‘I see an USB drive, proceed’ option within the application. You’ll now need to restart your PC and check whether you can choose your Android device within the boot menu. Typically boot buttons are F2, F8 or Delete key. You’ll find the particular on-screen instructions for your computer when it boots up, just before the OS loading screen appears.
Now tap on the app to let it know it has successfully been recognized as a boot device. Now tap the ‘close wizard’ button.
Once you have downloaded and set up the app, you’ll next need to locate and download a bootable .iso file that you can use alongside Drivedroid. If you’ve found this guide, chances are you may already have the files you need for installing a new operating system. However, if you don’t, you can actually find a lot of different Linux distros from within the application itself.
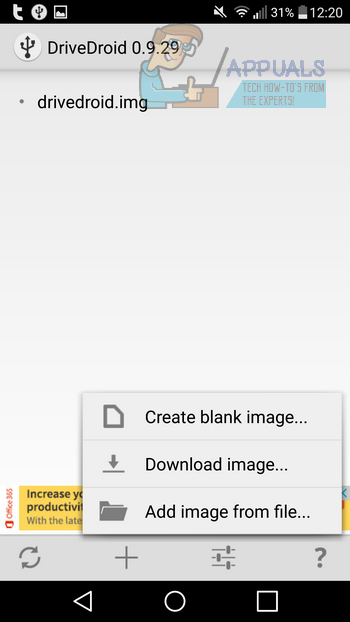
If you already have an .iso file you’d like to use, please skip step 2 and head straight to step 3. If you already have a bootable .iso tap the ‘+’ button at the bottom of the app UI, then tap ‘Add image from file.’
Next, give the image any name you like – this is simply for your own reference. Click the search icon under the path option and then search for your .iso file. If you haven’t already, move it to your smartphone’s internal memory first.
Step 2 – Downloading your Bootable .iso
If you don’t have a bootable .iso already, tap the ‘+’ button at the bottom of the app UI, then tap download image. There are a number of options to choose from, including Debian, Fedora and Ubuntu. Tap on the option you’d like and download one of the available files.
Step 3 – Finishing the Process
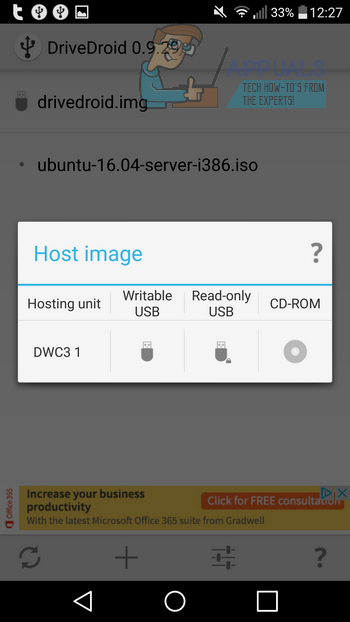
Next, your created or download .iso file will appear on the main Drivedroid home page. From here, simply tap your .iso file and wait for the ‘host image’ pop-up to load. Next, tap the icon underneath the ‘read-only’ USB option.
You can now disconnect your smartphone from your PC and connect it to the PC you’d like to boot the .iso onto. Make sure your PC is off and then go through your own PC’s boot menu to select the Android device as your flash drive.
That should be it – after this the process should be finished and your .iso will install onto your PC.
Источник
Android USB Tool
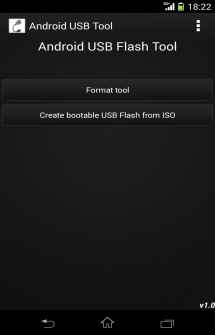
Android USB Tool. Программа для форматирования и создания загрузочных флешек. Данная программа может помочь в экстренных ситуациях, когда у вас нет под рукой компьютера и необходимо срочно создать загрузочный LiveUSB диск или отформатировать флеш-накопитель через USB-OTG. Теперь это можно сделать прямо на Android.
Как узнать адрес подключаемого диска:
- 1)Отсоедините флешку от устройства, если подключена.
- 2)Откройте любой файловый менеджер с доступом root и перейдите в /dev/block/
- 3)Вы увидите большой список, найдите в нем файлы с именем «sd*X» (Под X подразумевается число, под * — буква. Пример: sda1). Если такие файлы есть, то запомните их названия, если нет, то переходите к следующему пункту
- 4)Вставьте USB устройство и обновите список файлов. В списке появятся два или более файлов с именем «sd*» или «sd*X«. В данном случае «sd*» — сама флешка, а «sd*X» — раздел на флешке. Запомните имя файла «sd*X«.
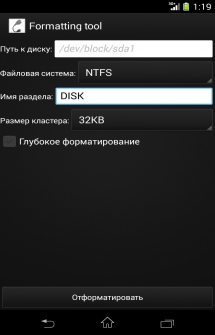
- 5)А теперь, узнав адрес, укажите его в программе. (Например: /dev/block/sda1).
Форматирование флешки:
Как форматировать флешку:
- После того, как вы подключили флешку к устройству, отмонтируйте флешку в Настройки -> Память -> Извлечь USB-накопитель . Теперь можно спокойно форматировать.
Форматирование MicroSD карты:
Как форматировать MicroSD карту памяти:
- Отмонтируйте карту в Настройки -> Память -> Извлечь MicroSD .
- Укажите вместо » sd*X » вот это — » mmcblk1p1 «.
- Форматируйте.
Если mmcblk1p1 нет, то находим адрес карты памяти по инструкции выше.
Как сделать флешку загрузочной:
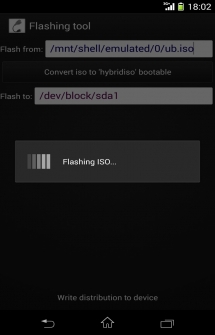
- Укажите путь к дистрибутиву, укажите адрес флешки, нажмите » Write distribution to device » и ожидайте несколько минут. Чем больше iso образ — тем больше времени уходит на запись(На образ в 500мб уходит примерно 5 минут).
Особенности:
- 1)Форматирование USB-накопителя в формат FAT32, exFAT, NTFS с поддержкой изменения размера кластера.
- 2)Запись ISO дистрибутивов на USB-накопитель.
- 3)Конвертирует linux образы в isohybrid. Это помогает исправить ошибку «isolinux missing or corrupt».
Скачать программу Android USB Tool на Андроид бесплатно вы можете по ссылке ниже.
Разработчик: eraferi
Платформа: Android 2.3 и выше
Язык интерфейса: Русский (RUS)
Состояние: Free (Бесплатно)
Root: Нужен
Источник
Android customization — how to connect a USB flash drive to your Android device

Last week on our Android customization series, we rounded out a string of Tasker and Zooper Widget tutorials that made it possible to rock your Homescreen with custom widgets. With the software customizations we’ve been working with, perhaps it is time to look at something a little more physical, like connecting a USB flash drive to your Android device.
Flash drives spent a good amount of time as the number one way to take your files with you wherever you needed to go. As some of that has changed with Android devices and cloud storage, many of us still have those USB flash drives kicking around looking for a good use.
Let us take a good look at connecting a USB flash drive to your Android device, but fair warning, you’ll need to purchase a new cable to proceed.
Before we get started
As mentioned, connecting a USB flash drive to your Android device will more often than not require a special cable called an USB On-The-Go or OTG cable. I will be using a simple $1.47 OTG cable from Monoprice today, but you may be more comfortable looking at this $1.09 cable from Amazon.
Beyond the basic OTG cable, you can step it up to a powered Y-splitter OTG cable. Be aware that this is not intended to charge your device, rather it is to power your connected USB peripheral. You shouldn’t need this for your basic USB flash drive, but it is highly recommended if you are attempting to connect a full external hard drive or anything that will draw more than 500mA of power.
If you do not already have a flash drive or ten kicking around, you may consider one of the OTG capable USB flash drives or card readers already on the market. Equipped with a micro USB connector, these unit will attach directly to your Android device.
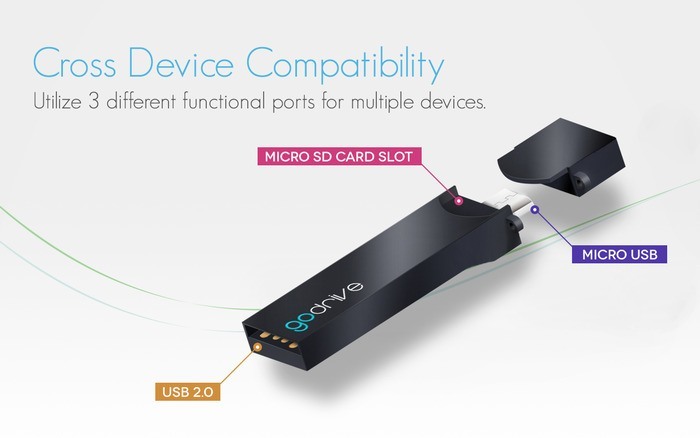
There are also some folks over on Kickstarter that have taken the OTG Flash drive all-in-one approach to the next level, creating a microSD card reader that can plug into either your computer or Android device, plus much more. Feel free to head on over to Kickstarter to learn more about the project, then, if it appears slightly beyond your drone flying, GoPro packing, smart TV flash drive needs, maybe this simpler USB OTG microSD card reader will better suit your needs.
This is the easy part. For best results, plug your USB flash drive into your USB OTG cable first, then plug the OTG cable into the micro USB port on your device .

With the right cable, connecting a flash drive to your Android device is a simple thing, but what do you do now?
Apps that can read USB flash drives
Once your USB flash drive is connected to your Android device, you’ll need to use specific apps to be able to access the data. There are a number of options here, of which I will cover just two.
ES File Explorer
In addition to being one of the few apps that can take advantage of your installed microSD card on device, ES File Explorer can also read and write to your connected USB flash drive. Best of all, no root required.
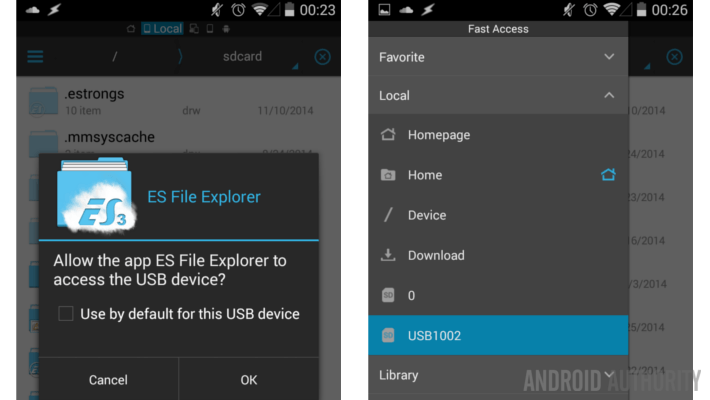
With your USB flash drive connected, open up ES File Explorer , you will be greeted with a permissions screen. Click OK to allow ES File Explorer to access your USB flash drive .
Now, swipe in from the left hand side to access the side menu. Open the Local section and choose your USB flash drive , mine was named “USB1002” but this is not the first time I’ve connected it.
To eject , simply close out of ES File Explorer then unplug . If your USB flash drive is equipped with an indicator light, make sure that it is not flashing before you unplug.
Special note: Although I’ve used ES File Explorer today, you should find that most file explorer apps will perform the same task in their own way. Check out our list of favorite file explorer apps for suggestions.
Nexus Photo Viewer and Nexus Media Importer
Don’t let the names fool you, these apps should work on any USB Host enabled Android 4.0+ Android device.
Nexus Photo Viewer is a simplified free version of Nexus Media Importer. Do try out Nexus Photo Viewer before spending the $4 on Nexus Media Importer. Both apps should connect to the media on your OTG cable connected USB flash drive.
As above, simply connect your USB flash drive to your OTG cable , then plug the OTG cable into your Android device . These apps will act on the USB attached intent and will immediately ask if you would like to connect. Click OK to proceed.
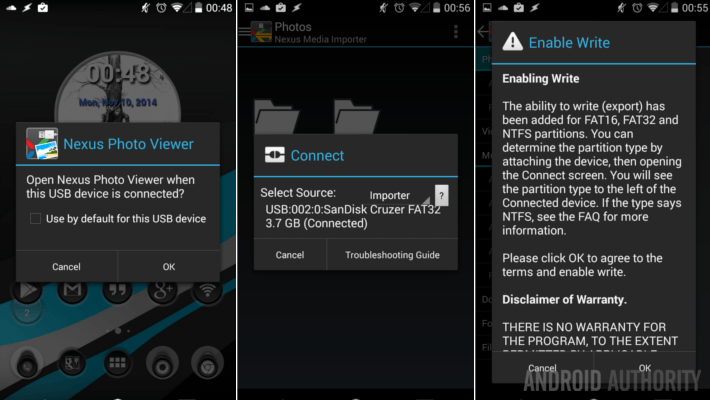
Once in either Nexus Media Importer or Nexus Photo Viewer, you will be able to view your stored content, with extra features such as a photo slide show available in the paid version. There is also a basic file explorer too, so you will be able to transfer files to and from your USB flash drive.
Disconnecting from Nexus Photo Viewer and Nexus Media Importer is done by accessing the menu button in the top right, then choosing disconnect . Then simply unplug .
What’s next
Do not think that a USB flash drive is the extent of devices that you can connect to your Android device. I have successfully tested several powered external hard drives, USB mice and keyboards. Just keep in mind that 500mA limit, as we’ve heard reports of high draw USB peripherals causing damage to phones. Personally, I’ve been lucky in that my device has rebooted on me, without causing any noticeable harm. I was attempting to connect a webcam, just for fun, but it didn’t work.

Next week
I’ll give you some time to play around with this week’s Android customization post, let you try attaching all of your USB components to your Android devices. I’ll give you some time, let’s say, on week. Next week, I’d like to use Tasker timer widgets to mess around with music. A sleep timer and an alarm clock should be a good start.
Have you found any fancy USB devices that have unexpectedly connected to your Android device?
Источник


