- How to share purchases with your family
- What is purchase sharing?
- Use your iPhone, iPad, or iPod touch to turn on purchase sharing
- Use your Mac to turn on purchase sharing
- Turn off purchase sharing
- Which payment method is charged for purchases that family members make?
- Learn more
- See your purchase history for the App Store, iTunes Store, and more
- How to see recent purchases on the web
- See your purchase history on your iPhone, iPad, or iPod touch
- See your purchase history on your computer
- If you can’t find an item in your purchase history
- Find out if a family member purchased the item
- Check if you purchased the item with a different Apple ID
- If you see purchases that you don’t recognize or unexpected charges
- Learn more
- iOS in-app purchases, part 1: Configuration and adding to the project
- Creating purchases
- Subscription configuration
- Duration and pricing
- Free trial
- Getting the list of SKProduct
How to share purchases with your family
One adult in the family — the family organizer — pays for everyone’s purchases. You can share apps, music, books, and more.
What is purchase sharing?
When you turn on purchase sharing, everyone in your family gets access to apps, music, movies, TV shows, and books that family members buy. The family organizer is billed for family members’ purchases.
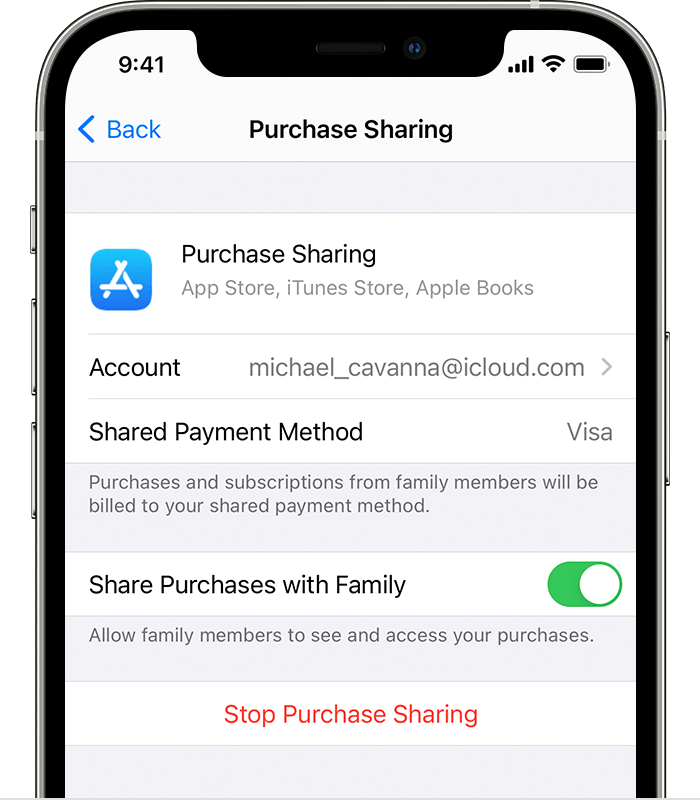
Use your iPhone, iPad, or iPod touch to turn on purchase sharing
- If you haven’t set up Family Sharing yet, set up Family Sharing.
- Open the Settings app.
- Tap your name, then tap Family Sharing.
- Tap Purchase Sharing.
- Tap Continue and follow the onscreen instructions.
- To see which payment method will be billed, tap Purchase Sharing again and look at the Shared Payment Method information.

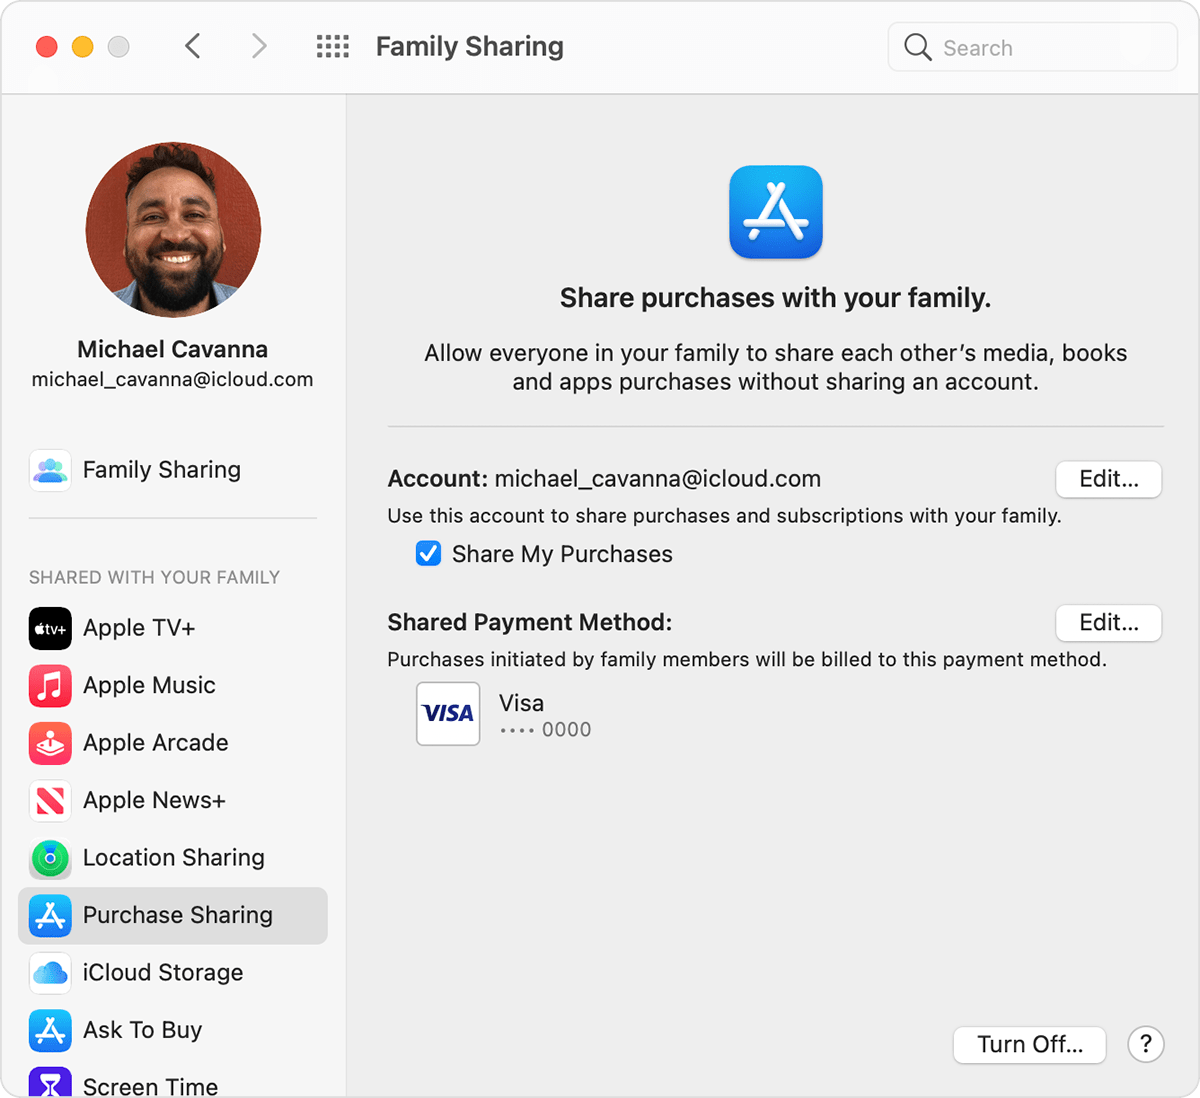
Use your Mac to turn on purchase sharing
- If you haven’t set up Family Sharing yet, set up Family Sharing.
- On your Mac, choose the Apple menu > System Preferences.
- Click Family Sharing.
- Click Purchase Sharing in the sidebar.
- Click Set Up Purchase Sharing and follow the onscreen instructions.
- To see which payment method will be billed, look at the Shared Payment Method information.
Turn off purchase sharing
- See your Purchase Sharing settings in Settings on your iPhone or iPad or in System Preferences on your Mac.
- Turn off purchase sharing:
- On your iPhone, iPad, or iPod touch, tap Stop Purchase Sharing.
- On your Mac, click Turn Off, then click Stop Purchase Sharing.
Which payment method is charged for purchases that family members make?
When Purchase Sharing is turned on, everyone’s purchases bill to the family organizer’s payment method.* If there’s an issue with the payment method, the family organizer can change or update their payment method.
If you’re the family organizer and you don’t want to share a payment method with your family, turn off purchase sharing. When purchase sharing is turned off, you can continue to share subscriptions like Apple TV+ and Apple Arcade.
Learn more
If you want kids to get permission before they make a purchase, turn on Ask to Buy.
Information about products not manufactured by Apple, or independent websites not controlled or tested by Apple, is provided without recommendation or endorsement. Apple assumes no responsibility with regard to the selection, performance, or use of third-party websites or products. Apple makes no representations regarding third-party website accuracy or reliability. Contact the vendor for additional information.
Источник
See your purchase history for the App Store, iTunes Store, and more
To see which apps, music, and other content you bought, look at your purchase history.
See a list of your purchases from the App Store, iTunes Store, Apple Books, and the Apple TV app.
![]()
How to see recent purchases on the web
- Go to reportaproblem.apple.com.
- Sign in with your Apple ID and password.
- A list of your recent purchases appears. If you’re not sure what you were charged for but you know the exact amount, search for the amount. If there’s a problem with an item that you purchased, use this website to report the problem to Apple.
![]()
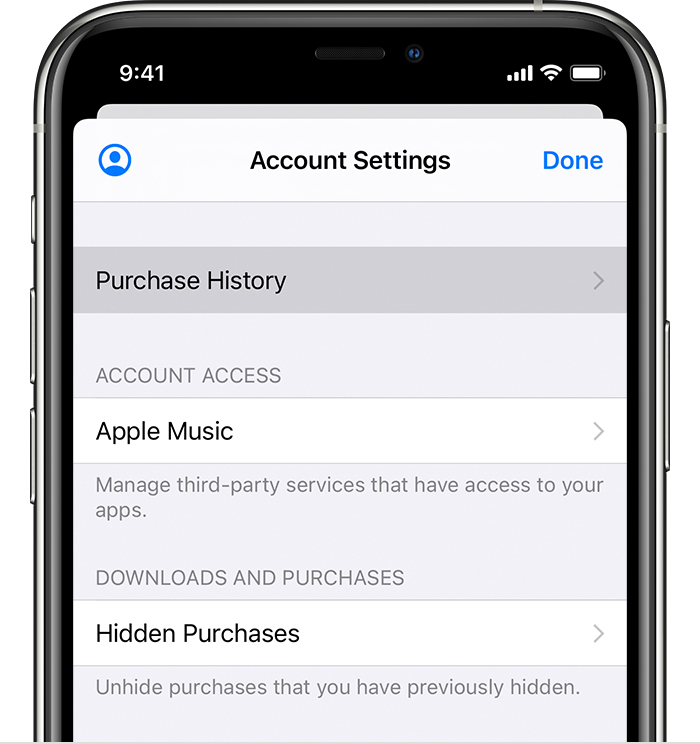
See your purchase history on your iPhone, iPad, or iPod touch
- Open the Settings app.
- Tap your name, then tap Media & Purchases. You might be asked to sign in.
- Tap Purchase History.
- Your purchase history appears. If you want to see purchases that you made more than 90 days prior, tap Last 90 Days, then select a different date range.
![]()
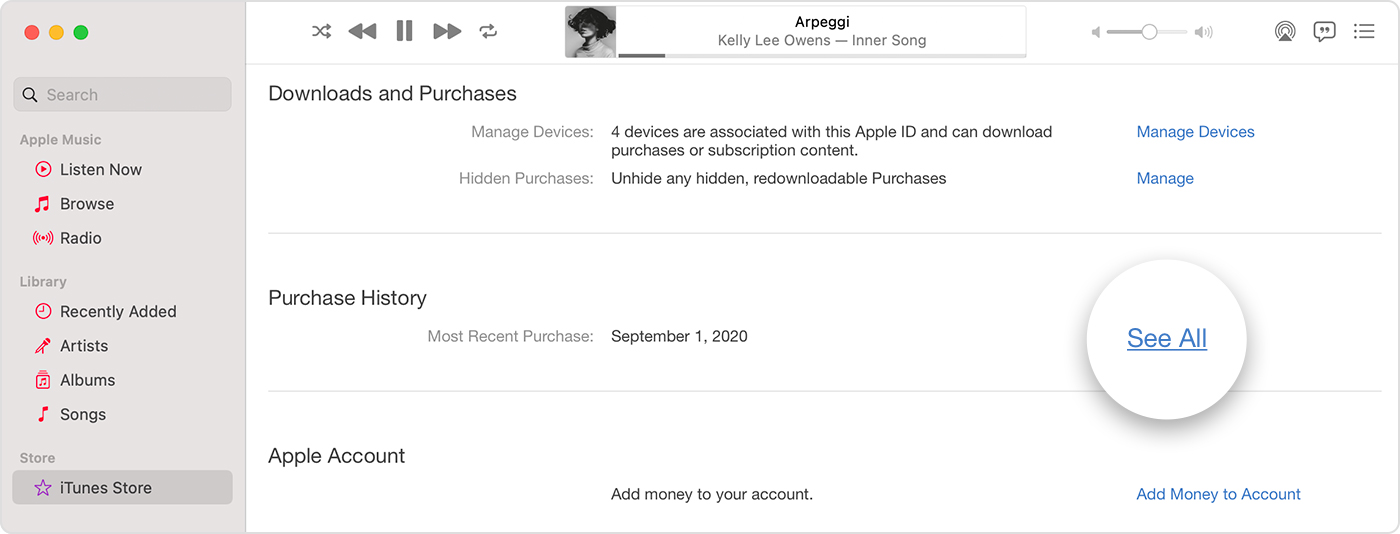
See your purchase history on your computer
- Open the Music app or iTunes. From the menu bar at the top of the screen, choose Account, then click View My Account.
- On the Account Information page, scroll down to Purchase History. Next to Most Recent Purchase, click See All.
- Find the item. It might take a moment for your Purchase History to appear. If you want to see purchases that you made more than 90 days prior, click Last 90 Days, then select a date range.
![]()
If you can’t find an item in your purchase history
If you can’t find the item you’re looking for, try these things before you contact Apple.
Find out if a family member purchased the item
If you use Family Sharing, your purchase history shows purchases that you made using your Apple ID, but you won’t see what other family members bought. To see what other family members bought, sign in with their Apple ID.
If family members have access to your device, you might want to require a password for every purchase.
To control what kids buy on their own devices, turn on Ask to Buy.
Check if you purchased the item with a different Apple ID
If you don’t see an item in your purchase history, you might have been signed in with a different Apple ID when you made the purchase. Sign in with that Apple ID to check if your purchases were billed to that account.
![]()
If you see purchases that you don’t recognize or unexpected charges
- If you see items in your purchase history that you don’t remember buying, check if someone else who uses your device, such as a family member, bought the item. If someone else is using your Apple ID and password, change your Apple ID password.
- Learn what to do if you don’t recognize a charge on your statement from your bank or financial institution.
- Learn how to request a refund.
![]()
Learn more
- If you see an in-app purchase in your purchase history but you don’t see it in the app, restore in-app purchases.
- Cancel a subscription.
- Learn about how App Store and iTunes Store purchases are billed.
- If you received a suspicious email notification about a purchase, the email might not be from Apple or reflect actual charges to your account. Learn how to identify legitimate App Store or iTunes Store emails.
Store availability and features might vary by country or region. Learn what’s available in your country or region.
Information about products not manufactured by Apple, or independent websites not controlled or tested by Apple, is provided without recommendation or endorsement. Apple assumes no responsibility with regard to the selection, performance, or use of third-party websites or products. Apple makes no representations regarding third-party website accuracy or reliability. Contact the vendor for additional information.
Источник
iOS in-app purchases, part 1: Configuration and adding to the project

![]()
![]()
![]()
![]()
![]()
![]()
Subscriptions are one of the ways to monetize an app. Developers can get a recurrent income and provide users with up to date content. Unlike regular purchases where Apple takes a 30% commission, this commission reduces to 15% in case the user is subscribed during one year or longer. Important: if the user cancels the subscription, this counter resets in 60 days.
With this article, we start our series of tutorials on implementing in-app purchases into an app. Here is the list:
In this part we will learn how to:
- Create purchases in App Store Connect
- Configure subscriptions: set a duration, price, trial periods
- Get a list of purchases in-app

Creating purchases
Before implementing your in-app purchases you have to:
- Pay for an Apple Developer account as a natural person or an entity.
- Accept all the agreements in App Store Connect. Updated agreements will appear in your App Store Connect account, it’s easy to notice them.
​​Let’s assume that our app will have two types of subscriptions: monthly and annual. Each of them will have a 7 days free trial.
​​On the application page in App Store Connect open In-App Purchases tab → Manage. Here you can see a list of created purchases. Click (+) next to the title to create a new purchase.
​​You’ll see an in-app purchase dialog appear. Select Auto-Renewable Subscription.
On the next step, you will be offered to create a Subscription Group.
A Subscription Group is a set of subscriptions with the essential feature: a user cannot activate two subscriptions at the same time from the same group. Besides, all the introductory offers such as trial subscriptions are applied directly to the entire group. Groups serve to separate business logic in the application.
Let’s name the group Premium Access. While adding another subscription, the interface will offer you to add it to the existing group. Later you will be able to manage the groups in the In-App Purchases menu → Subscription Groups.
Next, fill out the details:
- Reference Name is the title of your subscription in App Store Connect, as well as in Sales section and the reports
- Product ID is a unique product identifier, which is used in the application code
I would recommend choosing a simple Product ID name, which could give you as much information as possible. It’s better to indicate subscription duration to ease further analytics evaluating.

Add the second product following the previous instruction.
In the end, the interface of In-App Purchases tab в†’ Manage will look like this:
Subscription configuration
We added the purchases, but they are not ready yet to be used: Status bar indicates Missing Metadata. It means we still haven’t added the information about pricing and subscription duration. We’ll fix it now.
Duration and pricing
Click on the product to configure it.

Here we need to choose a Subscription Duration. In our case, we choose 1 Month or 1 Year. Then go to the Subscription Prices menu.
You can flexibly set prices depending on the country, but we will limit ourselves to automatic prices, in USD. App Store Connect will automatically convert prices into another currency, it’s not clear how it works though. Probably you would want to change the price manually adjusting to your target market.

Free trial
One of the most popular ways to increase subscriptions is a free trial:
A user activates it and uses an application for free. If he doesn’t cancel the subscription, after the trial expires, the user is being charged automatically.
The developers love free trials because they work well. Let’s learn how to enable it.
Click (+) next to the title and choose Create Introductory Offer from the list:

Choose a list of countries.

Choose the offer duration. You can set No End Date if you don’t want to limit yourself.

On the last step, you need to select an Offer Type.
As you can see in the next screenshot, there are three types:
Pay as you go — a reduced-price use: the user pays a reduced price during the initial period and then becomes a regular subscriber with standard prices.
Pay up front — a prepay use: the user pays a fixed amount of money at once and gets an opportunity to use the app during the determined period, and then also becomes a regular subscriber.
Free — a free trial, after its expiry user may become a subscriber.
We choose the third one and set duration for one week.

Getting the list of SKProduct
Let’s check if the mobile app sees the purchases and then lay the groundwork for further realization of purchases.
It’s a good rule to create a class singleton for working with StoreKit. Such a class has only one instance in the entire app. A lot of productIdentifiers will store our purchases identifiers:
Only identifiers are not enough.
To fully use the purchases you need to get: price, currency, localization, discounts.
SKProduct class returns all this information and even more. To get this information, we need to request Apple. Create an object SKProductsRequest, assign “delegate” (there you will receive the result). Call the method start(), which initialize an asynchronous procedure:
If the operation is successful, productsRequest(didReceive response:) method will be called​, which will contain all the relevant information:
If everything is successful, in the result there will be two lines in the log:
However, if there is an error, then SKProduct with such an ID will not be returned. It may happen if the product has become invalid due to any reason.
The next article will be focused on how to make in-app purchases: open/close transactions, handle errors, validate receipt, and more.
Источник


