- An Android developer’s first experience with iOS development
- Introduction
- Background
- Swift and Objective C
- Declaring variables and constants
- Unwrapping nullable objects
- Functions
- Loops and string interpolation
- XCode
- Conclusion
- Move from Android to iPhone, iPad, or iPod touch
- Before you begin
- Tap Move Data from Android
- Open the Move to iOS app
- Wait for a code
- Use the code
- Connect to a temporary Wi-Fi network
- Choose your content and wait
- Set up your iOS device
- Finish up
- If you need help with the transfer
- If you need help after the transfer
- Deploying to a Device
- Android Devices
- Requirements
- Running Your App
- Production Builds
- Sign Android APK
- iOS Devices
- Requirements
- Creating a Provisioning Profile
- Using an Apple ID
- Using an Apple Developer Account
- Running Your App
- Code Signing Your App
- Xcode 7 and Earlier
- Xcode 8
- Trusting the Certificate
An Android developer’s first experience with iOS development

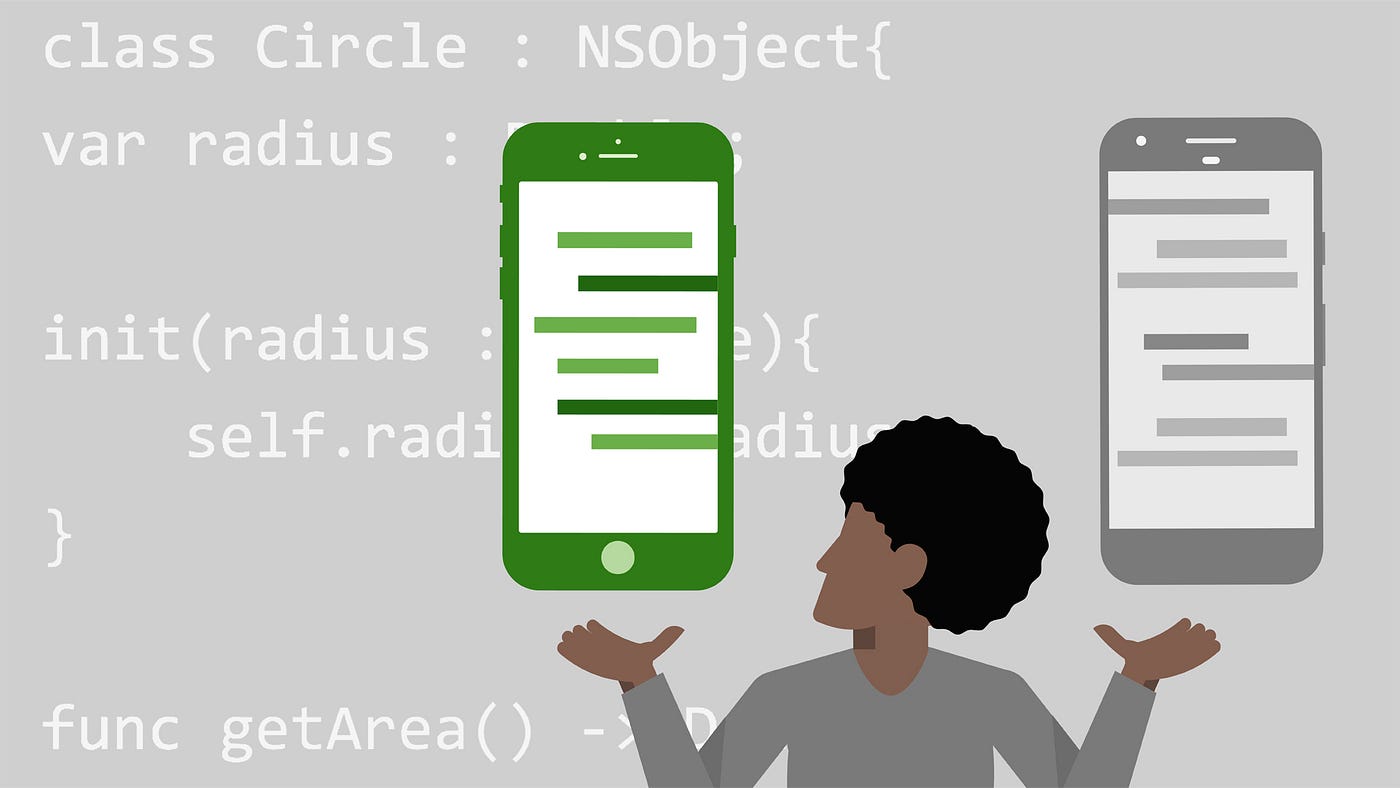
Introduction
I have been a junior Android developer at Trade Me for almost a year now. Recently I had the opportunity to do some work on the iOS app (even though I have no experience with iOS development). Of course I couldn’t pass up an opportunity to learn and gain some useful skills, but not without a few hurdles, pleasant surprises and revelations! Read on to find out what I think about Swift and Objective C, XCode, and whether or not I think you should try out iOS development.
Background
Recently, I went down to Wellington to attend Mobile Refresh, New Zealand’s conference for mobile technology enthusiasts. While I was there, I listened to Sam Jarman and Jie Li’s talk: Android and iOS, a 100% fully serious comparison. As you might expect, it wasn’t 100% serious. In fact, the majority of the talk was jokes about how similar Android and iOS development is. Before listening to this talk, I was already interested in learning iOS development but never thought I was ready to take the plunge. After listening to this talk and learning about the similarities, I felt like I was able to have a go. So I did. Spoiler alert! After venturing into iOS myself, to develop a feature for Trade Me’s iOS app, I can confirm that they are similar!
Swift and Objective C
When I joined Trade Me as an intern Android developer, they had just started writing all new code in Kotlin. I had about three years experience with Java, but none with Kotlin. Learning Kotlin was a huge challenge but using it daily in my job helped me pick it up quickly. After starting the iOS work, I was pleasantly surprised that picking up Swift was a quick and painless process. This is because the syntax of Swift is very similar to Kotlin as well as having similar patterns like extensions, disposables, observables, and similar architectures.
Declaring variables and constants
Unwrapping nullable objects
Functions
Loops and string interpolation
It was awesome to be able to jump straight in and start building stuff — until I had to make changes in an old file, which was written in Objective-C. This was a much trickier problem to tackle. The three-ish months at university studying Obj-C were enough to make me understand some of the basic concepts, but nowhere near enough for me to be able to jump in and understand the code. However, with some help from the internet (and sometimes the very intelligent and helpful iOS developer in my team), I learned enough to understand a lot of the Obj-C code that I needed to work with. When I first came across Obj-C code, I immediately started thinking about a career change. But after learning enough to work with it, I decided that I can put up with it when I have to. But I’m glad all new code will be written in Swift!
XCode
One reason why the development of this feature took longer than it should have was because XCode is quite slow. Two things in particular; the autocomplete and the IDE errors. In Android Studio, I am used to typing a few characters and getting the autocomplete suggestions straight away. In XCode however, I ended up typing a few characters and stopping typing, expecting some suggestions to appear, and then after a few seconds I start typing again, often just as the autocomplete suggestions appear. And the errors… coming from AS, I have come to expect errors to appear while I type, or as soon as I stop typing. Not in XCode. XCode will wait a few seconds to let you know you haven’t unwrapped a nullable object or you need to explicitly use `self`. Also, you may build your app and see the errors disappear. Hooray, they weren’t actually errors! Actually, they are errors. XCode just wanted to get your hopes up before it tells you your build failed. By the end of my work on this feature, I had gotten used to these quirks and annoyances, and could get on with coding just fine. Like Android Studio, XCode has it’s advantages and disadvantages but, at the end of the day, it gets the job done.
Conclusion
Soon after completing this work, I noticed a bug that was present on both our Android and iOS apps and I didn’t hesitate to start fixing the bug on both platforms! (Update: it was decided that the fix should be on the API, so I didn’t get to fix the bug on both platforms. Better luck next time). This made me realise that in just a few weeks I had learned enough to be able to work on manageable iOS features or bugs. This was a major confidence booster. After coming back to Android and writing Kotlin, I noticed another benefit: I feel like I’m thinking in a more functional way and using Kotlin the way it was meant to be used. I don’t know if this is a direct result of using Swift (maybe because of the many closures or extensions), or just learning a new language in general, but I’m glad I have a slightly better understanding of functional programming.
So if you’re reading this and you’re an Android developer considering trying out iOS or vice versa, give it a go. You’ll soon find yourself loving the same awesome features like null safety and nice, concise code with Kotlin or Swift… Or ranting about the same problems like flaky UI tests or buggy layout editors.
Источник
Move from Android to iPhone, iPad, or iPod touch
Ready to transfer to iOS? Download the Move to iOS app to get help switching from your Android device to your new iPhone, iPad, or iPod touch.
If you can’t use the Google Play Store, learn how to download Move to iOS.
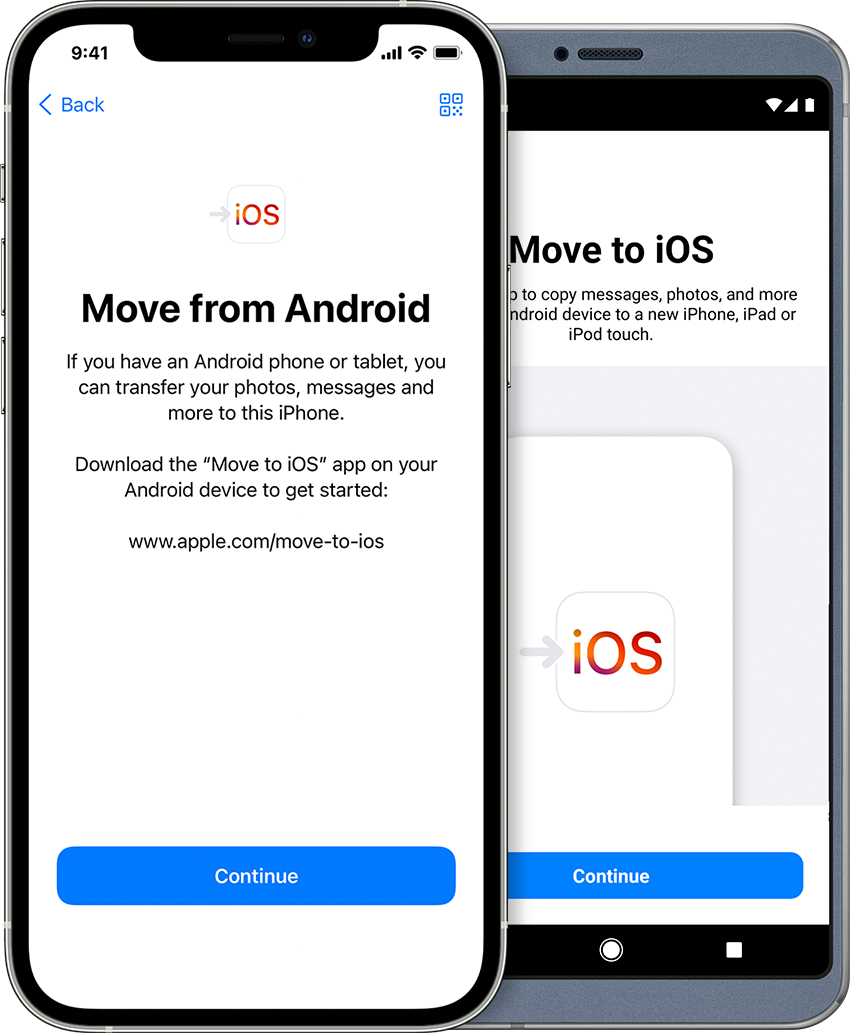
Before you begin
- On your Android device, make sure that Wi-Fi is turned on.
- Plug your new iOS device and your Android device into power.
- Make sure that the content you’re moving, including what’s on your external Micro SD card, will fit on your new iOS device
- If you want to transfer your Chrome bookmarks, update to the latest version of Chrome on your Android device.

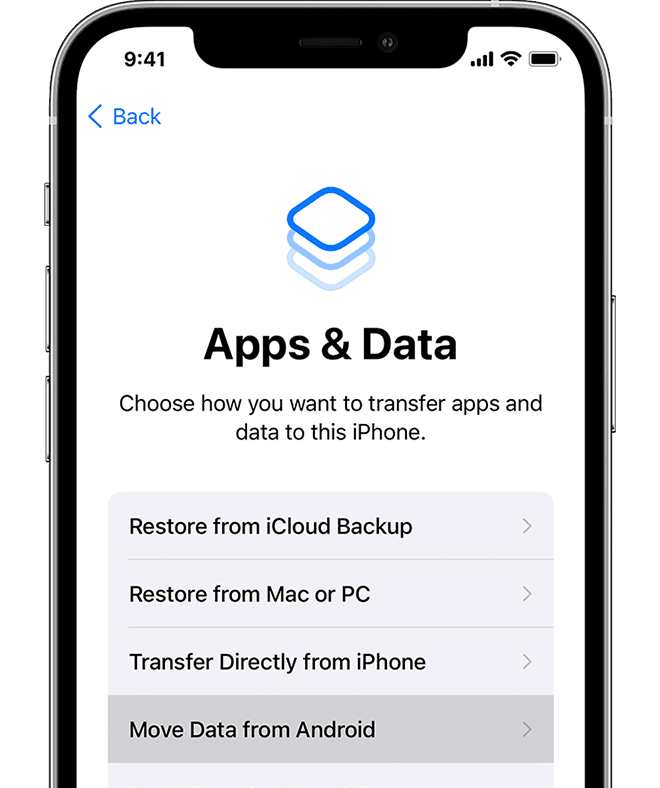
Tap Move Data from Android
While you set up your new iOS device, look for the Apps & Data screen. Then tap Move Data from Android. (If you already finished setup, you need to erase your iOS device and start over. If you don’t want to erase, just transfer your content manually.)
Open the Move to iOS app
On your Android device, open the Move to iOS app. If you don’t have the Move to iOS app, you can tap the QR code button on your new iOS device and scan the QR code using the camera on your Android device to open the Google Play Store. Tap Continue, and read the terms and conditions that appear. To continue, tap Agree.
Wait for a code
On your iOS device, tap Continue when you see the Move from Android screen. Then wait for a ten-digit or six-digit code to appear. If your Android device shows an alert that you have a weak internet connection, you can ignore the alert.
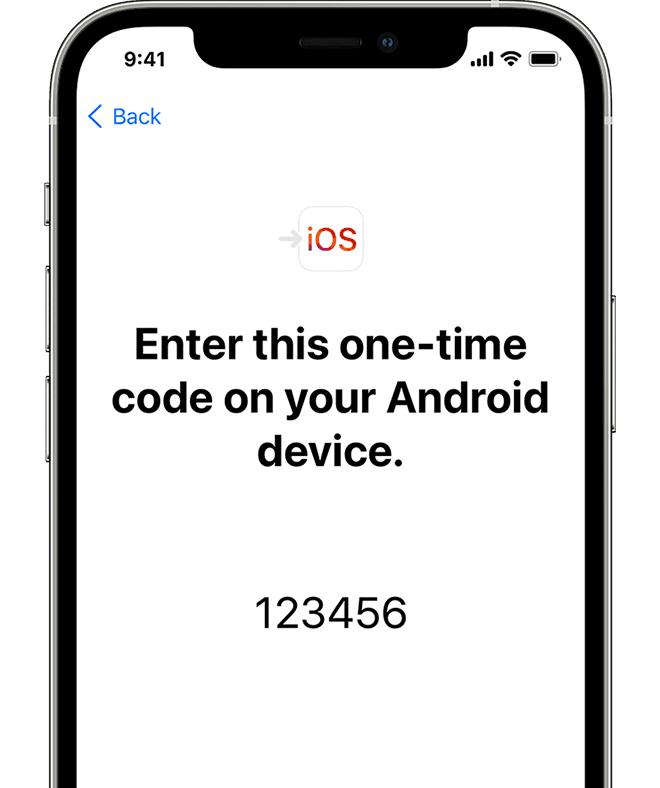
Use the code
Enter the code on your Android device.
Connect to a temporary Wi-Fi network
Your iOS device will create a temporary Wi-Fi network. When asked, tap Connect to join that network on your Android device. Then wait for the Transfer Data screen to appear.
Choose your content and wait
On your Android device, select the content that you want to transfer and tap Continue. Then—even if your Android device shows that the process is complete—leave both devices alone until the loading bar that appears on your iOS device finishes. The whole transfer can take a while, depending on how much content you’re moving.
Here’s what gets transferred: contacts, message history, camera photos and videos, photo albums, files and folders, accessibility settings, display settings, web bookmarks, mail accounts, and calendars. If they’re available on both Google Play and the App Store, some of your free apps will also transfer. After the transfer completes, you can download any free apps that were matched from the App Store.
Set up your iOS device
After the loading bar finishes on your iOS device, tap Done on your Android device. Then tap Continue on your iOS device and follow the onscreen steps to finish setup for your iOS device.
Finish up
Make sure that all of your content transferred. Music, books, and PDFs need to be moved over manually.
Need to get the apps that were on your Android device? Go to the App Store on your iOS device to download them.
If you need help with the transfer
- Make sure that you leave both devices alone until the transfer finishes. For example, on your Android device, the Move to iOS app should stay onscreen the whole time. If you use another app or get a phone call on your Android before the transfer finishes, your content won’t transfer.
- On your Android device, turn off apps or settings that might affect your Wi-Fi connection, like the Sprint Connections Optimizer or the Smart Network Switch. Then find Wi-Fi in Settings, touch and hold each known network, and forget the network. Then try the transfer again.
- Restart both of your devices and try again.
- On your Android device, turn off your cellular data connection. Then try the transfer again.
If you need help after the transfer
- Get help if Messages doesn’t work as expected after you transfer your content.
- If you don’t see apps from your Android device on your new iOS device, find and download them in the App Store on your new device.
- You might find that only some content transferred and your iOS device ran out of space, or your iOS device might appear full even though the transfer didn’t finish. If so, erase your iOS device and start the transfer again. Make sure that your Android content doesn’t exceed the available space on your iOS device.
Information about products not manufactured by Apple, or independent websites not controlled or tested by Apple, is provided without recommendation or endorsement. Apple assumes no responsibility with regard to the selection, performance, or use of third-party websites or products. Apple makes no representations regarding third-party website accuracy or reliability. Contact the vendor for additional information.
Источник
Deploying to a Device
Testing your app in the browser with ionic serve or with an emulator is fast, easy and convenient when your app is in development, but eventually you’re going to have to test on a device. Not only is it the only way to accurately test how your app will behave and perform, many Ionic Native plugins will only work when they are run on actual hardware.
Android Devices
Deploying to an Android device is a fairly straightforward process. If you have a working Android development environment, you’re ready to go.
Requirements
- Java JDK 8
- Android Studio
- Updated Android SDK tools, platform and component dependencies. Available through Android Studio’s SDK Manager
Running Your App
To run your app, all you have to do is enable USB debugging and Developer Mode on your Android device, then run ionic cordova run android —device from the command line.
This will produce a debug build of your app, both in terms of Android and Ionic’s code
Enabling USB debugging and Developer Mode can vary between devices, but is easy to look up with a Google search. You can also check out Enabling On-device Developer Options in the Android docs.
Production Builds
To run or build your app for production, run
This will minify your app’s code as Ionic’s source and also remove any debugging capabilities from the APK. This is generally used when deploying an app to the Google Play Store.
Sign Android APK
If you want to release your app in the Google Play Store, you have to sign your APK file. To do this, you have to create a new certificate/keystore.
Let’s generate your private key using the keytool command that comes with the JDK:
You’ll first be prompted to create a password for the keystore. Then, answer the rest of the nice tools’s questions and when it’s all done, you should have a file called my-release-key.jks created in the current directory.
Note: Make sure to save this file somewhere safe, if you lose it you won’t be able to submit updates to your app!
To sign the unsigned APK, run the jarsigner tool which is also included in the JDK:
This signs the APK in place. Finally, we need to run the zip align tool to optimize the APK. The zipalign tool can be found in /path/to/Android/sdk/build-tools/VERSION/zipalign . For example, on OS X with Android Studio installed, zipalign is in
To verify that your apk is signed run apksigner. The apksigner can be also found in the same path as the zipalign tool:
Now we have our final release binary called HelloWorld.apk and we can release this on the Google Play Store for all the world to enjoy!
All steps can also be found here: Android SDK docs
iOS Devices
Unlike Android, iOS developers need to generate a provisioning profile to code sign their apps for testing. The good news is that, as of iOS9, you can develop and test your apps on your iOS device without a paid Apple Developer account. This is particularly great for developers who want to try out mobile development with Ionic, since it saves the cost but still provides a lot of the features of having a full Apple Developer account. For a full breakdown of the features included, check out Apple’s docs.
Requirements
- Xcode 7 or higher
- iOS 9
- A free Apple ID or paid Apple Developer account
Creating a Provisioning Profile
To start, you’ll need to set up a provisioning profile to code sign your apps.
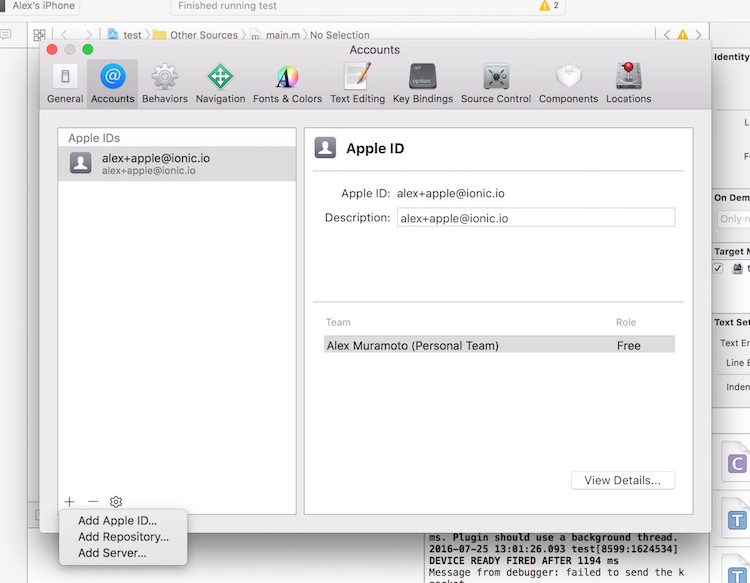
Using an Apple ID
- Open Xcode preferences (Xcode > Preferences…)
- Click the ‘Accounts’ tab
- Login with your Apple ID (+ > Add Apple ID…)
Once you’ve successfully logged in, a new ‘Personal Team’ with the role ‘Free’ will appear beneath your Apple ID.
Using an Apple Developer Account
Creating a provisioning profile with a paid Apple Developer account is a little bit more involved. For full instructions, check out Launching Your App on Devices in the Apple Developer docs.
Running Your App
- Run a production build of your app with ionic cordova build ios —prod
- Open the .xcodeproj file in platforms/ios/ in Xcode
- Connect your phone via USB and select it as the run target
- Click the play button in Xcode to try to run your app
Oops, code signing error! No problem.
Code Signing Your App
Next, you’ll need to code sign your app. How you do this will depend on if you are running Xcode 8 or an earlier version.
Xcode 7 and Earlier
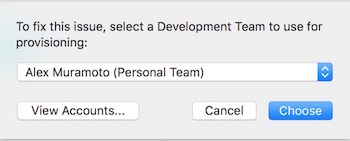
If you are running Xcode 7 or earlier, you’ll get a code signing error that looks like this when you try to run the app:
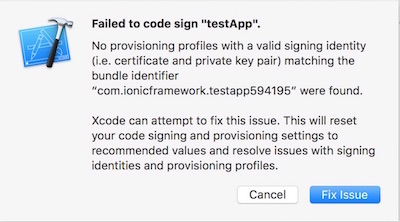
Click the ‘Fix Issue’ button, then select your ‘Personal Team’ profile.
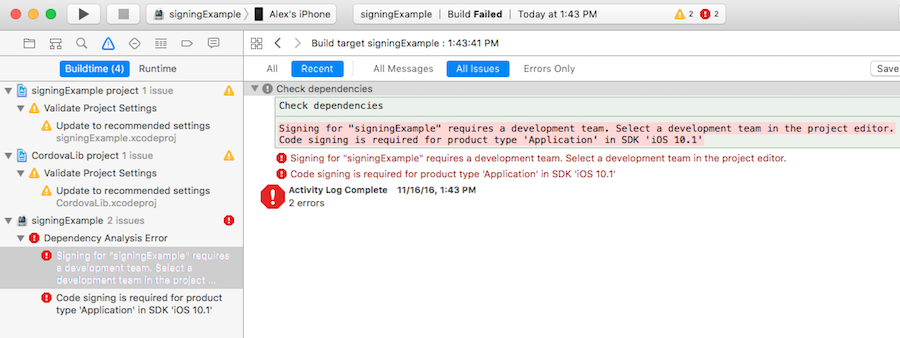
Xcode 8
If you are running Xcode 8, the code signing error will appear as a buildtime error, rather than as a pop-up:
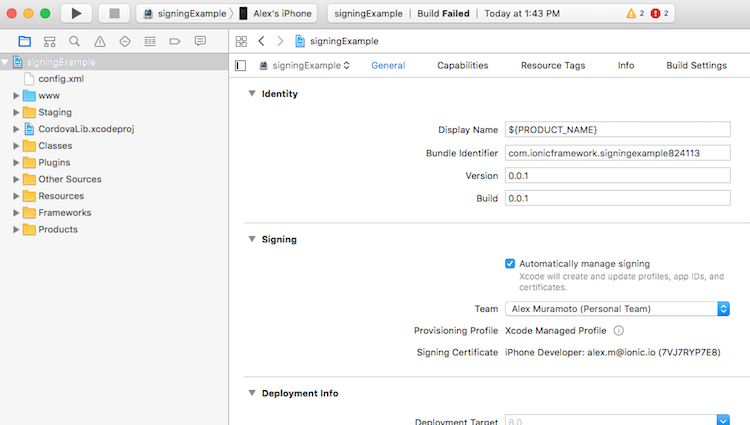
To select the certificate to sign your app with, do the following:
- Go to the ‘Project Editor’ by clicking the name or your project in the ‘Project Navigator’
- Select the ‘General’ section
- Select the team associate with your signing certificate from the ‘Team’ dropdown in the ‘Signing’ section
Trusting the Certificate
Once you’ve code signed your app, you should get a launch error that looks like this. On Xcode 7 and below you’ll see this automatically. On Xcode 8 it will appear the next time you try to run the app:
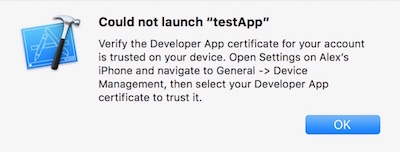
To get past this, we have to tell our iOS device to trust the certificate we code signed our app with:
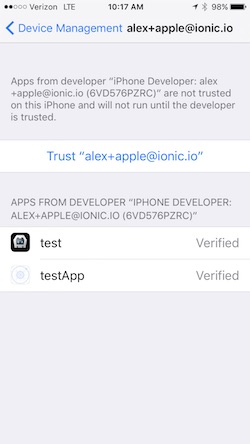
- Open the ‘Settings’ app on your iOS device
- Go to ‘General > Device Management’. You’ll see the email address associated with the Apple ID or Apple Developer account you used to code sign your app.
- Tap the email address
- Tap ‘Trust ’:
Now, go back to Xcode and hit that play button or run ionic cordova run ios —device from the command line to install and launch your app on your iOS device.
Источник


