- 5. Using Python on a Mac
- 5.1. Getting and Installing MacPython
- 5.1.1. How to run a Python script
- 5.1.2. Running scripts with a GUI
- 5.1.3. Configuration
- 5.2. The IDE
- 5.3. Installing Additional Python Packages
- 5.4. GUI Programming on the Mac
- 5.5. Distributing Python Applications on the Mac
- 5.6. Other Resources
- How to Install Python 3 on Mac – Brew Install Update Tutorial
- A Single Command to Run Python 3
- How to Install Homebrew on Mac
- How to Install pyenv to Manage Your Python Versions
- How to Use pyenv to Install Python or Update Your Python Version
- Troubleshooting pyenv Installation
- How to Set Up Your MacOS PATH for pyenv (Bash or ZSH)
- How to Set a Version of Python to Global Default (Bash or ZSH)
- The Final Step: Close Your Terminal and Restart it
5. Using Python on a Mac
Python on a Mac running macOS is in principle very similar to Python on any other Unix platform, but there are a number of additional features such as the IDE and the Package Manager that are worth pointing out.
5.1. Getting and Installing MacPython
macOS since version 10.8 comes with Python 2.7 pre-installed by Apple. If you wish, you are invited to install the most recent version of Python 3 from the Python website (https://www.python.org). A current “universal binary” build of Python, which runs natively on the Mac’s new Intel and legacy PPC CPU’s, is available there.
What you get after installing is a number of things:
A Python 3.9 folder in your Applications folder. In here you find IDLE, the development environment that is a standard part of official Python distributions; and PythonLauncher, which handles double-clicking Python scripts from the Finder.
A framework /Library/Frameworks/Python.framework , which includes the Python executable and libraries. The installer adds this location to your shell path. To uninstall MacPython, you can simply remove these three things. A symlink to the Python executable is placed in /usr/local/bin/.
The Apple-provided build of Python is installed in /System/Library/Frameworks/Python.framework and /usr/bin/python , respectively. You should never modify or delete these, as they are Apple-controlled and are used by Apple- or third-party software. Remember that if you choose to install a newer Python version from python.org, you will have two different but functional Python installations on your computer, so it will be important that your paths and usages are consistent with what you want to do.
IDLE includes a help menu that allows you to access Python documentation. If you are completely new to Python you should start reading the tutorial introduction in that document.
If you are familiar with Python on other Unix platforms you should read the section on running Python scripts from the Unix shell.
5.1.1. How to run a Python script
Your best way to get started with Python on macOS is through the IDLE integrated development environment, see section The IDE and use the Help menu when the IDE is running.
If you want to run Python scripts from the Terminal window command line or from the Finder you first need an editor to create your script. macOS comes with a number of standard Unix command line editors, vim and emacs among them. If you want a more Mac-like editor, BBEdit or TextWrangler from Bare Bones Software (see http://www.barebones.com/products/bbedit/index.html) are good choices, as is TextMate (see https://macromates.com/). Other editors include Gvim (http://macvim-dev.github.io/macvim/) and Aquamacs (http://aquamacs.org/).
To run your script from the Terminal window you must make sure that /usr/local/bin is in your shell search path.
To run your script from the Finder you have two options:
Drag it to PythonLauncher
Select PythonLauncher as the default application to open your script (or any .py script) through the finder Info window and double-click it. PythonLauncher has various preferences to control how your script is launched. Option-dragging allows you to change these for one invocation, or use its Preferences menu to change things globally.
5.1.2. Running scripts with a GUI
With older versions of Python, there is one macOS quirk that you need to be aware of: programs that talk to the Aqua window manager (in other words, anything that has a GUI) need to be run in a special way. Use pythonw instead of python to start such scripts.
With Python 3.9, you can use either python or pythonw.
5.1.3. Configuration
Python on macOS honors all standard Unix environment variables such as PYTHONPATH , but setting these variables for programs started from the Finder is non-standard as the Finder does not read your .profile or .cshrc at startup. You need to create a file
/.MacOSX/environment.plist . See Apple’s Technical Document QA1067 for details.
For more information on installation Python packages in MacPython, see section Installing Additional Python Packages .
5.2. The IDE
MacPython ships with the standard IDLE development environment. A good introduction to using IDLE can be found at http://www.hashcollision.org/hkn/python/idle_intro/index.html.
5.3. Installing Additional Python Packages
There are several methods to install additional Python packages:
Packages can be installed via the standard Python distutils mode ( python setup.py install ).
Many packages can also be installed via the setuptools extension or pip wrapper, see https://pip.pypa.io/.
5.4. GUI Programming on the Mac
There are several options for building GUI applications on the Mac with Python.
PyObjC is a Python binding to Apple’s Objective-C/Cocoa framework, which is the foundation of most modern Mac development. Information on PyObjC is available from https://pypi.org/project/pyobjc/.
The standard Python GUI toolkit is tkinter , based on the cross-platform Tk toolkit (https://www.tcl.tk). An Aqua-native version of Tk is bundled with OS X by Apple, and the latest version can be downloaded and installed from https://www.activestate.com; it can also be built from source.
wxPython is another popular cross-platform GUI toolkit that runs natively on macOS. Packages and documentation are available from https://www.wxpython.org.
PyQt is another popular cross-platform GUI toolkit that runs natively on macOS. More information can be found at https://riverbankcomputing.com/software/pyqt/intro.
5.5. Distributing Python Applications on the Mac
The standard tool for deploying standalone Python applications on the Mac is py2app. More information on installing and using py2app can be found at http://undefined.org/python/#py2app.
5.6. Other Resources
The MacPython mailing list is an excellent support resource for Python users and developers on the Mac:
Another useful resource is the MacPython wiki:
Источник
How to Install Python 3 on Mac – Brew Install Update Tutorial
MacOS comes with Python pre-installed. But it’s Python Version 2.7, which is now deprecated (abandoned by the Python developer community).
The entire Python community has now moved on to using Python 3.x (the current version as of writing this is 3.9). And Python 4.x will be out soon, but it will be completely backward compatible.
If you try to run Python from your MacOS terminal, you’ll even see this warning:
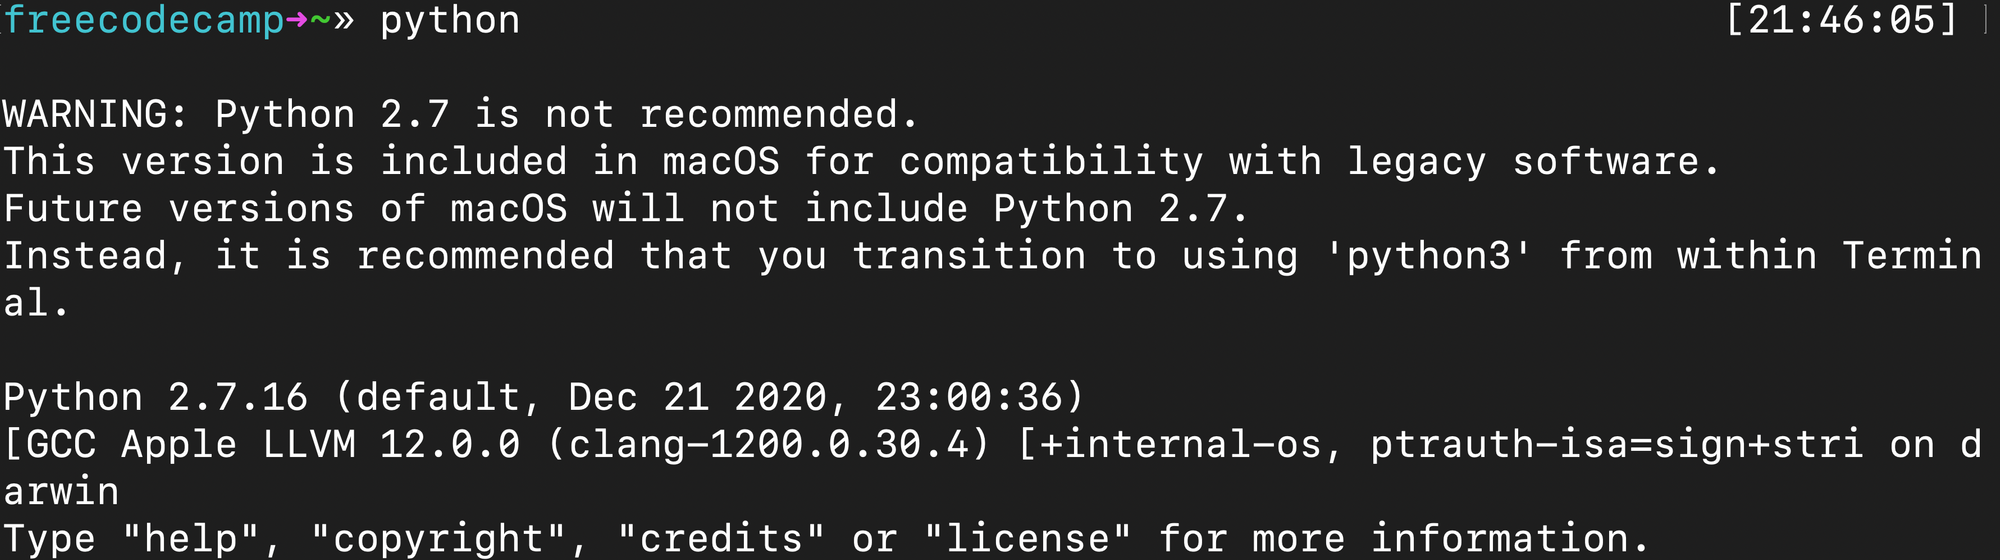 WARNING: Python 2.7 is not recommended. This version is included in macOS for compatibility with legacy software. Future versions of macOS will not include Python 2.7. Instead, it is recommended that you transition to using ‘python3’ from within Terminal.
Until Apple decides to set Python 3.x, as the default you’re going to have to install it yourself.
A Single Command to Run Python 3
For some of you reading this, this command may be enough. You can run Python 3 using this command (with the 3 at the end).
If that’s all you came for, no worries. Have a fun day and happy coding.
But if you want a proper Python version control system to keep track of various versions – and have fine-grain control over which version you use – this tutorial will show you exactly how to accomplish this.
 By the way, if you’re wondering why I keep referring to Python 3.x – the x is a stand-in for sub-versions (or point releases as developers call them.) This means any version of Python 3.
How to Install Homebrew on Mac
First you need to install Homebrew, a powerful package manager for Mac.
Open up your terminal. You can do this by using MacOS spotlight (command+space) and typing «terminal».
Now that you’re in a command line, you can install the latest version of Homebrew by running this command:
Your terminal will ask for Super User-level access. You will need to type your password to run this command. This is the same password you type when you log into your Mac. Type it and hit enter.
 A screenshot of my heavily customized terminal. Your terminal will probably look different from this.
Homebrew will ask you to confirm you want to install the following. You have to press enter to continue. (Or press any other key if you get cold feet.)

How to Install pyenv to Manage Your Python Versions
Now let’s take a moment to install PyEnv. This library will help you switch between different versions of Python (in case you need to run Python 2.x for some reason, and in anticipation of Python 4.0 coming).
Run this command:
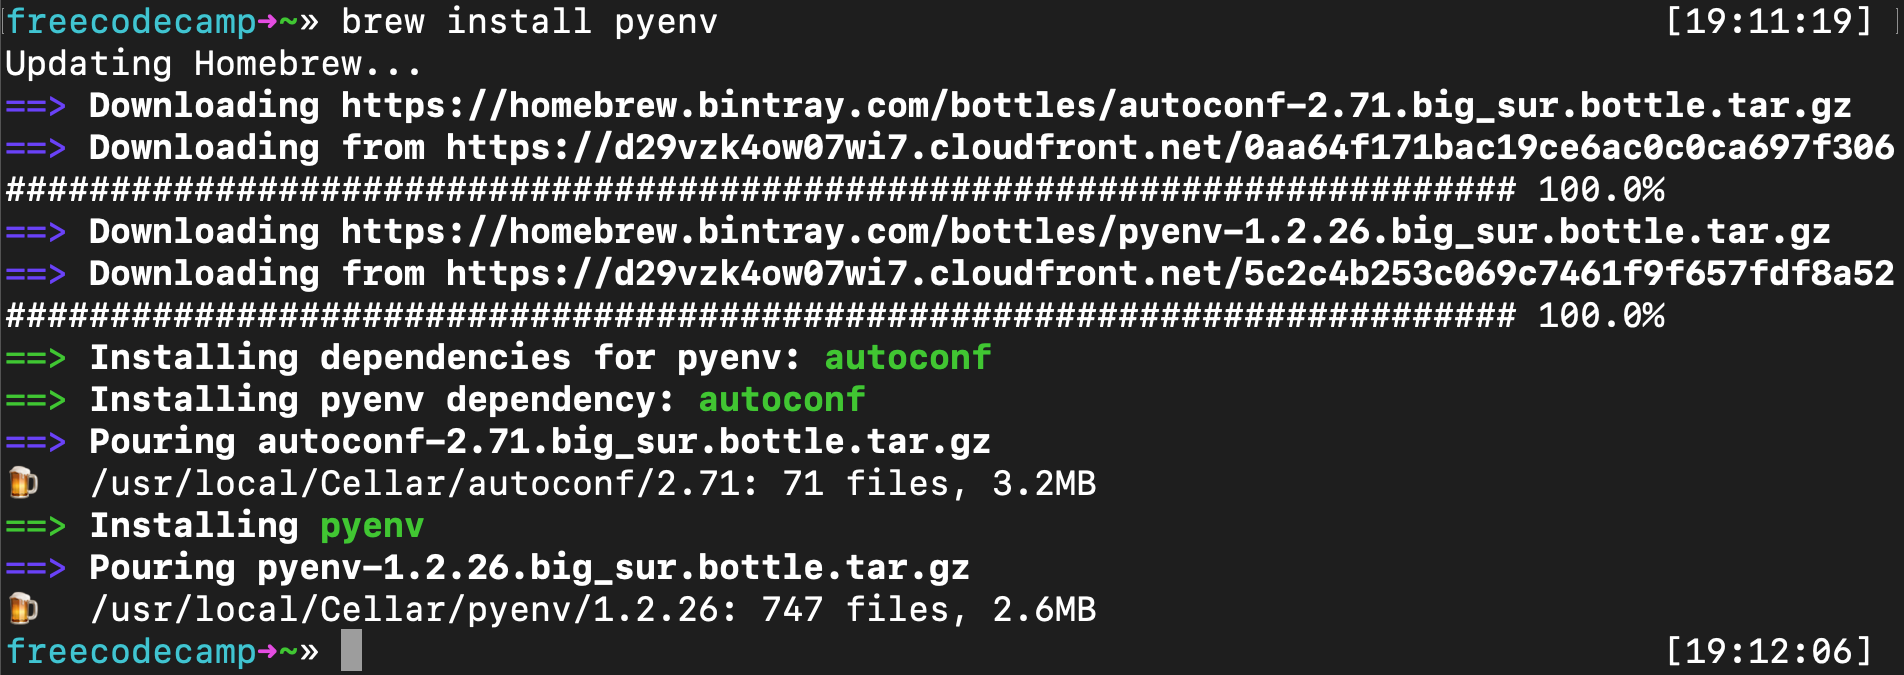 PyEnv installing
Now you can install the latest version of Python.
How to Use pyenv to Install Python or Update Your Python Version
Now you just need to run the following command:
Note that you can substitute 3.9.2 for whatever the latest version of Python is. For example, once Python 4.0.0 comes out, you can run this:
Troubleshooting pyenv Installation
If you encounter an error that «C compiler cannot create executables» then the simplest way to solve this is to reinstall Apple’s Xcode.
Xcode is a tool created by Apple that includes all the C libraries and other tools that Python uses when it runs on MacOS. Xcode is a whopping 11 gigabytes, but you’ll want to be up-to-date. You may want to run this while you’re sleeping.
You can get the latest version of Apple’s Xcode here. I had to do this after upgrading to MacOS Big Sur, but once I did, all the following commands worked fine. Just re-run the above pyenv install 3.9.2 and it should now work.
How to Set Up Your MacOS PATH for pyenv (Bash or ZSH)
First you need to update your Unix path to pave a way for PyEnv to be able to interact with your system.
This is a long explanation of how PATH works in MacOS (and Unix), straight from the pyenv GitHub repo.
When you run a command like python or pip , your operating system searches through a list of directories to find an executable file with that name. This list of directories lives in an environment variable called PATH , with each directory in the list separated by a colon:
Directories in PATH are searched from left to right, so a matching executable in a directory at the beginning of the list takes precedence over another one at the end. In this example, the /usr/local/bin directory will be searched first, then /usr/bin , then /bin .
And here is their explanation of what a Shim is. I’m quoting them at length again because I really can’t explain this better myself.
pyenv works by inserting a directory of shims at the front of your PATH :
Through a process called rehashing, pyenv maintains shims in that directory to match every Python command across every installed version of Python— python , pip , and so on.
Shims are lightweight executables that simply pass your command along to pyenv.
Here’s how to update your .bash_profile in Bash (which is installed in MacOS by default):
Or if you’ve installed ZSH (or OhMyZSH) like I have, you’ll want to edit the .zshrc file instead:
Then you want to add PyEnv Init to your terminal. Run this command if you’re using Bash (again, this is the default with MacOS):
Or run this command if you’re using ZSH:
Now reset your terminal by running this command:
How to Set a Version of Python to Global Default (Bash or ZSH)
You can set the latest version of Python to be global, meaning it will be the default version of Python MacOS uses when you run Python applications.
Run this command:
Again, you can replace 3.9.2 with whatever the latest version is.
Now you can verify that this worked by checking the global version of Python:
You should see this output:
 The * means that version is now the global default
The Final Step: Close Your Terminal and Restart it
Once you’ve restarted your browser, you run the python command and you’ll launch the new version of Python instead of the old one.
 Yay. Python 3.9.2 and no deprecation warnings
Congratulations. Thank you for reading this, and happy coding.
The teacher who founded freeCodeCamp.org.
If you read this far, tweet to the author to show them you care. Tweet a thanks
Learn to code for free. freeCodeCamp’s open source curriculum has helped more than 40,000 people get jobs as developers. Get started
freeCodeCamp is a donor-supported tax-exempt 501(c)(3) nonprofit organization (United States Federal Tax Identification Number: 82-0779546)
Our mission: to help people learn to code for free. We accomplish this by creating thousands of videos, articles, and interactive coding lessons — all freely available to the public. We also have thousands of freeCodeCamp study groups around the world.
Donations to freeCodeCamp go toward our education initiatives and help pay for servers, services, and staff.
Источник


