- Sketch to Android XML — A Designer’s Journey
- Building an icon library in Android VectorDrawables
- The starting point
- Next Steps
- Running into errors
- #1 The Scientific E notation
- #2 The Fill Rule
- #3 Transforms
- 3 quick tips for better XML files
- Now what?
- The future
- Как улучшить процесс дизайна и разработки под Android в Sketch 3
- Настройте файл Sketch
- Настройки для экспорта
- Экспорт
- И обещанный волшебный порошок
- Приятный бонус: Сжатие
- Если есть что-то лучше
Sketch to Android XML — A Designer’s Journey
Building an icon library in Android VectorDrawables

A team I’ve worked with recently wanted to move from using an icon font to using Android’s native Android VectorDrawables (XML files). Using Android VectorDrawables is more future-proof, more predictable and less hassle than an icon font.
We wanted to build one proper library for Android so there was less room for the errors and inconsistencies we’d been running into so far. The question “Hey Designer, can you create XML files for all 236 icons and make sure they work perfectly in Android Studio?” might not be the best place to start, but I installed Android Studio and accepted the challenge. And a challenge it was.
«Could you have it done by tomorrow?» — No, sorry.
The starting point
We use a Sketch Library for all of our icons. They’re set up as described in this article, which means that all the icons are set as a mask in Sketch and the colors are symbols we can use as overrides.
Our team for Mobile ran into one huge problem with this workflow: it’s great for us as designers in Sketch, but it doesn’t work very well for exporting icons — especially as SVG’s for Android because Android Studio doesn’t support masks.
So I simply started by duplicating the Sketch file and used plugins to quickly remove all the masks from the icons. Because all the icons had the same color layer to start with, I could use the “Select Similar Layers” plugin to select all the layers named “blue” and simply delete them that way. Then I could use Expand Groups to unfold all the artboards, select all the layers and uncheck “Use as Mask” by using the shortcut ⌃⌘M. This was actually a really quick way to get rid of the main problem. If you can avoid this by exporting SVG’s before making a Sketch library with Masks, I’d still recommend that 😉
Next Steps
Okay, so now I had a better Sketch file setup for exports. When the Icon Library was created in Sketch, a lot of work already went into collecting the icons and making them export friendly. This was before we decided to build an XML library and before we ran into the masking issue. I thought I could select all the artboards, export them as SVG, convert them to XML and things would be perfect 👌. Just kidding, I’m not that naive.
Unfortunately Sketch doesn’t offer an XML export option. Android Studio can convert SVG’s to XML in the Vector Asset Studio, but only one by one. As I had 200+ icons to convert, I decided to use the SVG2Android converter that was once recommended to me by an Android developer. The output is not perfect but it’s a good starting point. If you do have the time and patience (or a smaller batch of icons) to convert them one by one in Android Studio — do it.
Since I didn’t have them converted by Android Studio, I would add them to the drawables folder manually to check them individually. I simply looked at which folder Android Studio would add any assets to that were converted through the Asset Studio, and added my own XML files to the folder so they’d all be visible in Android Studio. This way I could check the code and preview to correct any errors as needed.
Running into errors
After converting, I got some warnings from both the SVG2Android Converter as well as Android Studio.
#1 The Scientific E notation
«Warning: found some numbers with scientific E notation in pathData which Android probably does not support. Please fix It manually by editing your editor precision or manually by editing pathData»
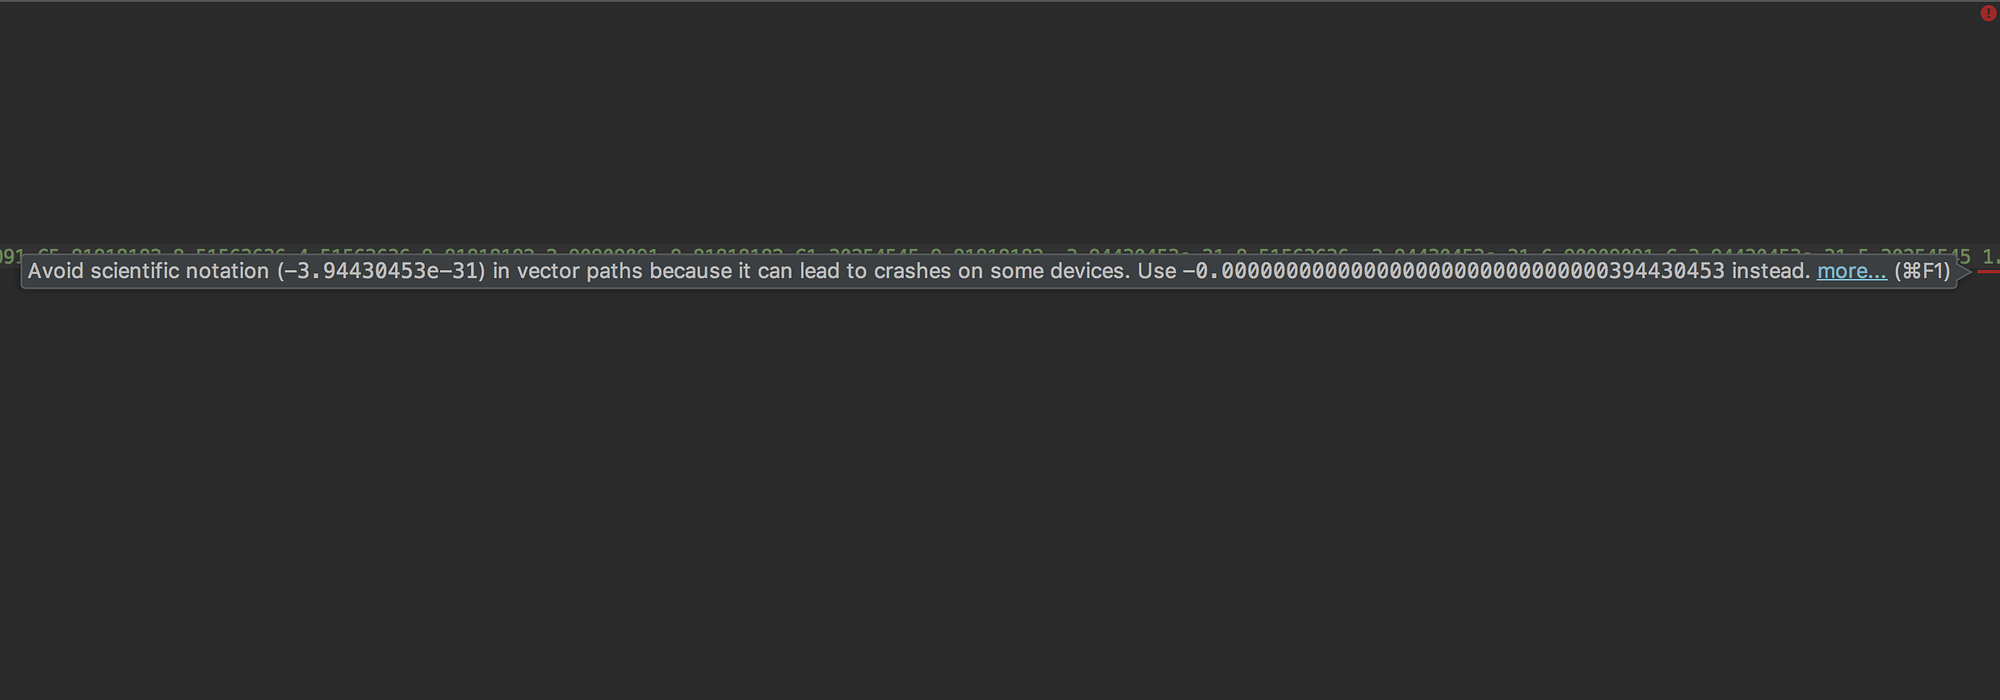
I’m starting with this one because it’s both tricky and misleading. The scientific E notation puts an exponent in the coordinates that Android Studio says could crash some devices. My mistake was to blindly trust the converter completely without checking if Android Studio could do a better conversion (spoiler alert: it can). My first ‘solution’ was to check which coordinates had the E notation by adding the XML file to the drawables folder in Android Studio and simply remove that part of the coordinates. This would usually show which vector points were the culprit. I’d change those in Sketch a little (our icons weren’t pixel perfect to start with so *shrug*) and hope the issue would be resolved. The first few times it worked fine and I could continue with the rest of the batch. At some point, I encountered icons that just couldn’t be ‘fixed’ that way. My next ‘solution’ was to copy them to Illustrator and export them from there (before making sure to release the Clipping Mask, remove that layer and fill in the icon again). While writing this post, I actually found out that the best solution is to convert it through Android Studio in the first place: no scientific E notations after the conversion at all. Oops. Lesson learned.
(N.B. Ideally, whether you’re converting to XML or not, you would be exporting your icons from Illustrator anyway, because they’d be designed in Illustrator to start with. It’s still superior in vector control and SVG export compared to Sketch.)
#2 The Fill Rule
Warning: found attribute ‘fill-rule:evenodd’ which is supported only on Android API 24 and higher
You seem to get this one no matter what, so don’t freak out, but it’s still an important little part of getting the basics right. When preparing icons in Sketch for export, make sure to set the fill to Non-Zero by clicking the cog wheel next to Fills in the Inspector. Sometimes this will break the icon when you’re working with a lot of different paths in paths in your shape. Make sure to fix it in Non-Zero by reordering your layers. Android Studio will still give a warning when the attribute (android:fillType) is there because it’s not supported in older Android API version. Because the default is Non-Zero, you’ll be good. You could even decide to just remove the attribute altogether (less code is better code?).
You can find a little extra information in this article and this one.
#3 Transforms
Warning: transforms on path are not supported, use option Bake transforms into path
This is a basic one. Any flips and rotations in the Sketch Inspector should be flattened into the shape before exporting. This not only better for exporting but also for using the icon in Sketch.
3 quick tips for better XML files
There are some things I noticed and for the tiny bit I know about code I can imagine these would be good.
Check all your icons in Android Studio individually, even if you do a batch conversion like I did. I still added the XML files to the drawables folder and made sure to click each of them individually. I find XML easier to read than SVG, and it’s how I discovered I had a weird Sketch bug that suddenly added an opacity property to certain icons.
The SVG2Android converter doesn’t remove the groups you may have made in Sketch. Which sounds good, but makes your code a little more complicated. Instead of just getting your shape as coordinates, you’ll get a which indicates the position of your shape within that group.
Converting in Android Studio removes the groups and just adds the right positioning in the path data. I assume this is the neater way (less chance for a mistake in positioning and margins!).
I’ve said it before and I’ll say it again. Illustrator’s SVG export is superior to that of Sketch. Sketch will always export the fill-rule, stroke, and stroke-width in SVG even if they’re unnecessary, resulting in the fillType, strokeColor and strokeWidth attributes in XML. (This is with standard export settings. No minimizer or optimized SVG was used in Sketch or Illustrator).

Now what?
Okay, so I’ve done all this and sent the XML library to the developers. But our current workflow as designers will still be the Icon Library Sketch file with all the masks. What if an icon changes and someone already made it into a mask? Or what if a new icon gets added by the Web team into this workflow and we want to use it for mobile too?
As it turns out, I can easily import an SVG export with a mask into Android Studio where it will be converted to an XML file. And yes, I will get a warning about the mask. But it’s super easy to remove the rectangle that we use as a color override in the code. You can ask your devs to take this step, or be nice and do it for them if you have Android Studio. Just make sure you remove the right path 😉
I think this is easier than having to work with duplicate files or duplicate artboards and potentially messing up the shared file. As long as you don’t have to do it for 236 icons like I had to now, it’s fine.
The future
Because we’re working with libraries now, I’ve made sure to implement version numbers into the Icon Library Sketch file and the XML folder with the icons. A changelog has also been included. The icon names will stay unchanged, but the main folder will have a version number. This way, we can match our versions between design and development, even if it’s a whole other team (as this is meant to be used internationally). Yay for consistent icon use! 🎉
Thank you to:
@NikosHuijgen for his feedback and making my long sentences shorter.
I’ve used Google’s Material Icon set in this article to demonstrate, obviously you wouldn’t usually need to optimize those for use in Android Studio 🙂
Источник
Как улучшить процесс дизайна и разработки под Android в Sketch 3
Создание дизайна под родные Android-приложения приносит массу удовольствия; временами даже счастья. И весь этот кайф длится ровно до момента, пока вы не возьмете ваше красивое приложение, на шлифовку которого у вас и вашей команды ушло несметное количество часов, и не… экспортируете исходники [и тут звучит драматическая музыка].
Экспорт исходников готового приложения под Android в Sketch – это, наверное, самое монотонное занятие, каким только может заняться дизайнер мобильных приложений. Не один год я искал способы усовершенствовать эту рутину. И до сих пор, похоже, каждый дизайнер сталкивается с той же проблемой, что и я: до сих пор нет идеального решения. Есть только методы немного лучше других.
Как уже говорилось, мой метод немногим лучше. Это самый быстрый способ, который мне удалось отыскать для Android в Sketch, но и он не без изъяна.
Настройте файл Sketch
Около года назад я перенес всю свою мобильную работу над Remind в Sketch по разным причинам, о которых уже подробно рассказали в других статьях. Если вы еще не испытали этот продукт, я очень советую вам скачать и попробовать.
Лучше всего для меня работает создание отдельной страницы в начале или в конце моего проекта в Sketch специально для исходников, которые необходимо экспортировать. Просто копируйте в эту страничку все исходники для будущего экспорта. Таким образом, у вас будет удобный набор всех изображений для будущего приложения. Также вы сможете быстро выделить все исходники сразу, чтобы указать настройки для экспорта.

Видите, я также разделяю исходники с помощью артбордов, чтобы упорядочить материалы по разделам приложения или даже релизам.
Настройки для экспорта
В Remind мы рисуем все в масштабе 200% (xhdpi) и потом уменьшаем. Этот прием отлично работает, но требует большей внимательности и продуманности. Тут каждый выбирает для себя. Я рекомендую рисовать дизайн в 100% (mdpi) и масштабировать для экспорта, если вы новичок в дизайне под мобильные устройства. Вот есть замечательная статья на эту тему. Я расскажу, как экспортировать исходники в обоих случаях.
Когда все нужные исходники размещены на страничке, выделите их все сразу и укажите настройки экспорта, как указано на картинках ниже, в зависимости от выбранного вами dpi:
 Поставьте “-” и введите подходящее разрешение dpi, как на изображениях выше.
Экспорт
- Создайте новую папку под именем res на своем компьютере.
- Вернитесь в Sketch (в котором все еще выделены все слои), придайте исходникам целопиксельный размер , выбрав опцию Layer >Round to Nearest Pixel Edge (округлить до ближайшего пикселя).
- Нажмите большую кнопку Export Layers (экспортировать слои) в панели Export и сохраните все слои в папку res.
 После экспорта папка будет выглядеть примерно так.
И обещанный волшебный порошок
Небольшой спойлер: под волшебным порошком я имел в виду shell-команду. Чтоб вы не поняли меня неправильно.
Это маленькая, но классная shell-команда, которую мне помог написать Эрик Холмс, пройдется по вашей папке res, создав все необходимые для экспорта папки, и разместит изображения по соответствующим папкам. Кроме того, изображения будут правильно переименованы.
Когда нужно вручную экспортировать каждый файл, правильно его называть и указывать корректное разрешение DPI в соответствующую папку, создается огромное пространство для ошибок. А мой метод исключает этот вездесущий человеческий фактор☺
Не так много дизайнеров пользуется shell-командами в целях экономии времени. Я обещаю, что они не такие страшные, какими кажутся на первый взгляд.
- Просто откройте терминал
- Скопируйте текст отсюда
- Вставьте его в окно терминала
- Нажмите клавишу возврата
Ух, это было грубо, но посмотрите! Настоящая магия! Все ваши файлы теперь аккуратно разложены по своим местам.
 Результат использования shell-команды.
Приятный бонус: Сжатие
Всегда, всегда, всегда сжимайте файлы перед тем, как отдавать их разработчикам. Для быстрой компрессии я предпочитаю ImageOptim. Обязательно также познакомьтесь с ImageAlpha. Последний инструмент требует больше ручного контроля и времени, но потенциально сможет сжать ваши файлы лучше.
С помощью ImageOptim вы можете просто перетащить свою папку res в окошко, и программа сделает свое дело. Если вы предпочитаете пользоваться shell-командами, в окне терминала просто вставьте эту команду и нажмите return:
open -a ImageOptim
Вуаля! Теперь у вас идеально организованные, сжатые, адаптированные для разработчиков исходники Android в Sketch -приложения.
Если есть что-то лучше
Описанный здесь метод действительно отлично подходит нашей команде, но суть в том, чтобы найти метод, подходящий именно вам и/или вашей команде. Я бы хотел услышать другие подходы, которые используют дизайнеры в своей работе. Я буду обновлять эту статью по мере нахождения новых, лучших способов подготовки исходников.
Источник


