- Kotlin in Xcode? Swift in Android Studio?
- A series on using Clean + MVVM for consistent architecture on iOS & Android
- Google + Uncle Bob = Clean MVVM
- Make your Android application work on iOS – tutorial
- Prepare an environment for development
- Make your code cross-platform
- Decide what code to make cross-platform
- Create a shared module for cross-platform code
- Add a dependency on the shared module to your Android application
- Make the business logic cross-platform
- Replace Android-specific code with cross-platform code
- Connect to platform-specific APIs from the cross-platform code
- Run your cross-platform application on Android
- Make your cross-platform application work on iOS
- Create an iOS project in Xcode
- Connect the framework to your iOS project
- Use the shared module from Swift
- Enjoy the results – update the logic only once
- What else to share?
- О том, как я написал простое приложение для Android/iOS
- План и подготовка
- Android
- Публикация в Google Play
- Публикация в iOS
- Выводы
Kotlin in Xcode? Swift in Android Studio?
A series on using Clean + MVVM for consistent architecture on iOS & Android

Mobile development has aspired toward “write once, run anywhere” since the earliest days of Java. When iPhone first launched, we saw companies like Facebook try to implement a generalized, WebView-based approach, before abandoning that effort and going native. Only a few years later in 2015, Facebook would try again with React Native, adopted with great fanfare by companies like Airbnb only to be undone a few years later.

Dropbox attempted to build a cross-platform C++ mobile library, but concluded that:
…mobile developers simply did not want to work on a C++ project…the associated overhead made the cost of this approach outweigh the benefits.
Other companies like Square acknowledged that “we still build everything twice”, but that mobile development has converged such that:
…we’re asking Android engineers to review iOS pull requests and vice-versa. We’re focusing these reviews on business logic and view models.
At Perry Street Software, we have been writing mobile apps since 2009 and publish two of the oldest apps on the iOS App Store — LGBTQ+ dating apps SCRUFF and Jack’d. We have witnessed every stage of the evolution of mobile development on iOS and Android, though as a small software company, we have had to be thoughtful about how we invest coding time and resources.
We agree with Square — write twice, but aim to align the code that implements “business logic.” But what does this mean in practice, and can you copy Swift code into Android Studio, or Kotlin into Xcode, twiddle your let ↔️ val , and use that as a template?
Google + Uncle Bob = Clean MVVM
There are many design patterns on mobile, among the most popular being MVC, MVVM, VIPER. At PSS, we started out with MVC, and over time have moved toward an MVVM designed informed by the Clean Architecture popularized by Uncle Bob and by Google’s Guide to App Architecture.
Источник
Make your Android application work on iOS – tutorial
Here you can learn how to make your existing Android application cross-platform so that it works both on Android and iOS. You’ll be able to write code and test it for both Android and iOS only once, in one place.
This tutorial uses a sample Android application with a single screen for entering a username and password. The credentials are validated and saved to an in-memory database.
If you aren’t familiar with KMM, you can learn how to create and configure a KMM application from scratch first.
Prepare an environment for development
Install Android Studio 4.2 or Android Studio 2020.3.1 Canary 8 or higher and other tools for KMM development on macOS.
You will need a Mac with macOS to complete certain steps in this tutorial, which include writing iOS-specific code and running an iOS application.
These steps cannot be performed on other operating systems, such as Microsoft Windows. This is due to an Apple requirement.
In Android Studio, create a new project from version control: https://github.com/Kotlin/kmm-integration-sample .
Switch to the Project view.

Make your code cross-platform
To have a KMM application that works on iOS, you’ll first make your code cross-platform, and then you’ll reuse your cross-platform code in a new iOS application.
To make your code cross-platform:
Decide what code to make cross-platform
Decide which code of your Android application is better to share for iOS and which to keep native. A simple rule is: share what you want to reuse as much as possible. The business logic is often the same for both Android and iOS, so it’s a great candidate for reuse.
In your sample Android application, the business logic is stored in the package com.jetbrains.simplelogin.androidapp.data . Your future iOS application will use the same logic, so you should make it cross-platform, as well.

Create a shared module for cross-platform code
The cross-platform code that is used for both iOS and Android is stored in the shared module. KMM provides a special wizard for creating such modules.
In your Android project, create a KMM shared module for your cross-platform code. Later you’ll connect it to your existing Android application and your future iOS application.
In Android Studio, click File | New | New Module.
In the list of templates, select KMM Shared Module, enter the module name shared , and select the Regular framework in the list of iOS framework distribution options.
This is required for connecting the shared module to the iOS application.

The wizard will create the KMM shared module, update the configuration files, and create files with classes that demonstrate the benefits of Kotlin Multiplatform. You can learn more about the KMM project structure.
Add a dependency on the shared module to your Android application
To use cross-platform code in your Android application, connect the shared module to it, move the business logic code there, and make this code cross-platform.
Ensure that compileSdkVersion and minSdkVersion in build.gradle.kts of the shared module are the same as those in the build.gradle of your Android application in the app module.
If they are different, update them in the build.gradle.kts of the shared module. Otherwise, you’ll encounter a compile error.
Add a dependency on the shared module to the build.gradle of your Android application.
Synchronize the Gradle files by clicking Sync Now in the warning.

To make sure that the shared module is successfully connected to your application, dump the greeting() function result to the log by updating the onCreate() method of the LoginActivity class.
Search for Hello in the log, and you’ll find the greeting from the shared module.

Make the business logic cross-platform
You can now extract the business logic code to the KMM shared module and make it platform-independent. This is necessary for reusing the code for both Android and iOS.
Move the business logic code com.jetbrains.simplelogin.androidapp.data from the app directory to the com.jetbrains.simplelogin.shared package in the shared/src/commonMain directory. You can drag and drop the package or refactor it by moving everything from one directory to another.

When Android Studio asks what you’d like to do, select to move the package, and then approve the refactoring.

Ignore all warnings about platform-dependent code and click Continue.

Remove Android-specific code by replacing it with cross-platform Kotlin code or connecting to Android-specific APIs using expect and actual declarations. See the following sections for details.
Replace Android-specific code with cross-platform code
To make your code work well on both Android and iOS, replace all JVM dependencies with Kotlin dependencies wherever possible.
In the login() function of the LoginDataSource class, replace IOException , which is not available in Kotlin, with RuntimeException .
For email validation, replace the Patterns class from the android.utils package with a Kotlin regular expression matching the pattern in the LoginDataValidator class:
Connect to platform-specific APIs from the cross-platform code
A universally unique identifier (UUID) for fakeUser in LoginDataSource is generated using the java.util.UUID class, which is not available for iOS.
Since the Kotlin standard library doesn’t provide functionality for generating UUIDs, you still need to use platform-specific functionality for this case.
Provide the expect declaration for the randomUUID() function in the shared code and its actual implementations for each platform – Android and iOS – in the corresponding source sets. You can learn more about connecting to platform-specific APIs.
Remove the java.util.UUID class from the common code:
Create a Utils.kt file in the shared/src/commonMain directory and provide the expect declaration:
Create a Utils.kt file in the shared/src/androidMain directory and provide the actual implementation for randomUUID() in Android:
Create a Utils.kt file in the shared/src/iosMain directory and provide the actual implementation for randomUUID() in iOS:
For Android and iOS, Kotlin will use different platform-specific implementations.
Run your cross-platform application on Android
Run your cross-platform application for Android to make sure it works.

Make your cross-platform application work on iOS
Once you’ve made your Android application cross-platform, you can create an iOS application and reuse the shared business logic in it.
Create an iOS project in Xcode
In Xcode, click File | New | Project.
Select a template for an iOS app and click Next.

As the product name, specify simpleLoginIOS and click Next.

As the location for your project, select the directory that stores your cross-platform application, for example, kmm-integrate-into-existing-app .
In Android Studio, you’ll get the following structure:

You can rename the simpleLoginIOS directory to iosApp for consistency with other top-level directories of your cross-platform project.

Connect the framework to your iOS project
Once you have the framework, you can connect it to your iOS project manually.
An alternative is to configure integration via Cocoapods, but that integration is beyond the scope of this tutorial.
Connect your framework to the iOS project manually:
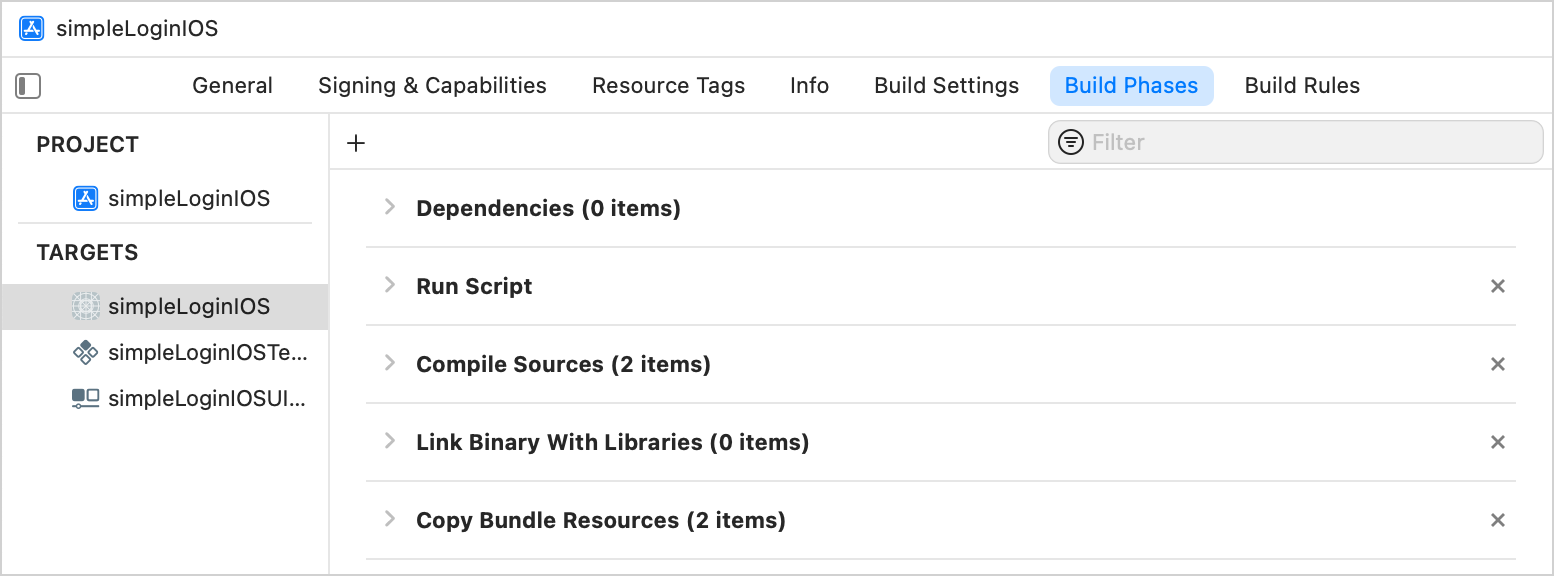
In Xcode, open the iOS project settings by double-clicking the project name.
On the Build Phases tab of the project settings, click the + and add New Run Script Phase.

Add the following script:

Move the Run Script phase before the Compile Sources phase.
On the Build Settings tab, specify the Framework Search Path under Search Paths – $(SRCROOT)/../shared/build/xcode-frameworks/$(CONFIGURATION)/$(SDK_NAME) .

On the Build Settings tab, specify the Other Linker flags under Linking – $(inherited) -framework shared

Build the project in Xcode. If everything is set up correctly, the project will successfully build.
Use the shared module from Swift
In Xcode, open the ContentView.swift file and import the shared module.
To check that it is properly connected, use the greeting() function from the KMM module:

In simpleLoginIOSApp.swift , import the shared module and specify the arguments for the ContentView() function:

Enjoy the results – update the logic only once
Now your application is cross-platform. You can update the business logic in one place and see results on both Android and iOS.
In Android Studio, change the validation logic for a user’s password in the checkPassword() function of the LoginDataValidator class:
Update gradle.properties to connect your iOS application to Android Studio for running it on a simulated or real device right there:
Synchronize the Gradle files by clicking Sync Now in the warning.
You will see the new run configuration simpleLoginIOS for running your iOS application right from Android Studio.


What else to share?
You’ve shared the business logic of your application, but you can also decide to share other layers of your application. For example, the ViewModel class code is almost the same for Android and iOS applications, and you can share it if your mobile applications should have the same presentation layer.
Источник
О том, как я написал простое приложение для Android/iOS
Хочу сразу отметить, что это не статья от профессионала, скорее взгляд любителя на мобильную разработку, скажем так, «с нуля». Мое основное занятие — это создание сайтов. В данное время я работаю у провайдера интернета и занимаюсь поддержкой внутреннего биллинга/сайта и так далее (PHP и немного Perl), довольно скучное занятие, скажу я вам. В общем, я обычный провинциальный «программист».
В один прекрасный момент у руководства компании возникла идея сделать мобильное приложение для iPhone, которое могло бы показать баланс пользователю, его статус, возможность взять «обещанный платеж», фактически, дублирование личного кабинета, но чтобы приложение. Не зная про мобильную разработку совсем ничего, идею воспринял с большим энтузиазмом, потому что всегда приятно делать/узнавать что-то новое, думаю, это у всех так.
Придя на работу в один из серых скучных дней, я решился и написал в поиске Google «как сделать мобильное приложение». Это было очень наивно. Кажется, я даже попробовал задать вопрос на Toster, «с чего начать разработку под мобильные приложения», тогда я еще не понимал насколько глупым воспринимается этот вопрос профессионалами.
Довольно быстро я разделил для себя разработку на две части, это был Android и iOS, потому что они совсем разные (поиск подсказал.
Как-то я наткнулся на Phonegap, насколько я понял, пишем на Javascript+html+css, а потом получаем готовое приложение для Android/iOS, но почему-то мне не хотелось пользоваться подобными решениями, во-первых: были непонятные отзывы, кто-то хвалил, кто-то ругал, а во-вторых: мне хотелось попробовать как это изнутри, каково это сделать «нативное» приложение.
План и подготовка
Собственно, идея довольно проста:
- Логин экран с логином/паролем
- Основной экран с информацией об абоненте (ФИО, № договора, баланс, статус (Активен, Отключен), есть ли авария на доме, кнопка Активировать обещанный платеж
- Экран с платежами (зачисления на счет)
- Экран со списаниями по счету
Для функционирования приложения я написал простейшее API на PHP, скрипт который по определенному запросу отвечал строкой в JSON-формате. Сделать это оказалось элементарно.
Начать решил с Android.
Android
Начал я с установки Android Studio, первоначально смутило количество кнопочек/иконок, но за пару дней я уже был как рыба в воде. Для начала надо было понять как вообще делаются приложения, очень помогает изначальное «Hello world!» которое создается по-умолчанию. Выглядело все достаточно просто и понятно. Погуглив «Как начать разработку в Android Studio», я понял, что надо скачать SDK. Открыв SDK-manager я не понял вообще ничего, ну, точнее, не понял что именно надо делать, поэтому поставил все галочки и ждал пока все скачается. Для чего оно мне нужно я совсем не понимал, общее представление конечно было «чтобы работала поддержка такой-то версии», но почему надо все отдельно качать и выбирать среди сотен галочек — бррр.
Вторым достаточно сложным этапом было запустить приложение на симуляторе. Погуглив, пришлось повозиться с AVD, конечно, потыкашись как слепой котенок я сделал несколько виртуальных устройств. На одном даже запустилось приложение. Честно сказать, симулятор у Android Studio совсем не User-friendly, очень долго я с ним воевал, пытался запускать по-разному, хотел чтобы кнопки управления были на экране и работали, но почему-то не работали. Видимо, сказывалось отсутствие опыта.
Как оказалось, для Android пишут на Java. Про Java я знал только то, что это язык программирования и это не Javascript.
Решил разбить большую задачу на более мелкие.
Теперь возникла ситуация когда у меня, в принципе, все готово, но я не знал как вообще делается приложение, поэтому, погуглив, я понял что никакой нормальной информации на русском языке мне не найти (либо я плохо искал). Информация либо устаревшая, либо не то что мне требуется. Спас меня youtube и знание английского языка. Сделав несколько запросов в ютюбе можно найти массу информации, да еще и с самим процессом — это очень помогло, если бы не обучающие видео, думаю, приложение я бы делал несколько месяцев.
Выбирая минимальную версию Android я остановился на 4 что-то там 🙂 (Охват аудитории 90%+ если верить Google).
Опять же разбив свои задачи на более мелкие я искал туториалы в youtube, например: «how to get json in android» или «menu in android studio». Конечно, пришлось пересмотреть штук 30 разных видео и все они были на английском (одно на немецком и одно на китайском — когда показывают не так сложно самому дойти что же говорят :)).
Разработка под Android заняла примерно неделю с момента установки Android Studio. После чего отобрав планшет у сына я смог протестировать свое приложение на реальном устройстве — просто подсоединив его к компьютеру.
Публикация в Google Play
Сначала я думал что будет очень сложно и даже переживал, но как оказалось всего 25$ и фактически без каких-либо серьезных проверок приложение попало в Google Play и через несколько часов было доступно в поиске, публикация заняла около одного дня.
Отдохнув пару дней и поразмыслив, решил что пора реализовать тоже самое приложение под iOS. Но, оказалось, что бесплатная среда разработки xCode может быть запущена исключительно в среде Mac. Пришлось скачать образ виртуальной машины MAC OS Yosemite и запустить ее через VMWare. Сделать это было очень просто и фактически не требовало от меня никаких телодвижений кроме как «ждать».
После чего я скачал xCode и начал разбираться, дело пошло быстрее, так как разработка под мобильные устройства что для Android, что для iOS примерно схожа в своих идеях.
Язык программирования выбрал Swift. Версию iOS минимум 7.1+
В принципе разработка под iOS была более простой, хотя баги симулятора присутствовали, но весь процесс оказался более удобным, нежели под Android. Опять же я открыл youtube и смотрел видео/читал руководства о том, как сделать какую-то вещь. Например, нагуглил прекрасный скрипт который делает slide menu, которого у меня не было в Android. В общем, еще один марафон и за неделю было готово улучшенное приложение, добавил возможность пополнить счет с помощью карты предоплаты и совместил платежи/списания в одно окно.
Использовал тоже самое API (тот же скрипт, что и для Android).
Публикация в iOS
Тут все оказалось не так радужно и просто как в Android. Во-первых, оказалось, что мне требуется реальное устройство для тестирования приложения, а без него никак не опубликоваться. Пришлось искать iPhone и привязать его к профилю тестирования.
Опять же, при создании аккаунта был выбор между «компания» и «индивидуальный разработчик», но начитавшись страшилок про 4+ месяца проверки компаний я решил регистрироваться как индивидуальный разработчик. Сделать это было не сложно, главное оплатить 99$ за аккаунт разработчика iOS со своей кредитной карты чтобы имя совпадало (подсказал поиск). Платеж проходил 2 дня.
После чего пришлось искать целое видео «how to publish in app store» и следовать инструкции, настолько там все непонятно. Какие-то сертификаты, туда — сюда. В общем, не очень удобно, хотя и сделать надо лишь один раз :).
Приложение ушло на проверку и ждало очереди около полутора недель. После чего было принято. Кстати, как показали логи, проверка была примерно такая: Логин -> Баланс -> Платежи -> Баланс. И все, хотя была еще страница «Пополнить баланс», но ее не проверяли (а зря, я там накосячил и пришлось выкладывать новую версию программы 1.1 которую тоже проверяли больше недели).
Выводы
1. Как оказалось это не сложно даже для человека который никогда не использовал Java/Swift/Mac OS.
2. Много новой информации заставляло мой мозг просто переполняться в первые дни и зависать. Помогал только сон, после него я более четко понимал что делать дальше. Не надо бояться таких этапов. Иногда мне казалось что «я вообще ничего не понимаю», были ощущения что я бьюсь головой в бетонную стену. Но на следующий день я решал проблему. Например, в Android, в самом начале у меня возникла ситуация «ничего не работает», когда я подключался к серверу и должен был получать информацию, оказалось, надо было это делать в асинхронном потоке. Потратил целый день.
3. Очень быстрое устаревание руководств/видео уроков. Платформы настолько быстро развиваются, что надо сразу проверять актуальность информации. На русском языке ее очень мало, после нескольких попыток я даже бросил искать и сразу начал штудировать stackoverflow и англоязычный интернет. Youtube со своими видео-уроками просто спас меня! Я открывал видео на одном мониторе и работал на втором. Без базового английского — никуда.
4. Сервисы вопрос-ответ реально помогают! Иногда, впадая в ступор я задавал вопросы и почти сразу получал ответы — очень удобно если находишься в тупике.
5. Apple более чутко относится к публикации приложений, но особых проблем кроме длительного времени я не заметил. Android же делают все очень быстро (зато пускают всех подряд, как я понял).
6. В общей сложности я потратил почти месяц (на разработку около двух недель с перерывами). Стоило ли оно того — думаю да, было очень интересно. Если у вас есть желание — попробуйте, все оказалось не так сложно. У меня нет смартфона Android/iPhone, но и без них все оказалось просто. Симуляторы работают достоверно.
Приложение называется dagotel, но оно создано для клиентов, поэтому дальше логина не пустит. Разве что посмотреть скриншоты.
Понятия не имею, зачем я написал эту статью и какие цели преследовал, но раз написал, решил опубликовать.
Источник


