- Android Shape Drawables Tutorial
- Have you ever wanted to reduce your Android application’s size or make it look more interesting? If yes, then you should try out ShapeDrawables.
- Why should you use ShapeDrawables?
- Are there any disadvantages?
- Let’s start coding
- Create a simple gradient ShapeDrawable in XML
- Clipping in Android. Quickly, qualitatively, cheap.
- Prototypes
- Easy way
- Thorny path
- Criteria for implementing the tool:
- View.clipToOutline
- Canvas.clipPath() method rendering elements in container
- Canvas.drawPath() method rendering elements in container, View.LAYER_TYPE_SOFTWARE
- Canvas.drawPath() method rendering elements in container, View.LAYER_TYPE_HARDWARE
- A safer way to collect flows from Android UIs
- Wasting resources
- Lifecycle.repeatOnLifecycle
- Under the hood!
- Visual diagram
- Flow.flowWithLifecycle
- Configuring the underlying producer
- Safe Flow collection in Jetpack Compose
- Comparison with LiveData
- StateFlow support in data binding
Android Shape Drawables Tutorial

Nov 3, 2017 · 6 min read

Have you ever wanted to reduce your Android application’s size or make it look more interesting? If yes, then you should try out ShapeDrawables.
First, we will go over the advantages and disadvantages of the ShapeDrawables. Then we will create some Drawables that could be used in your app and lastly for the grand finale we will try to replicate a gradient as can be seen in the Spotify app/website.
Why should you use ShapeDrawables?
When you want to use PNG or JPEG images in your applic a tion, you have to provide multiple copies of the same image for different screen densities. That, of course, clutters your app with copies of the same image. Yes, sometimes that is the path we have to choose because we can’t use Drawables for every single case, but we can dramatically reduce our application’s size if we can use Drawables instead. ShapeDrawables are a series of commands that tell how to draw something on the screen. That is why they can be resized and stretched as much as we want, without losing any quality. We can recolor and manipulate them even when the app is running and use the same ShapeDrawable multiple times in our app. Since ShapeDrawables are a subclass of the Drawable abstract class, we can use them in methods where a Drawable is expected. Click for the documentation of the ShapeDrawable.
Are there any disadvantages?
Of course, just like I have mentioned before we can’t use them in every case. I have said before that ShapeDrawable class is a subclass of the Drawable abstract class. There are other subclasses as well and every one of them has its own use case. You can click here to check other Drawable types and figure out which one is right for your case. Another issue is that they took a bit longer to draw than a Bitmap since there is a lot of parsing and drawing going on behind the scenes. But I think that is not a huge problem if your Drawables are simple.
My opinion is that you should use Drawables (ShapeDrawables) wherever you can, because they are easy to modify and they don’t take much space.
Let’s start coding
First let’s take a look at a simple example and then we will recreate a gradient as can be seen in the Spotify app/website.
Create a simple gradient ShapeDrawable in XML
First create a new drawable resource file.
Right click on res/drawable > New > Drawable resource file > give your file a name > use shape as a root element > click Ok
Shape root element defines that this is a ShapeDrawable.
This is how the first example looks like:
Источник
Clipping in Android. Quickly, qualitatively, cheap.

Hey, I’m Dmitriy Дмитрий Гайдук and I am wokring as an adroid-developer in KODE for more than three years.
Quite often, during mobile app developing process it is required to give the content some form, for example, to make a round image for the avatar. If such a tool like Picasso transformation is enough for ImageView, then it is more difficult for dynamic content. For example, there is a list of elements that can be scrolled and need to be clipped. For this, the CardView widget may well be appropriate.
But what if you need a form other than a rectangle, and at the same time, this form will be dynamically changed? It is the exact case from one of our ongoing projects. I couldn’t find proper UI components and decided to research what Android tools are appropriate for this case.
This is a longread — so the main part as usual in the end of the article.
Prototypes
Our designers are really creative. Sometimes their crazy ideas could puzzle even the most experienced developer. Look at what they prepared this time.
There is a card with some content, which could be scrolled. The card has rounded upper corners and lower corners remain straight. It is possible to pull the card up and when the card fills the entire screen, the rounding is removed. Really easy, at first sight, of course.

Easy way
You can use CardView, but there are some disadvantages which I found during coding:
- you can not set the radius for each corner separately;
- “fair” clipping works only on versions starting from Android Lollipop. Before this version, the content is indented by the size of the corner radius. This is noticeable when scrolling, spaces appear between the edges of the card;
- setting zero radius, an application running on a device with a version below Andrid Lollipop crashes. In the documentation, such cases are simply not described.
Thorny path
So, standart widget is useless. It’s time to look for the propriate way out and develop the tool by yourself. But first of all, we need to sort out woth all possibilities for this case in other Android tools.
Criteria for implementing the tool:
- ability to use at Android versions before and after Lollipop. In extreme cases, to combine approaches;
- ability to set any form. For example, using the Path class;
- presence of smooth lines and the possibility of antialiasing;
- performance. The shaping of the content should occur with minimal impact on the performance of the device, especially for dynamically changing content and form.
Of course, it is an ideal version of the tool. I researched 4 differents variants and all of them has pros and cons, but they are suitable for part of cases:
- View.clipToOutline
- Canvas.clipPath() method when rendering elements in container.
- Canvas.drawPath() method when rendering elements in container. Settings: PorterDuff.Mode + View.LAYER_TYPE_SOFTWARE
- Canvas.drawPath()method when rendering elements in container. Settings: PorterDuff.Mode + View.LAYER_TYPE_HARDWARE
View.clipToOutline
This is how CardView works.
How it works:
Set the background image of the desired form and set it in View.clipToOutline value = “true”.
We know that we work with API Android and the easiest way couldn’t be right. Look at documentation View.setClipToOutline()
Sets whether the View’s Outline should be used to clip the contents of the View…Note that this flag will only be respected if the View’s Outline returns true from Outline.canClip()
It is enough for Outline.canClip() to return true . Look documentation for this method too:
Returns whether the outline can be used to clip a View. Currently, only Outlines that can be represented as a rectangle, circle, or round rect support clipping.
So there are quite limited set of forms and it couldn’t realize all requirements of design.
To dynamically change the shape of the background image, you can create a class derived from Drawable. In getOutline() method set the desired outline.
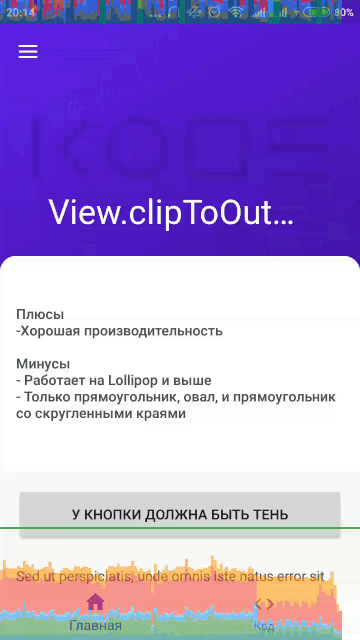
- Good performance
- Line smoothing.
- Works only on Lollipop version and higher;
- Only a rectangle, an oval, and a rectangle with rounded corners
Suitable for cases whan the app is developed for Android Lollipop or higher version and you you need to set the shape of a rectangle, an oval and a rectangle with rounded corners. Perhaps in the future there will be support for any form of contour.
Canvas.clipPath() method rendering elements in container
This variant requires inheritance from container class. In dispatchDraw() method do the trimming in the desired shape using Canvas.clipPath() method.
Set the required contour using the object of Path class. The flaws are visible after the launch of the application — there is no antialiasing, and it is unclear how to add it.

- Works on versions before\after Android LOllipop;
- Good perfomance.
The variant is simple to implement and is suitable for cases when you need to add the functionality to the project quickly, and antialiasing is unprincipled.
Canvas.drawPath() method rendering elements in container, View.LAYER_TYPE_SOFTWARE
This variant also requires inheritance from container class. We do trimming to the right shape in dispatchDraw() method using Canvas.drawPath() method with outline and the Paint class object in parameters. Paint object initializes with xfermode property.
PorterDuffXfermode(PorterDuff.Mode.CLEAR) objest allows to cut the desired area on the screen using the blend mode of one image to another. What for then setLayerType(View.LAYER_TYPE_SOFTWARE, null) ? The fact is that this mode does not work correctly in other types of Layer. Otherwise, behind the cropped figure there will be a white background, and we need a transparent one.
Detailed documentation of PorterDuff.
Accordingly, this setup leads to a performance drop. But how critical it is, can be seen on the performance graph.
During testing, it became clear that no longer work things like a shadow at the button. It seems that the problem is in View.LAYER_TYPE_SOFTWARE.
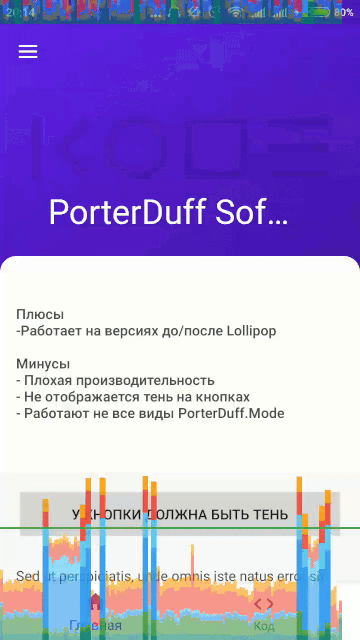
- Works on versions before\after Android Lollipop;
- Smooth lines.
- Bad performance
- The shadow is not displayed on the buttons. It looks like the problem is in View.LAYER_TYPE_SOFTWARE;
- Not all types of PorterDuff.Mode work
Canvas.drawPath() method rendering elements in container, View.LAYER_TYPE_HARDWARE
The key point, as in the previous approach, is overriding the dispatchDraw () method, in which we use the canvas.drawPath () method for trimming. We set up the View.LAYER_TYPE_HARDWARE for PorterDuffXfermode correct work, you need to add additional logic with the Canvas object in the dispatchDraw () method. Thanks for the hint Ilya Nekrasov

- Works on versions before\after Android Lollipop;
- Good performance;
- Smooth lines.
- If there are two View in container and Alpha changes in each of them, then flicker sometimes occurs. There is no flicker in any version of Android before Lollipop.
To solve the problem with clipping in our project, we used this method. We got rid of flickering when switching between screens, by creation a container for each screen. This affected the performance when changing screens, but not critical and almost imperceptible, since the transition takes less than a second.
Источник
A safer way to collect flows from Android UIs

In an Android app, Kotlin flows are typically collected from the UI layer to display data updates on the screen. However, you want to collect these flows making sure you’re not doing more work than necessary, wasting resources (both CPU and memory) or leaking data when the view goes to the background.
In this article, you’ll learn how the Lifecycle.repeatOnLifecycle , and Flow.flowWithLifecycle APIs protect you from wasting resources and why they’re a good default to use for flow collection in the UI layer.
Wasting resources
It’s recommended to expose the Flow API from lower layers of your app hierarchy regardless of the flow producer implementation details. However, you should also collect them safely.
A cold flow backed by a channel or using operators with buffers such as buffer , conflate , flowOn , or shareIn is not safe to collect with some of the existing APIs such as CoroutineScope.launch , Flow .launchIn , or LifecycleCoroutineScope.launchWhenX , unless you manually cancel the Job that started the coroutine when the activity goes to the background. These APIs will keep the underlying flow producer active while emitting items into the buffer in the background, and thus wasting resources.
Note: A cold flow is a type of flow that executes the producer block of code on-demand when a new subscriber collects.
For example, consider this flow that emits Location updates using callbackFlow :
Note: Internally, callbackFlow uses a channel, which is conceptually very similar to a blocking queue, and has a default capacity of 64 elements.
Collecting this flow from the UI layer using any of the aforementioned APIs keeps the flow emitting locations even if the view is not displaying them in the UI! See the example below:
lifecycleScope.launchWhenStarted suspends the execution of the coroutine. New locations are not processed, but the callbackFlow producer keeps sending locations nonetheless. Using the lifecycleScope.launch or launchIn APIs are even more dangerous as the view keeps consuming locations even if it’s in the background! Which could potentially make your app crash.
To solve this issue with these APIs, you’d need to manually cancel collection when the view goes to the background to cancel the callbackFlow and avoid the location provider emitting items and wasting resources. For example, you could do something like the following:
That’s a good solution, but that’s boilerplate, friends! And if there’s a universal truth about Android developers, it’s that we absolutely detest writing boilerplate code. One of the biggest benefits of not having to write boilerplate code is that with less code, there are fewer chances of making a mistake!
Lifecycle.repeatOnLifecycle
Now that we all are on the same page and know where the problem lies, it’s time to come up with a solution. The solution needs to be 1) simple, 2) friendly or easy to remember/understand, and more importantly 3) safe! It should work for all use cases regardless of the flow implementation details.
Without further ado, the API you should use is Lifecycle.repeatOnLifecycle available in the lifecycle-runtime-ktx library.
Note: These APIs are available in the lifecycle:lifecycle-runtime-ktx:2.4.0 library or later.
Take a look at the following code:
repeatOnLifecycle is a suspend function that takes a Lifecycle.State as a parameter which is used to automatically create and launch a new coroutine with the block passed to it when the lifecycle reaches that state , and cancel the ongoing coroutine that’s executing the block when the lifecycle falls below the state .
This avoids any boilerplate code since the associated code to cancel the coroutine when it’s no longer needed is automatically done by repeatOnLifecycle . As you could guess, it’s recommended to call this API in the activity’s onCreate or fragment’s onViewCreated methods to avoid unexpected behaviors. See the example below using fragments:
Important: Fragments should always use the viewLifecycleOwner to trigger UI updates. However, that’s not the case for DialogFragment s which might not have a View sometimes. For DialogFragment s, you can use the lifecycleOwner .
Note: These APIs are available in the lifecycle:lifecycle-runtime-ktx:2.4.0 library or later.
Under the hood!
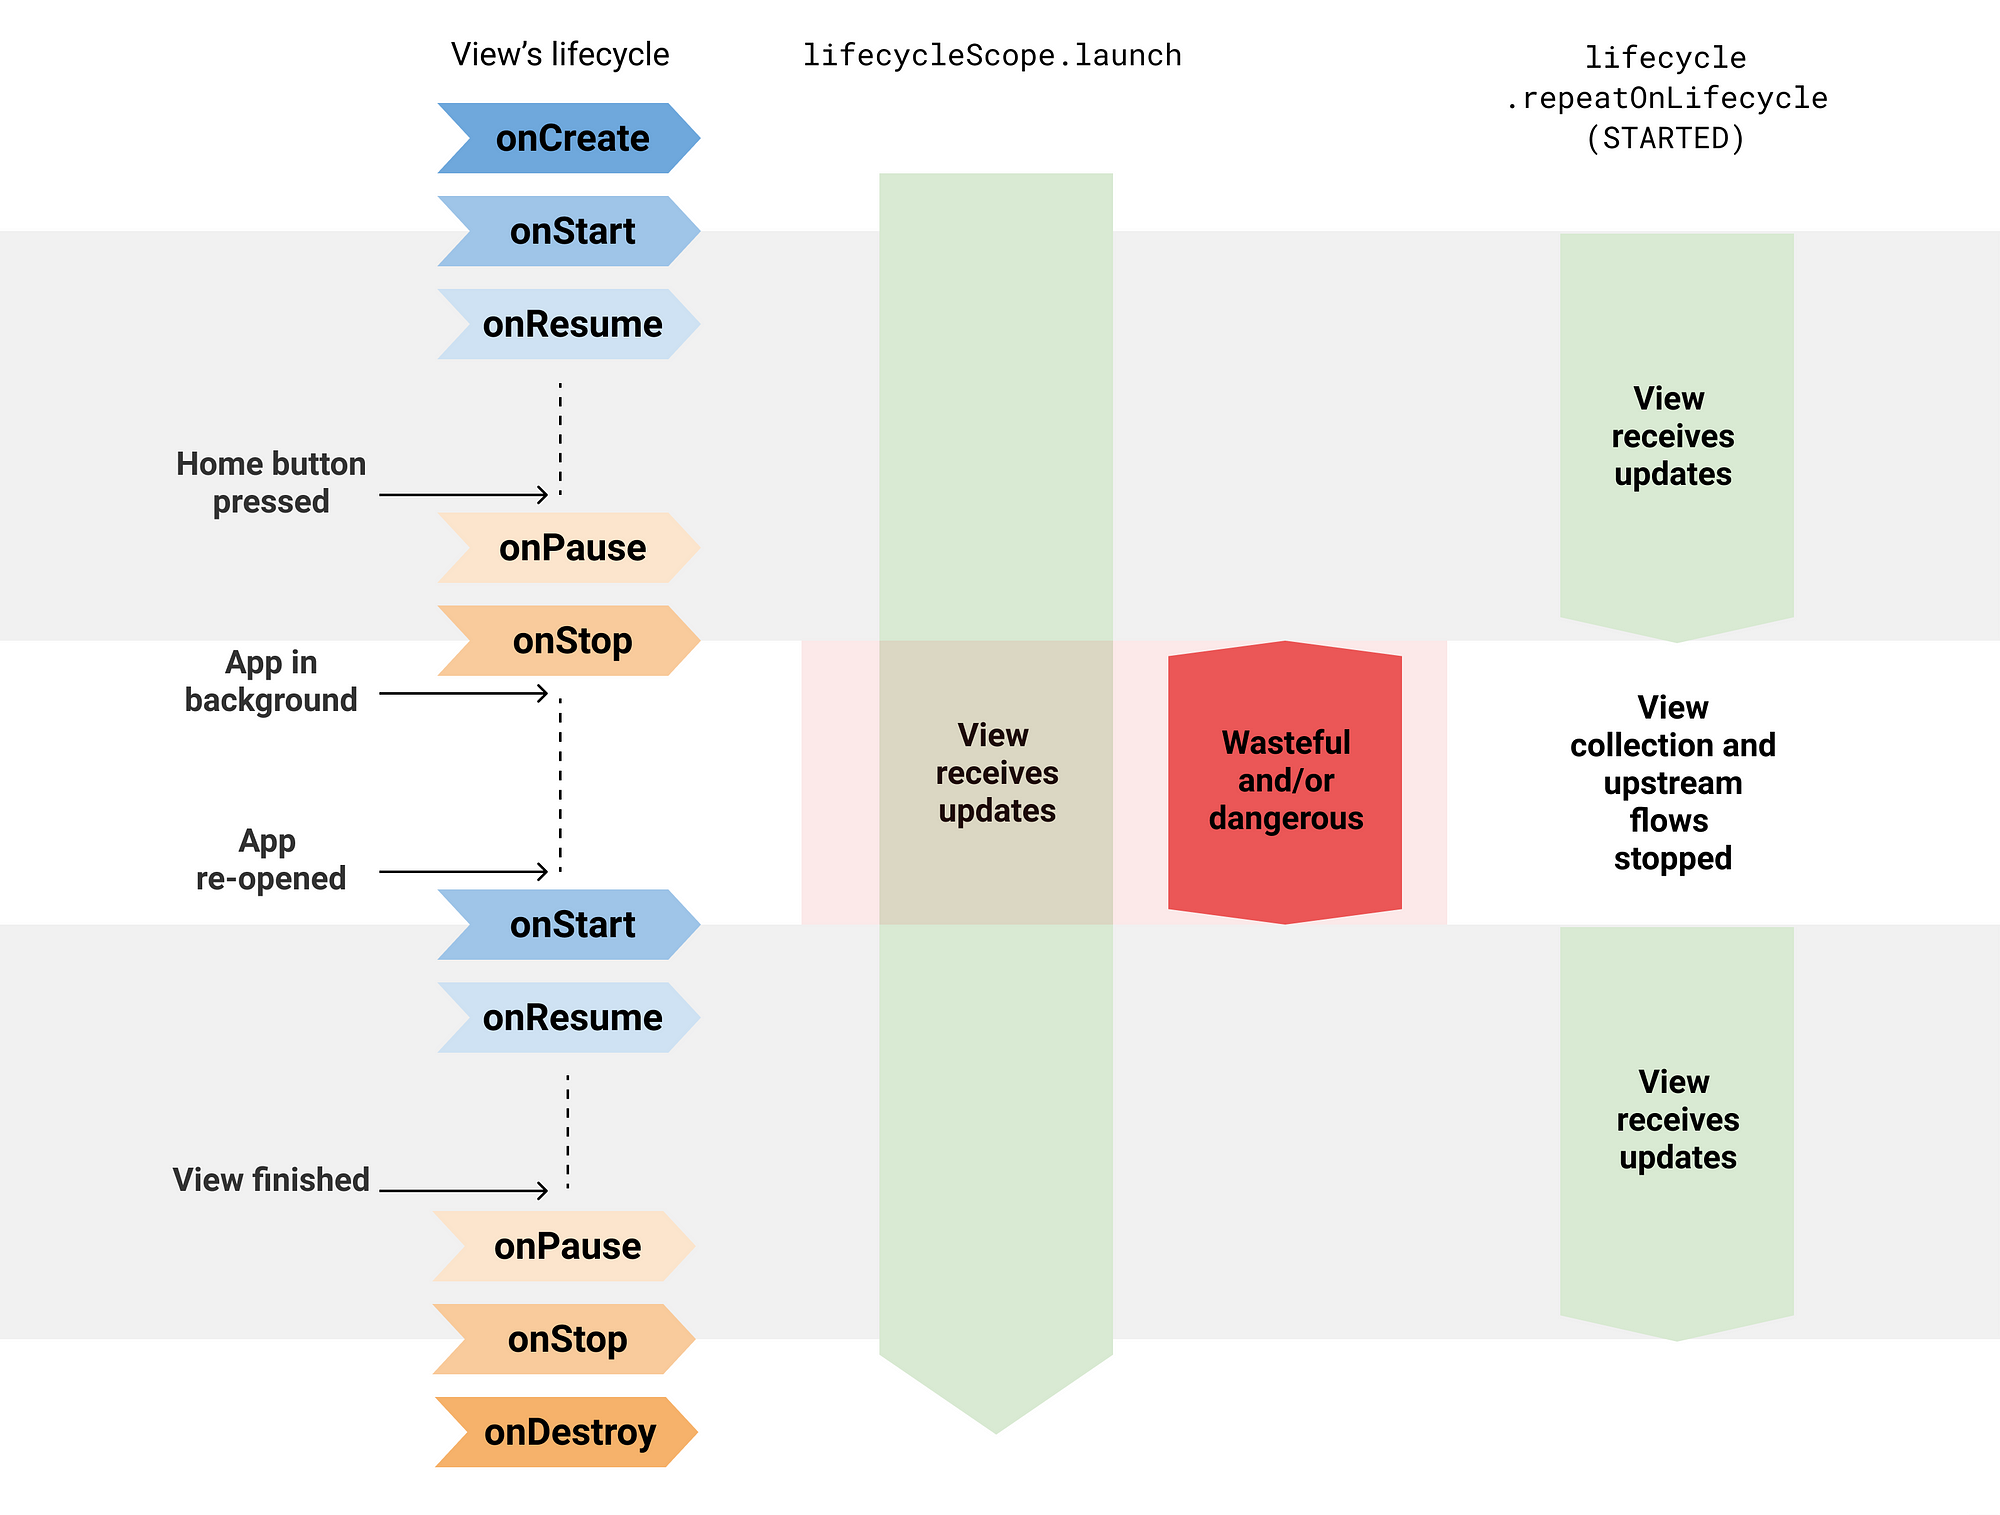
repeatOnLifecycle suspends the calling coroutine, re-launches the block when the lifecycle moves in and out of the target state in a new coroutine, and resumes the calling coroutine when the Lifecycle is destroyed. This last point is very important: the coroutine that calls repeatOnLifecycle won’t resume executing until the lifecycle is destroyed.
Visual diagram
Circling back to the beginning, collecting locationFlow directly from a coroutine started with lifecycleScope.launch was dangerous since the collection keeps happening even when the View is in the background.
repeatOnLifecycle prevents you from wasting resources and app crashes because it stops and restarts the flow collection when the lifecycle moves in and out of the target state.
Flow.flowWithLifecycle
You can also use the Flow.flowWithLifecycle operator when you have only one flow to collect. This API uses the repeatOnLifecycle API under the hood, and emits items and cancels the underlying producer when the Lifecycle moves in and out of the target state.
Note: This API name takes the Flow.flowOn(CoroutineContext) operator as a precedent since Flow.flowWithLifecycle changes the CoroutineContext used to collect the upstream flow while leaving the downstream unaffected. Also, similar to flowOn , Flow.flowWithLifecycle adds a buffer in case the consumer doesn’t keep up with the producer. This is due to the fact that its implementation uses a callbackFlow .
Configuring the underlying producer
Even if you use these APIs, watch out for hot flows that could waste resources even if they aren’t collected by anyone! There are some valid use cases for them, but do keep that in mind and document it if needed. Having the underlying flow producer active in the background, even if wasting resources, can be beneficial for some use cases: you instantly have fresh data available rather than catching up and temporarily showing stale data. Depending on the use case, decide whether the producer needs to be always active or not.
The MutableStateFlow and MutableSharedFlow APIs expose a subscriptionCount field that you can use to stop the underlying producer when subscriptionCount is zero. By default, they will keep the producer active as long as the object that holds the flow instance is in memory. There are some valid use cases for this though, for example, a UiState exposed from the ViewModel to the UI using StateFlow . That’s ok! This use case demands the ViewModel to always provide the latest UI state to the View.
Similarly, the Flow.stateIn and Flow.shareIn operators can be configured with the sharing started policy for this. WhileSubscribed() will stop the underlying producer when there are no active observers! On the contrary, Eagerly or Lazily will keep the underlying producer active as long as the CoroutineScope they use is active.
Note: The APIs shown in this article are a good default to collect flows from the UI and should be used regardless of the flow implementation detail. These APIs do what they need to do: stop collecting if the UI isn’t visible on screen. It’s up to the flow implementation if it should be always active or not.
Safe Flow collection in Jetpack Compose
The Flow.collectAsState function is used in Compose to collect flows from composables and represent the values as State to be able to update Compose UI. Even if Compose doesn’t recompose the UI when the host activity or fragment is in the background, the flow producer is still active and can waste resources. Compose can suffer from the same problem as the View system.
When collecting flows in Compose, use the Flow.flowWithLifecycle operator as follows:
Notice that you need to remember the flow that is aware of the lifecycle with locationFlow and lifecycleOwner as keys to always use the same flow unless one of the keys change.
In Compose, side effects must be performed in a controlled environment. For that, use LaunchedEffect to create a coroutine that follows the composable’s lifecycle. In its block, you could call the suspend Lifecycle.repeatOnLifecycle if you need it to re-launch a block of code when the host lifecycle is in a certain State .
Comparison with LiveData
You might’ve noticed that this API behaves similarly to LiveData , and that’s true! LiveData is aware of Lifecycle, and its restarting behavior makes it ideal for observing streams of data from the UI. And that’s also the case for the Lifecycle.repeatOnLifecycle , and Flow.flowWithLifecycle APIs!
Collecting flows using these APIs is a natural replacement for LiveData in Kotlin-only apps. If you use these APIs for flow collection, LiveData doesn’t offer any benefits over coroutines and flow. Even more, flows are more flexible since they can be collected from any Dispatcher and they can be powered with all its operators. As opposed to LiveData , which has limited operators available and whose values are always observed from the UI thread.
StateFlow support in data binding
On a different note, one of the reasons you might be using LiveData is because it’s supported by data binding. Well, so is StateFlow ! For more information about StateFlow support in data binding, check out the official documentation.
Источник


