- Android Location API with the fused location provider — Tutorial
- 1. Android Location API
- 1.1. Determine the current geolocation
- 1.2. Installation
- 1.3. Using the LocationManager
- 1.4. Forward and reverse Geocoding
- 1.5. Security
- 1.6. Prompt the user to Enabled GPS
- 2. Using GPS and setting the current location
- 2.1. Activating GPS on the emulator
- 2.2. Setting the geoposition
- Get Current location using FusedLocationProviderClient in Android
- Android Location Fused Provider
- Fused Location Provider
- Three Use Cases for location access
- Example Android Application to Get Location
- Prerequisite
- AndroidManifest.xml
- FusedLocationProviderApi Usage
- FusedLocationProviderApi
- GoogleApiClient
- Location Interface Implementations for Callbacks
- Continuous Location Access Activity
- Android Layout File
- Test Run the Location Application via Android Emulator
- Popular Articles
- Comments on «Android Location Fused Provider»
Android Location API with the fused location provider — Tutorial
This tutorial describes the usage of the fused location provider.
1. Android Location API
1.1. Determine the current geolocation
Most Android devices allow to determine the current geo location. This can be done via a GPS (Global Positioning System) module, via cell tower triangulation and via wifi networks.
Google Play provides the fused location provider to retrieve the device’s last known location.
1.2. Installation
To use the location manager make the Google play service available via your app build.gradle file.
Also specify the following required permission in your manifest.
1.3. Using the LocationManager
Now you can access the last known location. The fuse location provider provides a new simple API. The following is an example activity which uses it.
1.4. Forward and reverse Geocoding
The Geocoder class allows to determine the geo-coordinates (longitude, laditude) for a given address and possible addresses for given geo-coordinates.
This process is known as forward and reverse geocoding. The Geocoder class uses an online Google service.
1.5. Security
If you want to access the GPS sensor, you need the ACCESS_FINE_LOCATION permission. Otherwise you need the ACCESS_COARSE_LOCATION permission.
1.6. Prompt the user to Enabled GPS
The user can decide if the GPS is enabled or not.
You can find out, if a LocationManager is enabled via the isProviderEnabled() method. If its not enabled you can send the user to the settings via an Intent with the Settings.ACTION_LOCATION_SOURCE_SETTINGS action for the android.provider.Settings class.
Typically you would open an AlarmDialog prompt the user and if he wants to enable GPS or if the application should be canceled.
You cannot enable the GPS directly in your code, the user has to do this.
2. Using GPS and setting the current location
2.1. Activating GPS on the emulator
You need to activate GPS on your test device. If you test on the emulator and its not activated you «null» if you try to use a LocationManager .
The Google Map activity should automatically activate the GPS device in the emulator but if you want to use the location manager directly you need to do this yourself. Currently their seems to be an issue with this.
Start Google Maps on the emulator and request the current geo-position, this will allow you to activate the GPS. Send new GPS coordinates to the Android emulator.
2.2. Setting the geoposition
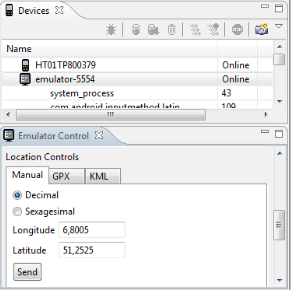
You can use the «DDMS» Perspective of Eclipse to send your geoposition to the emulator or a connected device. For open this Perspective select Window Open Perspective Other… DDMS .
In the Emulator Control part you can enter the geocoordinates and press the Send button.
You can also set the geoposition the Android emulator via telnet. Open a console and connect to your device. The port number of your device can be seen in the title area of your emulator.
Set the position via the following command.
Источник
Get Current location using FusedLocationProviderClient in Android
Sep 4, 2018 · 4 min read
Hello to coders,
Previously we have taught you how you get current location using GPS/Network Provider. Then android has revealed FusedLocationProviderClient under GoogleApi. FusedLocationProviderClient is for interacting with the location using fused location provider.
( NOTE : To use this feature, GPS must be turned on your device. For manually ask the user to turn on GPS, please check next article)
So let’s get started for the tutorial for getting the current location.
First, add a dependency for location by play services:
Then define FusedLocationProviderClient:
Add permission in manifest.xml
Now ask for runtime permission for above android 6 OS devices
N o w, request for permission if not granted and get the result on onRequestPermissionsResult overridden method, check highlighted code below:
Here, when you allow using permission for an app, it will return to onRequestPermissionsResult method. And again get the last location and print location on textview.
Above code will work if an app has already granted the location permission
Here you can notice, why we put a condition that if(location!=null) before getting latitude-longitude. The location object may be null in the following situations:
- Location is turned off in the device settings. The result could be null even if the last location was previously retrieved because disabling location also clears the cache.
- The device never recorded its location, which could be the case of a new device or a device that has been restored to factory settings.
- Google Play services on the device have restarted, and there is no active Fused Location Provider client that has requested location after the services restarted. To avoid this situation you can create a new client and request location updates yourself.
Now if in case we can’t getting location then we have an option for request location updates. Location updates will give you continuous location at any specific time interval as per your request. Let’s move on location updates.
Here we definitely get the current location using this location updates. And once we get the location, we can also remove location continuous updates else you will get multiple locations updates. This will help you when you want to move the marker on the map as current location changes.
Now you can find some methods of location request like setPriority(), setInterval() and setFastestInterval().
- setPriority: The priority of the request is a strong hint to the LocationClient for which location sources to use. For example, PRIORITY_HIGH_ACCURACY is more likely to use GPS, and is more likely to use WIFI & Cell tower positioning, but it also depends on many other factors (such as which sources are available) and is implementation dependent.
- setInterval: Set the desired interval for active location updates, in milliseconds. The location client will actively try to obtain location updates for your application at this interval, so it has a direct influence on the amount of power used by your application. Choose your interval wisely.
- setFastestInterval: Explicitly set the fastest interval for location updates, in milliseconds. This controls the fastest rate at which your application will receive location updates, which might be faster than setInterval(long) in some situations (for example, if other applications are triggering location updates). This allows your application to passively acquire locations at a rate faster than it actively acquires locations, saving power.
Источник
Android Location Fused Provider
This Android tutorial is to explain what a fused location provider is and how to use it to get the location using a sample Android application. We need not explicitly choose either GPS or Network location Provider, as the “Fused Location Provider” automatically chooses the underlying technology and gives the best location as per the need.

In this tutorial we will be using the FusedLocationProviderApi which is the latest API and the best among the available possibilities to get location in Android. If for some reason you wish to use the old APIs then refer the earlier written tutorial to get current location in Android.
Fused Location Provider
- It provides simple and easy to use APIs.
- Provides high accuracy over other options.
- Utilizes low power by choosing the most efficient way to access the location.
Three Use Cases for location access
With respect to fused location provider, we can broadly classify the API usage in three use cases.
- getLastLocation(GoogleApiClient) this API should be used when there is no need for continuous access to location from an application. Like one shot access or get user location based on some action. This is the simplified way to get the device location and also may not provide high accuracy.
- requestLocationUpdates(GoogleApiClient,LocationRequest, LocationListener) this API should be used when there a need for continuous location updates and the location is accessed when the application is active in foreground.
- requestLocationUpdates (GoogleApiClient, LocationRequest, PendingIntent) this API is used to receive location updates in the background even when the application is not active. So the difference is PendingIntent.
Example Android Application to Get Location
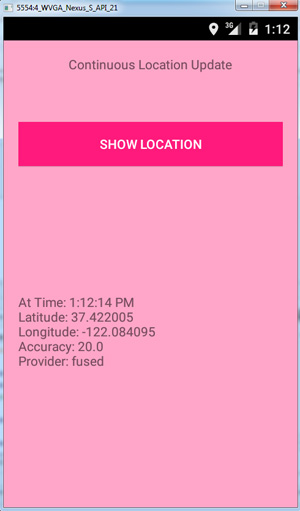
Following is an example Android application that shows how to get the current user location. This also continuously updates the location on the move.
Prerequisite
Google Play Services is required. If you are using Android Studio and Gradle, you should have the following dependencies added in build.gradle file
Note: As of now(14 March 2015), Fused location provider API is not working in all the Android Nexus virtual device emulators. Its a widely reported defect. You can use any other AVD to test in the emulator like WVGA AVDs. I used “4 WVGA API 21” virtual device in emulator to test it. It is also working on a real device and I tested it in Panasonic P81.
AndroidManifest.xml
Remember to give access permissions as shown below. You need not give permission for GPS, Network providers. I have seen Android location access tutorial examples giving all the available permission in the world. Just on android.permission.ACCESS_FINE_LOCATION is enough.
ACCESS_COARSE_LOCATION permission is for approximate location access using cell towers and Wi-Fi. ACCESS_FINE_LOCATION is for precise location access using GPS or cell towers and Wi-Fi. Choose the one that is appropriate for you and do not give both. Battery power is used accordingly.
FusedLocationProviderApi Usage
FusedLocationProviderApi
FusedLocationProviderApi can be accessed via LocationServices as below,
GoogleApiClient
FusedLocationProviderApi requires the GoogleApiClient instance to get the Location and it can be obtained as below.
- Instantiating the GoogleApiClient should be done in onCreate of the application Activity.
- googleApiClient.connect() should be done in onStart and disconnect() in onStop .
- When the GoogleApiClient is connected successfully, onConnected(Bundle) callback will be called. There we should register with LocationListener for location updates as LocationServices.FusedLocationApi.requestLocationUpdates(
mGoogleApiClient, mLocationRequest, this);
Location Interface Implementations for Callbacks
The following interfaces should be implemented to get the location update.
- LocationListener provides call back for location change through onLocationChanged.
- GoogleApiClient.ConnectionCallbacks provides call back for GoogleApiClient onConnected.
- GoogleApiClient.OnConnectionFailedListener provides call back for GoogleApiClient onConnectionFailed.
Continuous Location Access Activity
Following is the complete class which accesses the Fused Location Provider to get the location continuously in the Android example application.
Android Layout File
Test Run the Location Application via Android Emulator
In Eclipse, Open DDMS perspective (Window -> Open Perspective)
- Select your emulator device
- Select the tab named emulator control
- In ‘Location Controls’ panel, ‘Manual’ tab, give the Longitude and Latitude as input and ‘Send’.
In Android Studio, open Android Device Monitor
The below screen shot will help, 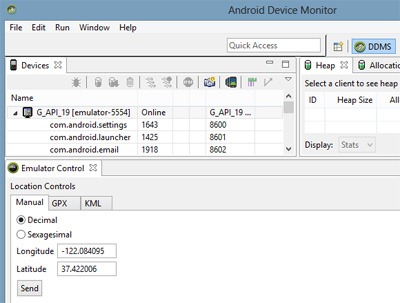


Popular Articles
Comments on «Android Location Fused Provider»
[…] This tutorial is to learn how to show the current location on map in an Android application using Google Maps API. Previously we have seen tutorials to get the current location using the different location providers. If you are looking to just get the latitude and longitude of a location, the refer get current location using Android Fused location provider tutorial. […]
Thank you! I couldn’t find a specific example of grabbing the fused provider anywhere until getting here.
This tutorial is great!
Is there another way to get the location as soon as see the activity on my screen in oppose to clicking a button?
I’ve tried placing the request for location in onCreate, onStart and onResume, but that only works in onResume after I really resume from standby.
Thanks you, this tutorial is so great. Have a nice day!
After implementing it I’m getting no Location at all. I’m not even getting default status icon when some app is trying to get the current location. With previous examples it worked fine.
dependencies <
compile fileTree(dir: ‘libs’, include: [‘*.jar’])
compile ‘com.android.support:appcompat-v7:21.0.3’
compile ‘com.google.android.gms:play-services:6.5.87’
>
And in activity:
if (!isGooglePlayServicesAvailable()) <
finish();
>
setContentView(R.layout.map_layout);
fusedLocationService = new FusedLocationService(this);
tvLocation = (TextView) findViewById(R.id.curPositionText);
Location location = fusedLocationService.getLocation();
String locationResult;
if (null != location) <
Log.i(TAG, location.toString());
double latitude = location.getLatitude();
double longitude = location.getLongitude();
// float accuracy = location.getAccuracy();
// double elapsedTimeSecs = (double) location.getElapsedRealtimeNanos()
// / 1000000000.0;
// String provider = location.getProvider();
// double altitude = location.getAltitude();
locationResult = “Latitude: ” + latitude +
” Longitude: ” + longitude;
> else <
locationResult = “Location Not Available!”;
>
tvLocation.setText(locationResult);
How would I setup pooling so that I can send the onChanged() location from the FusedLocationService back to the View without having to click on the button?
Источник


