- Нет пункта Generate Signed APK
- Signing Your Applications
- In this document
- See also
- Signing Overview
- Signing in Debug Mode
- Signing in Release Mode
- Signing Android Wear Apps
- Signing Your App in Android Studio
- Automatically Signing Your App
- Signing Considerations
- Securing Your Private Key
- Expiry of the Debug Certificate
- Signing Your App Manually
- Ручная подписка APK
- Подписка APK средствами IDE Android Studio
- Есть сгенерированные ключи подписи или создаем?
- Подписка APK средствами командной строки Android SDK
- Пример подписки средствами Android SDK
- Подписка APK средствами командной строки JDK
- Другие инструменты подписи
Нет пункта Generate Signed APK
В Intelij Idea в меню перед запуска выбивает Error:The apk for your currently selected variant (app-release.apk) is not
В Intelij Idea в меню перед запуска выбивает Error:The apk for your currently selected variant.
Generate Sequence Diagram нет в меню. Как скачать?
Хотел использовать этот волшебный метод, но, к сожалению, не смог его найти в меню. Даже поиск.
 BSPVideoSpe.apk — вирус или нет?
Добрый день! Вопрос к спецам по ОС Android. На смартфоне имеется такой файл: BSPVideoSpe.apk.
В Xubunte нет пункта Сеть
Подскажите пожалуйста — в свежеустановленной Xubunte_10 в меню «Переход» вообще нет пункта «сеть».
Нет пункта 64 битная виндовс в VB
При создании гостевой машины,нет в списке выбора гостевых ОС ,64 битных систем, на другом ноуте.
Нет пункта secure boot control
Доброго времени суток. В биосе отсутствует пункт Secure Boot Control Ноутбук Asus x301a Сброс.
Virtuemart 2.0.20b, нет пункта: главная
Всем привет. Установил виртуамарт(2.0.20b) на джумлу 2.5, встал норм. Но при создании пункта в.
Нет пункта Открыть таблицу в контекстном меню
Здравствуйте! Подскажите как сделать так чтобы в sql server 2008 появился пункт в контекстном меню.
Источник
Signing Your Applications
In this document
See also
Android requires that all apps be digitally signed with a certificate before they can be installed. Android uses this certificate to identify the author of an app, and the certificate does not need to be signed by a certificate authority. Android apps often use self-signed certificates. The app developer holds the certificate’s private key.
Signing Overview
You can sign an app in debug or release mode. You sign your app in debug mode during development and in release mode when you are ready to distribute your app. The Android SDK generates a certificate to sign apps in debug mode. To sign apps in release mode, you need to generate your own certificate.
Signing in Debug Mode
In debug mode, you sign your app with a debug certificate generated by the Android SDK tools. This certificate has a private key with a known password, so you can run and debug your app without typing the password every time you make a change to your project.
Android Studio signs your app in debug mode automatically when you run or debug your project from the IDE.
You can run and debug an app signed in debug mode on the emulator and on devices connected to your development manchine through USB, but you cannot distribute an app signed in debug mode.
By default, the debug configuration uses a debug keystore, with a known password and a default key with a known password. The debug keystore is located in $HOME/.android/debug.keystore, and is created if not present. The debug build type is set to use this debug SigningConfig automatically.
For more information about how to build and run apps in debug mode, see Building and Running.
Signing in Release Mode
In release mode, you sign your app with your own certificate:
- Create a keystore. A keystore is a binary file that contains a set of private keys. You must keep your keystore in a safe and secure place.
- Create a private key. A private key represents the entity to be identified with the app, such as a person or a company.
Add the signing configuration to the build file for the app module:
The package in app/build/apk/app-release.apk is now signed with your release key.
Note: Including the passwords for your release key and keystore inside the build file is not a good security practice. Alternatively, you can configure the build file to obtain these passwords from environment variables or have the build process prompt you for these passwords.
To obtain these passwords from environment variables:
To have the build process prompt you for these passwords if you are invoking the build from the command line:
After you complete this process, you can distribute your app and publish it on Google Play.
Warning: Keep your keystore and private key in a safe and secure place, and ensure that you have secure backups of them. If you publish an app to Google Play and then lose the key with which you signed your app, you will not be able to publish any updates to your app, since you must always sign all versions of your app with the same key.
The rest of this document provides detailed instructions about how to generate a private key and sign your apps in release mode with Android Studio.
Signing Android Wear Apps
When publishing Android Wear apps, you package the wearable app inside of a handheld app, because users cannot browse and install apps directly on the wearable. Both apps must be signed. For more information on packaging and signing Android Wear apps, see Packaging Wearable Apps.
Signing Your App in Android Studio
To sign your app in release mode in Android Studio, follow these steps:
- On the menu bar, click Build >Generate Signed APK.
On the Generate Signed APK Wizard window, click Create new to create a new keystore.
If you already have a keystore, go to step 4.
On the New Key Store window, provide the required information as shown in figure 1.
Your key should be valid for at least 25 years, so you can sign app updates with the same key through the lifespan of your app.

Figure 1. Create a new keystore in Android Studio.
On the Generate Signed APK Wizard window, select a keystore, a private key, and enter the passwords for both. Then click Next.

Figure 2. Select a private key in Android Studio.
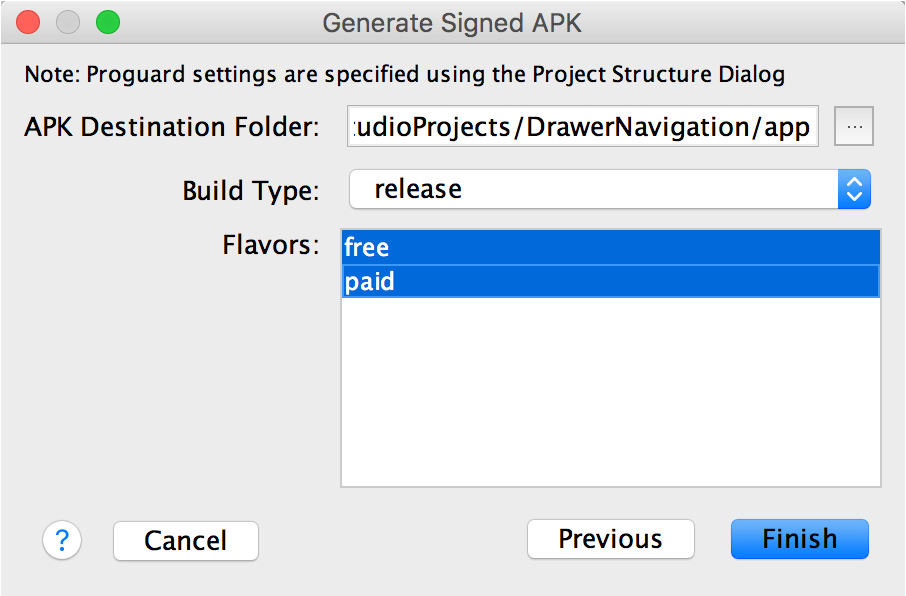
On the next window, select a destination for the signed APK and click Finish.

Figure 3. Generate a signed APK in Android Studio.
Automatically Signing Your App
In Android Studio, you can configure your project to sign your release APK automatically during the build process:
- On the project browser, right click on your app and select Open Module Settings.
- On the Project Structure window, select your app’s module under Modules.
- Click on the Signing tab.
Select your keystore file, enter a name for this signing configuration (as you may create more than one), and enter the required information.

Figure 4. Create a signing configuration in Android Studio.
Under Signing Config, select the signing configuration you just created.

Figure 5. Select a signing configuration in Android Studio.
You can also specify your signing settings in Gradle configuration files. For more information, see Configuring Gradle Builds.
Signing Considerations
You should sign all of your apps with the same certificate throughout the expected lifespan of your applications. There are several reasons why you should do so:
- App upgrade: When the system is installing an update to an app, it compares the certificate(s) in the new version with those in the existing version. The system allows the update if the certificates match. If you sign the new version with a different certificate, you must assign a different package name to the application—in this case, the user installs the new version as a completely new application.
- App modularity: Android allows apps signed by the same certificate to run in the same process, if the applications so requests, so that the system treats them as a single application. In this way you can deploy your app in modules, and users can update each of the modules independently.
- Code/data sharing through permissions: Android provides signature-based permissions enforcement, so that an app can expose functionality to another app that is signed with a specified certificate. By signing multiple apps with the same certificate and using signature-based permissions checks, your apps can share code and data in a secure manner.
If you plan to support upgrades for an app, ensure that your key has a validity period that exceeds the expected lifespan of that app. A validity period of 25 years or more is recommended. When your key’s validity period expires, users will no longer be able to seamlessly upgrade to new versions of your application.
If you plan to publish your apps on Google Play, the key you use to sign these apps must have a validity period ending after 22 October 2033. Google Play enforces this requirement to ensure that users can seamlessly upgrade apps when new versions are available.
Securing Your Private Key
Maintaining the security of your private key is of critical importance, both to you and to the user. If you allow someone to use your key, or if you leave your keystore and passwords in an unsecured location such that a third-party could find and use them, your authoring identity and the trust of the user are compromised.
If a third party should manage to take your key without your knowledge or permission, that person could sign and distribute apps that maliciously replace your authentic apps or corrupt them. Such a person could also sign and distribute apps under your identity that attack other apps or the system itself, or corrupt or steal user data.
Your private key is required for signing all future versions of your app. If you lose or misplace your key, you will not be able to publish updates to your existing appn. You cannot regenerate a previously generated key.
Your reputation as a developer entity depends on your securing your private key properly, at all times, until the key is expired. Here are some tips for keeping your key secure:
- Select strong passwords for the keystore and key.
- Do not give or lend anyone your private key, and do not let unauthorized persons know your keystore and key passwords.
- Keep the keystore file containing your private key in a safe, secure place.
In general, if you follow common-sense precautions when generating, using, and storing your key, it will remain secure.
Expiry of the Debug Certificate
The self-signed certificate used to sign your application in debug mode has an expiration date of 365 days from its creation date. When the certificate expires, you will get a build error.
To fix this problem, simply delete the debug.keystore file. The default storage location is in
/.android/ on OS X and Linux, in C:\Documents and Settings\ \.android\ on Windows XP, and in C:\Users\ \.android\ on Windows Vista and Windows 7.
The next time you build, the build tools will regenerate a new keystore and debug key.
Note that, if your development machine is using a non-Gregorian locale, the build tools may erroneously generate an already-expired debug certificate, so that you get an error when trying to compile your application. For workaround information, see the troubleshooting topic I can’t compile my app because the build tools generated an expired debug certificate.
Signing Your App Manually
You do not need Android Studio to sign your app. You can sign your app from the command line using standard tools from the Android SDK and the JDK. To sign an app in release mode from the command line:
Generate a private key using keytool . For example:
This example prompts you for passwords for the keystore and key, and to provide the Distinguished Name fields for your key. It then generates the keystore as a file called my-release-key.keystore . The keystore contains a single key, valid for 10000 days. The alias is a name that you will use later when signing your app.
Compile your app in release mode to obtain an unsigned APK.
Sign your app with your private key using jarsigner :
This example prompts you for passwords for the keystore and key. It then modifies the APK in-place to sign it. Note that you can sign an APK multiple times with different keys.
Verify that your APK is signed. For example:
Align the final APK package using zipalign .
zipalign ensures that all uncompressed data starts with a particular byte alignment relative to the start of the file, which reduces the amount of RAM consumed by an app.
Источник
Ручная подписка APK
Тут вам покажем несколько способов инструментов, при помощи которых можно подписывать приложения Android перед публикацией их в Google App Play.
Подписка APK средствами IDE Android Studio
Вы можете использовать Android Studio для ручного создания подписанных APK, по одному за раз, или для нескольких вариантов сборки сразу. Вместо того, чтобы вручную подписывать APK, вы также можете настроить свои настройки сборки Gradle для автоматической обработки подписей во время процесса сборки. В этом разделе описывается процесс ручной подписи. Подробнее о подписании приложений как части процесса сборки см. В разделе Настройка процесса сборки для автоматической подписки APK.
Чтобы вручную подписать APK для выпуска в Android Studio, выполните следующие действия:
- Жмем Build > Generate Signed APK и откроется окно Generate Signed APK . (Как создать ключи подписи в Android Studio мы писали в прошлой статье)
- В окне Generate Signed APK Wizard выберите хранилище ключей, закрытый ключ и введите пароли для обоих. (Если вы только что создали хранилище ключей в предыдущем разделе, эти поля уже будут заполнены) Затем нажмите «Next»

- В следующем окне выберите пункт назначения для подписанных APK, выберите тип сборки (если применимо), выберите продукт (ы) и нажмите «Finish»

Когда процесс завершится, вы найдете свой подписанный APK в выбранной вами папке назначения. Теперь вы можете распространять подписанный APK через торговую площадку приложения, например, в Google Play Store, или использовать выбранный вами механизм распространения подписанного приложения конечным пользователям.
Чтобы пользователи могли успешно устанавливать обновления для вашего приложения, вам нужно будет подписать APK с тем же сертификатом на протяжении всего срока действия вашего приложения.
Подробнее об этом и других преимуществах подписания всех ваших приложений с помощью одного и того же ключа, по поводу безопасности и редактирования.
Есть сгенерированные ключи подписи или создаем?
Мы уже разбирали тут, как генерировать хранилище ключей с ключом подписи. Если кратко, то вы можете подписать свое приложение из командной строки с помощью инструмента apksigner или настроить Gradle для его подписки во время сборки. В любом случае вам нужно сначала сгенерировать закрытый ключ с помощью keytool. Например командой
Примечание: keytool находится в каталоге bin/ вашего JDK. Чтобы найти ваш JDK из Android Studio, выберите «File»> «Project Structure», а затем «SDK Location», и вы увидите местоположение JDK
В этом примере команды консоль еще запросит ввести пароли для хранилища ключей и ключа подписи и запросит заполнить поля Distinguished Name для вашего ключа. Затем он генерирует хранилище ключей в виде файла с именем my-release-key.jks, сохраняя его в текущем каталоге (вы можете перемещать его по своему усмотрению). Хранилище ключей содержит один ключ, действительный в течение 10 000 дней.
Теперь вы можете создать unsigned APK, т.е. построить конфигурацию release и подписать его вручную или вместо этого настроить Gradle для автоматического подписания APK.
Подписка APK средствами командной строки Android SDK
Инструмент apksigner, доступный в версии 24.0.3 и выше для Android SDK Build Tools, позволяет вам подписывать APK и подтверждать, что подпись APK будет проверена успешно на всех версиях платформы Android, поддерживаемых этими APK. В этом подразделе представлено краткое руководство по использованию инструмента и служит ссылкой для различных параметров командной строки, которые поддерживает инструмент
Примечание 1. если вы подписываете APK с помощью apksigner и вносите дальнейшие изменения в APK, подпись APK становится недействительной. Поэтому перед подписанием APK вы должны использовать такие инструменты, как zipalign.
Примечание 2. Чтобы использовать инструмент apksigner, вы должны иметь версию 24.0.3 или выше установленных инструментов Android SDK Build Tools. Вы можете обновить этот пакет с помощью диспетчера SDK.
1). Открываем командную строку и перемещаемся в корневую директорию —из Android Studio, выбираем View > Tool Windows > Terminal. Затем вызываем команду assembleRelease :
Это создает APK под именем module_name-unsigned.apk в папке project_name/module_name/build/outputs/apk/. APK будет неподписанным(unsigned) и невыровненным(unaligned), который на данный момент — он не может быть установлен до тех пор, пока не будет подписан вашим секретным ключом.
2). Align the unsigned APK using zipalign:
zipalign гарантирует, что все несжатые данные начинаются с конкретного выравнивания байтов относительно начала файла, что может уменьшить объем оперативной памяти, потребляемой приложением.
3). Подписываем APK своим личным ключом с помощью apksigner:
В этом примере выводится подписанный APK на my-app-release.apk после его подписания с закрытым ключом и сертификатом, который хранится в одном файле хранилища ключей: my-release-key.jks.
Инструмент apksigner поддерживает другие параметры подписки, включая подписание файла APK с использованием отдельного закрытого ключа и файлов сертификатов и подписку APK с использованием нескольких подписчиков. Для получения дополнительной информации см. ссылку apksigner.
4). Убеждаемся, что ваш APK подписан:
Пример подписки средствами Android SDK
Если вышеописанное вызывает трудности, то давайте сделаем некоторый простой пример генерации ключа командой keytool, выполнения операции zipalign и подписи командой apksigner.
Сначала строим релиз средствами Cordova и Android SDK
Команда keytool генерации ключа в консоли:
Операция zipalign в консоли:
Обратите внимание, что zipalign мы выполняем по прямому пути версии приложения, которая соответствует версии нашего разрабатываемого приложения.
Операция подписи apksigner:
Обратите внимание, что apksigner мы выполняем по прямому пути версии приложения и указываем путь к сгенерированному ключу, которая соответствует версии нашего разрабатываемого приложения. Далее, после нажатия Enter, консоль запросит поочередно запросить пароль от хранилища ключей и от самого ключа.
Подписка APK средствами командной строки JDK
Выше мы уже знакомились с инструментом keytool для создания хранилища ключей и самих ключей подписи в составе JDK, а в данной секции описано то, как средствами JDK подписывать этим ключом приложение и для этого есть специальный инструмент в составе JDK в той же папке, что и keytool — jarsigner.
Команда подписи с ее параметрами записывается так
Имена параметров нам знакомы по keytool:
- хранилище (keystore),
- пароль (storepass) к нему
- пароль (keypass) к ключу.
- А последние два параметра – это имя APK-файла, который вы хотите подписать и алиас ключа из указанного хранилища, который вы хотите использовать для подписи.
После данной команды приложение будет подписано и будет готово к установке на устройства или можно распространять через Google App Play.
Другие инструменты подписи
Пожалуй, сюда можно добавить такие инструменты, как:
- apk-signer — простой инструмент командной строки для подписи apk
- APK Signing Tool — этот инструмент с оконным интерфейсом позволяет вам подписать APK с вашим хранилищем ключей. Вы можете переопределить хранилище демо-версий и использовать свое собственное хранилище ключей перед загрузкой приложения в Google Play.
- APK Signer — инструмент с оконным интерфейсом упрощает создание файла хранилища ключей.
Источник


