- Kotlin Android – Get screen Width and Height Programmatically
- Android – Get Screen Width and Height
- Steps to Get Width and Height of Screen
- Code – Get Width and Height
- Example – Kotlin Android – Get Screen Dimensions Programmatically
- Conclusion
- Tek Eye
- Determining the Size of an Android View or Screen at Run Time
- Finding the Size of an Android View in Code
- Finding the Size of an Android Layout in Code
- Finding the Size of an Android View During Screen Construction
- See Also
- Archived Comments
- Do you have a question or comment about this article?
- mstfldmr / CameraPreview.java
- Get display width android
Kotlin Android – Get screen Width and Height Programmatically
Android – Get Screen Width and Height
In Android, WindowManager is available to every Activity. Through WindowManager, we can get the metrics of default display in which the activity is being shown.
In this tutorial, we will learn how to get width and height of the screen, on which the application is running, with the help of example Android Application.

Steps to Get Width and Height of Screen
To get Android screen width and height programmatically, follow these steps.
- Create a DispalyMetrics() object.
- Pass the displayMetrics object to getMetrics() method of Display class. WindowManager.defaultDisplay() returns the Display object.
- Screen Width could be obtained using displayMetrics.widthPixels
- Screen Height could be obtained using displayMetrics.heightPixels
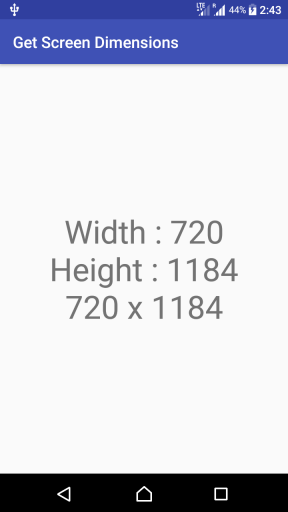
In the following screenshot, width and height of the Android device screen is obtained programmatically and displayed using TextView.
Code – Get Width and Height
A quick snippet of the code to obtain screen dimensions programmatically is provided below
Example – Kotlin Android – Get Screen Dimensions Programmatically
In the following example, we shall obtain screen width and height, display it in the Activity with the help of TextView.
activity_main.xml
MainActivity.kt
Conclusion
In this Kotlin Android Tutorial – Get Screen Dimensions Programmatically, we have learnt to get screen width and height programmatically using DisplayMetrics.
Источник
Tek Eye
For efficient bitmap handling or dynamic View creation in an app, the area that a screen item or layout is using needs to be known. If no fixed sizes are allocated at design time the size of a View may not be known until an app is executed. This is because of the wide range of display sizes that Android supports. Just look on GSMArena to see the huge range of Android devices produced over the years, and to see the wide variation in screen sizes and pixel densities. The example code in this article shows how to read the screen size and the size of Views as the app runs.
(Note: All Android screen items are derived from Views. A screen component, e.g. a TextView , is derived from the View class. Such screen components are also known as widgets. Layouts are ViewGroups and are also derived from Views.)
Determining the Size of an Android View or Screen at Run Time
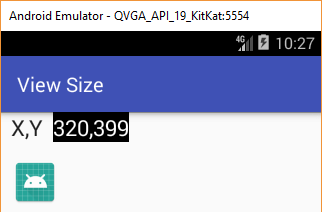
To run the example code in this article first create a new Android project. Those new to Android programming can read the article Your First Android Hello World Java Program to see how. For this article the app is called View Size.
Use a simple layout for activity_main.xml (the layout file may have another name). Add a TextView with id labXY and set the Text attribute to X,Y. Next to it add another TextView called textXY with Text set to ? (actually \? to make it valid in the XML). Here is the layout used for this example:
Add this code to the bottom of the onCreate method in MainActivity.java (or whatever the class was called). Add the required an imports for TextView and DisplayMetrics when prompted with the Alt-Enter:
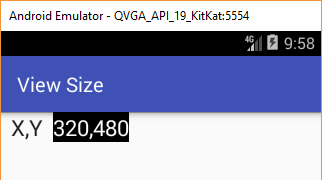
This is the code running on an Android Virtual Device (AVD) with a 320×480 screen:
Finding the Size of an Android View in Code
Drop an ImageView onto the layout, here using the ic_launcher.png icon file, or other images can be used. The size of a View can be retrieved using the getWidth and getHeight methods. Change the code in the onCreate to set the TextView to the ImageView’s width and height (an import for View is required, again usually prompted for and added with Alt-Enter):
Mmmmm! The code is showing 0,0 for the ImageView size, even though we can see that it is not 0,0:
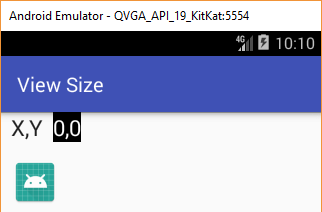
This is because in onCreate the screen has not yet been laid out so the size of the ImageView has not been determined hence the getWidth() and getHeight() methods are returning zero. In fact they will likely return zero in onStart() and onResume(). What is needed is to override onWindowFocusChanged() to get the ImageView sizes:
Finding the Size of an Android Layout in Code
The same code can be used to get the size of the View (the layout, i.e. ViewGroup) in which the screen components sit. Notice that in the screen XML the RelativeLayout was given an id (@+id/screen), which means the base View’s width and height can be grabbed (change R.id.imageView to R.id.screen in the code):
Notice that the layout height is less than the screen height because of the notification bar.
Finding the Size of an Android View During Screen Construction
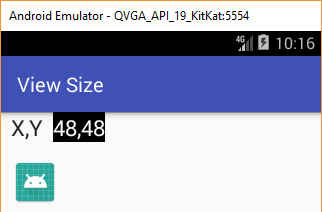
To get the the size of a View as soon as it is known (rather than waiting for the onWindowFocusChanged event) attach a listener to its ViewTreeObserver . Do this by writing a class that implements ViewTreeObserver.OnGlobalLayoutListener in the Activity’s class. This new class will have an onGlobalLayout method that gets the View dimensions that can then be stored for later use (here they are displayed as before). Here is the example source code for the entire MainActivity.java file to show this way of getting the ImageView’s width and height:
Download some example code in view-size.zip from this article, ready for importing into Android Studio. See the instructions in the zip file, alternatively the code can also be accessed via the Android Example Projects page.
See Also
- Using Immersive Full-Screen Mode on Android Developers
- See the Android Example Projects page for lots of Android sample projects with source code.
- For a full list of all the articles in Tek Eye see the full site alphabetical Index.
Archived Comments
Kestrel on December 15, 2014 at 4:20 am said: Hey fantastic article, can you also talk about the fitSystemWindows and how things are affected when its set or not set by default. Thanks in advance.
Author: Daniel S. Fowler Published: 2013-06-19 Updated: 2017-12-17


Do you have a question or comment about this article?
(Alternatively, use the email address at the bottom of the web page.)
↓markdown↓ CMS is fast and simple. Build websites quickly and publish easily. For beginner to expert.
Free Android Projects and Samples:
Источник
mstfldmr / CameraPreview.java
This file contains bidirectional Unicode text that may be interpreted or compiled differently than what appears below. To review, open the file in an editor that reveals hidden Unicode characters. Learn more about bidirectional Unicode characters
| package net.aldemir.myapp.camera ; |
| import android.content.Context ; |
| import android.content.res.Configuration ; |
| import android.graphics.Point ; |
| import android.hardware.Camera ; |
| import android.os.Handler ; |
| import android.util.AttributeSet ; |
| import android.util.Log ; |
| import android.view.Display ; |
| import android.view.Surface ; |
| import android.view.SurfaceHolder ; |
| import android.view.SurfaceView ; |
| import android.view.ViewGroup ; |
| import android.view.WindowManager ; |
| import java.util.List ; |
| public class CameraPreview extends SurfaceView implements SurfaceHolder . Callback < |
| public int getDisplaySize () < |
| WindowManager wm = ( WindowManager ) getContext() . getSystemService( Context . WINDOW_SERVICE ); |
| Display display = wm . getDefaultDisplay(); |
| Point size = new Point (); |
| display . getSize(size); |
| int width = size . x; |
| int height = size . y; |
| > |
| > |
This file contains bidirectional Unicode text that may be interpreted or compiled differently than what appears below. To review, open the file in an editor that reveals hidden Unicode characters. Learn more about bidirectional Unicode characters
| package net.aldemir.myapp.gui.activity ; |
| import android.graphics.Point ; |
| import android.os.Bundle ; |
| import android.view.Display ; |
| import at.ingdiba.ingdibaapp.R ; |
| import at.ingdiba.ingdibaapp.gui.activity.base.BaseActionBarActivity ; |
| public class MyActivity extends BaseActionBarActivity < |
| @Override |
| public void onCreate ( Bundle state ) < |
| super . onCreate(state); |
| setContentView( R . layout . activity_barcode_reader); |
| Display display = getWindowManager() . getDefaultDisplay(); |
| Point size = new Point (); |
| display . getSize(size); |
| int width = size . x; |
| int height = size . y; |
| > |
| > |
You can’t perform that action at this time.
You signed in with another tab or window. Reload to refresh your session. You signed out in another tab or window. Reload to refresh your session.
Источник
Get display width android

This application provides display and control of Android devices connected via USB (or over TCP/IP). It does not require any root access. It works on GNU/Linux, Windows and macOS.

- lightness: native, displays only the device screen
- performance: 30
120fps, depending on the device
70ms
low startup time:
1 second to display the first image
Its features include:
The Android device requires at least API 21 (Android 5.0).
Make sure you enabled adb debugging on your device(s).
On some devices, you also need to enable an additional option to control it using keyboard and mouse.
![]()
- Linux: apt install scrcpy
- Windows: download
- macOS: brew install scrcpy
On Debian and Ubuntu:
A Snap package is available: scrcpy .
For Fedora, a COPR package is available: scrcpy .
For Gentoo, an Ebuild is available: scrcpy/ .
For Windows, for simplicity, a prebuilt archive with all the dependencies (including adb ) is available:
It is also available in Chocolatey:
The application is available in Homebrew. Just install it:
You need adb , accessible from your PATH . If you don’t have it yet:
It’s also available in MacPorts, which sets up adb for you:
Plug an Android device, and execute:
It accepts command-line arguments, listed by:
Sometimes, it is useful to mirror an Android device at a lower definition to increase performance.
To limit both the width and height to some value (e.g. 1024):
The other dimension is computed to that the device aspect ratio is preserved. That way, a device in 1920×1080 will be mirrored at 1024×576.
The default bit-rate is 8 Mbps. To change the video bitrate (e.g. to 2 Mbps):
Limit frame rate
The capture frame rate can be limited:
This is officially supported since Android 10, but may work on earlier versions.
The device screen may be cropped to mirror only part of the screen.
This is useful for example to mirror only one eye of the Oculus Go:
If —max-size is also specified, resizing is applied after cropping.
Lock video orientation
To lock the orientation of the mirroring:
This affects recording orientation.
Some devices have more than one encoder, and some of them may cause issues or crash. It is possible to select a different encoder:
To list the available encoders, you could pass an invalid encoder name, the error will give the available encoders:
It is possible to record the screen while mirroring:
To disable mirroring while recording:
«Skipped frames» are recorded, even if they are not displayed in real time (for performance reasons). Frames are timestamped on the device, so packet delay variation does not impact the recorded file.
On Linux, it is possible to send the video stream to a v4l2 loopback device, so that the Android device can be opened like a webcam by any v4l2-capable tool.
The module v4l2loopback must be installed:
To create a v4l2 device:
This will create a new video device in /dev/videoN , where N is an integer (more options are available to create several devices or devices with specific IDs).
To list the enabled devices:
To start scrcpy using a v4l2 sink:
(replace N by the device ID, check with ls /dev/video* )
Once enabled, you can open your video stream with a v4l2-capable tool:
For example, you could capture the video within OBS.
It is possible to add buffering. This increases latency but reduces jitter (see #2464).
The option is available for display buffering:
Scrcpy uses adb to communicate with the device, and adb can connect to a device over TCP/IP. The device must be connected on the same network as the computer.
An option —tcpip allows to configure the connection automatically. There are two variants.
If the device (accessible at 192.168.1.1 in this example) already listens on a port (typically 5555) for incoming adb connections, then run:
If adb TCP/IP mode is disabled on the device (or if you don’t know the IP address), connect the device over USB, then run:
It will automatically find the device IP address, enable TCP/IP mode, then connect to the device before starting.
Alternatively, it is possible to enable the TCP/IP connection manually using adb :
Connect the device to the same Wi-Fi as your computer.
Get your device IP address, in Settings → About phone → Status, or by executing this command:
Enable adb over TCP/IP on your device: adb tcpip 5555 .
Unplug your device.
Connect to your device: adb connect DEVICE_IP:5555 (replace DEVICE_IP ).
Run scrcpy as usual.
It may be useful to decrease the bit-rate and the definition:
If several devices are listed in adb devices , you must specify the serial:
If the device is connected over TCP/IP:
You can start several instances of scrcpy for several devices.
Autostart on device connection
To connect to a remote device, it is possible to connect a local adb client to a remote adb server (provided they use the same version of the adb protocol).
Remote ADB server
To connect to a remote ADB server, make the server listen on all interfaces:
Warning: all communications between clients and ADB server are unencrypted.
Suppose that this server is accessible at 192.168.1.2. Then, from another terminal, run scrcpy:
By default, scrcpy uses the local port used for adb forward tunnel establishment (typically 27183 , see —port ). It is also possible to force a different tunnel port (it may be useful in more complex situations, when more redirections are involved):
To communicate with a remote ADB server securely, it is preferable to use a SSH tunnel.
First, make sure the ADB server is running on the remote computer:
Then, establish a SSH tunnel:
From another terminal, run scrcpy:
To avoid enabling remote port forwarding, you could force a forward connection instead (notice the -L instead of -R ):
From another terminal, run scrcpy:
Like for wireless connections, it may be useful to reduce quality:
By default, the window title is the device model. It can be changed:
Position and size
The initial window position and size may be specified:
To disable window decorations:
To keep the scrcpy window always on top:
The app may be started directly in fullscreen:
Fullscreen can then be toggled dynamically with MOD + f .
The window may be rotated:
Possibles values are:
- 0 : no rotation
- 1 : 90 degrees counterclockwise
- 2 : 180 degrees
- 3 : 90 degrees clockwise
The rotation can also be changed dynamically with MOD + ← (left) and MOD + → (right).
Note that scrcpy manages 3 different rotations:
- MOD + r requests the device to switch between portrait and landscape (the current running app may refuse, if it does not support the requested orientation).
- —lock-video-orientation changes the mirroring orientation (the orientation of the video sent from the device to the computer). This affects the recording.
- —rotation (or MOD + ← / MOD + → ) rotates only the window content. This affects only the display, not the recording.
Other mirroring options
To disable controls (everything which can interact with the device: input keys, mouse events, drag&drop files):
If several displays are available, it is possible to select the display to mirror:
The list of display ids can be retrieved by:
The secondary display may only be controlled if the device runs at least Android 10 (otherwise it is mirrored in read-only).
To prevent the device to sleep after some delay when the device is plugged in:
The initial state is restored when scrcpy is closed.
Turn screen off
It is possible to turn the device screen off while mirroring on start with a command-line option:
Or by pressing MOD + o at any time.
To turn it back on, press MOD + Shift + o .
On Android, the POWER button always turns the screen on. For convenience, if POWER is sent via scrcpy (via right-click or MOD + p ), it will force to turn the screen off after a small delay (on a best effort basis). The physical POWER button will still cause the screen to be turned on.
It can also be useful to prevent the device from sleeping:
Power off on close
To turn the device screen off when closing scrcpy:
For presentations, it may be useful to show physical touches (on the physical device).
Android provides this feature in Developers options.
Scrcpy provides an option to enable this feature on start and restore the initial value on exit:
Note that it only shows physical touches (with the finger on the device).
By default, scrcpy does not prevent the screensaver to run on the computer.
Rotate device screen
Press MOD + r to switch between portrait and landscape modes.
Note that it rotates only if the application in foreground supports the requested orientation.
Any time the Android clipboard changes, it is automatically synchronized to the computer clipboard.
Any Ctrl shortcut is forwarded to the device. In particular:
- Ctrl + c typically copies
- Ctrl + x typically cuts
- Ctrl + v typically pastes (after computer-to-device clipboard synchronization)
This typically works as you expect.
The actual behavior depends on the active application though. For example, Termux sends SIGINT on Ctrl + c instead, and K-9 Mail composes a new message.
To copy, cut and paste in such cases (but only supported on Android >= 7):
- MOD + c injects COPY
- MOD + x injects CUT
- MOD + v injects PASTE (after computer-to-device clipboard synchronization)
In addition, MOD + Shift + v allows to inject the computer clipboard text as a sequence of key events. This is useful when the component does not accept text pasting (for example in Termux), but it can break non-ASCII content.
WARNING: Pasting the computer clipboard to the device (either via Ctrl + v or MOD + v ) copies the content into the device clipboard. As a consequence, any Android application could read its content. You should avoid to paste sensitive content (like passwords) that way.
Some devices do not behave as expected when setting the device clipboard programmatically. An option —legacy-paste is provided to change the behavior of Ctrl + v and MOD + v so that they also inject the computer clipboard text as a sequence of key events (the same way as MOD + Shift + v ).
To disable automatic clipboard synchronization, use —no-clipboard-autosync .
To simulate «pinch-to-zoom»: Ctrl +click-and-move.
More precisely, hold Ctrl while pressing the left-click button. Until the left-click button is released, all mouse movements scale and rotate the content (if supported by the app) relative to the center of the screen.
Concretely, scrcpy generates additional touch events from a «virtual finger» at a location inverted through the center of the screen.
Physical keyboard simulation (HID)
By default, scrcpy uses Android key or text injection: it works everywhere, but is limited to ASCII.
On Linux, scrcpy can simulate a physical USB keyboard on Android to provide a better input experience (using USB HID over AOAv2): the virtual keyboard is disabled and it works for all characters and IME.
However, it only works if the device is connected by USB, and is currently only supported on Linux.
To enable this mode:
If it fails for some reason (for example because the device is not connected via USB), it automatically fallbacks to the default mode (with a log in the console). This allows to use the same command line options when connected over USB and TCP/IP.
In this mode, raw key events (scancodes) are sent to the device, independently of the host key mapping. Therefore, if your keyboard layout does not match, it must be configured on the Android device, in Settings → System → Languages and input → Physical keyboard.
This settings page can be started directly:
However, the option is only available when the HID keyboard is enabled (or when a physical keyboard is connected).
Text injection preference
There are two kinds of events generated when typing text:
- key events, signaling that a key is pressed or released;
- text events, signaling that a text has been entered.
By default, letters are injected using key events, so that the keyboard behaves as expected in games (typically for WASD keys).
But this may cause issues. If you encounter such a problem, you can avoid it by:
(but this will break keyboard behavior in games)
On the contrary, you could force to always inject raw key events:
These options have no effect on HID keyboard (all key events are sent as scancodes in this mode).
By default, holding a key down generates repeated key events. This can cause performance problems in some games, where these events are useless anyway.
To avoid forwarding repeated key events:
This option has no effect on HID keyboard (key repeat is handled by Android directly in this mode).
Right-click and middle-click
By default, right-click triggers BACK (or POWER on) and middle-click triggers HOME. To disable these shortcuts and forward the clicks to the device instead:
To install an APK, drag & drop an APK file (ending with .apk ) to the scrcpy window.
There is no visual feedback, a log is printed to the console.
Push file to device
To push a file to /sdcard/Download/ on the device, drag & drop a (non-APK) file to the scrcpy window.
There is no visual feedback, a log is printed to the console.
The target directory can be changed on start:
Audio is not forwarded by scrcpy. Use sndcpy.
In the following list, MOD is the shortcut modifier. By default, it’s (left) Alt or (left) Super .
It can be changed using —shortcut-mod . Possible keys are lctrl , rctrl , lalt , ralt , lsuper and rsuper . For example:
Super is typically the Windows or Cmd key.
| Action | Shortcut |
|---|---|
| Switch fullscreen mode | MOD + f |
| Rotate display left | MOD + ← (left) |
| Rotate display right | MOD + → (right) |
| Resize window to 1:1 (pixel-perfect) | MOD + g |
| Resize window to remove black borders | MOD + w | Double-left-click¹ |
| Click on HOME | MOD + h | Middle-click |
| Click on BACK | MOD + b | Right-click² |
| Click on APP_SWITCH | MOD + s | 4th-click³ |
| Click on MENU (unlock screen) | MOD + m |
| Click on VOLUME_UP | MOD + ↑ (up) |
| Click on VOLUME_DOWN | MOD + ↓ (down) |
| Click on POWER | MOD + p |
| Power on | Right-click² |
| Turn device screen off (keep mirroring) | MOD + o |
| Turn device screen on | MOD + Shift + o |
| Rotate device screen | MOD + r |
| Expand notification panel | MOD + n | 5th-click³ |
| Expand settings panel | MOD + n + n | Double-5th-click³ |
| Collapse panels | MOD + Shift + n |
| Copy to clipboard⁴ | MOD + c |
| Cut to clipboard⁴ | MOD + x |
| Synchronize clipboards and paste⁴ | MOD + v |
| Inject computer clipboard text | MOD + Shift + v |
| Enable/disable FPS counter (on stdout) | MOD + i |
| Pinch-to-zoom | Ctrl +click-and-move |
| Drag & drop APK file | Install APK from computer |
| Drag & drop non-APK file | Push file to device |
¹Double-click on black borders to remove them.
²Right-click turns the screen on if it was off, presses BACK otherwise.
³4th and 5th mouse buttons, if your mouse has them.
⁴Only on Android >= 7.
Shortcuts with repeated keys are executted by releasing and pressing the key a second time. For example, to execute «Expand settings panel»:
- Press and keep pressing MOD .
- Then double-press n .
- Finally, release MOD .
All Ctrl +key shortcuts are forwarded to the device, so they are handled by the active application.
To use a specific adb binary, configure its path in the environment variable ADB :
To override the path of the scrcpy-server file, configure its path in SCRCPY_SERVER_PATH .
To override the icon, configure its path in SCRCPY_ICON_PATH .
A colleague challenged me to find a name as unpronounceable as gnirehtet.
strcpy copies a string; scrcpy copies a screen.
Источник


