- Camera and Gallery Access on Android with Kotlin
- 1-Camera Integration
- 2-Choose Photo on Gallery
- Pick Image From Gallery Or Camera In Android Kotlin Programmatically
- Creating Pick Image From Gallery Or Camera In Android Studio Tutorial step by step
- Step 1: Create a new project in Android Studio.
- Step 2: Updating AndroidManifest.xml file
- Step 3: Updating activity_main.xml file
- Step 4: Preparing MainActivity.java class
- Step 5: Description of MainActivity.java
- JAVA Version
- Pick Image From Gallery in Kotlin – Android
- Method to Pick Image From Gallery in Kotlin
- Get Image Full Path From URI
- Optional
- 1. Upload Image to Server in Android
- 2. Capture Photo with Camera in Kotlin – Android
- 3. Pick Multiple Images From Gallery in Kotlin
- How to pick an image from Gallery and use it in Android ?
- How to Download Image from the Web in Android using Kotlin
- Creating the Image Downloader
- Using the Image Downloader
- Asking for Permissions
Camera and Gallery Access on Android with Kotlin


In this article, I want to talk about how to activate the camera on Android.

1-Camera Integration
First we create an empty project in Android Studio.
After creating an empty project in Android Studio, we add a button and ImageView in our XML file. So, the last version of the XML file will be like this.

After completing the screen design, we go to the MainActivity.kt folder. We have defined intent in our setOnClickListener code block of our button. We passed the intent we defined to the takePhotoIntent variable. Then we define a provider file. Again, we create a variable and send it to the providerFile variable that we created. We write the package name of the created project into the “getUriForFile” parameter.
Note: We encode “provider” and “meta-data” in the “AndroidManifest.xml” file.
We are coding two functions. First of these functions, we create a function to import your photo file. Inside this function we define the type of photo file.
The second function is that we use the bitmap method to verify the captured photos.
What is a Bitmap? Bitmap is a frequently used expression for photos and images. It is the general expression given to the picture formats in which all the color information required to display a photograph or picture on the computer screen is given the pixel color information that makes up the screen.
2-Choose Photo on Gallery
After completing the camera integration process, we add another button in the design section to select a photo from the gallery.

Then we provide our conditions into the btnChoosePhoto.setOnClickListener code block in the MainActivity.kt file. And encode IMAGE_CHOOSE ,PERMISSION_CODE variables into the companion object code block.
We need a function to select a photo from the gallery. We are coding the function named chooseImageGallery . In it we define the variable intent and specify its type.
Note: We cannot create Static Properties and Static Function in Kotlin. Therefore, we need to use Companion Object to become a static properties. Thus, we can code the property that we want to be static inside the object.
We have defined the onRequestPermissionsResult override function for which we will make a request.
And finally we provide the condition to the onActivityResult function.
I hope my article was useful. Hope to see you in the next article. 😊
Источник
Pick Image From Gallery Or Camera In Android Kotlin Programmatically

Pick image from gallery or camera in android kotlin example is today’s tutorial.
Pick image from gallery or camera in android kotlin tutorial guides you how to select/get the image from a gallery in android programmatically.
We will choose/take a photo from gallery or camera in the Android Studio by opening via Intent.
First, check the output of pick image from gallery or camera in android example and then we will develop it.
Creating Pick Image From Gallery Or Camera In Android Studio Tutorial step by step
Step 1: Create a new project in Android Studio.
Step 2: Updating AndroidManifest.xml file
Note: If you are targeting SDK version above 22 (Above Lollipop) then you need to ask a user for granting runtime permissions. Check marshmallow runtime permission for more information.
Final code for AndroidManifest.xml file
Step 3: Updating activity_main.xml file
Copy and paste below source code in activity_main.xml file
Step 4: Preparing MainActivity.java class
Add following source code in MainActivity.java class
Step 5: Description of MainActivity.java
When the user clicks the button, dialog with select options appears.
Following is button click method.
The dialog contains options whether to select an image from gallery or to capture from camera.
Below is the code for showPictureDialog() method.
If a user selects gallery, then following method is executed.
And if user choose camera, then below method is run.
After selecting an image from gallery or capturing photo from camera, an onActivityResult() method is executed.
Code for onActivityResult(), is as below.
If an image comes from an gallery, then compiler goes at below code.
If a photo is from a camera, then compiler goes to following.
Below is the method to save the image or photo.
In above code, IMAGE_DIRECTORY is the folder name in which all the images will be saved.
JAVA Version
So that’s all for pick image from gallery or camera in android kotlin example. If you have queries, then ask them in the comment section. Thank you 🙂
Источник
Pick Image From Gallery in Kotlin – Android
This article contains a step by step guide to pick an image from the Gallery in Kotlin Android.
Before starting, add the following READ_EXTERNAL_STORAGE permission in your Manifest.xml file above the application tag.
You also need to add Runtime permissions for API Level 19 & above. This article will help you to Ask Runtime Permissions in Kotlin Android.
Method to Pick Image From Gallery in Kotlin
After adding permissions you can call the following method to pick an image from Gallery.
The above method will open the phone’s default Gallery App. After choosing an image, Gallery will automatically be closed and your Activity’s onActivityResult method will be called. The code is the following.
in the Above ‘ onActivityResult ‘ method, you receive an Intent object which contains all data about the selected image.
REQUEST_CODE is a constant integer value, which can be initialized with any number at the class level, like below.
Get Image Full Path From URI
I have already written an article on the topic to get the file path from a URI. I have provided a URIPathHelper class to get the file path from a URI. You can copy the URIPathHelper class from this article and use it in your code to get the full image path from the URI you received above in the onActivityResult(. ) method.
Get Path From URI In Kotlin Android
Optional
If you want to get Bitmap From ImageView in Kotlin, you can use the following code.
For further operations on Bitmap & Images, like resizing, have a look at our post Resize Bitmap by Keeping the Same Aspect Ratio in Kotlin.
If you have any questions, don’t hesitate to ask in the comments section below.
1. Upload Image to Server in Android
2. Capture Photo with Camera in Kotlin – Android
3. Pick Multiple Images From Gallery in Kotlin
You can also visit our Coding Articles & Tutorials Knowledge Base for other helping code snippets.
Источник
How to pick an image from Gallery and use it in Android ?
In Android applications, it can be useful to offer users the possibility to pick an image from their Gallery. When image is picked, you can then use it in a wallpaper for example or to work on the image depending the purpose of your application.
To achieve that, you must first launch the intent ACTION_PICK to let OS prompt dialog to users to pick an image from Gallery :
When you call pickImageFromGallery, users will see the following dialog on his screen :
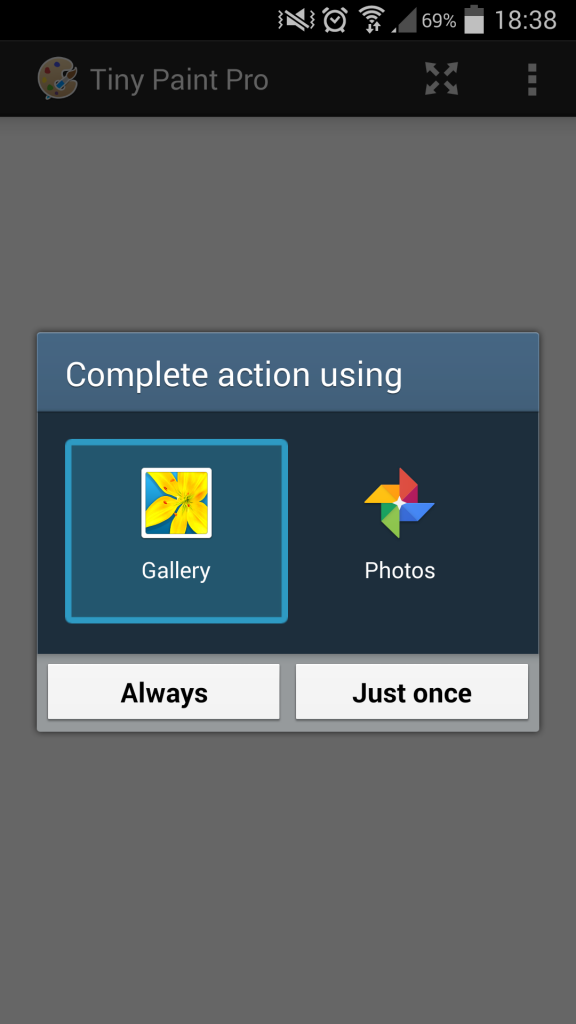
OS prompt a dialog to users to let them choose applications that they want to use to pick an image from Gallery.
Once user have picked an image from Gallery, OS returns to the calling activity where onActivityResult method is invoked. In this method, you must check that the request code matches well the request code you use when your launch intent. Here, we used the constant IMAGEREQUESTCODE. So, we will have the following code :
You can notice than we check that result code is OK before to process. Intent passed in parameter has a getData method that lets you to get URI of picked image.
Now, we’re going to use this URI to get Bitmap of the picked image to use in the application. This job is made in manageImageFromUri method :
To get bitmap, we use getBitmap method from Media class with content resolver and image URI passed in parameters. Once bitmap is got, you can use it like you want in your application Android.
Источник
How to Download Image from the Web in Android using Kotlin
In this tutorial, I’m going to show you how to download an image from the Web and save it in your Phone Storage (not the SD card), using the DownloadManager on Android.
As an example, we are going to download the following image I found on the Internet and uploaded on imgur.com

Creating the Image Downloader
Go to your AndroidManifest.xml file (manifests > AndroidManifest.xml) and add the following permissions:
Go to your Activity file and create a method with a parameter url and type String.
Also, set the directory you want to save the image.
In this example, we’re using the Pictures folder in our Phone Storage.
Create a DownloadManager.Request
In request‘s options, we set as a title of the image to be the URL name.
For example, if we download an image from the following link.
Then, the download image will have funnycat.png as a name.
Now, check the status of your download and show it in Toast.
Using the Image Downloader
To use the downloader, just call the method downloadImage and pass the URL of your image, like that:
Asking for Permissions
If your app supports Android 9 (API level 28) and lower, you need to ask the user for permission before downloading the image on their device.
In Android 10 (API level 29) and above, you don’t need to do that.
Go to your AndroidManifest.xml file (manifests > AndroidManifest.xml) and add the following permission:
Create a method askPermissions() and ask the user if they want to allow app to store images in their phone.
If they Deny, the next time an AlertDialog will show up and tell them why your app needs these permissions.
After getting the permission results (Allow or Deny), the onRequestPermissionsResult method called.
Now, you can use the image downloader like that:
If you have any questions, please feel free to leave a comment below
Источник


