- Kotlin Android – Get screen Width and Height Programmatically
- Android – Get Screen Width and Height
- Steps to Get Width and Height of Screen
- Code – Get Width and Height
- Example – Kotlin Android – Get Screen Dimensions Programmatically
- Conclusion
- Tek Eye
- Determining the Size of an Android View or Screen at Run Time
- Finding the Size of an Android View in Code
- Finding the Size of an Android Layout in Code
- Finding the Size of an Android View During Screen Construction
- See Also
- Archived Comments
- Do you have a question or comment about this article?
- 支持不同的屏幕尺寸
- 创建灵活的布局
- 使用 ConstraintLayout
- 避免使用硬编码的布局尺寸
- 创建备用布局
- 使用最小宽度限定符
- 使用可用宽度限定符
- 添加屏幕方向限定符
- 使用 Fragment 将界面组件模块化
- 使用旧尺寸限定符支持 Android 3.1
- 使用布局别名
- 创建可拉伸的九宫格位图
- 针对所有屏幕尺寸进行测试
- Support different pixel densities
- Use density-independent pixels
- Convert dp units to pixel units
- Kotlin
- Use pre-scaled configuration values
- Kotlin
- Provide alternative bitmaps
- Put app icons in mipmap directories
- Use vector graphics instead
- Advice for uncommon density issues
- Test on all pixel densities
Kotlin Android – Get screen Width and Height Programmatically
Android – Get Screen Width and Height
In Android, WindowManager is available to every Activity. Through WindowManager, we can get the metrics of default display in which the activity is being shown.
In this tutorial, we will learn how to get width and height of the screen, on which the application is running, with the help of example Android Application.

Steps to Get Width and Height of Screen
To get Android screen width and height programmatically, follow these steps.
- Create a DispalyMetrics() object.
- Pass the displayMetrics object to getMetrics() method of Display class. WindowManager.defaultDisplay() returns the Display object.
- Screen Width could be obtained using displayMetrics.widthPixels
- Screen Height could be obtained using displayMetrics.heightPixels
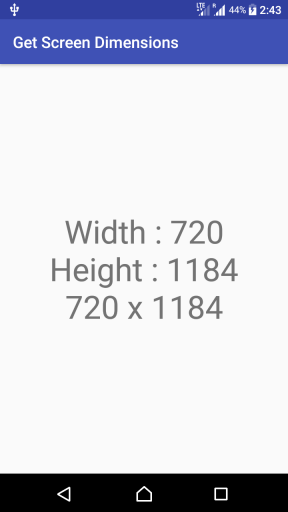
In the following screenshot, width and height of the Android device screen is obtained programmatically and displayed using TextView.
Code – Get Width and Height
A quick snippet of the code to obtain screen dimensions programmatically is provided below
Example – Kotlin Android – Get Screen Dimensions Programmatically
In the following example, we shall obtain screen width and height, display it in the Activity with the help of TextView.
activity_main.xml
MainActivity.kt
Conclusion
In this Kotlin Android Tutorial – Get Screen Dimensions Programmatically, we have learnt to get screen width and height programmatically using DisplayMetrics.
Источник
Tek Eye
For efficient bitmap handling or dynamic View creation in an app, the area that a screen item or layout is using needs to be known. If no fixed sizes are allocated at design time the size of a View may not be known until an app is executed. This is because of the wide range of display sizes that Android supports. Just look on GSMArena to see the huge range of Android devices produced over the years, and to see the wide variation in screen sizes and pixel densities. The example code in this article shows how to read the screen size and the size of Views as the app runs.
(Note: All Android screen items are derived from Views. A screen component, e.g. a TextView , is derived from the View class. Such screen components are also known as widgets. Layouts are ViewGroups and are also derived from Views.)
Determining the Size of an Android View or Screen at Run Time
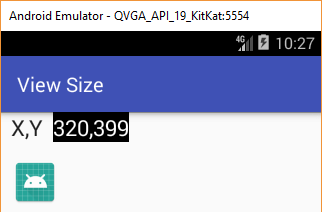
To run the example code in this article first create a new Android project. Those new to Android programming can read the article Your First Android Hello World Java Program to see how. For this article the app is called View Size.
Use a simple layout for activity_main.xml (the layout file may have another name). Add a TextView with id labXY and set the Text attribute to X,Y. Next to it add another TextView called textXY with Text set to ? (actually \? to make it valid in the XML). Here is the layout used for this example:
Add this code to the bottom of the onCreate method in MainActivity.java (or whatever the class was called). Add the required an imports for TextView and DisplayMetrics when prompted with the Alt-Enter:
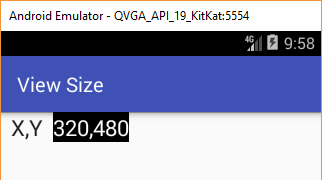
This is the code running on an Android Virtual Device (AVD) with a 320×480 screen:
Finding the Size of an Android View in Code
Drop an ImageView onto the layout, here using the ic_launcher.png icon file, or other images can be used. The size of a View can be retrieved using the getWidth and getHeight methods. Change the code in the onCreate to set the TextView to the ImageView’s width and height (an import for View is required, again usually prompted for and added with Alt-Enter):
Mmmmm! The code is showing 0,0 for the ImageView size, even though we can see that it is not 0,0:
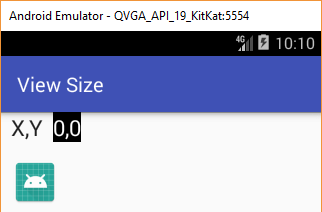
This is because in onCreate the screen has not yet been laid out so the size of the ImageView has not been determined hence the getWidth() and getHeight() methods are returning zero. In fact they will likely return zero in onStart() and onResume(). What is needed is to override onWindowFocusChanged() to get the ImageView sizes:
Finding the Size of an Android Layout in Code
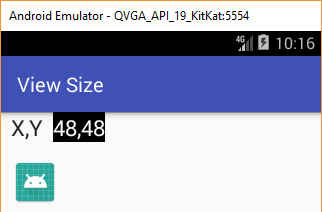
The same code can be used to get the size of the View (the layout, i.e. ViewGroup) in which the screen components sit. Notice that in the screen XML the RelativeLayout was given an id (@+id/screen), which means the base View’s width and height can be grabbed (change R.id.imageView to R.id.screen in the code):
Notice that the layout height is less than the screen height because of the notification bar.
Finding the Size of an Android View During Screen Construction
To get the the size of a View as soon as it is known (rather than waiting for the onWindowFocusChanged event) attach a listener to its ViewTreeObserver . Do this by writing a class that implements ViewTreeObserver.OnGlobalLayoutListener in the Activity’s class. This new class will have an onGlobalLayout method that gets the View dimensions that can then be stored for later use (here they are displayed as before). Here is the example source code for the entire MainActivity.java file to show this way of getting the ImageView’s width and height:
Download some example code in view-size.zip from this article, ready for importing into Android Studio. See the instructions in the zip file, alternatively the code can also be accessed via the Android Example Projects page.
See Also
- Using Immersive Full-Screen Mode on Android Developers
- See the Android Example Projects page for lots of Android sample projects with source code.
- For a full list of all the articles in Tek Eye see the full site alphabetical Index.
Archived Comments
Kestrel on December 15, 2014 at 4:20 am said: Hey fantastic article, can you also talk about the fitSystemWindows and how things are affected when its set or not set by default. Thanks in advance.
Author: Daniel S. Fowler Published: 2013-06-19 Updated: 2017-12-17


Do you have a question or comment about this article?
(Alternatively, use the email address at the bottom of the web page.)
↓markdown↓ CMS is fast and simple. Build websites quickly and publish easily. For beginner to expert.
Free Android Projects and Samples:
Источник
支持不同的屏幕尺寸
通过支持尽可能多的屏幕,您的应用可以在各种不同设备上运行,这样您就可以使用单个 APK 将其提供给最多的用户。此外,如果能够使您的应用灵活适应不同的屏幕尺寸,可确保您的应用可以处理设备上的窗口配置更改,例如,当用户启用多窗口模式时发生的窗口配置更改。
- 使用允许布局调整大小的视图尺寸
- 根据屏幕配置创建备用界面布局
- 提供可以随视图一起拉伸的位图
创建灵活的布局
使用 ConstraintLayout
如需创建适用于不同屏幕尺寸的自适应布局,最佳做法是将 ConstraintLayout 用作界面中的基本布局。使用 ConstraintLayout ,您可以根据布局中视图之间的空间关系指定每个视图的位置和大小。通过这种方式,当屏幕尺寸改变时,所有视图都可以一起移动和拉伸。
如需使用 ConstraintLayout 构建布局,最简单的方法是使用 Android Studio 中的布局编辑器。借助该工具,您可以将新视图拖动到布局中,将其约束条件附加到父视图和其他同级视图以及修改视图的属性,完全不必手动修改任何 XML(请参见图 1)。

图 1. Android Studio 中的布局编辑器,显示了一个 ConstraintLayout 文件
但是, ConstraintLayout 并不能解决所有布局场景(特别是动态加载的列表,对于此类布局,应使用 RecyclerView),但无论您使用何种布局,都应该避免对布局尺寸进行硬编码(请参见下一部分)。
避免使用硬编码的布局尺寸
为了确保布局能够灵活地适应不同的屏幕尺寸,您应该对大多数视图组件的宽度和高度使用 «wrap_content» 和 «match_parent» ,而不是硬编码的尺寸。
虽然此视图的实际布局取决于其父视图和任何同级视图中的其他属性,但是此 TextView 想要将其宽度设为填充所有可用空间 ( match_parent ),并将其高度设为正好是文本长度所需的空间 ( wrap_content )。这样可以使此视图适应不同的屏幕尺寸和不同的文本长度。
图 2 显示了当屏幕宽度随着设备屏幕方向而发生变化时,如何使用 «match_parent» 调整文本视图的宽度。

图 2. 灵活的文本视图
如果您使用的是 LinearLayout ,则也可以按布局权重展开子视图,以便每个视图按自身权重值所占的比例填充剩余的空间。但是,在嵌套的 LinearLayout 中使用权重将要求系统执行多次布局遍历以确定每个视图的尺寸,这会降低界面性能。幸运的是, ConstraintLayout 几乎能够构建 LinearLayout 所能构建的所有布局,而不会影响性能,因此您应该尝试将布局转换为 ConstraintLayout。然后,即可使用约束链来定义加权布局。
注意 :使用 ConstraintLayout 时,不得使用 match_parent 。而应将尺寸设为 0dp 以启用一种称为“匹配约束”的特殊行为,该行为通常与 match_parent 的预期行为相同。如需了解详情,请参阅如何调整 ConstraintLayout 中的视图尺寸。
创建备用布局

图 3. 同一应用显示在尺寸不同的屏幕上,针对每种屏幕尺寸使用不同的布局
您可以通过创建额外的 res/layout/ 目录提供特定于屏幕的布局(针对需要不同布局的每种屏幕配置创建一个目录),然后将屏幕配置限定符附加到 layout 目录名称(例如,对于可用宽度为 600dp 的屏幕,附加限定符为 layout-w600dp )。
如需在 Android Studio(使用 3.0 或更高版本)中创建备用布局,请按以下步骤操作:
- 打开默认布局,然后点击工具栏中的 Orientation for Preview 图标 。
- 在下拉列表中,点击以创建一个建议的变体(如 Create Landscape Variant),或点击 Create Other。
- 如果您选择 Create Other,系统将显示 Select Resource Directory。在此窗口中,在左侧选择一个屏幕限定符,然后将其添加到 Chosen qualifiers 列表中。添加限定符之后,点击 OK。(有关屏幕尺寸限定符的信息,请参阅下面几部分。)
使用最小宽度限定符
使用“最小宽度”屏幕尺寸限定符,您可以为具有最小宽度(以密度无关像素 dp 或 dip 为度量单位)的屏幕提供备用布局。
例如,您可以创建一个名为 main_activity 且针对手机和平板电脑进行了优化的布局,方法是在目录中创建该文件的不同版本,如下所示:
- 320dp:典型手机屏幕(240×320 ldpi、320×480 mdpi、480×800 hdpi 等)。
- 480dp:约为 5 英寸的大手机屏幕 (480×800 mdpi)。
- 600dp:7 英寸平板电脑 (600×1024 mdpi)。
- 720dp:10 英寸平板电脑(720×1280 mdpi、800×1280 mdpi 等)。
图 4 提供了一个更详细的视图,说明了不同屏幕 dp 宽度与不同屏幕尺寸和方向的一般对应关系。

图 4. 建议的宽度断点以支持不同的屏幕尺寸
使用可用宽度限定符
您可能希望根据当前可用的宽度或高度来更改布局,而不是根据屏幕的最小宽度来更改布局。 例如,如果您有一个双窗格布局,您可能希望在屏幕宽度至少为 600dp 时使用该布局,但屏幕宽度可能会根据设备的屏幕方向是横向还是纵向而发生变化。在这种情况下,您应使用“可用宽度”限定符,如下所示:
如果您关心可用高度,则可以使用“可用高度”限定符来执行相同的操作。例如,对于屏幕高度至少为 600dp 的屏幕,请使用限定符 layout-h600dp 。
添加屏幕方向限定符
为此,您可以将 port 或 land 限定符添加到资源目录名称中。只需确保这些限定符在其他尺寸限定符后面即可。 例如:
使用 Fragment 将界面组件模块化
在针对多种屏幕尺寸设计应用时,您希望确保不会在 Activity 之间不必要地重复界面行为。因此,您应该使用 Fragment 将界面逻辑提取到单独的组件中。然后,您可以组合 Fragment 以便在大屏幕设备上运行时创建多窗格布局,或者在手机上运行时将 Fragment 放置在单独的 Activity 中。
使用旧尺寸限定符支持 Android 3.1
如果您的应用支持 Android 3.1(API 级别 12)或更低版本,则除上面的最小/可用宽度限定符之外,您还需要使用旧尺寸限定符。
在上面的示例中,如果要在较大的设备上显示双窗格布局,那么您需要使用“large”配置限定符来支持 3.1 及更低版本。因此,要在这些旧版本上实现此类布局,您可能需要创建以下文件:
使用布局别名
如果同时支持低于和高于 Android 3.2 的版本,您必须同时对布局使用最小宽度限定符和“large”限定符。因此,您应创建一个名为 res/layout-large/main.xml 的文件,该文件可能与 res/layout-sw600dp/main.xml 完全相同。
这两个文件的内容完全相同,但它们实际上并未定义布局,而只是将 main 设置为 main_twopanes 的别名。由于这些文件具有 large 和 sw600dp 选择器,因此它们适用于任何 Android 版本的平板电脑和电视(低于 3.2 版本的平板电脑和电视与 large 匹配,高于 3.2 版本者将与 sw600dp 匹配)。
创建可拉伸的九宫格位图
如果您在改变尺寸的视图中将位图用作背景,您会注意到,当视图根据屏幕尺寸或视图中的内容增大或缩小时,Android 会缩放您的图片。这通常会导致明显的模糊或其他缩放失真。解决方案是使用九宫格位图,这种特殊格式的 PNG 文件会指示哪些区域可以拉伸,哪些区域不可以拉伸。
九宫格位图基本上是一种标准的 PNG 文件,但带有额外的 1 像素边框,指示应拉伸哪些像素(并且带有 .9.png 扩展名,而不只是 .png )。如图 5 中所示,左边缘和上边缘的黑线之间的交点是可以拉伸的位图区域。

图 5. 九宫格图片 ( button.9.png )
针对所有屏幕尺寸进行测试
如果您希望在物理设备上进行测试,但又不想购买设备,则可以使用 Firebase 测试实验室访问 Google 数据中心内的设备。
Источник
Support different pixel densities
Not only do Android devices come in different screen sizes (handsets, tablets, TVs, and so on), but their screens also have different pixel sizes. That is, while one device has 160 pixels per square inch, another device fits 480 pixels in the same space. If you don’t consider these variations in pixel density, the system might scale your images (resulting in blurry images) or the images might appear at the completely wrong size.
This page shows you how you can design your app to support different pixel densities by using resolution-independent units of measurements and providing alternative bitmap resources for each pixel density.
Watch the video below for an overview of these techniques.
For more information about designing the actual icons assets, see the material design icon guidelines.
Use density-independent pixels
The first pitfall you must avoid is using pixels to define distances or sizes. Defining dimensions with pixels is a problem because different screens have different pixel densities, so the same number of pixels may correspond to different physical sizes on different devices.

Figure 1. Two screens of the same size may have a different number of pixels
To preserve the visible size of your UI on screens with different densities, you must design your UI using density-independent pixels (dp) as your unit of measurement. One dp is a virtual pixel unit that’s roughly equal to one pixel on a medium-density screen (160dpi; the «baseline» density). Android translates this value to the appropriate number of real pixels for each other density.
For example, consider the two devices in figure 1. If you were to define a view to be «100px» wide, it will appear much larger on the device on the left. So you must instead use «100dp» to ensure it appears the same size on both screens.
When defining text sizes, however, you should instead use scalable pixels (sp) as your units (but never use sp for layout sizes). The sp unit is the same size as dp, by default, but it resizes based on the user’s preferred text size.
For example, when you specify spacing between two views, use dp :
When specifying text size, always use sp :
Convert dp units to pixel units
In some cases, you will need to express dimensions in dp and then convert them to pixels. The conversion of dp units to screen pixels is simple:
Imagine an app in which a scroll or fling gesture is recognized after the user’s finger has moved by at least 16 pixels. On a baseline screen, a user’s must move by 16 pixels / 160 dpi , which equals 1/10th of an inch (or 2.5 mm) before the gesture is recognized. On a device with a high-density display (240dpi), the user’s must move by 16 pixels / 240 dpi , which equals 1/15th of an inch (or 1.7 mm). The distance is much shorter and the app thus appears more sensitive to the user.
To fix this issue, the gesture threshold must be expressed in code in dp and then converted to actual pixels. For example:
Kotlin
The DisplayMetrics.density field specifies the scale factor you must use to convert dp units to pixels, according to the current pixel density. On a medium-density screen, DisplayMetrics.density equals 1.0; on a high-density screen it equals 1.5; on an extra-high-density screen, it equals 2.0; and on a low-density screen, it equals 0.75. This figure is the factor by which you should multiply the dp units in order to get the actual pixel count for the current screen.
Use pre-scaled configuration values
You can use the ViewConfiguration class to access common distances, speeds, and times used by the Android system. For instance, the distance in pixels used by the framework as the scroll threshold can be obtained with getScaledTouchSlop() :
Kotlin
Methods in ViewConfiguration starting with the getScaled prefix are guaranteed to return a value in pixels that will display properly regardless of the current pixel density.
Provide alternative bitmaps
To provide good graphical qualities on devices with different pixel densities, you should provide multiple versions of each bitmap in your app—one for each density bucket, at a corresponding resolution. Otherwise, Android must scale your bitmap so it occupies the same visible space on each screen, resulting in scaling artifacts such as blurring.

Figure 2. Relative sizes for bitmaps at different density sizes
There are several density buckets available for use in your apps. Table 1 describes the different configuration qualifiers available and what screen types they apply to.
Table 1. Configuration qualifiers for different pixel densities.
| Density qualifier | Description |
|---|---|
| ldpi | Resources for low-density (ldpi) screens ( 120dpi). |
| mdpi | Resources for medium-density (mdpi) screens ( 160dpi). (This is the baseline density.) |
| hdpi | Resources for high-density (hdpi) screens ( 240dpi). |
| xhdpi | Resources for extra-high-density (xhdpi) screens ( 320dpi). | xxhdpi | Resources for extra-extra-high-density (xxhdpi) screens ( 480dpi). | xxxhdpi | Resources for extra-extra-extra-high-density (xxxhdpi) uses ( 640dpi). |
| nodpi | Resources for all densities. These are density-independent resources. The system does not scale resources tagged with this qualifier, regardless of the current screen’s density. |
| tvdpi | Resources for screens somewhere between mdpi and hdpi; approximately 213dpi. This is not considered a «primary» density group. It is mostly intended for televisions and most apps shouldn’t need it—providing mdpi and hdpi resources is sufficient for most apps and the system will scale them as appropriate. If you find it necessary to provide tvdpi resources, you should size them at a factor of 1.33*mdpi. For example, a 100px x 100px image for mdpi screens should be 133px x 133px for tvdpi. |
To create alternative bitmap drawables for different densities, you should follow the 3:4:6:8:12:16 scaling ratio between the six primary densities. For example, if you have a bitmap drawable that’s 48×48 pixels for medium-density screens, all the different sizes should be:
- 36×36 (0.75x) for low-density (ldpi)
- 48×48 (1.0x baseline) for medium-density (mdpi)
- 72×72 (1.5x) for high-density (hdpi)
- 96×96 (2.0x) for extra-high-density (xhdpi)
- 144×144 (3.0x) for extra-extra-high-density (xxhdpi)
- 192×192 (4.0x) for extra-extra-extra-high-density (xxxhdpi)
Then, place the generated image files in the appropriate subdirectory under res/ and the system will pick the correct one automatically based on the pixel density of the device your app is running on:
Then, any time you reference @drawable/awesomeimage , the system selects the appropriate bitmap based on the screen’s dpi. If you don’t provide a density-specific resource for that density, the system picks the next best match and scales it to fit the screen.
Tip: If you have some drawable resources that the system should never scale (perhaps because you perform some adjustments to the image yourself at runtime), you should place them in a directory with the nodpi configuration qualifier. Resources with this qualifier are considered density-agnostic and the system will not scale them.
For more information about other configuration qualifiers and how Android selects the appropriate resources for the current screen configuration, see Providing Resources.
Put app icons in mipmap directories
Like all other bitmap assets, you need to provide density-specific versions of your app icon. However, some app launchers display your app icon as much as 25% larger than what’s called for by the device’s density bucket.
For example, if a device’s density bucket is xxhdpi and the largest app icon you provide is in drawable-xxhdpi , the launcher app scales up this icon, and that makes it appear less crisp. So you should provide an even higher density launcher icon in the mipmap-xxxhdpi directory. Now the launcher can use the xxxhdpi asset instead.
Because your app icon might be scaled up like this, you should put all your app icons in mipmap directories instead of drawable directories. Unlike the drawable directory, all mipmap directories are retained in the APK even if you build density-specific APKs. This allows launcher apps to pick the best resolution icon to display on the home screen.
For icon design guidelines, see the material guide for icons.
Use vector graphics instead
An alternative to creating multiple density-specific versions of an image is to create just one vector graphic. Vector graphics create an image using XML to define paths and colors, instead of using pixel bitmaps. As such, vector graphics can scale to any size without scaling artifacts, though they’re usually best for illustrations such as icons, not photographs.
Vector graphics are often provided as an SVG (Scalable Vector Graphics) file, but Android does not support this format so you must convert SVGs files to Android’s vector drawable format.
You can easily convert an SVG to a vector drawable from Android Studio using Vector Asset Studio as follows:
- In the Project window, right-click on the res directory and select New > Vector Asset.
- Select Local file (SVG, PSD).
Locate the file you want to import and make any adjustments.

Figure 3. Importing an SVG with Android Studio
You might notice some errors appear in the Asset Studio window, indicating some properties of the file that vector drawables do not support. But this will not prevent you from importing—the unsupported properties are simply ignored.
Click Next.
On the next screen, confirm the source set where you want the file in your project and click Finish.
Because one vector drawable can be used on all pixel densities, this file goes in your default drawables directory (you don’t need to use density-specific directories):
For more information about creating vector graphics, read the Vector Drawable documentation.
Advice for uncommon density issues
This section describes more about how Android performs scaling for bitmaps on different pixel densities and how you can further control how bitmaps are drawn on different densities. Unless your app manipulates graphics or you have encountered problems when running on different pixel densities, you can ignore this section.
To better understand how you can support multiple densities when manipulating graphics at runtime, you should understand that the system helps ensure the proper scale for bitmaps in the following ways:
- Pre-scaling of resources (such as bitmap drawables)
Based on the density of the current screen, the system uses any density-specific resources from your app. If resources are not available in the correct density, the system loads the default resources and scales them up or down as needed. The system assumes that default resources (those from a directory without configuration qualifiers) are designed for the baseline pixel density (mdpi) and will resize those bitmaps to the appropriate size for the current pixel density.
If you request the dimensions of a pre-scaled resource, the system returns values representing the dimensions after scaling. For example, a bitmap designed at 50×50 pixels for an mdpi screen is scaled to 75×75 pixels on an hdpi screen (if there is no alternative resource for hdpi) and the system reports the size as such.
There are some situations in which you might not want Android to pre-scale a resource. The easiest way to avoid pre-scaling is to put the resource in a resource directory with the nodpi configuration qualifier. For example:
When the system uses the icon.png bitmap from this folder, it does not scale it based on the current device density.
Auto-scaling of pixel dimensions and coordinates
You can disable pre-scaling dimensions and images by setting android:anyDensity to «false» in the manifest or programmatically for a Bitmap by setting inScaled to «false» . In this case, the system auto-scales any absolute pixel coordinates and pixel dimension values at draw time. It does this to ensure that pixel-defined screen elements are still displayed at approximately the same physical size as they would be at the baseline pixel density (mdpi). The system handles this scaling transparently to the app and reports the scaled pixel dimensions to the app, rather than physical pixel dimensions.
For instance, suppose a device has a WVGA high-density screen, which is 480×800 and about the same size as a traditional HVGA screen, but it’s running an app that has disabled pre-scaling. In this case, the system will «lie» to the app when it queries for screen dimensions, and report 320×533 (the approximate mdpi translation for the pixel density). Then, when the app does drawing operations, such as invalidating the rectangle from (10,10) to (100, 100), the system transforms the coordinates by scaling them the appropriate amount, and actually invalidate the region (15,15) to (150, 150). This discrepancy may cause unexpected behavior if your app directly manipulates the scaled bitmap, but this is considered a reasonable trade-off to keep the performance of apps as good as possible. If you encounter this situation, read Converting dp units to pixel units.
Usually, you should not disable pre-scaling. The best way to support multiple screens is to follow the basic techniques described in this document.
If your app manipulates bitmaps or directly interacts with pixels on the screen in some other way, you might need to take additional steps to support different pixel densities. For example, if you respond to touch gestures by counting the number of pixels that a finger crosses, you need to use the appropriate density- independent pixel values, instead of actual pixels, but you can easily convert between dp and px values.
Test on all pixel densities
It’s important to test your app on multiple devices with different pixel densities so you can ensure your UI scales correctly. Testing on a physical device is easy but you can also use the Android Emulator if you don’t have access to physical devices for all the different pixel densities.
If you would rather test on a physical device, but don’t want to buy the devices, you can use Firebase Test Lab to access devices in a Google data center.
Content and code samples on this page are subject to the licenses described in the Content License. Java is a registered trademark of Oracle and/or its affiliates.
Источник


